Search the Community
Showing results for tags 'russian'.
-
Hello everyone I'm new here, and I'm already impressed by the worldwide modelling contingent (that I hope include men AND women). Was wondering if any of you can point me in the right direction with respect to finding out the actual uniform colours for modern military Russian pilot uniform? I've carried out a lot of searches online, but to no avail! My immediate plans are to build a collection of Sukhoi aircraft, commencing with (possibly, haven't fully decided) the 1/72 Su-24 from Zvezda. Tiny figures (bought some from Pavla), I know, but what colour is their uniform? Where can I find out this information, with reference to manufacturers model paint types that are available in the UK?
-
After reviewing this kit a while back here, I figured I'd give it a go, cos I do rather like these Russian side-by-side two-seaters, and I've not built anything modern for a while. I've built a few Kitty Hawk kits over the years, and found that as long as you test fit and keep your wits about you, they build up into pretty good models. So, with as many wits as I can scrape together, I set about building it, which is nice I'll try to flag up any gotchas so you don't have to find them out the hard way, but there's always a better way of doing things, so I reserve the right to be wrong at any point I began at the beginning (really? ) with the cockpit, and the seats, which are made up from a surprisingly large number of parts. I always clean up parts prior to fitting to remove mould seams, any flash and such that inevitably crop up with even the bestest moulding machines. The seats went together well with a bit of the aforementioned fettling, and given the part count, I took my time, adding a few parts and leaving them to dry off while I did something else. Each one has 20 parts before you break out the seatbelts, so if you try to put them all on together, you're gonna have a mushy mess on your hands. I ran across an issue with the rear panels on the headbox, which were a bit wide at the front, so I trimmed them down and they fit nicely now. I also noticed that the kit sides have two location pegs, but only one hole in the seat pan, so I cut off the rear one. It doesn't affect fit at all, as they butt hard up against the rear of the seat. The end result is some rather nice seats Their ejection rails are a single styrene part with a PE back, but there's a little break in the groove that holds the PE, so I sliced and trimmed that out so they fit within it better. Quite delicate, so I'm trying to be careful when I'm handling them. Incidentally, some of the part numbers are switched on the small parts, so check the diagrams, rather than trusting you have the correct arm-rest or whatever. The cockpit floor needs a few parts adding, and those are quite small and delicate, so before you add those, widen the slots for the launch rails a bit, so they fit a little looser. You'll thank yourself later Here's a weird thing. There's only one pair of rudder pedals, and they seem to be fitted between the two pilot stations, with one pedal for each pilot. Is that a mistake on the designer's part, or is that how they look? The rear bulkhead is a snug fit to the floor too, so test that and check if it needs a little easing. Now for the engines. Cutting and preparing took a couple of minutes, and I cut them dremelled off the ejection turrets inside to save weight, even though it's unnecessary for all but the one at the rear. Less plastic at the back, less nose-weight needed I glued two sections together first, and allowed the glue to set up a little before I tried in the third section, holding the ends betwixt thumb and forefinger while I got the join nice and neat. You can run glue along the last two joins from inside if you've left the first joint long enough, and adjust the seams while the glue is still moist ( ) . I'm not bothering with ancillaries or painting the engines on mine, so I won't be hiding the seams, but with care you can get them nicely lined up to minimise the job. The 2nd one was a tad harder because I hadn't left the first seam long enough, but overall not too difficult. I later glued in the engine fronts, but left the rear off for now, while I fill the three seams that'll probably never be seen The gear bays were a mixed bag. The nose gear bay is easy enough up until you put the rearmost C-shaped panel in, which I think is a little wide for the aperture. I test fitted the main parts of the bay in the lower fuselage, and couldn't find a way to make part C26 fit unaltered. The groove it fits into could be the culprit, but I ended up sanding away the lip until it was very small, after which it fitted nicely. Part C25 fits the bay ONE way, which you can tell by looking at it from above. The end of the lips taper in at one end, and that matches the contours of the bay. That'll save some head-scratching There's a couple of square ejector-pin marks in the bottom of this part, one recessed, the other proud. I put a slip of styrene in the low one and sanded them both back flush with a narrow stick. The main bays go together fairly easily, but F16 isn't used for both bays. F15 is used with B30, and F16 is fitted to B29. Those can be added after you've built the bay to make things easier for yourself. The same goes for D9 and D10. The numbers are switched in the diagrams, so swap 'em over if you haven't yet spotted they wriggle in the wrong direction. The gun bay is a simple affair, so not worthy of leaving the access panel off, so I built it up without titivating it, and won't paint it either. part F33 is a bit mushy as well as being tiny, so take care fitting it. My barrel had a weakness in the corrugated part, probably caused by two cooling wavefronts of styrene meeting and not mixing well. I glued that back together, and will replace the muzzle with some micro-tubing to get a nice hollow barrel and a realistic steel finish. Here's a pic of the various assemblies sat together: I'm currently working on the fit of the engines to the fuselage, which are held into the lower fuselage by a slot on the bottom of the engine, and two tabs on the leading edge, which you can see in the pic above. The bulkheads that glue into the fuselage aren't tooled properly, and one of the slots has been inverted in CAD, and has been moulded as a rectangular block sticking out. Oops! I chopped them off and drilled a new slot, tweaking fit as I went. They should fit reasonably central in their nacelles now, once I've painted the front and rear. Those two afterburner rings also had a couple of cold-front weak-points, so I drizzled glue in there and left them to set up. I've just started cleaning the parts up, with tiny amounts of flash on the uprights that I would rather remove, even though you'll be hard pushed to see up the tail without a flashlight! That's where we're up to as of now, and I'm quite enjoying myself. I would have held out for some Eduard parts to detail things normally, but as the canopy doesn't open, there's not a lot of point me lavishing detail on it, even if the sets were available (which they aren't at time of writing). If the exterior sets arrive before I get the fuselage closed up, I could be tempted, and I've just noticed that KH are working on a set of metal legs for this kit. After building the AMK Mig-31 and watching its legs spread under the weight over the next year or so, I'd really like to get hold of a set Shall I carry on with a detailed description of the build, or just crack on in a "today I built the xxxx" manner?
-
Hallo again This is the Trumpeter 1/48 kit. I used etched parts from Eduard and stencils from Bregnun. The Su-24 was for me a challenge. I never saw this a/c in real. Yes, most a/c I know in reality, also the old birds. This one not at all. So I had to use just the web and my own feeling. A new and in this case the very first experience to me. No literature I could rely on. Yes, sometimes it is fun, just to guess. Well, finally you may find out if my guess was good or false. Happy modelling
-
Out of the box with the exception of the seat. Nicely detailed kit, great cockpit although the coaming around the instrument panel needs thinning. I used Akan's MiG-29SMT paint set but had to remix some colors as there are several schemes. There were 2 kinds of splinter camouflage, grayish and greenish versions. I went with the green version it took a lot of reference photos to get it right.
- 21 replies
-
- 45
-

-
Here's another one that was started years ago and put back in the box due to a big move. It's an awesome kit, only one of this scale and not without challenges. It is all OOB as the kit contains all you need; one piece fiberglass fuselage, resin parts, full intakes, metal reinforced landing gear, photo etch, vac formed canopy and a great decal sheet with all the stencils. The build had a quite a few disasters in the final stages, I had to replace the canopy (luckily HpH provide 2) and it's a little rough up close but it looks ok from a distance. Now I'll have to wait for a mainstream kit so I can do a production version with that all flaps, engines drooped gangster look.
- 26 replies
-
- 59
-
-

-
 The Weathering Magazine - Special Iron Factory Ammo by Mig Jimenez We have now seen a few weathering magazines from Ammo this publication is longer at 114 pages and is in effect a book not a magazine. As the title would suggest this edition concentrates on painting & weathering techniques for tanks/AFVs. Different products are show , though as the title suggests Ammo products feature. This book deals with Soviet equipment in conflicts since WW2. The book features; 2S3 SPG from Afghanistan. BMP-2 from Donestsk. BTR-70 from Afghanistan. T-64B from Ukraine. T-80B from Chechnya. T-90A from Syria. Conclusion This looks to be a very useful publication, although in magazine format the print quality is that of book. Overall a high quality publication. Recommended. Review sample courtesy of
 -
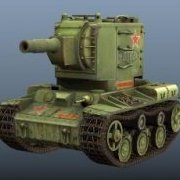
While waiting for some scratch building materials for my Mig-3 project I decided to do this Trumpeter IS-7 kit I had laying around, because I find Trumpeter 1/72 kits are always a pleasure to work on. I did a few modifications for added detail, but overall the kit had the nice detail that I have come to expect from these 1/72 Trumpeter kits. The last one I did was an STRV-103 from Trumpeter that I loved building, so I was hoping this would be another reasonably priced gem. Although it was missing a few details that were present on the model shown on the package, it was pretty much just as good. Hope you enjoy. For those who are curious it was primed with black Stynylrez primer (same as Mig One Shot) with some pre-shading done with light grey. Colours used were XF-13 then XF-67 NATO green for some modulation, Vallejo Metal Color steel was used for the tracks with Vallejo 70.862 grey black used for the tires. I also used the grey black for the machine gun barrels after which I dry brushed them with Mr. Metal Color iron once the final flat clear was applied. My gloss coats for decals and weathering was Future (or Pledge whatever it is now) and the final matt was Microscale Micro Flat thinned 50/50. I often see people saying they have really bad results from Microscale flat and satin clear coat, but it seems like most of the time they don't thin it enough. I at least thin it 40/60 and I have always had good results, I've tried the Tamiya flat clear but I find it just doesn't do a very good job at achieving a flat finish. Anyways that's enough of my flat clear coat rant. As far as weathering goes I just used Tamiya black, dark brown and brown panel liner along with AK European earth and dark earth pigments. Then using enamel thinner for pre-fixing pigments and then enamel pigment binder or Vallejo water based binder depending on whether applying with brush or airbrush. I also had detail upgrade parts for the main gun and plethora of machine guns mounted all over this thing. The main thing I wish I had done better were the headlights. They were just molded out of one piece normal plastic, so I made it recessed with a ball engraving bit which worked well, painted the inside silver (wish I had done a slightly cleaner job or used a bit of panel liner for the edge) then put a thick dab of microscale kristal klear on for a lens. Sadly it didn't quite dry in a convex manner as I hoped, but it still look pretty good for the scale. Any recommendations on what I could use in the future? Clear epoxy maybe? I thought about shaping something out of some scrap clear sprue, but the scale was just too small to do something like that properly.
-
Hi guys and girls, You can find the built thread here on the site. I finished this one having some issues here and there, most of my own making. The engine didnt fit too well. Needed some surgery to convince it to stick in reasonable. Lesson learned, more dryfitting even or maybe because my own scratch detailling. I had few problems with the landing gear, a first . With enourmess trembling hands I attached the antenna wires, they could be thighter but I take it. The canopy parts had disstortion and scratches otb. I was affraid to repair them, an error I will live to regret. Next time I will just try or order new ones. For the rest I tried to keep it tidy with minimal weathering. I hope you guys like it. I want to enter this one in the next IPMS Netherlands Euromilitaire show. You guys think I should do that? Tips tops are welcome. Greetings Lars
- 10 replies
-
- 25
-
-
 This 48th scale kit is my most recent and my proudest kit. Though the icm decals discintergrated in water, i am very fond of my work and the kit. The kit overall fitted well together, the wings required a bit of sanding to get the right shape but apart from these the kit was very nice.
 -
Can someone tell me what the basic colors of this aircraft would be? or where I can find more info. on this particular aircraft?
-
Su-34 Fullback (KH80141) 1:48 Kitty Hawk The Sukhoi Su-34, known by the NATO reporting name 'Fullback' is an all-weather strike fighter, designed to replace the ageing Su-24 Fencer in Russian service. Despite being based on an existing design (the Su-27), the type endured an extremely protracted development, punctuated by the collapse of the Soviet Union. Eventually, 200 of the type are expected to enter service, replacing approximately 300 Su-24s. There are many differences between the Su-27 and the Su34, principal amongst which is a completely new nose, which accommodates the crew side-by-side, and gives it a duck-billed look that is hard to capture, plus small canards forward of the main planes, all of which has a reduced front radar signature, due to basic stealth shaping. Since September 2015, Su-34s have been involved in the conflict in Syria, dropping BETAB-500 and OFAB-500 bombs. There has already been interest in the type from overseas customers. Algeria has ordered an initial batch of 12 aircraft, while Vietnam is apparently also interested in the type. The Kit This is a complete new tool from Kitty Hawk, following on from another manufacturer's slightly flawed attempt, so a lot of people are hoping it's right. It arrives in a large box, as it is a big aircraft with 12 hardpoints for attaching munitions, of which KH are apt to include many! The boxtop art shows a Fullback climbing out after causing some chaos with some oil storage tanks, and inside the lid it quite a full box – the artwork header has also been updated from the original to a more modern, funky look to catch the eye, as you can see above. Many of these semi-blended designs are moulded with wings integral to the fuselage halves, which reduces the part count and usually means that half the box is taken up with just two parts. Not so here, as the wings are separate, and all the available space is taken up with parts. The fuselage halves still take up the full length of the box, and there is a high parts count due to the generous provision of Russian weapons. Beside the two fuselage halves there are thirteen sprues in pale grey styrene, a sprue of clear parts, four resin (yes, resin!) exhaust cans, a sheet of Photo-Etch (PE) parts, and three decal sheets of various sizes. The instruction booklet has a glossy cover with fold-out leaves that detail the box contents in front and painting of the weapons at the rear, while the full colour painting and markings guide is found in the centre of the booklet, which will be more use when removed carefully and the staples bent back so your instruction booklet doesn't fall apart, which is exactly what I've just done. First impressions are good, with a little flash around the large complex fuselage mouldings, which isn't entirely surprising, as they are complex shapes. There are slide-moulding seams behind and forward of the cockpit opening that will need a little attention before construction, and just aft of that a few panel lines have been tooled very faintly so they don't catch on the mould as the part is ejected. These would be best deepened with your favourite scribing tool before you get too far into the build. The inboard walls of the rear engine nacelles also suffer from this to a slightly lesser extent, so while you have your scriber out, fix those too. They're not defects, but necessities of production that have been present since injection moulding model kits began. The massive array of weapons provides spans six sprues, and it's best to consider them as a generic set, as there are some that won't be used and more that the Su-34 can carry. It's cheaper for KH to tool one set of weapons for all Soviet/Russian subjects than individual load-outs again and again. Construction begins with the cockp…. Nope, with the engines for a change, which KH have included for good measure, and to which are fair quantity of parts are devoted, only to be hidden away unless you're planning on opening up some panels, which will of course require some surgery to the upper fuselage, but if you flip it over, you'll see that KH have thoughtfully included two panels above each engine that can be cut out from the inside to provide access to the engines, with rivets engraved on the interior so they can be left lying about as if they are being worked on. Sure, they're a bit thick, but this is a much better option than just hiding the detail away, and if you're interested in scale fidelity, you have a shape template to base your work on. Both Saturn AL31FM1s are included, and they are set aside until later on in the build. Whether you paint them fully is entirely up to you and whether you want to cut those panels out, but I'd probably just do the front and rear faces, as they're all that will be seen eventually. Now it's the turn of the cockpit, and the first item is a pair of well-detailed Zvezda K36dm seats, which have PE seatbelts included, and are an improvement on earlier kits. The cockpit floor has the side consoles moulded in, and slots for the ejection ladders, plus control columns and decals for all panels, which are printed on a small decal sheet that has an almost photographic look to it. The rear bulkhead and access door fit to the back, and the instrument panel to the front to finish off, then this too is set aside while the gear bays and cannon bay are built up. The former are well-detailed with individual panels and additional parts to give a busy look, while the cannon bay is somewhat simpler with only a few parts in addition to the breech. The nose gear bay is more complex, and has the hatch for crew access moulded in, with a ladder built into the nose gear bay later on. This explains why you should never see a Fullback with its cockpit open, unless the crew are about to disappear on their ejection seats. Finally, the fuselage is ready to close up, after the aforementioned fettling and the removal of the residual sprue gates that can be found on the mating surfaces in places, which is an effort to avoid marring surface detail and IMHO is a great idea that is slowly creeping into kits from various manufacturers. The gear bays, two engine supports, the engines themselves and the cockpit are all added to the lower half, with the upper fuselage dropped on and glued along with the canards, which pivot on a pin, so you can set them to whatever pitch seems appropriate after checking your references. The forward facing radar is fitted to the blunt end of the fuselage, and the nose cone is popped over it, covering it up unless you do some scratching and pose it opened. The pilot's HUD is a sizeable part, and has a trough in the cockpit coaming, a PE glass support, and two part glazing, plus a horizontal lens on the clear sprue. A few probes and the refuelling probe are added, although I'd leave those until later on in case I broke them off. The twin vertical stabilisers are next, with a single thickness that is bolstered at the root, and with separate rudder, antennae and clear formation light. These are also set aside (the theme of this build!) while the exhausts and stinger are made up. You may have noticed that the exhaust cans are resin, and you can choose open or closed positions to suit your intended situation, with the tabs at the rear locking it in place on the two-part exhaust trunks. Careful painting whilst paying attention to your references will result in a good finish to this area. The Stinger is the fairing between the engines, and contains the rear radar, as well as various other equipment, and the chaff and flare dispensers that are fired to confuse and thwart incoming missiles. The body of the stinger is two part, with a recess in the top for the PE dispensers, and holes in the rear that accommodate three PE exhaust vents, which will need rolling to fit the contours of the surrounding area. These assemblies are all fitted to the rear along with some more small parts, and the tail fins attach to the sides of the fuselage with two locating pins each. Before the engine nacelles are installed, additional parts are added inside the main wheel bays that will mate with the corresponding cut-outs in the nacelles later on. Each nacelle is built up in the same manner, with a main outer skin, small PE auxiliary intakes on the sides, plus a pair of blow-in doors further back. The intake ramp attaches to the eventual roof of the intake, and a two-part trunk changes the interior profile to match the cylindrical shape of the engine front. A small elliptical insert is added to the outside of each one before they are fitted to the fuselage, along with a few more small parts hither and thither. It still needs wings, which is next and begins with the elevators, which have fairings added at their base, and when they are attached to the fuselage, another part is added, which connects them to a hinge-point in the fuselage rear. The main wings are each two parts, with slats and flaps front and rear respectively, along with a small wing fence toward the tip, and a choice of straight or curved fairing where the leading edge meets the tip rails, which you'll need to check your references to select the correct one for your airframe, as all the decal profiles show curved fairings. They fit into the fuselage on two tabs with a good mating surface, and should blend with the upper surface with a little care and test-fitting. Landing is tricky without wheels, and Russian fighters invariably have tough gear for rough field operation, and twin rear wheels on bogies are the norm. The Fullback has sturdy struts reminiscent of the Mig-31, but with both wheels on the outer face of the bogie. The legs have separate scissor-links and additional actuators, with a pair of two-part wheels each, which have decent hub and tyre detail. There should be some circumferential tread, which is absent due to moulding limitation, but as these aircraft are often seen with threadbare tyres, painting them to resemble well-used examples gets round needing to replicate this. Either that or you could treat yourself to a set of wheels from Eduard that will doubtless fit this newer tooling. The nose gear is also pretty substantial and has a high parts count, which includes a pair of clear landing lights. The crew ladder is in two parts and fits to the rear of the leg, above the mudguard that nestles behind the tyres to reduce FOD intrusion into the airframe on rough airstrip movements. The wheels are each two parts, and again there is no tread, despite it being shown on the diagrams. Happily, each gear leg can be added to a completed airframe, which is good news as it saves them from damage during handling. There are scrap diagrams of each main gear bay showing how things should look once you have installed them and the small surrounding panel at the rear of the bays. The front gear bay doors are single parts, while the rear bay doors all have additions before they can be inserted, with actuators adding a bit of realism. More scrap diagrams show their orientation after they are added, so there's little chance of making a slip-up here. Before you can load up your Fullback, you need pylons, which are all fitted with PE shackles or styrene sway-braces before they are added to the model alongside the wingtip rail. A twin rail fits between the nacelles, and either three underwing pylons, or two and a double are attached to each wing, plus the wingtip pods already mentioned. Additional single rails fit to the underside of the nacelles level with the gear legs. As already mentioned, there is a ton of weapons on those six sprues, with ten pages devoted to building them up. This is what's selected to be carried by the Su-34: 2 x FAB-500-M54 general purpose bomb 2 x BETAB-500 bunker buster 2 x OFAB-250-SZN bomb 2 x SPPU-22 gun pod 2 x U-6 pylon adapter 2 x R77 Missile Adder medium range A2A missile 2 x R73 Archer short range A2A Missile with APU-73 adapter 2 x UBK-23 gun pod 2 x GUV-8700 gun pod 2 x R27-ET/R27-ER Alamo medium range missiles with APU-470 pylon adapter 2 x R27-T Alamo medium range missiles with APU-470 pylon adapter 4 x R60 Aphid short-range A2A missile with three types of pylon adapters 2 x U-4 adapter rail 2 x UB-32 rocket pod 2 x KH-35 Kayak anti-shipping missile 2 x S-24 rocket with APU-68 pylon adapter 2 x KH-23 Kerry A2G missile with APU-68 pylon adapter 2 x KH-59 Kazoo TV guided missile 2 x KAB-250 satellite guided bomb 4 x FAB-250-M62 bomb 4 x FAB-250-TS bomb (there's a spelling mistake showing it as "F2B" on the instructions) 4 x FAB-250-M54 bomb 2 x BETAB-500-ZD penetrator bomb 4 x SAB-100 high explosive bomb 2 x S-25-A, B & C rocket 2 x RBK-500-250 cluster bomb 2 x B-8M rocket pod 2 x B-13 rocket pod 2 x KH-25-ML/MT Karen A2G Missile 2 x KH-29L Kedge laser guided A2G missile 2 x KAB-500KR TV guided bomb 2 x KAB-500L laser guided bomb 2 x KAB-1500-L/KR laser/TV guided bomb 2 x UB-16 rocket pod 2 x KH-31 A2G missile 2 x KH-58ME Kilter missile 2 x KH-58 Kilter missile with AKU-58 pylon adapter There are two pages of diagrams showing which stations the various weapons are suitable for, but if you're going for accuracy, check your references for some real-world loadouts, as with all aircraft there are limitations. The parts on the sprues are also marked by designation, with all the parts for each weapon sub-numbered within that section of the sprue. Markings The largest decal sheet is for the armament, with each weapon's stencils and markings sectioned off with a dotted line and the designation, which will make applying them a much easier proposition. Four pages of colour diagrams at the rear of the booklet show their colours and markings. Once you have unpicked the main painting guide from the centre of the booklet, you can rotate them so they're easier on the eye, where you'll discover that there are four markings options, each with four views so that there is no guesswork with the camouflaged options. Everything is a good size too, which makes reading the decal numbers and other details a lot easier than some of their first kits, proving that KH have come a long way in all departments. There is a variety of schemes available out of the box, two of which use the three shades of blue camo, one in primer, and another in dark blue over blue, and all rocking a fetching white radome. There are also large expanses of bare metal where paint wouldn't last, on the underside of the engine nacelles, and the leading edges of the elevators (hot missile exhaust?). From the box you can build one of the following rather generically described airframes: Russian Aerospace Defence Forces Red 02 in three-tone blue camo Russian Aerospace Defence Forces Red 03 in three-tone blue camo Russian Aerospace Defence Forces in primer Russian Aerospace Defence Forces in dark blue over pale blue It is unclear where and by whom the decals were printed by, but in general they are of good quality with decent sharpness and colour density except for the use of half-tones to create orange and the dielectric panel decals. On my sample, the dielectric panels also expose an element of mis-registration of the white, which is offset, giving the panels a drop-shadow effect on the sheet, which will probably disappear once applied. I would however be tempted to paint them and create some masks using the decals as templates. The white also shows up in the outlined digits as well as the tail decal BBC POCCИИ having the entire white outline projecting from the top, rather than equally spaced around the letters. Conclusion The plastic looks great, and as Kitty Hawk has stated that they want their Su-34 to be the best on the market in the scale, it shows that they have put additional effort into this model. The huge choice of weapons are also highly detailed, which are likely to be seen again as KH fill more gaps in the Soviet/Russian line-up, and we can forgive them for the little faux pas with the decals, which can be rectified fairly easily – hopefully it's an isolated case. As to shape, I've put some of the main parts together with tape to get a feeling for the overall shape of the airframe, and my first impression is that it's a good overall shape, with maybe a little more of a flare to the tip of the radome needed at the front, but it's very hard to gauge against photos of the airframe due to distortion and such, so I'll leave the final decision to you guys. If you want to discuss it further, start a thread in the main forums and link back to this thread Very highly recommended. We're now building this one, and you can find the thread here, with plenty of hints and tips, as well as pictures of the process Review sample courtesy of Available soon from major hobby shops
-
Here's my Su-30MKI based on the Academy kit. I used Sol, A.M.U.R Reaver, Neomega, Fairy Hobby, Eduard, Begemot, Aires, AKAN paints, Metallic Details and various other Flanker bits. It was quite a fight to get it all together but I'm glad I finally managed, it's a Flanker I always wanted on the shelf. The AKAN paints for this particular Su-30MKI Bort 01 and the second prototype 06 were excellent and Begemot had both the demonstrator's decals, I think there's something to be said for companies that produce such niche items for kits that don't really exist without some aftermarket and elbow grease. I think I'll reward myself with a well deserved relaxing build of one of the latest 1/48 Flanker family that arrived last week. Thanks for looking.
-
Here is my finished model of the topical SS26 Transporter erector and launcer kit from ZVEZDA. I have problems making small kits now, ,but wanted to include this on in my collection, so I did as best I could. The unusual digital camflage I saw on several web sites, and thought interesting. Made straight out of the box. The model transmission parts are minute and very fiddly to do all the bits! the position of the cab and other top parts are delicately mounted on the model to fit exactly the same as the real ones. where the engine fits wasn't clear, so I messed that up, but it is hidden inside. I painted the interior of the cab matt black, then took special care to paint all the sides of the transparencies with a matt black pen, as this made the very thick windows look better, without internal reflections. I do this to all kits and it helps a lot I think. I messed up the details on the rockets so I just painted them green. the digital camouflage was seen on parade pictures, and done thus: 1 felt tip for the black , 2 over: paint brush and enamel for the white bits. The model is of a topical system as the missile is supposed to be nuclear capable, and thus contravening Tactical misslile agreements. An interesting addition to any armour collection. though a very expensive kit. Added to my missile section. SS26_4 SS26_5 SS26_6 SS26_2 SS26_3 SS26_1 after seeing the enlarged pictures, I realise I have a few bits to paint: the cable, the tow hooks, the wipers...
-
Here is my finished model of the topical SS26 Transporter erector and launcer kit from ZVEZDA. I have problems making small kits now, ,but wanted to include this on in my collection, so I did as best I could. The unusual digital camflage I saw on several web sites, and thought interesting. Made straight out of the box. The model transmission parts are minute and very fiddly to do all the bits! the position of the cab and other top parts are delicately mounted on the model to fit exactly the same as the real ones. where the engine fits wasn't clear, so I messed that up, but it is hidden inside. I painted the interior of the cab matt black, then took special care to paint all the sides of the transparencies with a matt black pen, as this made the very thick windows look better, without internal reflections. I do this to all kits and it helps a lot I think. I messed up the details on the rockets so I just painted them green. the digital camouflage was seen on parade pictures, and done thus: 1 felt tip for the black , 2 over: paint brush and enamel for the white bits. The model is of a topical system as the missile is supposed to be nuclear capable, and thus contravening Tactical misslile agreements. An interesting addition to any armour collection. though very expensive. SS26_4 SS26_5 SS26_6 SS26_2
-
Here are some pictures of my completed model. this was made straight out of the box. I dirtied it up as though in service, though only nice clean parade ones have been seen. Used Humbrol enamels sprayed over a base green, then a pin wash to bring up the line work and details, then used mixed W&N artisit pastels ground up to dirty it up a bit. pressed on with a stiff brush end. The ZVEZDA model goes together with little filler needed, only a bit on the flat panels at the front of the turret. Even at 1/35th there are tiny parts for the optical and radar systems. Tracks were strips of flat links, glued with superglue, not always fitting well. prefer rubber ones. Engine side grilles stand off grid panels are very difficult to fit on to the various tiny supports, I just used a lot of super glue there. T14 Tank T14 Tank T14 Tank enjoyable make. Transfers were very good but not used. Wheels were painted black for the rubber, all the rest spray painted then dirtied up. OH!, and the empty bottles on top: the crew are inside, sleeping of six bottles of wine . ZZzzzz.
-
WWI Russian Maxim MG Team ICM 1:35 The set from ICM brings us a Maxim 1910 and a crew of two. 58 Maxims were purchased by the Imperial Russian Army in 1899 but then they contracted Vickers to make them in Russia. Even though the contract was signed in 1902 manufacturing only started in 1910. Due to these delays and the war with Japan in 1904 an additional 450 guns we purchased from overseas. The gun was supplied on a wheeled carriage. There is one sprue for the gun crew, two small sprues for the gun and carriage, and one sprue of Weapons & Equipment. This is one sprue from ICM 35672 WWI Russian Infantry Weapons and Equipment. Conclusion This is a good set which provides the gun and crew, it will make a nice little model/diorama in its own right, or can be used as part of a larger diorama. Its good to see ICM producing kits slightly out side the normal westen countries for WWI. Highly recommended. Review sample courtesy of
-
Hi, So this is my T-34/85. The story behind this model is the tank has been taking some heavy hits from ze Germans (seen by the deep gouges in the armour) and they were unfortunate enough hit a landmine, destroying the left track and leaving them stranded in the thick mud, leaving the crew no choice but to open the hatches and leg it. Let me know what you think - constructive feedback always welcome Tanks for looking (Pun intended, I'm sorry)
-
Hello fellow Modellers! This "Red" 02 is a "Polish Flanker" stationed in Stargard, Poland and featured by photographer Robert Senkowski in Verlinden Lock On 17. 1992, when VVS left, there was a big fly out ceremony. I spent a lot of time to make a sleeker aft fuselage and other corrections and detailing. I made this model 2002/2003. The older pictures on tarmac were on film. I hope you like this grey stuff, Cheers!
-
Well I think she is finished, Thanks for looking!! Steve build thread
-
Hey, I was looking at the Evolution Miniatures Modern Russian Soldier figures and started wondering how these were painted for the boxart. More specifically, the digital camouflage pattern. I found a couple of ideas on another thread but wanted to pick "the community mind" about alternatives. Source: http://www.evolution-miniatures.com/ Source: http://www.evolution-miniatures.com/ Does anyone happen to know who painted these figures and what method was used? I also contacted Evolution directly in case they would care to share the method. Many thanks in advance! Cristian
-
Hi, Yet another newbie question Can somebody please point me to a place where I can find more information about the name, size and construction of this antenna type used by the Russian Navy, as shown below? I would like to scratch built it for my next project. In case you have more information about how to build it, that would be even more helpful. Thanks! Cristian
-
T-90 1/35, Meng with Masterclub tracks
-
My friend sent me pic's of a kit he picked up at a flea market. Anyone recognize it?
-
A wee bit of topic, but hopefully off interest 'The City Where Russia Cannot Hide Its warships' The ship spotters of Istanbul have become a key resource for diplomats and intelligence experts, alerting the world to the scale of Russia's campaign in Syria. BBC News Magazine (linky)


copy.thumb.jpg.d8f94c146f5d2da12880c4799901d6dc.jpg)


-Copy.thumb.jpg.eac41eb756d9c8b5491a5d14c6f00e5b.jpg)