Search the Community
Showing results for tags 'revell'.
-
Last year on one of the model shows I was given revell set of spitfire Vb and Bf109 G10 in 1:72. I would not buy this set myself, as I've seen how many errors are in those two kits. First I wanted to sell them but I noticed that this two pack is more expensive than those two models when bought alone. Sigh. Model landed in back of the stash for some time. But after building first Spitfire Vb by revell this year and noticing that you can, indeed turn it into a decent model I started thinking about doing something with that other duopack. And then I found good images of Spitfire MkVb DB605 aka Messerspit. It was captured Spitfire Mark Vb (EN830/NX-X) that accidentally landed on the Channel island of Jersey on 18th November 1942. It was taken to Rechlin, Germany within a month of its capture. After some testing Germans decided to remove Merlin 45 and replace it with a Daimler-Benz DB 605A, a propeller and carburettor scoop from a Messerschmitt Bf 109G was fitted as well. Also its 12 volt electrical system was replaced with the Luftwaffe's 24 volt one. The original guns of the Spitfire Vb was removed as well According to multiple test pilots this hybrid plane turned out to be better than both Spitfire MkV and Bf109 G, joining strong sides of both planes while eliminating some of their problems. If I knew how much work it would be I would probably just get Brengun model... Especially as Revell propeller for Bf109 is completely crap (I guess molds are completely worn out by now) - each blade has different shape and length So I would have to buy new one (possibly Eduard printed one). But, instead I started work on revell plastic by removing engine from Spit and attaching new one from Messerschmit. It indeed fit well, having same width as spitfire hull but I found out I had to build entire upper part of cowling and fill the intake on the under side of it. Then I built cockpit with spare Eduard frame and plasticard floor, I also found 3d model of spitfire seat and printed it. Seat belts are from eduard set. I used front part of canopy from kit, but I decided to use another piece from Eduard for the back and movable part - as I plan to build my Eduard spits with open cockpit I have spare closed canopies from multiple models. So I cut one of them and tried to place it on this model. The fit is... not great. I had to thin parts of movable section as well as cut into the hull to fit it and even then I got small crack on the glass... But still it is better than Revell's foggy and scratched offering. With cockpit done I was finally able to join flusage halves, wings and attach engine. It obviously turned out not fitting that well but lot of fitting, gluing, puttying, sanding and polishing later, the result look like this:
-
Revell Chinook HC.Mk.1 1/48 Model kit by Jonathan Hughes, on Flickr Something of a departure from my normal builds, but one I’ve been promising to get done for a year or two for a friend who had the model sat under his desk in the office for about ten years and wondered if he’d ever find the courage (as a non-modeler) to tackle it; we’ve worked together for about twenty years, so I offered to build it for him. It will essentially be an out of the box build but with a few changes to decals to represent the first aircraft he worked on (so many) years ago. I was quite surprised to see that there were very few articles on the build of the Revell kit (a few of the Italeri version – which I think is the same kit) and hadn’t realised that the kit had become a little scarce. As I said, it’s a bit of a departure for me, as I usually build aeroplanes and in 1/72… so to tackle a 1/48 Helicopter (pronounced heli-co-peter) 😊 is putting me somewhat outside my comfort zone, but we’ll give it a go. I started with some kit familiarisation of the sprues and the instructions, and looking at where all the painting instructions were hidden. Ok, confession… I’m not much of a fan of Revell instructions, which seem a bit random and basic. I spent quite some time marking up the sheets with colour annotations, but realised that using the instructions alone was never going to tell me everything I needed to know. More of that to come. Anyway… the sprues A first look at sprues by Jonathan Hughes, on Flickr An article on the Italeri kit that I’d read about in Phoenix Aviation Modelling suggested the need to “droop” the rotor blades. I took a close look at the rotor blades on the sprue and noticed that these ones are least are pre-drooped. Poor photo but shows blade curvature (droop) by Jonathan Hughes, on Flickr I appreciate that when parked, the blades (or some of them at least) can look even more drooped that this. The day before IPMS SMW at Telford I meet up with some good mates at RAF Museum Cosford for a wander around (well… what else would you do?) and I took a good look at their HC.Mk.1 that they have (Bravo November)… including some studying of the rotor blades, and whilst the blades on the front rotor do exhibit more of a droop, they’re drooped at the root and not along the blade length. I’m no Chinook expert so I presume this is something to do with Parking of the blades… I’ll need to look at the photos I took when I get to this stage… but I was left with the impression of not needing to bend the blades at least. Another aspect that the article I’d read had left me with the impression of was that the overall fit of the model was less than ideal. To be honest, this is the first model I’ve made with both an inner and outer fuselage, so I was interested in doing a little test-fitting to see how all the parts went together, to see what I’d need to face later on. To be honest… “false alarm”… as having taped the inner sections together, I cocooned it in the outer shell and, despite some slight warping or the under-side, it seemed to go together “ok”…. Yes, a little disobedient along the top section, but some strong tape as glue dries will sort that (I hope). One impression I was left with was the “heft” that this model had. I’m not used to such large models or ones that are dual skinned… it was quite impressive. Inner and outer fuselage components taped together for fit check by Jonathan Hughes, on Flickr I was interested to see how much would be visible inside… always good to know; this test assembly helped the understanding. Looking to see what will be visible inside by Jonathan Hughes, on Flickr The glazing and nose cover were added and despite a few gaps, I hope these will be treatable with a little persuasion of the parts when them need to be glued. The glazing did have a few scratches, possibly due to having broken loose of its sprue when in the bag/box… so I spent an evening polishing these out. There are still a few imperfections, but these look to be in the material, so we’ll need to live with these. A little clamping and filler will hopefully sort these gaps by Jonathan Hughes, on Flickr This is the interior all taped up for the just-described test-fit. Interior fuselage components test fit by Jonathan Hughes, on Flickr So… getting back to the dearth of detail in the instructions, I’d spent some time searching for a useful book to refer to for this build. There really are not many books on the chinook. I found WWP Chinook In Detail and thought that it might help (yes it will) It’s a bit like the Danny Coremans “Daco” books that I use for reference in other builds, but getting a copy took some doing, what with it being out of print. Yes, a Japanese site said they had several copies… but that copies would be dispatched once in stock (suspicious!) so I eventually paid a little more from a UK second-hand book supplier and it arrived a few days later. This has interior and exterior details of US and UK examples, so has proven very useful. Useful reference by Jonathan Hughes, on Flickr With the photographic reference book in hand, I could start painting with a little more confidence. I started with the interior as this needed doing first (of course). I used Halfords primer on everything, then applied a few light coats of a light grey (matched to photos – noting that floor, panels and padded walls and roof are not all quite the same shade). I mixed some Tamiya grey shades with white to get the colour I sought… adding more white where it was needed. Once good and dry, I masked off the grey sections so that I could apply a dirty-black (a very dark grey) Floor painted and masked for "black" areas by Jonathan Hughes, on Flickr Once airbrushed some variations in tone, the floor was unmasked looking ok. Once hard, I applied a few light coats of Aqua Gloss to seal everything for weathering. Floor section black areas applied by Jonathan Hughes, on Flickr A similar approach was taken for the walls and ceiling, albeit with rear sections given a few coats of “interior green”, which I mixed using about 10 to 12 drops of yellow to 1 drop of black.. which with some experimentation seemed about right… mission models paints being used here. The seats had also been primed, and then given a light coat of Tamiya white… followed by a few light layers of Mission Models Insignia red. Once dry, I added a couple of coats of aqua gloss to seal it in, then painted the silver/grey sections by hand using Mig Ammo Bare Metal Matt Aluminium which went on with a small brush excellently. Finally, I made a few variations of light grey or hemp colour (using mission models paints) to brush-on the seat belts. Photos show these to be a bit of a mix of colours on any particular aircraft, so that’s what I did. The end result was sealed with some more aqua gloss and looked a bit “bright” but would tone-back a little with some weathering. Seats, painted by Jonathan Hughes, on Flickr On to that weathering I mentioned; I took an easy route of using Tamiya panel liner brushed on liberally and then wiped off… which worked ok. Weathering interior sections by Jonathan Hughes, on Flickr The bulkheads and cockpit panels that lacked transfers (overhead panel and cockpit entry sides) were all painted up (using photographic references). There are a few issues here as the kit parts are a bit “hybrid” in some areas – or rather nothing like any photos I could see… so some artistic licence was needed in places, but I think they look ok… given how much will be visible afterwards. Interior painted by Jonathan Hughes, on Flickr Cockpit and bulkhead sections by Jonathan Hughes, on Flickr Although not shown, I later painted in the details in the rear fuselage "green" sections, and transfers were added to the fuselage sides (prior to weathering) I assembled the cockpit and test-fitted the seats to just take a look. It was only after the cockpit panel transfers had been added and sealed with a matt coat that I noticed that the HSI colours are upside down… at least, I presume the aircraft isn’t flying through a brown sky over water… hmmm. But it was too late to rectify that. Thanks, Revell. Before everything was assembled, I applied a unifying flat coat to everything. I don’t usually do anything flatter than semi-gloss (or satin) coats for exteriors, but for interiors, especially where there’s lots of soft coverings such as the insulation on the walls and seats) a flat coat seemed to be better. This tones everything back a bit and worked quite well for the interior floor, walls and ceiling. I’d do the same for the ramp later in the build. Cockpit assembled and seats test-fit by Jonathan Hughes, on Flickr Front section fwd-view by Jonathan Hughes, on Flickr Realising that before I could close the interior and exterior fuselage, I’d need to assemble the rear ramp… and thus paint it too. The kit provides for this to be fitted early in build, and has two brackets to attach it to the rear of the floor section. So, I assembled the rear ramp sections as shown. Now… here I have a bit of a gripe with the kit as the attachment brackets are angled and you need to take care which way they’re attached. Here’s where I feel-down a bit. Following the instructions, I added them one way… and when doing a test fit with the fuselage, found that the whole ramp sat a bit low… with a big step-up to the cabin floor level (which could not have been right). I looked at the instructions again … no, that’ the way the brackets are shown attaching… look at a later step in the instructions and it shows them the other way up. It’s not the part flipped… the brackets are reversed. So. I opened the ramp up and managed to remove the brackets and added them the other way up... packing them out a bit with plasticard to strengthen the whole thing. Initial ramp assembly by Jonathan Hughes, on Flickr When I then tried to fit these, I found that it would not close-up properly at all, I was a bit peeved! Having slept on it, I decided to go for a different approach and make some forks that could slot into the rear fuselage once complete... and thus not need to be fitted until final assembly (much easier) I disassembled the rear ramp.. which took a little doing Ramp disassembly and bracket removal by Jonathan Hughes, on Flickr I then made the two forks from four laminates of plasticard, and cut a wedge from each end so that the fork would be angled forward of the ramp, to allow a dropped angle for the ramp at the end. The reinforcing just beefed up the structure given that it would now be a separate part. Shown on test fit (for test fitting to the fuselage) and after gluing Revised fitting for ramp... test fit by Jonathan Hughes, on Flickr Fettling the ramp to work with attachment "forks" by Jonathan Hughes, on Flickr In the latter photo above, the two chamfers are evident in the outer shell, allowing the forks to sit close to the outer skin once assembled. The ramp was assembled, some details added with a pin-vice and Rosie-Rivetter and primed. A shade of grey similar to the interior was added (as close as I could get it) and then this was masked for the back sections. Masked and black areas applied to ramps by Jonathan Hughes, on Flickr Notable in the above shot are the two ramp sections that sit atop (or down from) the main ramp. To sit these parts flush on the main ramp, they were sanded flat on their undersides. Once finished, these will just sit on top of the main ramp... ready for use if needed. Once finished and weathered, the ramp looked ok. The upper clamshell section for the rear fuselage opening sits inside the ramp when open; it is visible sticking-out of the main ramp here. Ramp completed, with weathering by Jonathan Hughes, on Flickr That was 2023… it’s now 2024… so back to it. Happy New Year all. The seats were glued in place and I set about taping up the fuselage interior sections for gluing. Interior assembly stage by Jonathan Hughes, on Flickr I used plenty of masking tape to hold it all together then glued everything using Tamiya thin. Once dry, I beefed this up with my sprue-goo mix (Tamiya thin and sprues) along the seams. Interior taped up whilst glue dries #1 by Jonathan Hughes, on Flickr Interior taped up whilst glue dries #2 by Jonathan Hughes, on Flickr One thing that may be noticeable from that last photo is that there’s a gap between the rear undercarriage bay plate and the fuselage walls… I therefore cut out a couple of sections of plasticard and glued these into the gap, using tape again to hold it all together. Added "packing" to rear undercarriage bay assembly by Jonathan Hughes, on Flickr Whilst all of the glue was drying overnight, I wrapped the outer fuselage sections around the outside, to keep everything true or square whilst it set hard. That gap by the rear undercarriage part being very evident here (prior to fixing) Outer fuselage added to keep interior "square" by Jonathan Hughes, on Flickr And finally…. after a good 24 hours, all tape was removed and some final check made. I re-clamped the rear section and added some more glue, along with some more sprue-goo to bolster the grip, and then used this on all slightly open seams (although they’ll all be covered by the outer skin once added. Final clamping and glue and some sprue goo. by Jonathan Hughes, on Flickr So that’s it for now. Not my normal type of build but another case of learning as I go. Thanks for reading… Jonathan.
- 27 replies
-
- 25
-

-
First serious bit of modelling I've attempted in about forty years – so guess that makes me a newbie! My first experience of photoetch, acrylics, airbrush... you name it. So I wanted to do a subject I felt a connection to, and something that would stretch me to the max. So it's Revell's 1/32 Schnellbomber which will assume the guise of 4D+DH 'Dora Heinrich' of 1.KG30. This Ju 88A-1 fell to the guns of 603 (City of Edinburgh) Squadron on 16/10/39 during a Luftwaffe raid on RN ships in the Firth of Forth. 'Dora' was the first enemy bomber downed by the RAF over the British mainland in WWII, and was on the receiving end of the first ever Spitfire victory. I was born by the Forth, and have lived half my life on its banks, my family have worked for generations on its waters and in its docks and I live just a few miles from where 'Dora' ditched almost eighty years ago. So I thought I'd make her the first half of a 1/32 'Dogfight Double'. Eventually I'll get around to tackling her nemesis – XT-A 'Stickleback' a MkI Spit of 603 Squadron. Over a year in, having too much fun, here's some (unfinished) pit shots. Apologise for quality – taken with an iPhone4 Cockpit side walls, still needs wiring/some piping added Eduard PE, Aims and homemade decals Floor and curtains printed on inkjet Pilot seat, control column and BZG2 Bombsight
- 51 replies
-
- 27
-
-
My first 262 was the original Airfix one released in 1960. I never thought it looked quite right but it has taken them until 2017 to replace it. After that I built the Frog kit released in the early 1970's, perhaps a scaled down version of the Hasegawa 1/32 kit Frog imported back then. Now I will have a shot at the 1997 Revell version- Looks like it comes with rocket tubes! Pete
- 11 replies
-
- 23
-
-
The Northrop F-89 Scorpion is an all weather twin-engined interceptor designed and produced by the American aircraft manufacturer Northrop. It was the first jet powered aircraft to be designed for the Interceptor role from the outset to enter service,as well as the first combat aircraft to be armed with air-to-air nuclear weapons in the form of the unguided Genie rocket. First flew in 1948 and entered service in 1950. For this GB, I plan to build Revell’s 1/72 F-89D/J kit. I will be finishing it as the aircraft shown on the boxart, a F-89D from 61st Fighter Interceptor Squadron from Ernest Harmon AFB, New Foundland, 1957. Why this one? I like the look of the aircraft with the large wingtip rocket pods (containing a 104 ‘mighty mouse’ FFAR rockets) and more importantly it has a big smiley face on it.
- 37 replies
-
- 20
-
-
While working on Vc from Malta, I pulled out "Spitfire Mk.V" by Revell - the well known 1996 boxing featuring some nice looking details and some massive blunders. I actually thought it is mk.Vc so I started it planning to build it with Xtradecal decals I used for the other Spitfire. But as you may be aware, it is in fact mk.Vb. Oh well. At this point I decided to build it as LF version as I do not have clipped Spitfire in my collection. Kit has decals for it - AEoE, EP120 (boxart plane). So I built model with clipped wings. And then I learned Revell idea of "Sky" as used on code letters and band is too dark. I looked through my spares box but haven't found any decals for LF version of mk.Vb. I do have some nice ones for full span wings. Sigh. Now I am not sure how I will paint it. Either I will stay with AEoE and ignore that letters are too dark. Or I will make undocumented plane from 303 Squadron that operated some LF Mk.Vb from late 1943 to June 1944 using RFoD codes from well known Zumbach's plane from the period when 303 first operated ordinary Mk.Vb (Oct'41-June'43). Cockpit is one of the weakest parts of this model that would require complete rebuilding. On the other hand, transparencies are so terrible, you will not see much of this. So, as I started this model with attitude "I have it so I will build it" I decided to paint what little there is and hide it under the glass. The other major problem is obviously lack of gull wing. I decided to check if I can do something about it. Using rotary tool and sandpaper and copious amounts of putty and surfacer plus actual forcibly bending the plastic parts I managed to get some promising results. During this process I learned changed shapes interfere with cockpit floor. This plus the fact that this "flat" part has no panel lines (despite model having very nice panel detail overall) got me thinking and I believe this may be actual reason why they flattened this piece - they could have discovered that there is a problem when building test shots and at this point the only way to make body buildable was to carve into mould to flatten it. At some point (I have this model for a long time so box was opened numerous times) I managed to lose kit spinner so I fitted Rotol prop from Airfix. Is it acceptable? If the shape is bad I may print new one as I got the files when building Malta Spitfire.
-
Dassault Mirage 2000C (03813) 1:48 Carrera Revell The Mirage family of fighter aircraft began in the late 1950s as a brainchild of Marcel Dassault, using the delta wing format and having no horizontal tail surfaces. The Mirage 2000 is the final mainstream (ignoring the Mirage 4000, which did not see service) 4th generation development of the general concept before adoption of the Rafale by the French Air Force in 2000. The C in the title for the fighter stands for Chasseur or Hunter. As well as two internal 30mm DEFA cannon the aircraft is armed in the air-to-air role with Matra R550 Magic, Matra Super 530D, and MBDA MICRA Missiles. In addition to the Mirage C there is a two-seat B model trainer, N model that has Nuclear Strike capability, and D model Ground attack version, all of which saw service with the French Air Force. Mirage 2000 aircraft have also been sold to Egypt, India, Peru, The UEA, Greece, Tiawan, Brazil, and Qatar, many of which are still in use, although at time of writing, Greece retired theirs a couple of years ago. The Kit This is a reboxing by Carrera Revell of a Monogram kit that was first issued in 1982, and was later upgraded with some weapons, most notably the Exocet missiles, and a one-piece lower wing. The kit arrives in a shallow end-opening box with a painting of the subject on the front, and inside there are four sprues in grey styrene that don’t have the modern runners around the edges to protect the parts from damage or accidental removal during handling. There is also a small clear sprue, a wide decal sheet and the instruction booklet that is printed in colour on matt paper, with painting and decaling instructions on the rear pages. Detail is reasonable for the era, although the panel lines on the underside of the wings are engraved because of their later tooling date, while the rest are raised, which might make a little extra work for the modeller if the urge takes them it rescribe the rest. There is a little flash here and there, but much of it is on the sprues, although a little is also present on the parts, but flash is easily removed, and is preferable to short-shot parts on any day of the week. The clear parts are in good shape, although my sample had a little light scuffing on the canopy that could be sanded and polished away with little effort. Construction begins with the cockpit tub, adding the instrument panel in the front, building the Martin-Baker Mk.10 seat from three parts, and adding decal seatbelts before installing it in the sloped rear of the cockpit along with the control column. There is also a crew figure that is moulded mostly in one part, with a separate right arm for the control column that should allow it to be positioned accurately on the control column. The pilot’s back is hollow to help reduce the likelihood of sink-marks on the figure, and to assist in a close fit to the seat or waving to someone if you prefer. The fuselage halves have sidewall detail moulded into their inner surfaces, and these should be painted before the cockpit tub is glued to the starboard side, and the walls of the nose gear bay beneath are inserted underneath and into the port side, so that the fuselage can be closed and the seamlines dealt with in your preferred manner. The clear windscreen and HUD glass parts are fitted to the front of the cockpit opening, then the assembly is put to one side while the wings are built. The lower wing is moulded as a single full-span part that also has portions of the lower fuselage moulded-in, gluing the upper wings over the top, and then unusually moving on to the making of the main landing gear before it is joined to the fuselage. Each gear leg comprises a single strut with retraction jack added, and two-part wheels glued to the stub axle at the lower end, fitting the captive bay doors next to the strut on the outer edge of the bay. It’s probably wise to skip ahead and join the fuselage to the wings before doing this, but the instructions blunder on with the weaponry next, making a large three-part finned fuel tank for under the centreline, a couple of Exocet missiles on custom pylons, and a pair of Magic A2A missile on their own pylons on the outer stations. This is where the two assemblies are joined in the instructions, and good luck dealing with any seamlines without knocking any of the weapons or gear legs off if you followed the instructions! The single SNECMA M53-P2 engine is not depicted, but the afterburner ring is trapped between a tapering length of trunking and exhaust petals, which slides into the rear of the fuselage under the tail once completed, and to avoid any possibility of see-through effect, the four holes in the trunking ‘plant pot’ would be best filled with styrene sheet or something similar. At the intake end, the blanked off fronts of the nacelles either side of the cockpit have a two-part intake with shock-cone on the inner face, and a strake added at an angle to the horizontal on the outer surface, with a scrap diagram helping you get the angle right. If you followed the instructions, your Mirage is lying nose down on the table at this stage, which is about to be rectified by the addition of nose gear, which is moulded as a single strut and retraction jack, which has a pair of trapezoidal landing lights added, one on each side of the strut, and two single part wheels, one on each side of the short cross-axle. This plugs into sockets in the shallow bay, then it’s a case of adding the various probes and sensors around the model, one on each side of the fin, two at an angle in front of the windscreen, plus another in the centre, and the pitot probe at the very tip of the nose cone. The final act is to decide whether you want to pose the canopy open or closed by gluing the tab at the rear of the part into a slot behind the cockpit at an angle or otherwise. Markings There are two decal options on the wide sheet, both wearing the same basic scheme, but one with special markings to set it apart from its in-service colleague. From the box you can build one of the following: Mirage 2000C/RDM EC 1/2 ‘Cigognes’ Dijon, France, 1994 Mirage 2000C/RD EC 5/330 ‘Côte D’Argent’, Centre D’Experimentations Aeriennes Militaires EM AA Monte-de-Marsan, Tigermeet 1996, Beja, Portugal Decals are by Cartograf, which is a guarantee of good registration, sharpness and colour density, with a thin matt carrier film cut close to the printed areas. Conclusion It’s not the newest kit in the world, and you might want to consider rescribing the raised panel lines if you’re so inclined, but there are some good decal options to make this old kit more appealing. Recommended. Carrera Revell model kits are available from all good toy and model retailers. For further information visit or
-
 Here's a bit more nostalgia from me. I was a primary (elementary) schoolboy in Sydney in 1985 who raced home on a cloudy afternoon, desperate to see the incoming Concorde. February 14 1985 was the first time, as far as I know, that Concorde had arrived in Sydney since the prototype toured in the early 1970s. Luckily I got home in time - Concorde was late! My house was under the flightpath to Kingsford Smith, and before too long I saw the beautiful aircraft come roaring along, nose angled down for landing. As it passed I raced up the hill from my house, with my mother in tow, to keep the aircraft in sight and make the moment last. That's always been a vivid childhood memory for me so I figured I should commit it to plastic! I've wrestled with this old Revell kit for a year. I don't know if this is victory or abandonment but I'm calling it done. I found it hard to photograph - if anyone has pro-tips for photographing big white models let me know. There is a subtle wash through the panels which doesn't really show up here. I've used Bra.Z resin (intakes and windscreen) with the F-DCAL Negus and Negus livery sheet. I painted the vertical stabiliser using masks made with a stencil cutter - a first for me. Hopefully the spirit of the build comes across. I'm not trying this one again.
 -
With the Jet provost done and the other activities out of the way, it’s time to get back in the saddle and do some more modelling. For a bit of a mojo boost, I watched Top Gun, Top Gun Maverick and The Final Countdown on DVD’s. So tonight, out came the Airfix F-14A Tomcat (blueprint box) and the Revell F-14D Super Tomcat from the stash - both 1/72. I’m going to try to build them both together stage by stage (rather than build one and then the other). The Revell is better in detail as it’s a much later kit, but the Airfix one still has a certain charm to it - even with the raised panel lines which I’ve decided to leave to see how it turns out. So, the first stage was to build the two cockpit tubs. The Airfix one is much longer then the Revell and both have raised detailing in the some consoles in roughly the same depth. The ejection seats are worlds apart in detail, so I might see if I can 3D print something a little more interesting for the Airfix kit. Otherwise the offices are fairly well detailed considering….. Both tubs were painted with Tamiya XF-19 Light Grey (as it’s what I had to hand) and are drying off. They will both receive other colours to highlight the consoles and IP’s. I’ve also bought an extra set of Airfix F-14A decals which offers two options - TopHatters and the Black Aces - to go with the Bounty Hunter and Grim Reaper options for the kits.
- 44 replies
-
- 12
-
-
As part of my effort to clear my backlog of started kits I have dug out my Matchbox Spitfire. I started this literaly decades ago, but didn’t get far. I have looked at it occasionally, but no action. Then I bought some Xtradecal decals for it, SAC MkIX undercarriage legs, MasterCasters interior, Master gun barrels. Finally I found out about the Grey Matter correction set for the nose, which of course I immediately ordered on a wim. Having now spent about ten times what the original kit cost, guilt has led me to this, my first WIP. It will not be a tutorial, I am not that good, it will not be a guide to the ultimate accurate Matchbox Spitfire, but posting about it will serve to prod me to get it built. With a little luck, at about the halfway point, somebody will announce a new accurate Mk 22/24 for you guys waiting for one. We will start with the nose, the Grey Matter nose is one seriously large accurate lump of resin. I may scratchbuild the u/c legs out of brass because even the SAC legs might fold under the weight! It also might be the first Spitfire build to need weight in the tail to prevent it becoming a nose sitter. You can see the difference with the kit item. The panel lines look much more to scale than the Matchbox lines-lol.
- 118 replies
-
- 11
-
-
 Greetings all, An Easter holidays completion from me - Revell's 1/32nd scale Hawker Hunter FGA.9 more or less OOB, other than some aftermarket decals from AeroMaster and some home-made FOD guards. This kit is really under-rated in my humble opinion - it has lots of detail OOB and beautiful surface detailing from a time when Revell were at the top of their game. I had no issues whatsoever with the build - it's about as close as you can get to building Lego - and it went together in a few days. Paints were Xtracolur enamels with a splash of Humbrol Matt Cote to finish it off. Some light weathering was done with Mig pastels. All in all a very enjoyable build - and it only cost me a tenner under the table at a show! All the best, Tom Hawker Hunter FGA.9, XG207, 58 Squadron, RAF Wittering, mid-1970s.
- 21 replies
-
- 48
-
-

-
- Hawker Hunter
- Revell
- (and 1 more)
-
 Brussels Airlines introduced around half a dozen special liveries on their A320 fleet,all representing Belgium arts. In this case the Smurfs. I assume everybody remembers the cartoons with those blue dwarfs and their enemy Gargamel... PAS decals offers almost all of those liveries,but I guess some of them are just too difficult to reproduce in decal and kit form. The smurf design has its fair share of difficulties as well but it can be done. The decals are very nicely printed and of excellent quality. The most tricky part is the paint and masking job. Lots of photo reference was needed and I also made a copy of the decals that went over the windows to line out the demarcation between the blue and white. For the blue I used Revell blue 52 which I found a good match. The fading black to blue on the fin was achieved with a piece of paper holding in front of the blue.A few trials were needed to get it right. Its a funny livery and a real eye catcher in my cabinet. Thanks for looking Alex
- 16 replies
-
- 41
-
-
-
 Hi all, I seem to be making good time with my main GB build (1/32 Arado Ar 234) so I am risking all and putting in a second build in true WWEMD style The box is a bit beaten up but packied with goodies! Thanks go to Britmodeller @BushBrit66 for the kit and accessories. As this is a Revell rebox (it's the Dragon kit) all the sprues are packed together in one big bag. The build also includes the very nice Verlinden cockpit and engine set. Although it doesn't include a full engine, the exposed detail is very nice. And obviously the cockpit is completely overhauled. There's also a cornucopia of reference material which should make this a cinch. I rarely build in this scale so it all feels rather fine and little, so this will be a nice side-build I can keep busy with while struggling with the resin MDC Ar 234! Thanks for looking, Alan
- 20 replies
-
- 18
-
-
-
DHC-6 Twin Otter, 440 Transport Squadron of CAF
- 14 replies
-
- 51
-
-
-
This is the Piper PA-48 Enforcer I'm planning to build for the GB. Although not a true Mustang, this has been approved by Patrice @TEMPESTMK5 and will be the Halberd Models resin conversion for the Revell P-51D-15-NA kit in 1/32. Here's the raw materials... The very nice Revell 1/32 kit. This is the later edition with the fin fillet to complement the earlier -5-NA. It's not as finely cast as the more expensive versions, but it goes together really well. Great parts breakdown, especially in the cockpit. Enables much finer detail than the traditional moulded sidewalls. Lots of armament options as well, with two drop tank variants, 500lb bombs, and 5in rockets. Three canopy options, including the required blown Dallas canopy for this aircraft. This is the ludicrously good Halberd Models conversion set for the kit. As @trickyrich will tell you, the quality and fit are superb for a resin/3D conversion, especially considering the size of the parts. As you can see this is a very extensive set - two replacement fuselage halves being the most substantial parts, plus the tip tanks, prop and spinner, cockpit floor, ejection seat and lots of pylons! On with the show... Cheers, Alan
- 10 replies
-
- 10
-
-
Hi, Here's my Revell F-84E with Aeromaster decals. That 86th FBW must have been quite a sight, I hope to reproduce a little of that magic. After years of looking for the F-84E and only seeing F-84G's, I finally found several last year at a modelling festival and from an estate sale. The one from the estate sale (a modeller named Jean-Claude of the Amay Models Club) had a bit of work done on it. He removed what looks like external reinforcement plates around the Main Landing Gear wells. I've circled the areas in red on the picture below. The shape of the ones in front of the wells reminded me a bit of the compressibility flaps on late P-38's and I noticed that there was a stencil with quite a bit of text on them. Stencils 40 and 41 on the Revell kit sheet. Fearing that the stencil might mean "stay away from this flap!" I looked at it with a magnifier. The stencil is about electrical plugs. I plan to use Jean-Claude's lower wings on this build as this will be the earliest F-84E that I'd want to build and thus the best one to do without external reinforcements. Cheers, Stefan.
-
Golden Age of Transport is an interesting subject for a GB, certainly something that is on my mind every now and then - but I haven't actually built any kits for. So I searched for a kit that would suit this GB and came across a Dornier Do X. The biggest and heaviest of it's kind that made world records that lasted past WW2 - and made a transatlantic test flight that lasted almost two years! It's almost as much as a boat as it's a plane. Pilot controlled two 'throttles' - left and right. But they were not really throttles, they simply signalled the engineers inside the wing - and they made the adjustments to the twelve engines, much like in ships. All in all, certainly a worthy subject of this GB!
- 15 replies
-
- 20
-
-
Hi all, with my second build about to be wrapped up and a few weeks before the Baby Boomers GB starts I thought why not fit another kit in here whilst I'm on a hot streak. So I picked up the Revell rebox of Hasegawa's Hs 129 in 1/48. The main pull for me was the kit features decals for a Panzerknacker based in Libya and I'm yet to do a North African campaign luftwaffe build. Specifically this Henschel captured at Castel Benito airfield. Looking forward to it, thanks for looking in!
- 18 replies
-
- 10
-
-
 Dear Friends This is the Revell Ju 88A-1 which has the short squared off wings compared to the A-4. The best part of the Revell kit is the beautiful cockpit. I felt some of the fuselage panel lines where a tad deep so sanded the whole fuselage right down, particularly near the cockpit. Here I added the Eduard PE cockpit and Eduard MG-15 machine guns. The decals are from the Xtrakit BoB set. This aircraft went out to bomb Woodley airfield in October 1940 near Reading under clouds, couldn't find it so went to alternate target of Hatfield and hit the de Havilland factory (with Mosquito prototypes damaged). The airfield defences weren't asleep and the hit the Ju 88 which crash landed shortly afterwards. Hope you like it? Andrew
- 22 replies
-
- 69
-
-
-
Normally I am not such a great fan of presenting somewhat botched models, but here we go in the name of complete honesty (after all, not all kits come out perfect, don't they?): As mentioned in a previous post, I am in quite a spare with my race car models since some years. Suddently it 2eemed, as if I could do nothing right anymore. Consequently, I had like 5 unfinished kits sitting around, where I got stuck because of some flaw or the other. And a stack of about 30 kits which I didn't even dared to start. Recently I decided to just go ahead again ... I went with the "easier" Revell 1/24 kits before trying my hand again at my stack of 1/20 F1 cars. So, after completing one of the unfinished cars, I wanted to do this little kit as a "weekend edition" out of box (I even left the engine completly out). It went pretty well in the beginning, until I decided to use the kit provided decals for the yellow parts of the livery. The decals either would really bend in all the right directions or, with the help of softener, dissolve nearly instantly. As a result, some of the not dissolved pieces dry on wrongly and partly scaled of afterwards, while the dissolved sections looked like anything but the original. To add to the insult, I also had massive problems with the fitting of the rear wing. Which, honesty - remember - started with me glueing the wings to the endplates forward side backwards. It didn't get better after that .... I tried to correct some parts with paint but then just went ahead and finished the build without too much care for covering all mishaps or any more details (as one result, there are no exhaust pipes within the "chimneys"). I tried the pictures from the best angles and actually the car sitting in my shelf on a not too prominent spot, it is - let's say - OK. (here you can spot some of the damage, especially around the front suspension and near the "E" / "elf" on the engine cover) Thanks for looking and coments welcome as always. Cheers
- 14 replies
-
- 16
-
-
Happy Easter folks! Here is my attempt at Revell's new(ish) big Hurricane. Decent enough kit for the price, although some quite clever design in places is let down by the soft plastic as the pieces aren't as sharply moulded as they might otherwise be. Nothing a bit of effort can't overcome though. Thanks for looking, J.A.
- 10 replies
-
- 33
-
-
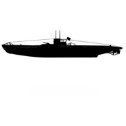
I have always admired the look and lines on German Uboats and thought how cool it would be to have one on display. I purchased a several of the Revell 1:72 kits and put them aside. I decided to research a little learn a little about the Uboat before construction of my kits. Sooo, I bought a few books on the the Uboats and have been reading some of the history which they were involved in as well as other sub books too. Das boot 04/21, Blind mans bluff 05/21, Twenty million tons under the sea 05/21, Iron coffins 05/21, The luck of the draw 05/21, Operation Drumbeat 06/21, Torpedo junction 06/21, Gunther Prien and the U-47 (reading now). So after dragging my feet for a bit I started the kit last Thursday on July 1st.
-
I thought I would also build another classic Baby Boomer - the Hawker Hunter. I built the original Airfix Mk 6 released in 1960 in black plastic to represent one of the "Black Arrows" display team from 111 Squadron, and then one of the remoulded FGA 9 kits Airfix released in 1983, and still have at least one of the later 1994 boxings in my stash which I was thinking of converting to an earlier mark, but more recently I picked up a Revell kit cheaply and so I thought I would try that. I was never entirely happy with the Airfix remoulding - something did not look quite right but I have no idea why. I will now have a chance to see if the Revell kit looks better. It was first released as a Mk 6 in 2005, reissued as a Mk 9 in 2008 and this is a 2018 reboxing. Pete
-
 Following my comment on @John Masters's thread, I realised that I had not shared that build that I completed at the end of 2020. If my memory is any good, this aircraft is an F.6 that received the rear part of an FGA.9 with the parachute housing and not an FGA.9 as Revell state on the box. Final pictures: The build: Moulding: This picture is typical of what was in my box: Flash, heavy sink marks and soft surface details caused by the moulding issues. Nothing major but frustrating nonetheless when it comes to a kit that is not supposed to be short run... Having said that, a fired of mine who had acquired several boxes right after the kit was released did not have the same issues. Cockpit: The cockpit tub is very nice OOB and the seat was improved using my usual process (lead wire, Tamiya masking tape strips, plasticard, aluminium foil, Magic Sculp and stretched sprue): The cockpit sides were detailed using plasticard and a punch-and-die: The backplate was the area that needed more improvements: I also added a collimator before gluing the windshield: Once painted, it looks really nice. I did not use the decals but painted everything by hand using a sharpened toothpick and Vallejo acrylics: Air inlets: It is advisable to add a shim of plasticard where the wings meet the fuselage around the air inlets. Otherwise you will be left wth a nasty gap at the top and bottom junctions: The air inlet cone is missing and the resulting empty space is quite noticeable. I made some off 0,2mm plasticard sheet: Painted white at the front and going black at the back to give an impression of depth: Parachute housing: It had a very nasty sink mark and the panel lines had nearly disappeared. It took quite a bit of time and effort to bring it back to a decent condition: I had to rescribe and add missing rivets to quite a few hatches / covers, mostly on the wings. Overall fit: In spite of the moudling issues, the overall fit was good and little filler was needed: Painting and weathering: The model was painted using Mr Hobby Aqueous over an Ammo One Shot black primer: Grey: I sprayed a highly thinned H331 DSG in a mottling fashion, building up slowly the coverage and letting the black show through around the panel lines. Then, I made some highlights using H337, insisiting on raised details and the centre of the panels. I finished with some post-shading using Panzegrau. Green: I used H73 DG follosing the same process and made highlights by adding H313 sand to the dark green. I toned down the effect with several light mists of H73. Red: I primed the area in white, then applied a coat of yellow and finally the red base coat (H13). I applied some shadows using a highly thinned dark brown. I then applied the decals, though most roundels , the code and fin flash were painted using masks cut with my Silohouette: I like to get the landing gear and weapons out of the way as quickly as possible, as I consider them as a chore: Then, I applied the washes: I used True Earth Neutral brown on the underside, Black on the camouflage and Dark Brown on the red. The weathering was done using mostly felt tip pens and aluminium and dust weathering pencils: Finally I applied a light coat of VMS matt varnish. In hindsight, I probably should have been more restrained on the weathering. But at the time, I wanted to give it a worn out look. On some pictures, they are in a worse condition than shown here with large patches of white showing underneath the red on the wings, for instance.
- 33 replies
-
- 85
-
-
-
 It's that time of year again when I find all sorts of new projects making their way towards the workbench...! I know I have plenty on the go already, but most of these are awaiting paint which requires better weather - I spray outdoors and need warmer, drier conditions. As @Paulaero will understand, these other models are generally at least 95% built, which qualifies me to start on something new in the meantime! 😁 This build is partly a new challenge and a bit of repetition too. The new bit is refurbishing one of my older models and this will form the bulk of this thread. The repetition part is concurrently building two untouched Revell 767-300 kits, which I did here a couple of years ago and I don't see any point in documenting it here again! However, these kits will throw up a few challenges along the way (more on this when I get to those parts!), hence their inclusion into this thread. Let's start with the model to be refurbished. I would guess that I built it around 20 years ago, when my modelling skill set was rather more limited than it is now. It is the Revell 767-300, with RR engines and built to depict G-BNWA which I flew regularly at back in 2003. The model has been in the attic for years and I think it must have been dropped at some point too - luckily I still have most of the pieces: It's certainly been neglected and the attic did it no favours - it's covered in grime: The refurbishment will consist of the following tasks- 1. Open the fuselage up and fill the windows with Milliput 2. Removal of the damaged undercarriage and rebuild the model with the gear doors closed 3. Replacement of the missing windscreen (the only piece that I cannot find!) 4. Removal of the old paint and re-spraying with an accurate demarcation line and correct shade of blue 5. Production of custom decals to give the model a new identity To complete this introduction, the other two models in this build were purchased cheaply but with a few pieces missing. More importantly though, they both have the sprues for the RR engine option, so these will be built as BA aircraft. Here are the sprues: And another shot, showing the first task completed - Milliput is applied: It is well past its 'use by' date and quite dry and crumbly, but perfectly good enough for this job!


.thumb.jpg.ad2b820bfdebfdb8541e9255a05f38c7.jpg)