Search the Community
Showing results for tags 'revell'.
-
 Well I decided to dig this out to use as a stress reliever build to go alongside my Days of Thunder build and well, just look what happened in 3hrs Ok so it was a stalled build from last year lol. Better explanation to come in a WIP I'm going to start about a Capri with a Turbo Eye's peeled everyone lol. TTFN Ashley
 -
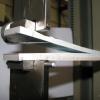
Evening all, I've just finished building this as a mojo-mender as with a few long term projects on the go, I'd become bogged down and in need of something that went together without problems - this 1/32nd scale twin-stick MiG-29UB proved to be just the medicine. I picked this up at Telford for £25 which proved to be very good value for money. It's quite simple kit but in truth that's why I chose it - the cockpit lacks detail and the undercarriage bays are very basic, but the overall fit and construction is excellent and I encountered no construction issues at all. I used the decals from the box, which represent a MiG-29UB of 120 IAP based at Domna, Siberia, in the summer of 2003. Revell's colour guidance could only be interpreted by someone with a masters degree in colour mixing, so instead I just used pictures on the net for guidance, using mainly US equivalents from Xtracolour to get a close-enough match to the real thing. Other than that, it's as it comes in the box. Mikoyan MiG-29UB, Domna Air Base, Siberia, 2003. Jet pipe detail isn't too bad at all: Cockpit detail is pretty basic but some Airscale placards and dial decals and a belt set from Eduard means it's passable when peering through the canopy: The overall quality of the surface detail is excellent in my opinion: Wheel bays are basic but when sitting on its undercarriage very little is visible anyway: If you're thinking about a good value, large scale modern-era jet fighter, then I'd recommend this kit wholeheartedly... Tom
- 26 replies
-
- 38
-

-
- Revell
- 1/32nd scale
- (and 1 more)
-
Hi Everyone, Here is another 2015 build : Revell 1:535 Iowa class battleship USS Missouri BB-63. Ever since I saw the film Under Siege, I have always wanted a model of the USS Missouri, but not in the refitted condition from the film, so I was very pleased to see a kit in LSA models of the ship as she was built to avenge Pearl Harbor. Here is the kit. The one strange thing with this kit is that the kit has a rudder but no propellors and shafts included with it, or provision to put them in the hull. Cheers, Rick
-
 Evening all, I've now completed my Stuka as per the following build thread: http://www.britmodeller.com/forums/index.php?/topic/234998686-148-revell-junkers-ju87b-2-stuka/ It's the Revell boxing, built OOB save for Eduard fabric seatbelts (I'll revert to PE in future - I didn't get on so well with these to be honest) and an Eduard Brassin MG15 machine gun to replace the kit item. Paints are all Colourcoats, but I used Humbrol clear coats. The stencils and crosses were from the Revell decal sheet. The ID markings and nose art were from an old FCM Battle of Britain decal sheet, and the Swastikas were from Xtradecal. The aerial is Infini Model Lycra Rigging Line, Fine / 70 denier (0.091mm diameter). Sorry about the indoor photos, but the light is starting to fade and I wanted to post this tonight for personal reasons.
- 10 replies
-
- 22
-
-
- Colourcoats
- Infini Model
- (and 3 more)
-
Hi, this is my first time I publish the pictures of a finished model on this forum, so I would be happy to get some advice how to make the pictures properly as those are the first ones I ever made like that. So to start: The kit is the last re-release of the Revell kit of the M60a3. The fit of the kit was pretty good except the tracks and running gear which was pretty hard to assemble as the instructions are not clear IMHO at some parts. Aswell is are the painting scheme instructions a bit of a inconsistent as the the camouflage in one is neat and tidy painting in three different greys as the other is made out of four types of criss-crossed lines and dots which is a very hard to see clearly what to paint where. I built a M60a3 which took part in REFORGER`85 because I liked the the orange identification marks and I had this photo of it (https://commons.wikimedia.org/wiki/File:M60A3_Panzer.jpg) and I like building vehicles I have references pictures of (ok; I just favour building them;I don`t exclusively do so). I haven`t weathered it yet and I also intend to build a little diorama/vignette for it. So, here are the pics (finally ) IMG_0187 by nivelnnamkcurts, auf Flickr IMG_0188 by nivelnnamkcurts, auf Flickr IMG_0189 by nivelnnamkcurts, auf Flickr IMG_0190 by nivelnnamkcurts, auf Flickr IMG_0195 by nivelnnamkcurts, auf Flickr Comparsion to its predecessor, a M48 made from the Italeri/esci kit ... IMG_0196 by nivelnnamkcurts, auf Flickr ... and an 1/72 esci/italeri figure. BTW: I think I messed up a bit with the decals IMHO
- 10 replies
-
- 10
-
-
I have a favour to ask, I am building the kit below, in the Airliners Group Build here on BM My question is, what other decal and livery options are available for this kit ? I believe the ones included in the kit are for the prototype aircraft. Any help really appreciated Cheers Pat
-
So as promised I am joining this GB! I can't stand ideally by while everyone builds an 88, especially as most are building the same kit I have! So you guessed it.... tonight Matthew, I will start building.... the 1/72 revell ju88 a4. (Actually I started building it last night....) So the kit! Untitled by robert mulvey, on Flickr Box art you all know and love Untitled by robert mulvey, on Flickr And the scheme I would like to do... I did have to put some real thought into this choice, I am currently re reading Roald's going solo (he would have been 100 this year) with the kids and thought of doing the Greek option, however the the sicily option won out as a) I will be doing the chaps that fired at it in the MTO GB b ) the Greek scheme is to late for when Roald was in Greece c) I prefer it d) did I mention it had a link to malta and I pretty much love anything to do with the place and e) it operated not far from where me and the wife had our honeymoon... rude not to Untitled by robert mulvey, on Flickr Last night I opened the box to take pictures and had the overwhelming urge to start something on it. I, for reasons completely unknown to me, started and completed masking the glazing by hand with tamiya tape..... half way through I regretted this, it was about the time the blade went straight through the tape, glazing and into my finger. Looking at it, it will be covered by paint once painted so hopefully I will get away with it 😕 Stix is having and influence on me, I have prepped parts before I need them and then sealed them away for safe keeping!! Does this mean my models will look like his now.... Anyway, there may not be much progress on this as the cockpit scares me and I want to move ahead with my hellcat (and tiny buffalo mate) so I can focus on this. Cheers for dropping by Rob
- 29 replies
-
- 10
-
-
 Hi Folks here are a few photos of my entry for the recent Hawker Hunter Group Build. This is the Revell 1/72 Hunter F Mk 6 kit back dated to an F Mk 1 using various aftermarket parts and decals. More details can be found in the WIP here: http://www.britmodeller.com/forums/index.php?/topic/235000770-a-hunter-from-fife-finished/ Not one of my best but it fills a hole in the display cabinet. Duncan B
- 21 replies
-
- 36
-
-
Hi, I have recently finished building my Revell 1/72 M60 tank and just wanted to start painting but i dont know how. Heres the problem: I wanted to paint it as a vehicle of Reforger 85` as it is depicted on the boxart (http://www.revell.de/fileadmin/import/images/bau/03140_%23BAU_M60_A3_2015.PDF first painting scheme; Boxart: http://www.britmodeller.com/forums/index.php?/topic/234987966-m60-a3-172-revell/) as I like the orange identification marks and i have a picture of it (https://upload.wikimedia.org/wikipedia/commons/6/6d/M60A3_Panzer.jpg ) though in the instruction it is supposed to be a four-tone camo scheme (while it isn´t MERDC summer verdant (http://www.cybermodeler.com/armor/m60/m60_profile01.shtml) as the colors nor the scheme are matching, the boxart shows mostlikely a standart NATO three-tone camo and the original pictures isn`t much help either so: How should I paint it? Thank you in advance Levin
-
C-54D Skymaster Revell 1:72 The Skymaster from Douglas was a four engine transport aircraft developed for the USAAF during WWII. Like its predecessor the C-47 its was also developed from an a civilian airliner; in this case the DC-4. The DC-4 started life back in 1935 from a requirement of United Air Lines for a larger and more sophisticated replacement for the DC-3. The DC-4 had a planned capacity of 42 passengers and would be the first large aircraft to feature a nosewheel. Other new features would be boosted flight controls, and air-conditioning. The prototype would fly in 1938 with airline certification following in 1939. The prototype aircraft was changed significantly to what would become the DC-4 with a lot of complex systems being removed to make the aircraft less complex. Before the DC-4 could really be put into production for the airlines all of the US production capacity would switch to war production. The DC-4 was taken on by the then USAAF and USN. The USAAF would designate the DC-4 the C-54, and the USN the R5D. The C-54 would go through a few design changes, the D model would feature an increased fuel capacity in the wings along with R-2000-11 Engines. A total of 380 would be built. The aircraft would carry out long range transport in WWII seating upto 50 troops. They would go onto feature heavily in the post war Berlin Airlift, and constitute a major contribution to the Korean Airlift. The aircraft began to be phased out of the new USAF in 1948 by the arrival of the C-124 Globemaster. The last C-54 in US service would be used until 1974 by the US Navy test pilots school. As well as the US many overseas military Air Forces would use the aircraft including the UK, France, Portugal, and Canada. The civilian DC-4 would also be built in large numbers following WWII and serve with a vast array of airlines around the world. Several are still flying today, most with the now famous Buffalo Airway in Canada. Though it should be noted that many more DC-3's still fly than the aircraft which was designed to replace it! The Kit The announcement of this kit by Revell was welcome news to both modellers of large military transports and airliner modellers. The kit is upto the standard we now expect from Revell. Like other large aircraft they have brought us such as the Transall the C-54D features a full interior which builds up and goes into the main fuselage. The kit arrives on 13 suitably large sprues of grey plastic and one clear sprue. The parts are well moulded with engraved panel lines. It is noted that provision has been made for the large rear bubble windows which featured on some aircraft for these to be installed. Construction starts in the conventional way with the cockpit section. The front wheel well is built up on the underside of the cockpit floor. This is followed above by the forward cockpit bulkhead which is backed up with the instrument panel. The coaming for this is fitted along with the centre console. Control yokes are added (rudder pedals are moulded into the floor) along with multi part seats for the pilots. The engineers/radio ops station behind the cockpit is then added to the main long floor along with equipment racks. Following behind this a crew rest area with two bunks if fitted. The bulkhead to the rear compartment is then added and a roof panel inserted. The seats for the load area are added along both sides. When this is done the interior sides are then added. The last stage to construct the interior is to add the cockpit section to the front of the main cabin section. The complex front landing gear can then be assembled. This contains seven parts to assemble and add to the front wheel well. All of the cabin glazing is now added to the outer fuselage halves. There are some different options for this so care is needed to select the right ones. The next major step is to add the completed interior into the main fuselage. Revel recommend adding 50 grams of weight to the front of the aircraft to avoid a tail sitter. The cargo door needs adding to the left half of the fuselage before closing them up. Underneath two spacers have to be added also at this time. Once these are done the main fuselage can be closed up around the interior. Construction now moves to the aircraft's wings. For the lower wing various parts are added into each engine nacelle along with an engine front and fire wall (for the two inboard engines). The rear of the firewall becomes the inside front of the main gear well. Rear bulkheads for the gears wells are also added. There is the option for raised or lower flaps in the kit and these need to be selected at this stage as some of the parts need to be fitted into the wing before it is closed up. It looks like some cutting of parts is required for the flaps up option. Once the flaps are out of the way the upper wings can be fitted. The tops of the nacelles and intakes are also added here. The wing is now joined to the fuselage. Outer parts of the engine cowlings are now added. It is also at this stage that more parts for the lowered flaps are added (skip this if going for flaps up). Following this the next major stage in construction is to make up and add the rudder, tailpanes and their control surfaces. These are all two half conventional parts. Attention is now drawn to the engines on the wings. The engines feature two banks of cylinders with exhausts and intakes on either side. All of these parts are separate and with careful assembly and painting should turn out to be good looking examples of the real thing. The completed engines are fitted into their cowlings and these then attached to the wings. The exhausts can then be added. The correct nose (a choice of two) is then added to the front of the fuselage. Again it is recommended 10 grams of weight be added in here. Construction then moves to the landing gear. The front wheel is constructed and added to the gear leg. The front gear doors are supplied as one part and will need to be cut if displaying the model with the gear down. The main gear legs and their retraction struts are added at this time. The inner hubs, scissors and brake lines are also added to the legs, along with main wheels. These are followed by the outer hubs. Retraction struts are added for the complex main gear doors. Again these will need to be split down if doing a gear down model. Following the earlier decision as to the flap state the relevant parts are now added at this stage. Separate ailerons are also added to the outer wings. The canopy is then fitted. The large clear part fits back to become part of the fuselage and the windows masked on it. The overhead instrument panel must be fitted before this part is installed.To finish of the rear cargo door is added. This is one part but can be cut if the modeller wishes it open (it would be a shame to waste that interior?). The propellers are added, along with landing lights, aerials, some antenna cable (not included) needs to be added to the top and undersides. Finally if you have miscalculated the weight a tail stand is provided, however like other aircraft of this period the Skymaster is often seen on the ground with this fitted. Decals The decal sheet provides two marking options for the USAF. The decal sheet is fairly small in the box and features the blue band around the windows for option 1, and the orange flash for option 2. All walkway markings for the wings are included. The decal sheet is fairly matt in finish, well printed and colour dense. There is minimal carrier film present around the decals, but it is present in the USAF markings and other titles. C-54 Skymaster 0-17218 - 1949. C-54 Skymaster 317227 - Berlin Airlift 1948-49. Conclusion This is an impressive kit from Revell and follows on from their other 1:72 scale transports by giving the modeller a full interior. Very Highly Recommended. Revell model kits are available from all good toy and model retailers. For further information visit
-
Hello all. Just like several others in this STGB I'll be building the Revell 1/72 Hunter FGA.9. The plan is to build two planes, one in the 1960s colours of the Royal Rhodesian Air Force (Green/Grey over HSS) and one in the early 1980s Zimbabwe AF colours. If things go really well, I might dig up my third copy of my kit from my secondary stash at my parents' home and build a 1970s bird as well (RhAF, Green/Earth over Earth). There have been a couple of sprue shots, but I don't think anyone has shown them unwrapped yet, so here you go. Those with an encyclopaedic knowledge of third-party decal offerings might recognise the Xtradecal International Hunters sheet,which will be providing the markings. The first painting has started
- 28 replies
-
- 2
-
-
- 1/72
- Hawker Hunter
- (and 3 more)
-
This 747 was built along with my other Revell British Airways 747-236. That kit came with two decal options (BA and Thai) and was released somewhere in 1990.The decals where still in good condition,but whoever designed that decal set,esp. for the Thai version was either an apprentice or had no clue what he was doing... It was quite tricky to get them to match and align with the 747s fuselage and have the correct spots for the doors and windows. The windows and other details come from a 747 detail set. The build itself was straight forward with no problems.Revell's 747-100/200 kit is very nice for its age and I enjoy every build of them. I did some humble corrections on the kit's engines,as they are a bit off shape. Some more 747's are waiting in my stash,but due to our house renovation I had to empty my hobbyroom...so no airliner production probably for the next 2 months... So here I present my last and recent builds that rolled off production line or had to be rushed over the finishing line before the shutdown... All modells and the whole stash I had to relocate (evacuate) to my moms place...luckily she just lives in the next house. But the place is now quite crowded... Here a pic of the current situation...not my whole fleet though and also some snap fit models that I bought some time ago On we go with the 747 walkaround... Cheers, ...and also no cats,as these pics were taken at my moms place...
- 18 replies
-
- 20
-
-
- Boeing 747
- Revell
- (and 1 more)
-
HMCS Snowberry, Flower Class Corvette Revell 1:144 The Flower Class Corvette is probably one of the best known Escort Ship of all time, purpose built for the task and based on merchant design to enable it to be constructed in merchant ship yards. Designed as an all weather depth charge platform they carried only rudimentary surface and AA weapons. Although intended to act as coastal escorts they were actually used in both the Atlantic Theatre and the Russian Convoys. Snowberry was ordered by the Royal Navy (RN) 22 January 1940 as part of the 1939-1940 Flower-class building program. She was laid down by George T. Davie & Sons Ltd. at Lauzon on 24 February 1940 and launched on 8 August 1940. She was commissioned into the RN on 26 November 1940. She sailed to the United Kingdom in February 1941 and was completed at Greenock in April 1941. On the 15 May 1941 Snowberry was one of ten corvettes loaned to Canada. She could be told apart from other Canadian Flowers by her lack of minesweeping gear and the siting of the after gun tub amidships. During her career she had three significant refits. The first took place at Charleston beginning in December 1941 and taking six weeks to complete. Her second overhaul took place again at Charleston from March 1943 until 14 May 1943. In late March 1944 she went to Baltimore, Maryland for a five-week refit After completing at Greenock and working up at Tobermory, Snowberry was assigned to Western Approaches Command. In June 1941, she sailed for Newfoundland after being loaned to the Royal Canadian Navy. Upon her arrival in Newfoundland in June 1941 she joined Newfoundland Command as a convoy escort between St. John's and Iceland. From July to October 1941 she was deployed as such. She departed for a short refit and upon her return in February 1942 she was briefly deployed as an ocean escort once again. In March 1942 Snowberry transferred to Western Local Escort Force (WLEF). In June 1942, after the U-boats had begun attacking oil tankers sailing along the North American coast, she joined the newly formed Tanker Escort Force. In September 1942 she was placed under American control escorting convoys between Guantanamo and New York. She returned to service after her second major refit in August 1943, when she was assigned to Royal Navy controlled escort group EG 5. On 23 August 1943 Snowberry as part of the 5th Support Group, was deployed to relieve the 40th Escort Group which was undertaking a U-boat hunt off Cape Ortegal. The warships of both groups were attacked by 14 Dornier Do 217s and 7 Junkers Ju 87s that were carrying a new weapon the Henschel Hs 293 anti-ship guided missile. Several sailors were injured and killed in HMS Bideford (40th EG) but Snowberry escaped damage. Two days later, the 5th SG was relieved by the 1st Support Group and the warships of both groups were again attacked by 18 Dornier Do 217s also carrying Hs 293 weapons. Athabaskan was heavily damaged and HMS Egret was sunk but Snowberry again escaped damage. On 20 November 1943 Snowberry, along with Nene and Calgary, depth charged and sank U-536 northeast of the Azores at 43° 50N, 19° 39W. When the group replaced its corvettes with frigates in March 1944, Snowberry departed for her final refit. After workups she was briefly assigned to WLEF again but transferred to Portsmouth Command in mid-September 1944. She remained with them until she was decommissioned by the Royal Canadian Navy. Snowberry was paid off from the RCN on 8 June 1945 when she was returned to the Royal Navy at Rosyth. In 1946 she was used as a target ship off Portsmouth. Her remains were sold for scrap and in August 1947 she was broken up at Middlesbrough. The Model Having re-released the big 1:72 scale kit of the Flower Class about three years ago, Revell have now produced an all new kit of HMCS Snowberry in 1:144, which matches quite a few submarine kits out there. Rather than just reduce the 1:72 kit, this is an all new moulding, and completely different layout. The kit comes in the standard flimsy end opening box, which I thought Revell might be getting away from, with a nice representation of the ship in a moderate sea. Inside there are nice sprues and two hull halves in a medium grey styrene, a small decal sheet and a reel of thread. All the parts are really nicely moulded, with the only sign of flash being on the sprues, not the parts, although there are numerous moulding pips which will mean more cleaning up than should be necessary. There are no other apparent moulding imperfections and the detail is pretty good, particularly the hull plates which whilst still pronounced, they are not as bad as the kits bigger sister. The plastic used appears quite glossy and is not as soft as some Revell kits, Whether the gloss is mould release agent I cannot tell, but it's good practice to clean all parts in warm soapy water just to be on the safe side.Revell also seem to have done some more research for this kit as the deck is much more accurate for the ship it is depicting. What is nice, is that they are using the full colour instructions, on better stock, rather than the recycled toilet paper of old. Construction begins with the transom and the fitting of the two depth charge doors, each of which can be posed open or closed. The two hull halves are joined together, with the propeller shaft and rudder post sandwiched between, and the transom glued to the stern. There is a large internal bulkhead glued near the midpoint of the hull giving some rigidity and a attachment point for the main deck and quarter deck. The two dck sections are fitted next, followed by the propeller, bilge keels and if required the stand is also assembled at this point. With the model upright in the stand, the deckhouse on the foreward portion of the quarter deck is built up. The two stern mounted depth charge racks are assembled, as are the smoke pot racks. The depth charges are assembled and fitted into the racks, with the smoke pots fitted the top of the rear section of each rack. More detail, in the shape of separate cleats, bollards, crane, vents and hatches are fitted to the quarter deck, whilst along each side of the deckhouse the depth charge throwers and spare depth charges are glued into position. Two twin Vickers machine gun mounts are built up, each from four parts, whilst the single 2pdr Pom Pom is made up from eight parts and four large ventilators, each of two halves are also assembled. Moving forward from the quarterdeck The deckhouse roof is fitted out with two winches, the two Vickers machine gun assemblies, and a locker. The skylights are fitted with their frames and clear window parts before being glued into position. The PomPom pedestal is also attached to the roof, along with the eight supports for the guns bandstand mounting and director tower, along with the four large ventilators. The deckhouse roof isw finished off with the fitting of the guard rails. The three piece funnel is assembled, as are the two, four piece carley floats. The floats are fitted to two three piece racks that are fitted to each side of the deckhouse, as are two depth charge handling cranes. The funnel base is the fitted where the deckhouse joins the foredeck and the funnel assembly glued to the base and fitted out with a vertical ladder, four more ventilators, ready use lockers and steam pipes. The chartroom in front of the funnel is then assembled and fitted with a skylight, chimney, and railings. The ships boats, each made up form seven parts are fitted to the moulded cradles and the four davits glued to the deck. The bridge structure is assembled, and includes internal rooms which are a scratch builders delight with so much potential. The supports for the upper bridge are glued into position along with two lockers and a deck hatch. The bridge deck is then glued into position and fitted out with support braces on each side and three support beams to the front. The compass binnacle, bearing sight, voice pipes and surrounding bulkheads are attached to the deck, along with the large bridge front, bridge screen. The modeller has a choice of with a large or small aldis lamp fitted in each bridge wing. The two 20mm Oerlikons are assembled, each from five parts are fitted to their mounts on the bridge. The Hedgehog mounting is also assembled, from four parts and fitted to the starboard side, just in front of the bridge. Numerous other parts are added to the bridge, such as life rings, lockers, splinter shields, with separate splinter mattresses, and navigation lights. The radar lantern is built up form eleven parts and fitted to the radar room roof. Three large lockers are fitted to the foredeck, just in front of the bridge, on the port side, in front of which there is a large shield with supports angled from the bridge front above which the DF aerial is fitted. The four inch turret is made up from six parts and again is crying out for the super detailer. The gun sits on a large circular mount, which in turn sits on a pedestal, mounted to the deck. The mount is fitted with stanchions, which are then joined together to make railings using the thread provided. The fo’c’sle is then kitted out with two small winches and one large four piece anchor winch, along with the two chains, plus the usual bollards, cleats, shields, railings etc. The pole mast is fitted just behind the bridge and is made up with separate yardarm, vertical ladder and crows nest. The Jack staff is then glued into position and the rigging, again from the thread provided, although it’s a bit furry, thus finishing the build. Decals There is a single sheet of decals which are nicely printed, in good register in a matt finish. There are markings for just HMCS Snowberry, its pennant numbers for bow sides and stern, depth markings, ships nameplates, and a Donald Duck cartoon for the turret. The carrier film on the larger decals, such as the ships numbers is a lot less prominent than normally found, and should bed down nicely on a gloss coat, before being finished with a matt varnish. Conclusion Its great to see Revell release all new kits, and this one is a little corker. Great for all maritime modellers, even those who don’t have too much room, as at around 439mm it’s not too large to be displayed. For the particular colours used on the ship, you might want to try the new Akan paints reviewed HERE. Highly recommended. Revell model kits are available from all good toy and model retailers. For further information visit
- 11 replies
-
- 11
-
-
- Snowberry
- Flower Class
- (and 1 more)
-
I built this on and off for about a year, with extensive pauses because of unforeseen circumstances and health issues. Eventually got it done though, and then found out about a local modeling exhibition and entered it. You can see the build thread here, although most of the decaling process is not very well covered. I managed to put the left side windows onto the right and vice versa, which led to some pretty extreme moving around and cutting out of windows to save the build. A few of decals, especially parts of the thin red cheatline, refused to stay put, which warranted the use of diluted PVA glue to keep them in place. Metallic leading edge decals on the tail and horizontal stabilizers went on fine, but the first one I tried to apply to the wing (there are two massive one and two small ones per wing, I tried one of the big ones) crumpled up and partially disintegrated almost immediately. I ended up masking off and drybrushing all of the leading edges on the wings and winglets. The winglets, by the way, were left uncorrected, as I didn't want to overcomplicate my first (proper) build. Here are the photos: The modeling exhibition I mentioned earlier - Mini MAKS 2016 (MAKS being the bi-annual airshow which happens just outside Moscow) - ended two days ago, and it turns out that my 737 got 3rd place in the under-18s category. I was quite happy about that, especially considering that the prize was two new airliner models. Having never applied so many decals on such a large plane (my actual first model was a Zvezda 1:200 Ju-52 with, like, five decals), I had no idea how to make them set properly. This led to quite a lot of decal silvering. I have no idea how to prevent this in the future, so...any advice?
- 14 replies
-
- 14
-
-
- air berlin
- boeing
- (and 5 more)
-
German Type IXc/40 U-Boat 1:72 Etch sets Having updated the Revell 1:72 Type IX U-Boat, Eduard have now turned their sights onto the Type IXc/40 with the release of three sets of etched brass, to update the conning tower and the hull. The hull sets in particular will require quite a bit of surgery to be carried out on the kit to allow the etched parts to fit, but with plenty of care and patience they will make quite a difference to the finished model. 53158 – Hull Set 1: Comes in a zip lock bag with one sheet of etched brass. This set contains a selection of replacement free flooding and venting areas. Rather than just scabbing the panels onto the kit, it’s be better to remove the areas, using the etched panels as a guide, thinning down the edges then fitting the panels from the outside. The set also includes a selection of deck vents, which once again will need the areas of the kit to be removed, plus some cleats, and tie downs to improve the decks look. 53159 – Hull Set 2: Also comes in a zip lock bag with one sheet of etched brass. The sheet contains a series of inner skin panels onto which the hull flood vents are attached; each vent has to be folded to shape before fitting. The kit holes need to be carefully cut out and the vents panels fitted from the inside of the hull parts. On the outside the etched grilles are attached giving a much better representations of the real thing. The set also include replacement parts for the bow torpedo tubes and the decks between them. The longitudinal bulkhead between the tube doors is also completely replaced and detailed with etched uprights. The inner and outer doors are also replaced and there is an option for open or closed doors. The kits air outlet vents also need to be opened up and covered with etched grilles and plates. The stern tube is similarly detailed, with a new door and many additional details. I can’t quite make out where parts 15 and 16, due to the scrappiness of the instructions, and not having the kit to hand, but they look like they go under the foredeck, near to where the deck has been cut away. 53160 Conning Tower: Although the easiest to use, this single sheet set definitely has the most parts, Once again contained in a large zip lock bag, the set is used to add detail, not only to the tower, but also the AA weapons. The twin 20mm guns receive new fittings for the mounts as well as the guns themselves, with new sights, supports, traversing wheels, brackets and spent casing bags. The 37mm mount receives a new splinter shield, and allthe fittings that are attached to it, plus the shield supports. There are also new foot rests, elevation and traversing wheels fro both seating positions, new cocking levers, gun muzzles, sights, brackets and panels. The decks of the tower are provided with new drain hole panels, the anti-slip bars around each gun position are replace, the kit parts having been removed first. The shelving/seating around the inside of the tower are replaced, as is the door covering the radar array, whilst the emergency lifebuoy containers are fitted with new handles and large wing nut clamps. The radar array is also replaced with an etch assembly. The set also includes the canvas dodgers, that are fitted to the lower parts of the guardrails, plus clamps and other fittings for the snorkel support arm and the associated pipework. Conclusion Whilst the Type IXc is an excellent kit there are some things that really can’t be moulded using standard techniques and it this is where the etched brass comes in. The finesse it provides to a finished model can really make it shine. These sets can, when used correctly do just that for the Type IXc, just be careful with the cutting out of the kit parts. Highly recommended. Review sample courtesy of
-
After a disaster with Humbrol matt varnish yesterday, I have just about managed to salvage this build now. It left a white residue on the surface, meaning I had to weather the helicopter more than I wanted to to blend it all in a bit and make it look even slightly acceptable Revell NH90 TTH in 1/72 Painted with Revell aqua colours, weathered more than planned with Eazi weathering powders. Thanks for looking, Jason
- 7 replies
-
- 14
-
-
- Revell 1/72 nh90 tth
- Revell
- (and 3 more)
-
This is my first WIP post here on Britmodeller, and the second model I am building. I have decided that I will be building D-ABBG, an Airberlin 737-86J, serial number 32918. It is currently in storage and has been re-registered as SU-TMG, ready to be delivered to a new Egyptian airline, FlyEgypt, also known as T1 Airlines. Anyway, here are what I have found (while lurking on Britmodeller without an account) to be the normal 'introduction images' (sorry for the size): The box is new and shiny as I bought this kit in Vienna just a few weeks ago and it has not had time to become bent and ruined. Three sprues, two with the fuselage and other parts and one with aerodynamic bits, plus a clear sprue with the canopy and landing lights. Everything is moulded very very well, lots of beautiful detail and there is no warping (expectable since the kit is so new).
-
UH-72 Lakota - Personnel + material transport version. 1:32 Revell The EC145 is a twin engine helicopter in the "light utility" category. It was originally called the BK117 C2, and was based on the MBB/Kawasaki BK117 C1, which in turn became part of the Europcopter line following a merger of MBB and Matra. The helicopter can carry upto 9 passengers and two crew. Airbus market the helicopter as a passenger/corporate transport, but it more readily seen in its Emergency Medical configuration. It is also used in the SAR role. One of the largest single users is the US military where it is designated the UH-72 Lakota. In 2006 the UH-72 was announced the winner of the US Army's Light Utility Helicopter programme. This was to replace UH-1 and OH-58 airframes in the US Army and National Guard inventories. The basic UH-72 airframe is nothing more than a commercial EC145 fitted with military radios. As well as the utility role the cabin can be configured for Medevac, VIP transport, and support roles. The UH-72 is faster than the helicopters it has replaced with a new digital cockpit, a hoist allows rescue work. To date the only other customer for the UH-72 has been Thailand although Airbus are actively pursuing the USAF into replacing its remaining UH-1 helicopters with UH-72s. The Kit The Revell kit of the EC145 is a relatively new tool, in that it dates back to 2005. The kit arrives on two sprues of white plastic, five of light grey platic, two sprues of clear plastic, and two sprues of dark grey plastic containing the new parts for the UH-72 (mainly the seating). All the parts are well formed and there is no evidence of flash. It looks from the contents that all the parts for the civil airframes are still in the box, just blacked out on the instructions. Construction start with the main floor. Some moulded on parts which are not used for the UH-72 must first be removed. Then on to the cockpit area the rudder pedals, cyclic and collective sticks, along with other parts and panels are added. The centre line console is made up and added along with the instrument panel. All instruments on both are provided as decals. It is then on to the seats. As this is the utility / transport model there are the two pilots seats and eight seats for the rear. These all appear to be crashworthy seats. There are two sets of three seats each for the rear which attach to frames that need to be assembled. The other two rear seats and the pilot seats are stand alone. All seats are multi part with moulded on seat belts. Once all of the seats are in place a couple of side consoles are added to the cockpit and some personal equipment is provided if the modeller wished to add this to the rear cargo area. Next up the inner sides to the rear area are added along with the cabin roof. This forms a complete interior module which is to be inserted into the outer fuselage frame. However before this is done the glazing must be added to the outer frame as all of it seats from the inside. The interior of the outer frame must also be painted at this stage. Once all of this is complete the outer halves can be joined around the interior module. The skid braces can then be attached to the outer floor and this added to the completed fuselage. Next up the rotor head is made up. On the instruction there seem to be two different ways of completing the main rotor head assembly but no mention is made of why? It is suspected one is to aid motorisation of the rotors. The rotor head assembly is then sandwiched between the two halves of the engine dog house on top, and exhaust parts are added. The tail boom is then made up and it and the dog house are added to the main fuselage. The main cabin doors are then assembled and these are added as well. The large front glazing parts are now added as are the winglets on the tail boom. At the rear of the helicopter the cargo doors are completed and these are then added. The exhaust parts are also added at this stage. Construction then moves onto the skids. Here two versions are offered depending on which of the decal options you are making, but they seem the same?? The skids and a step? are added along with mounts and braces. Cable cutters are attached to the front of the skids. Last up the tail rotor is fitted along with a whole host of aerials, pitot tubes, antennas, grab handles etc. The final construction step is to add the main rotor blades to the rotor head and attach the top cover. Clear Parts There is extensive glazing on the helicopter and Revell have not let us down. The clear parts are very well moulded with no visible defects. They are crisp and clear. Decals The decals are printed in Italy for Revell and look good. Two decal options are provided. US Army Joint multinational Readiness Centre, Germany 2015 (Camo option) US Army Falcon Observer Controller Team, Germany 2015 (OD Option) Review sample courtesy of
-
Finnished the Ferrari California yesterday. Feels good to finaly finnish a model again! With the closed top version: The colour is Ferrari Grigio Ingrid. Everything but the wheels is painted with Zero Paints. The wheels are Zero Paints black with a gloss clearcoat and a coat of Alclad Chrome. Thanks for watching! Mike
-
Finally decided to do my first WIP. I've gone for the Revell 1/72 Nato Helicopter NH90 TTH for the next build. This will be done in the scheme of 79+02,Heeresfliegerwaffenschule, Bückeburg, Germany in 2007. Will be using Kuivalainen etch and Eduard mask with this one. First up, is getting rid of this fairly nice detail to make way for the etch- 16 seats and two cockpit panels worth of sanding later- And after a little touch of paint- Thanks for looking, Jason
- 31 replies
-
- 5
-
-
- nato helicopter
- nh90
- (and 3 more)
-
My first large scale build since returning to the hobby after a 30 year lay off. I built this last year, haven't got any build pictures as I was just concentrating on getting the model built first, as I get more into model building I will start posting work in progress topics in the near future.
- 15 replies
-
- 25
-
-
It may be a simplified kit, but a little bit of work yields a nice result: A grand total of five parts in that interior! Colour is Zero Paints. I started out with "Protonic Blue", (a BMW i8 colour), but decided it was too pale, so I overcoated it lightly with Blu Dino. It looks nicely zingy to me now. There's a reasonable amount of detail to paint, even through construction is very simplified. I put carved a centreline channel in the engine covers, and striped the chrome from the headlights before repainting with the complexity of the real thing. And I had to add a bottom to the steering wheel -- I don't know where mine went, short shot, broken or just not there...? The 2005 GT (actually a 720 Mirage...) is a Polar Lights snap kit, titivated, and the 'vette is the recent Revell Germany release of another snap kit. Just goes to show that there's nothing inherently wrong with them, and that a bit of detailing work with pain can really lift them. bestest, M.
-
 This is my tutorial on how to get a good weathered finish on the nose cap of a model plane. There will be no pictures sadly because I don't know how to get them from my phone to the forum. This is intended for beginners and people who need or want to finish a model faster. 1. Start with a black base coat. Just paint the nose cap black, and make sure the whole cap is painted the color. 2. Get any color you want or the one assigned in the painting instructions and paint the color from the top of the nose to the bottom. One or two coats is the best for this, because you still want to keep the weathered finish on it. And Voila! You have an easily weathered nose cap! This is probably my only tutorial, as I discovered this accidently and wanted to show it with other modelers. Don't say hate comments to me saying this was unneeded, as I am only 13 and I'm not as good a modeler as adults. And don't say any hate comments to other people, because that's just plain rude.
 -
Hi folks - finally joining my first group build I'm a big fan of all things Luftwaffe so thought this would be as good a chance as any to make a start in a group build. I've had this kit in my stash for a while now and have been looking for the perfect opportunity to start so here I go. Customary shot of the box art: As much as I love the scheme on the box art, I've decided to go for something a bit different and have gone for the following scheme: I thought this scheme would make a nice change as I've only ever completed Luftwaffe aircraft in the usual RLM 70/71 splinter camo so this will keep things interesting. The kit is excellent - well detailed for the scale and I've decided to build OOB. I've made a start on the items for the cockpit which even at this early stage nicely replicate the typically cramped and busy office of a Ju88. I'll make some tape seat belts to add to the realism but other than that I'll be using only the kit parts. Got a few more stages to go and then I'll be able to get the cockpit painted up and detailed.
-
I have really got the bug for these tiny WW1 fighters. I cant wait to finish the last before I start the next. Here is my effort on the Fokker E.III as flown by Vizefeldwebel Ernst Udet, Kampfeinsitzerkommando Habsheim, Western Front, Winter 1915/16. Once again, straight from the box. Hope you enjoy the pictures.