Search the Community
Showing results for tags 'revell'.
-
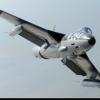
 Still digging in my collection now I bring you one of our service stars: the A340. They arrived in 2000 and were retired this year from service. 15 years flying to Madrid-Frankfurt, Auckland-Sydney, Los Angeles, a few times to Easter Island-Tahiti and even once to the Falkland Islands. I was lucky enough to fly it for 3 years and I am deeply proud of it. I did try to make her justice as much as I could. Real aircraft paint matched to Automotive paints, Gio decals, tail hand masked and painted. Thanks for looking. Part of the family in scale:
- 20 replies
-
- 26
-

-
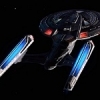
TIE Fighter & Vader's TIE Fighter 1:110 & 1:121 Revell The TIE Fighter is the standard Imperial single-seater attack ship, and attrition rates during the three films it starred in must have been horrific! Named after the bow-tie it resembled, a cranked "special" was also designed as the personal mount of arch baddie, Lord Vader. They have menacing designs in darker colours than Rebel ships, which emphasises their alignment with the Dark Side of the Force, as does the eerie scream of their engines, which as per most Sci-Fi films, can still be heard in the vacuum of space. The Kits These are both in the Level 3 range, and as such are more of a traditional kit than any of the Level 1 and 2 snap-together offerings as they require glue and paint, and are quite small thanks to the scale, which doesn't seem at all consistent throughout the five kits released so far for no apparent reason. That gripe aside, They arrive in a small red themed box with Kylo Ren (the new baddie) menacing us with a light sabre at the top, with a new style of colour printed instructions on slightly better paper stock. Darth vader's TIE Fighter Arriving on three sprues of Imperial blue/grey styrene with a clear sprue for the windscreen, you get a diminutive but fairly well sculpted Dark Lord sat in the same seat as the standard TIE Fighter, with the same angled tray and side walls, but a different control panel, which we see Vader fiddling with during the flight down the trench in Ep.IV. The top hatch is glued in place on the upper hull with a clear insert, and in the lower half the leading-edge inserts, windscreen and cockpit tub are installed before closing up the hull. A windscreen frame decal is included, and then it's time to make up the wings, which are moulded as one piece with a separate detail insert that hides some ejector-pin marks on the vertical inner side. A scrap diagram shows the correct orientation of the detail, as you wouldn't want them installed upside down! As with the other kits, the decal and painting call-outs are made during construction in Revell colour codes, and don't forget to have some masking tape on hand for those "solar panels" on the wings. TIE Fighter The standard TIE is presented in 1:110, which makes for a bigger kit than Vader's TIE, which is a shame for those wishing to create a small scale Death Star trench diorama. It is supplied on four sprues of Imperial grey/blue styrene with a clear sprue for the canopy and a decal for the framing in dark grey. The detail is better on this larger kit, and the pilot benefits as a result. His cockpit builds up the same way as Vader's, and the upper hull houses the hinging hatch with clear insert, while the lower hull accepts the cockpit tub and windscreen part. Closing the hull up should be fairly easy, as only the seams around the spherical crew compartment are properly visible, and they're quite short. The wings are each one large part with a central boss added to the outside to complete the detail. They side over the fuselage pegs and then it's just a case of assembling the two-part stand to keep her off the desk, with a small hole in the bottom of the crew compartment keeping it in place. Conclusion Again we have the scale discrepancy reducing the overall appeal to the avid modeller, but individually they are quite nice kits if you do your research and make sure you know what you are getting. All these Level 3 kits are ideally suited to the casual or younger modeller, and with a little care can build into nice models. Revell model kits are available from all good toy and model retailers. For further information visit
-
1/32 Revell Hawker Hunter FGA.9 / Mk.58
thehennessyguy posted a topic in Work in Progress - Aircraft
Brandon Hennessy 04/09/2016. Hey guys. Started a 1/32 hunter the other month and having a steady pace with it so thought i would throw it up and see how it goes ! enjoy i've sprayed the camo and the wing tips along with the black nose cone. the canopy also received a good dipping with some AK Gauzy which I'm loving at the moment Thanks for looking Brandon -
 Hello, here's my 1/72 Revell Messerschmitt Me-262 B1, dressed as a 'Nachtjäger' of 10./NJG 11, also known as 'Kommando Welter' (http://www.kommando-welter.de/). Photo etch from Eduard, vacu from the spares box, decals kit's own. Painted with acrylics from Mr.Hobby, mottling applied free-hand using Harder & Steenbeck Evolution 0,15mm nozzle. Revell's kit depicts an early production Me-262. For a nightfighter, follwing changes/additions were made: - broad trim tab - additional flare ports on fuselage For an entirely correct model, you'd also need to: - add two small blisters on the nose - add fuel pipe at the back of the cockpit (Yup, I forgot to correct these flaws as they came to mind too late in the build.) Hope you like the finished model! Photographs by Wolfgang Rabel, IGM Cars & Bikes. Cheers from Vienna!
- 19 replies
-
- 34
-
-
- kurt welter
- kommando welter
- (and 1 more)
-
 This may or may not be how the beaches of So Cal could have looked if the combined forces of the U.S and Great Britain had not prevailed in WWII. Nice model to build with the addition of a scratch built roof rack, machine gun barrel exhaust pipes and after market nose art decals (slightly doctored). Finally got hold of some 1/24 scale sun loungers! Thanks for looking, regards Siffo.
 -
Hi all. Newest project has come to an end. Revell CL-604 Challenger. Great kit, added a few antennas, and an acrylic stand. Chuffed with the result. Painted with Humbrol, Alclad, and Mercedes rattle can clear coat. Robin
- 7 replies
-
- 16
-
-
- Challenger
- Revell
- (and 1 more)
-
HI all, Just thought I would share this one that's been on my workbench for the past few weeks but I never got around to posting here...an OOB build of Revell's F-16 Tigermeet '09 Box Contents.. The big decal sheet that doesn't quite fit inside the box!! (note the bend in it) Started with the cockpit and apart from seatbelts, all OOB. Drybrushed the panels instead of using the kit decals.. This kit really falls together nicely, just the odd area to watch out for the fit.. Simple one colour paint scheme of Gunship Grey applied with a brush (first coat) And the underside masked up for the light grey bit.. Started the decal work on the drop tanks, to see how they worked. Really nicely printed by Daco and settled down lovely with some MicroSol.. And then on to the airframe! Did I say the decals were lovely? Well, they are but they're oversized for the kit and needed endless trimming and re-fitting to get them to work. And MicroSol for the curves.. Underneath pic... And with the doors removed... And how she looked the other night....the tail decal was a bit of a bear to fit More updates tonight hopefully! Thanks for looking. Dermot
-
 Revell 1/32 Arado AR196A-3 Seaplane "FINAL REVEAL!!": Hello Guys, Following on from my "Build Update #6" posting, I assembled the canopy onto the fuselage, attached an EZ-Line antenna, glued all the light lenses into their locations, glued the pitot tube and counter-balance weights onto the underside of the wings, along with door handles on the canopy frame sections, and, fitted the engine cowlings and engine bay doors in their open positions to complete her!! So, here are the "Final Reveal" images of my completed Arado AR196A-3...I hope you enjoy the views as much as I enjoyed building her! And, forgive me for the number of photos that I have posted, I couldn't make my mind up which ones to select and it was taking me too long to choose, so in the end, I just uploaded all of the photos. Well, there she is. I hope you enjoyed the views as much as I enjoyed building this fabulous kit, which I must say, is fabulous value for money! Now, I have to start designing and planning part two of this build, which will be the diorama to set this plane into. I have 4 ideas presently "floating" around my head (no pun intended), but first, I need to sketch them all out and calculate my material requirements and costs before deciding which design idea I go with. I'm a little anxious as I've never built a diorama before and have no clue where to start, so, I guess watching some fellow modelers "How To" vids are my next step! If you didn't see my "Build Thread" for this model, here is the link to it: http://www.britmodeller.com/forums/index.php?/topic/234980467-revell-132-arado-ar196a-3-seaplane-my-first-post/ In the mean-time, if you'd like to watch my "Final Reveal" YouTube video for this plane build, here is the link to it: https://youtu.be/ZRKU-k-M-BE And, on my YouTube channel you can find my "In-Box-Review" and "Build Update" Videos, for this build, too: "In-Box-Review" video link: https://youtu.be/MxfUpfYJDyU "Build Update #1" video link: https://youtu.be/nJ4rEbxFcv8 "Build Update #2" video link: https://youtu.be/Z_NoWew9Qus "Build Update #3" video link: https://youtu.be/AUQsz__kKyE "Build Update #4" video link: https://youtu.be/FpnxQFUASbU "Build Update #5" video link: https://youtu.be/iyCPzT-H_wU Thanks again to everyone that has followed this build thread, and, for the kind and encouraging comments that you have left me, they are all greatly appreciated and keep me motivated to continue! Happy modeling guys! Have Fun! Cheers!! Martin
- 52 replies
-
- 39
-
-
 Bought this kit from eBay over a year ago for $25NZD but since it's my holidays, I can finally build it!
- 12 replies
-
- 3
-
-
- revell
- super hornet
- (and 2 more)
-
A wee while ago, a guy came up to buy a painting from me, and he then began to ask about the numerous(!) Spitfire models I had out on display. Within ten minutes, he'd convinced me to build a model for his brother, who is a massive Spitfire fan. I met with the guy's brother, and his spec was simple: build a Battle of Britain-type Spitfire. During the course of the discussion, he'd mentioned reading Geoffrey Wellum's book, First Light, and had watched the TV-film made from it. That helped make my mind up for the colour scheme, as I knew the RAF's Battle of Britain Memorial Flight Spitfire IIa had worn Wellum's markings once. Anyway, this was the end result - Revell's big Spitfire IIa. A fun build, although I hated the fact that the seat was in so many parts (I mean, seriously?!). The kit's inaccuracies weren't a bother on this one, as P7350 has the metal ailerons and circular oil cooler anyway. I enjoyed it so much that I've actually bought one for myself - and might do another one after that!
-
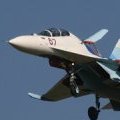 Hi all, My first try on a work in progress. My wife complains that I don't finish any Kits while the stash is getting bigger and bigger... Can't say that's not true, so another approach to keep my motivation alive and to have a backup in moments of doubt or in search for reference 😉 So the plan is to build both together and I just begon to build te flanker. Also a small amount of building the fulcrum has taken place. I can't help but I am a bit sad about the decal cockpits Zvezda put in their otherwise superb Kits. Maybe it's the AMS speaking but what's the general thought here? Anyhow, The start has been made, so while waiting for a couple of new computers, I hope to get some pics up soon. Wish me luck!! Oh, subjects are 'red 54' RF-93731, revell's boxing) on the flanker and 'red 21' RF-29160 for the MiG. Greetings!
 -
I saw this on the Revell stand at Telford and couldn't resist it....... A so called friend has already called it a soap dish Need to finish the PBR but I had to put together the hull. Great fit I hope its an indicator of the rest of the kit. Gotta love that ugly duckling shape.......... Kev Kit review here http://www.britmodeller.com/forums/index.php?/topic/234967912-harbour-tug-boat-fairplay-1144-revell/?hl=%2Brevell+%2Bfairplay
-
Hey folks, as mentioned, my follow-up to the F-8 Crusader from a couple of weeks back is another USN subject. One of the quickest (a month-and-a-day), easiest and most relaxing builds I've ever done. The old Monogram F9F-2 Panther updated in 2009 by RoG to an F9F-5P. Only addition to the build was a Pavla resin seat everything else including the 'stickers' are straight from the box. Kit - Revell (nee Monogram). Paint - Tamiya acrylics, Xtracolour enamels. Decals - Kit. Extras - Pavla resin seat. Grumman F9F-5KD Panther VU-1, NAS Barbers Point Hawaii 1959. Paint is mostly Tamiya acrylics with the exception of the fuselage which is Xtracolours' enamel 'Engine Grey'. Nothing else to add, another 'loved every minute' build. Please feel free to make any criticism, comments or ask any questions. AFN Ian.
- 19 replies
-
- 28
-
-
 Last year (2015) was important for all us WWII RAF fans being the 75th Anniversary of the Battle of Britain (BoB). For me a highlight was the visit by our own Procopius and I took great pleasure in driving him around a bit, culminating in a visit, with Jon (06/24), to the BoB display at Duxford. What a trip... Jon encouraged me to buy the Hannants decals for the Typhoon, further encouraged by sending me a kit - thanks Jon. I would say I intend to do it justice but after my Beaufort build I need a bit of a rest... For the RAF it was a chance to show off their new aircraft by painting it in the scheme of the Hurricane flown by Flight Lieutenant James Brindley Nicolson VC DFC, the only Fighter Command pilot to be awarded a Victoria Cross medal during the battle. It's good to see they use the same techniques as us: The kit is well known (I think): and is the 2007 rebox (it's been in my stash since last year). This is what I'm hoping to achieve: Nice. Time for some sprue shots.
- 231 replies
-
- 15
-
-
- Eurofighter
- Typhoon
- (and 2 more)
-
Dear all, Since this little gem from Revell ended up on shelf of doom (still have to add fuel tanks and some minor touch ups are needed including weathering), it is technically still work in progress HUD and ejector seat belts were scratchbuilt. Apart from that, everything else is OOB Up front, it is a mean machine Underneath the wings, fuel tanks are still missing. Best Regards, T
-
Hi all, I'm starting my first work in progress to present you the build of the 1/144 747-400 from Revell. As many of you already know, there are a lot of issues in this kit. I'll be correcting some but not all. Moreover every part had to be cleared from the plastic as it was pretty badly moulded … I'll try to be pretty accurate with the small details … I've already gathered many pictures of the actual plane. The decals are from F-dcal, and I'll probably be going for the F-GITH "license plate". I began by separating the nose from the rest of the fuselage in order to be able to work on it properly. One of the main issues is the nose profile, which is really ugly in revell's kit. I found on the internet ways to modify it. This helped a lot : http://floatingmid.com/nosemod.jpg I also heard the nose was too thin, but I let it as it was. I sanded down what was probably supposed to be the pitots. I will have them in the PE set I ordered … The scribing does not look good here but I arranged that. No filled windows for this one. I'll use clearfix. The joints are filled … I cleared a lot of plastic around the tail … I'll have to add some details here though. When I glued the nose and the rest of the fuselage back together, I had a bad surprise : the nose was thicker than the rest of the fuselage … With a lot of filling and sanding I now have a much better result. Winged added. Not shown here : I tried to reduce the thickness at the back edges. Looks pretty good now. I cut a hole for the nav lights. One of the other main issues is the wing angle. It is to flat and should be more inclined. I chose not to modify that because I felt I wouldn't have the skills to do it … and because I was a little bit impatient too … Here's a pic I took of the tail of a 747-100 in Le Bourget museum of aviation and space. I think I have more work to do with the fuselage joints … I glued plastic card in the inside to strengthen them. A lot of filler had to be added on the joint between the wing and the fuselage to make it "smoother". When I'll receive the Photo Etched set of details I'll start the landing gears and the engines. Jean
- 17 replies
-
- 2
-
-
- Air France
- Revell
- (and 3 more)
-
 Hi all and here's the latest from me - finished for the KUTA group build here. I always wanted to model an F-14 getting ready to launch with dropped flaps etc so decided to take a knife to the original Revell kit a couple of years back...and then lost all interest. She has been in stuffed away in a box on the shelf of doom for ages and I finally got the finger out and finished it for the GB. Not my finest build and some inaccuracies here and there but I had a lot of fun and am really happy to have it finished at last. The full build log is here but in summary... Kit: 04195 Revell 1/72 F-14D Tomcat Paints: All brush painted - Revell Aqua Colour acrylics, Future, Flory Models wash, W&N Matt Varnish Decals: From Hobby Boss F-14D kit for BuNo163894 VF-2 Bounty Hunters, CAG jet USS Constellation Extras: Hasegawa - pilots, wing sweep bladders, BOL rails, Lantirn pod and weapons Hobby Boss - catapult nose gear Wing slats/flaps - kits' own and scratchbuilt The real a/c was delivered to the US Navy in 1990 and served with a couple of squadrons before transferring to VF-2 squadron aboard USS Constellation in the late 90s. In 2001, the plane became the CAG jet with the callsign 'Bullet 100' and dropped over 55 bombs during operations in Iraq in 2003. The big stripe markings apparently are called 'Langley Stripes', in honour of when this squadron served in the 1920s aboard the USS Langley, the first American aircraft carrier. Thanks for looking and comments welcomed! Dermot
- 16 replies
-
- 17
-
-
I love birthdays! No sprue shots, sorry, but there are heaps around on the internet. Straight into it! Instrument panel: And sink marks filled: Here the instrument panel is dry fitted onto the console, on the floor of the heli. Assembled the Sea Skua missiles And Mk 11 depth charges. At least that's what the instructions say, but the blurb on the side of the box says something about Sting Ray torpedoes, so I'm not sure what they are!? (I'm no expert on such things!) The decals look fun: I want to do the black cats version though, so I probably have to invest in some decal-settling solutions. Then I noticed this: A crack on the otherwise crystal-clear parts... Spares part has been requested! Thanks for looking!
-
Completed the 458! Really happy about this one and love the colour! Thanks for watching! Mike
-
 Last Christmas I received both the X-Wing and the First Order Tie Fighter kits. I'm kind of on a Star Wars building kick at the moment and decided to pull this one out of the stash and get started on it. It is Interesting to note that while this kit can be displayed in flight, there is no pilot figure. With this said, I went to the spares box and found a helicopter pilot that would fit the bill nicely for a Resistance Pilot. These kits are prepainted, albeit not very well. I decided to leave the cockpit as-is and do a little dry brushing to enhance some details. I glued the pilot in the cockpit and pressed the cockpit into place. I began work on the S-Foils and the fit on the some of the parts were less than stellar. I know it's a snap tite kit, but I guess I set my expectations too high for a model kit tooled in the 21st century. There were some pretty big gaps to fill in the panels. Once the filling and sanded were done and the factory paint job left a lot to be desired, I stripped the paint and primed the entire kit with Tamiya Gray Surfacing Primer.
 -
 I present to you my second completed model, a 1/48 F/A-18F VFA-154. A few dodgy seam lines as I kind of rushed the assembly to get to the painting stage as I was doing this as a test run for a few hornet projects I want to do. Mr hobby paints were used with a MIG panel line wash and pigments for weathering. Hope you like it.
- 16 replies
-
- 23
-
-
Revell's 1/32nd scale Spitfire finished as P8177 of 1690 Bomber Defence Training Flight, Metheringham, Lincs. The pilot unfortunately has undercart problems so is going round again to try to shake the port leg loose! Max
-
 Hi all, This is the first time I've posted any pictures of my kits online so apologies if I get anything wrong with photos etc. I bought this one about a year ago and I've kept working on it on and off over the whole year. I was originally planning on getting an American truck of some kind but searching the Internet I came across images of completed versions of the LF 20/16 and other Revell versions and just liked the amount of detailing. Anyway It was a great build and I am quite pleased with the results - so much so that it's the first kit I've bought a proper display case for. It's mostly 'out of the box' - I don't dare risk weathering my kits in case I mess them up! Sorry for the quality of the photos - I only had my work's iPad to hand. Kind regards, Stix [/url] [/url]
- 21 replies
-
- 8
-
-
- Schlingmann LF 20/16
- Fire Truck
- (and 1 more)
-
 Yet another ebay impulse buy occurred last Saturday following a few pints and it arrived today. The new tool Revell Hawk. This rather neat little kit comes trying to be a modern hawk with 2015 Reds decals however it has the old style curved rear upper fuselage. Now this gave me an idea, make it into a very early hawk. As early as it comes, the prototype XX154 as it was when it first flew in 1974, looking something like this:- http://www.airport-data.com/aircraft/photo/001133060L.html The Revell offering will need a bit of modification, but not a lot. So things I know I need to change are as follows Wing fences moved inboard and reshaped, - Plasticard Absence of vortex generators. - wet & dry Wide ejection seat head boxes - Scratch built or modified old matchbox seat Fritag style So far I cant see any other changes needed. This sounds far to simple to be true so.... Anyone know what else is needed?? Thanks for looking CT
 -
Hello all A few pics of one of my latest completions - Revell's Arado AR 196 in 1/32. All built out of the box with just a Montex Mini Mask for the canopy, and what a lovely kit to build. Loads of lovely detail inside and out, so I've posed it with everything open and with one wing folded. Eventually painted with a mix of Tamiya and Mr Hobby acrylics. I had intended to go with Humbrol's range of RLM colours for the RLM 72/73 topside camo, but these proceeded to block my airbrush in no time at all, and the paint i managed to get onto the plane had a horrible gritty finish to it that i could have sanded down another model with! I'm sure others out there have got good results using these paints, but I don't think I'll ever use them again... The eventual colours used for the splinter camo were a mish mash of greens and greys which I played around with until I ended up with something I was happy with, even if nowhere near the actual colours specified. Kept the weathering light as I usually do, with just some pre-shading of panel lines and oild-based washes applied. Overall I'm quite chuffed with how this one has turned out - a real pleasure to put together. Thanks for looking. Cheers Adam
- 19 replies
-
- 23
-