Search the Community
Showing results for tags 'revell'.
-
 Do you feel the need? This kit was generously donated to me by my employer Sunward Hobbies and will be my next build. This will be a slight change for me as I stick mostly to pre cold war subjects but a change of pace is always welcome. The kit looks straightforward and shouldn't take too long to complete (I sure hope so as June will be a very busy month for my channel). Check back in soon to see the progression of the build.
-
- 1
-

-
- Revell
- Grumman F-14D Tomcat
- (and 1 more)
-
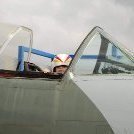
 Good Evening All! Here is my second (and last) Starfighter at the 1/72eme scale, the Revell one. I must admit that this kit was difficult nut to crack as I found a major flaw in its design, not expected when I opened the box: At first glance, the kit seems great, nice engraved panels, a fair amount of details including the cockpit etc so I thought it would be an easy OOB built, even if Revell (or Monogram as it seems that Revell reboxed it) decided to separate the front end from the rear end of the fuselage, making an uneasy adjustment of both part . Alas! When I put the left part fuselage on some 1/72eme drawings, I found out that the general length of the fuselage is short by a good 5mm, affecting the elegance of this iconic fighter. 😫🤬😤. This photo shows the missing 5mm. If you compare the Esci/Italeri 104 to the Revell one, you will see that the second one is OK. So stupidly I started the surgery simply by elongating the fuselage by adding a 5mm evergreen section were the kit was already cut, thinking that it will do the trick. Another stupid error! This put the WW bay now too de-centered to the rear, so I have to revise my tactic and insert first a 5mm section rear of the intakes and another one at the rear of the WW bay, respecting the fuselage shape with Tamiya putty and sanding: This pix show the upper part evergreen 5mm insert just behind the air intakes. WWB modification. Also, the arrester hook is obstructed on early F-104 version. So I don't go into all the pain of this surgery (re-engraving, riveting, sanding...😰) but at the end of the day, I got a correct fuselage length. Hurray! As I love complications, I decided to add a resin exhaust, resin wings, flaps, aileron and slats down (very very fragile), to open some panels to show what is inside the beast using both the Verlinden kit (lower electronic bay and rear gun bay) and the CMK 7008 details resin kit (radar, upper electronic bay cockpit and ejection seat) and finally some PE. Another bad surprise welcomed me as the CMK kit, given and sold for a "C" version is in fact a "G" one, with a different radar and electronic bay! re 🤬🤬😤...if modifying the inner electronic bay and cover was not so difficult, modifying the small radar electronic black boxes and the dish was another story because first the photos are not legion and second the scale doesn't help. red arrows show what to modify from the original CMK piece for having a AN/ASG14T1 radar For the rest, the canopy is too flat and inaccurate so I vac-formed one, putting the heating system tubing which is showing up quite well on the real aircraft, the WW bay rear and front need some tubing an wiring even if you don't see that much after completing the model and I scratch built the front part of the 20mm cannon (strongly not given by Verlinden). I decided to show a Zipper in an interception configuration with two wingtip mounted AIM-9B and a pair of underwing drop tanks. All fins are made from aluminium can to respect the scale. I added the IFR probe, even if not showed on the photos; Painting the model was a classical use of Alclad II to reflect he shiny and well-maintained conditions of the aircraft. For the markings, I chose the 479th TFW Boss bird, quite colorful and I fortunately found two B&W photos of this aircraft in the Starfighter aficionados well known http://www.916-starfighter.de/ website. Decals are coming from the surplus box and the kit. Now the photos: The true Starfighter: The model: That's it for the Revell Zipper, ...and, as usual a little dio: the radome trolley is scratch built (from a Lockheed factory photo), the ladder, MA-1 and fuel browser are aftermarket product: That's it for the moment for my Starfigher saga, next to come will the D but still in the box. Enjoy the photos, thank you for watching and critics are always welcomed!
- 13 replies
-
- 38
-
-
I've taken a small delivery of Star Wars Bandai,/Revell Kits to test the water as I don't normally do Film, TV and SciFi. Feedback appreciated https://testvalleymodels.com/products/slave-1-gift-set-05678 https://testvalleymodels.com/products/boba-fetts-starship-06785 https://testvalleymodels.com/products/outland-tie-fighter-06782 https://testvalleymodels.com/products/death-star-star-desdtroyer https://testvalleymodels.com/products/razor-crest-06781
-
Hello guys, my most recent project was this 32nd scale Fw 190F-8 from Revell. The kit was really nice to build, but I messed up the engine fit, which refused to fit between the two teardrop panels in the nose. I ended up removing the engine mounts and glued the engine to the cowling, which was then mounted to the fuselage. The aircraft chosen was Black 2 from Schlachtgeschwader 10, found in Czechoslovakia in May 1945. The sharkmouth on the main bomb was shown only in the White 70/Black 6 option, but I liked it so much that I decided to add it to Black 2.
- 5 replies
-
- 17
-
-
- Focke Wulf
- Fw 190F-8
- (and 1 more)
-
@chrism started this build and passed it over to me for completion. Having made two Airfix ones last year, I decided to do something a little different. Hope you like it.
-
Got this kit as a birthday gift yesterday. I'll be making a start on it from February 20th onwards. The first thing I did with the kit was to grab the spare wing light that came with it, and replace the one I damaged on my Fw 190A-8/R11. Here are the box and sprue shots. Box: Replaced light and the damaged light: Instructions and decals: Sprues:
- 11 replies
-
- 1
-
-
- Luftwaffe
- Focke Wulf 190
- (and 1 more)
-
I really enjoyed this build, a nice kit!
-
A-Wing StarFighter (01210) 1:72 Carrera Revell/Bandai The A-Wing was a minor character in the original (and best) Star Wars trilogy, appearing in the background in some of the large space battles. It has since gained a little more prominence in the new films and the cartoon spin-offs, which are numerous. It’s a small one-seater twin-engined ship manufactured (in a galaxy far far away) by Kuat Systems Engineering, and somehow finds its way into Rebel hands. Its speed and pivoting main cannons make it a useful tool that is suited for rapid interdiction and lightning strikes. The Kit This is a licensed reboxing by Revell of the excellent Bandai kit that was released in 2016, which was available only by personal import or from a grey-import box-shifter until now. This is the most minimalistic reboxing from Revell, with a sticker placed over a portion of the box showing Revell’s logo and their product code along with a few European-style descriptions of what it is – a self-assembly model kit. If you’re a Star Wars model builder, you probably know what to expect inside, and I’m one myself so I’ve already got one of the Bandai kits in my stash. Bandai have an incredible team of engineers creating their kits, who achieve amazing detail, simplicity and cleverness of construction, and skill of tooling the most stunning injection moulded kits around. They regularly inject several colours and types of styrene into one sprue with their kits that Western companies could only aspire to, which cuts down the sprue-count and makes for a less messy desk during the build. They’re also snap-together kits in essence, with pre-coloured parts that don’t require painting if you’re either a beginner, a child without the facilities or just don’t want to get the paint out. If you aren’t familiar with Bandai’s style of snap-together kits, you probably think that this renders them simplistic and toy-like. Get that mindset right out of your mind right now, as these kits couldn’t be further from that type of product. The box is pure Bandai with a black glossy surface to the top-opening box, with five sprues in cream; dull red, cream, black and clear; grey; black and finally clear red. Because the A-Wing is a compact fighter, you get the ship itself, plus a base with a Turbo-Laser Turret on a section to one side, which gives that frissant of Death Star to accompany your model. The decals are duplicated as stickers for the younger or less skilled builder, and the package is rounded off by the inclusion of a concertina-fold instruction booklet in colour. Originally, the instruction booklets were written almost completely in Japanese, but as time went on they have included more English, which is helpful to augment the visual instructions and icons that appear throughout the booklet. Construction begins with the A-Wing, which first has its cockpit made up from six highly detailed parts plus a decal or sticker (whenever I say decal, also think sticker from hereon in). The lower hull is next, adding inserts into the weapons mounts and their rear, after which the hull topside is clipped into place, with the cockpit dropped in from above. The red section of the topside is separate due to the self-coloured parts, with a separate spin behind the cockpit and the tapered apron toward the front. The spine has a three-part cream insert at the rear, then it clicks in place along with the apron into the upper hull around the cockpit tub, locking it in place. A similar red insert is fitted to the underside, and clear side panels smooth out the joint between top and bottom halves. The nose cone is red, as are two panels in the underside wings, and another red insert fits behind the tapered section under the hull. Flipping the hull over, a roll-over hoop is added to the rear of the cockpit, and a pilot figure with two small decals is popped into the seat before the clear canopy and a snap-on curved frame part. The engine nacelles project from the rear of the arrow-head hull, and have fins at an angle top and bottom of the exhausts. These have clear engine inserts with stoppers behind them for painting a fiery colour or lighting, and a two-part trunk is clipped to each side of the fins with a tiny part with two angled pipes/hoses coming out of the sides. At the rear are a pair of oval fairings with four more exhaust cups inside, the shape of which is akin to a pair of F-16 intakes, which given their kit-bashed heritage they very well could be just that. Having a second look, I seriously think they are! The twin ovals are attached to an insert with the four exhausts and are fitted together with the main engines and their fins, then are offered up to the rear of the hull to be clipped into place. The pivoting guns at the wingtips are each made up from three parts with hollow muzzles, then the three gear bay doors are clipped into place if you are depicting your A-Wing in flight on the stand, or in the open position with three two-part gear legs if you are putting it on the ground. There are plenty of diagrams to show you where the various parts should fit, so don’t concern yourself about making a mistake. That’s the A-Wing finished and now it’s time for the base and turret extension. The base has a greebly-filled surface to its single part, with an angular diagonal riser that has a jointed tip to allow the modeller to adjust the pose of their model at any time. The bases are able to be linked together by the included clips, which leads us nicely to the bonus Turbo-Laser turret that can clip onto the base, as its footprint is the exact same size as the base itself, and it also has the cut-outs for the clips. The tapering base is a single part, which is extended upward by another dual taper section that is made from four parts inserted into its flat top, and is joined by the turret at the top, which is three parts and builds up around the gun assembly. This begins with two hollow-tipped barrels that have toothed quadrants fitted on their outer edges and in between them, after which the barrels are raised to the vertical and bracketed by a two-part assembly that holds them in situ. The barrels are then returned to the horizontal and surrounded at the sides and on top by the turret shell. The turret clips into place on the top of the base, and can be rotated and elevated as you see fit – just so long as you enjoy playing with it Oh, and no, I couldn’t resist building the turret. Markings The kit is self-coloured, so technically you don’t need to paint a thing, but the back page of the instructions give you a six-view look at the model as per the box art, with colour and decal/sticker call-outs along the way. The pilot figure is also shown painted with the two tiny decals on the helmet, and there is some weathering that has been applied around the cockpit and the rest of the hull to give you an idea of what to aim for. There’s a lot of pictorial evidence out there for any other markings and schemes that you might wish to portray though, and we often see some adventurous schemes here on Britmodeller.com. Conclusion It was a gorgeous kit in 2016 when it came out, and it’s just as good now. If you’re a Star Wars modeller and want a well-detailed model of an A-Wing, this is the kit to get. Very highly recommended. Currently, Revell are unable to ship to the UK from their online shop due to recent changes in import regulations, but there are many shops stocking their products where you can pick up the kits either in the flesh or online. Revell model kits are available from all good toy and model retailers. For further information visit or
-
Hello all. Now the February edition of AMW has finished selling, I can show you some shots of my Revell 1/32 Tempest built for that publication. It was a struggle of a kit, very little fitting properly, and made more awkward by the editor's instruction to include the exposed fuel/oil tanks ahead of the cockpit. That took a lot more surgery than you'd believe! Lots of resin and photoetched bits went into this, and the final result was done up as a 501 Squadron machine, which was my Dad's old unit. So, here is G for Gordon: Onwards and upwards, Dean
- 16 replies
-
- 45
-
-

-
A pair of Revell 1/144 F-14A arrived yesterday, so the plan is to build them in flight as a wingman pair. The bags of bits
- 11 replies
-
- 9
-
-
- 144
- Jolly Rogers
- (and 1 more)
-
Revel box build with AA and other third party decals. Seemed that everything went wrong with this kit, I must have dropped it about a thousand times and weirdly it didn't fit very well. Still, here it is, not bad. Have also just finished a much nicer Zvezda A320neo, which can be seen here: https://www.britmodeller.com/forums/index.php?/topic/235106308-sas-scandinavian-a320neo-zvezda-1144/#comment-4327834 Chris.
- 5 replies
-
- 16
-
-
- Revell
- Embraer 195
- (and 1 more)
-
Hello guys, Here are the photos of my most recently completed model, the Me P.1099 from Revell Germany in 1:72.
- 7 replies
-
- 8
-
-
- messerschmitt
- Revell
- (and 1 more)
-
I apologise - we started this one a few weeks ago I've been meaning to post a WIP but just didn't get round to it... My son received the Revell 1/72 Sea Vixen for Christmas. It's one of his favourite aircraft - we have fond memories of seeing XP924 / Foxy Lady at airshows down here in the south before her belly landing. I've read up on the 'imperfections' of this kit. But for my son and me it resembles a Sea Vixen, so it's one for the stash and the collection. The main aims of this kit (for me at least) were to channel my inner perfectionist and let my son do the lion's share of the build - with me assisting. Obligatory box shot (sorry forgot to take a photo of the sprues). My son then started wondering if it was possible if we could actually make XP924. The Revell kit supplies decals for 899 squadron. I then looked online and found some decals from the old Xtrakit box. Ordered and the arrived pretty promptly from Czechoslovakia... In the meantime we made a start. Painting the parts for the cockpit. All OOB. Cockpit instrument decals were applied onto a few spots of Humbrol gloss and the cockpit assembled. Somewhere at this point I read online if a cockpit really is black don't paint it black. A bit late at that point. As @Harry_the_Spider said in his WIP - darker than the back of Satan's sock drawer in there - 🤣 It was a good start. And then today we noticed this as we cut the lower fuselage from the sprue... Initially I thought we must have broken something as we cut - but no that wierd bit on the RH undercarriage bay just looks like a bad part where the plastic didn't get to the edge of the mould... Jr is a bit gutted. We've got plenty to be getting on with whilst we wait to see how this gets resolved. We can prepare the twin boom tail, the ordnance. Mask the canopy. Hopefully it will get sorted soon by the shop the kit was purchased from or Revell 🤞
-
 Amazon have just delivered this, the Revell reboxing of Matchbox’s Panzer II. This will be my 4th entry. I built the Tamiya 1/35 version a while back for another group build, looking forward to adding this one to the collection.
 -
 Finished my what if/Anime Spitfire Mk.IX in 1:48 from Revell/Hasegawa. It was fun to make another Spitfire (this is my fifth one). I will try to look for some more, if my German aircraft interest doesn't sabotage my search. I used decals from two Xtradecals decal sheets for the letters. Insignia came from the Airfix 48th Spitfire Mk.I and also from an Xtradecal wing roundels sheet.
 -
One of the things that got me back into scale modelling after some years of not building anything was the anime Strike Witches. In fact, I liked the anime so much that I set on a mission to find, buy, and build the aircraft the real pilots used (from which the Strike Witches girls were based from). The story so far: In the year 1939, an alien race know as the Neuroi invaded Europe, conquering the contienent in a matter on months. The only mass of land these invaders weren't able to conquer was Britannia, protected from the land Neuroi by the Britannian channel. Fast forward to 1944, the 501st Joint Fighter Wing, an elite squadron formed by the top aces of different air forces of the world, began fighting back the Neuroi with their Striker Units, aircraft-like machines which are attached to their legs and allow the girls to take the fight back to the Neuroi. The pilots of the 501st JFW are Mina Dietlinde Wilcke, Mio Sakamoto, Gertrud Barkhorn, Erica Hartmann, Francesca Lucchini, Charlotte E. Yeager, Lynette Bishop, Yoshika Miyafuji, Eila Imatar Juutilainen, Sanya V. Litvyak and Shizuka Hattori. I have built all the aircraft from the real pilots, however, the only one which didn't have a real ace was Lynette Bishop. She uses an Ultramarine Spitfire Mk.IX and, in the second season, a Spitfire Mk.22. I've already built the Spitfire 22, so I thought on building the Mk.IX, used by Lynette in the first season. The chose kit is the Revell/Hasegawa Supermarine Spitfire Mk.IX/XVI in 1:48. I decided to start the kit by building the most tedious part of any WW2 propeller plane, the propeller. I painted the blades in matt black and the nose cone in Sky. I then masked the upper part of the nose cone and painted the lower half of it in red. Cockpit: Fuselage halves and cockpit: Cockpit glued to the fuselage: Wings. Options are provided for extended or clipped wingtips for either the Mk.IX or XVI. The same goes for the rudder. And here's where I'm now. Painting will start as soon as I come back home.
-
Hello I would like to present a model of U-boot in huge scale 1:72 from Revell. Many extras was applied during a build. Enjoy.
- 21 replies
-
- 75
-
-
-
Hello guys, I finished my Ta 154 in 1:48 from Revell yesterday. Decals, which were issued in 1999, worked pretty well.
-
Hi all - I had this kit in my stash for some time but when I saw Simon Dyer's build in 79 Squadron markings I was inspired to get it built - I always wanted to finish it in the 79 Squadron scheme & had the same decal sheet for XG228 - I did some research on the internet and found some colour photos of these aircraft at RAF Brawdy & with a bit of fiddling with decaI sheets was able to turn it out as XG160 tail number 22 - a bit of a nostalgia trip as our family lived in nearby Solva when my dad was posted as a CPO to Brawdy in the late 1950's - it was in the Navy's hands as the FAA's base for Hawker Seahawk fighters back then & very interesting for young boys. The model is basically from the box apart from the True Details resin cockpit set which after some minor fettling fitted remarkably well. I borrowed David Mooney's idea of using 2mm x 1mm micro magnets to attach the outer pylon stores so I can alternate the fuel tanks or rocket pods if I ever get the urge - this is his F4D link https://www.britmodeller.com/forums/index.php?/topic/235100540-132-f-4d-spook-on-a-spook/#comment-4225499 The Revell kit decals were showing their age and the yellow stencil were translucent when applied but I found an alternatIve set of 1/32 Hawker Hunter stencils made by DEKL'S in South Australia and these went on quite well. I tried but could not get a good result dry brushing the moulded on instrument dials so replaced them with AirScale decals The green hose on the Ejection Seat is a bit of guitar string I only did some light smearing on the belly with Tamiya weathering colour and highlighted some panel line with a sharp 2H pencil CJP
- 17 replies
-
- 54
-
-
-
On 24 September 1944 LP826, a Wellington X of 85 Operational Training Unit, was lost when it crashed on the Althorp Estate of the Spencer family after the pilot had lost control of the aircraft. During a night exercise, the Wellington from Husbands Bosworth dived into ground from a considerable altitude on the outskirts of the Althorp estate in Northamptonshire with the tragic loss of all seven crew members. HARPER, Charles - Sgt(A/G) - 1829682 - RAFVR - Kirkconnel Cemetery, Dumfriesshire. SAUNDERS, Frederick Charles - Sgt (Radio Op-Air) - 1852883 - RAFVR - Clevedon Cemetery, Somerset. COLEMAN, Sydney Francis - Sgt (Air Bomber) - 1339954 - RAFVR - Frome (Holy Trinity) Churchyard, Sommerset. JONES, Thomas William - Sgt(A/G) - 3031716 - RAFVR - Cardiff (Cathays) Cemetery, Glamorganshire. His death was at the age of just 19. WILTON, Alan Henry - Sgt(Pilot) - 1587833 - RAFVR - Bristol (Canford) Cemetery, Gloucestershire. I do not know the names of the other two who were lost. No 85 Operational Training Unit was stationed at Husbands Bosworth from 15 June 1944 to 14 June 1945. Squadron codes for 85 OTU were 9P and 2X for this period. This is the Revell re-box of the Matchbox kit. I used Vallejo, Hataka and Humbrol acrylics.
-
I've had a couple of false starts with models I wanted to build, I hope this project will yield a couple of decent vehicles. I've had a couple of Revell Jaguar XK120s in my cupboard for a while, I bought two because I wanted to try building this kit two different ways. The vision: One car built as factory standard. This is based on a car I saw in an old magazine; light blue with a navy and grey interior, with rear-wheel spats. One car built as a bit of a tuned-up, example with a set of Dunlop alloys and no spats. This one will be Tamiya British Green with a tan interior. Here's a mock-up, the wheels and tyres came from K&R Replicas. It might take a bit of ingenuity to fix them to the axles. You can also see that the body needs a lot of cleaning up, those mould lines are just about the worst possible place. On the early XK the ventilation flaps in the front wings need filling in, as these were never fitted as standard (although I think some owners added them later). For the tuned up XK I want to replicate the look of a later car, where the sidelights were integrated with the front wings, rather than being separate, chrome parts. This is a nicely detailed kit, but the copyright information moulded into some parts shows that it is a Monogram moulding and it feels like it might be almost as challenging as the old Monogram Maserati 3500 kit I built last year.
- 74 replies
-
- 16
-
-
Howdy! My first completion of the New Year is Revell's 1/72 P-47M Thunderbolt. A very enjoyable build OOTB and as is my want brush painted. The main camo is my own mixture of approximate colours as suggested by the instructions. The aircraft represents A 63rd Fighter Squadron Jug from the 56th FG US 8th Army Airforce Boxted England 1945. I have added the rockets and fuel tanks as per the instructions but am unsure if this particular aircraft ever carried them! But they look good to me and i like my Tbolts tooled up, so to speak. Thanks for looking ATB Greg
- 23 replies
-
- 27
-
-
 During building a Birdcage Corsair and a French Suez Crisis F-84F, my dad thought, why not build a French Suez Corsair too? So he will start the Revell reboxing of the Hasegawa kit. DSC_0002 by grimreaper110, auf Flickr
 -
"Seek and Destroy" 41 Sqn's finest Hi everyone! Time for another Tornado build I think, this time of a 41 Sqn GR.4 in 1:72 scale. Let's get cracking, then! The Subject So the first visit I ever had to an operational fast-jet base was back in August 2017. Me and my dad tottered on up to the fence one morning while on holiday in Lincolnshire, and we were fortunate enough to see a mass launch of Typhoons. Around lunchtime, when most of the Typhoons had returned from their morning launches, we decided to walk around to the BBMF end of the base. As we rounded the corner I noticed an engine note which didn't sound quite like a Typhoon we'd become accustomed to... ... and there she was: This was the only time that I managed to see a "live" Tornado on the ground before she was retired from RAF service in April of last year. We watched as the crew taxied her to the runway and took off, never to be seen again (as it turns out, the very same aircraft was to reappear at RIAT in the "617 Sqn formation" with the Lancaster and F-35, which I'm trying to re-create to some extent in 1:72 scale). We were fortunate enough to then see a practice display by the RAF Typhoon team, followed by a totter around the BBMF hangar and a practice QRA scramble that same day. As we returned home from the holiday we stopped by Coningsby again and for the first time saw the Lancaster take to the air, having failed for many years to see her at airshows due to weather. So that's where my love of this particular airframe began. The Build This is a kit that I'm sure many will be familiar with, the venerable 1:72 Revell Tornado GR.1. The surface details and construction are exceptional for the scale and is really the only real option for a Tornado in this scale, but alas it required a FLIR pod and some cockpit scratchbuilding to bring it up to GR.4 spec. Freightdog provided the FLIR pod and Master Models provided the brass pitot tube and AoA probes. Decals came from the Xtradecal Tornado Retirement Schemes set. During my 1:32 build of ZA326 (the raspberry ripple Tornado- link to build here) I've built up quite the reference archive. Armed with that, I decided to edit the 1:72 kit to resemble ZA560 as I saw her: flaps/slats down, auxiliary air intake doors open, a variety of cooling doors open, the CAGNET aerial (thanks to these guys for their help) and a variety of other small details. The one thing I would have done differently is to replace the nose of the kit with a resin one, but hey, I think it just about passes? As with the real thing I had to salvage parts from another Tornado, in this case it was one of the nose wheels which decided to go walkies (or perhaps roll-ies?) Sadly, due to a lack of additional decals I wasn't able to follow the exact scheme/decalling as I saw her in back in 2017, but it was still the same airframe nonetheless. I can live with it! You might notice the different coloured stripes of the underwing fuel tanks, these were present on the real thing at the time- i masked and sprayed on the grey stripes; given that the grey stripes that came with the kit decals blended in perfectly with the paintwork.... As always, Vallejo Model Air paints were used; USAF Medium Gray for the main colour, some panels were picked out in Light Gray, with the nose being Sea Grey. Weathering was achieved with a mix of diluted black/brown paints and the fabulous UMP Earth weathering wash. But you're here for pictures, rather than my ramblings, and pictures you shall have! Conclusion And so, this build draws to a close. Thank you to the folks who helped out with the info on the cooling vents and the CAGNET aerial, and thank you for dropping by and having a look the build! Stay safe and look after yourselves Best wishes, Sam
-
Hello Folks, I finshed my Tonka and wanna show you the result. Building Thread Video: https://youtu.be/J1jg-gT6iOU Materials: Mr. Colour Mr. Paint Vallejo Model Air Tamiya Quick Setting Micro Set /Sol Vallejo Putty Kit:
- 21 replies
-
- 56
-
-
- Revell
- Tornado ADV
- (and 1 more)