Search the Community
Showing results for tags 'revell'.
-
CH-47D Chinook (03825) 1:144 Carrera Revell The CH-47 Chinook is a tandem rotor heavy lift helicopter, developed by Vertol and manufactured by Boeing Vertol since 1962. Its incredible longevity is testament to the quality, flexibility and robustness of the original design. Over 1,200 examples have been produced, and the type has seen frontline service in conflicts such as the Vietnam War, the Falklands Conflict in British service, both Gulf Wars and Afghanistan where its utility was so much in evidence that many airframes became worn out by the end of their time there. In its capacious loading area, the Chinook could lift a 24,000lb payload or carry anywhere between 33 and 55 troops. The CH-47D was fitted with more powerful engines than its predecessors, adding an additional 2,000lbs to its internal or external carriage capacity. It is often used to carry 105mm howitzers, associated equipment and crew, as well as the usual troop transport role, with improved avionics leading to a production run of just over 20 years, with moderate overseas sales, serving alongside the comparable MH-47D that was used primarily by Special Forces with in-flight refuelling capability amongst other alterations to suit its cloak-and-dagger role. The Kit This is a reboxing of Revell’s 2000 kit, although it has also found its way into Academy boxes in the past, and the sprues have a ‘not Revell’ feel to them, as they’re not moulded in Revell’s usual style or styrene colour, and the bags are heat-sealed. On the underside of the floor part is a small logo of Ace Corporation of Korea, which finally gives the game away. Inside the small end-opening box are four sprues in grey styrene, a clear sprue, small decal sheet, colour instruction booklet with profiles on the rear, and that annoying safety sheet. Can you tell I don’t like them? Bearing the scale of this kit in mind, the detail is good, including cockpit and engraved external details, plus a well-detailed floor and seats, but no interior detail in the fuselage halves, with a lot of ejector pin marks within. Construction begins with the cockpit, which is built up on the front of the floor, painting the floor as indicated using Revell’s usual letters-in-flags and an extensive key at the beginning of the instructions. The cyclic and collective sticks are inserted into the floor, and the instrument panel is mounted on a raised area at the front, adding a decal for the instruments before fixing the two pilot seats and two bulkheads behind them, the front of which has quilted insulation engraved on the surface. The two fuselage halves are prepared with a dozen circular portholes in the sides, with a choice of a blown alternative for one on each side, and two doors per side, held flush with the outer skin by a pair of supporting tabs. The fuselage halves are then brought together around the interior, taking care to fill the ejector pin marks and paint it up if you think they will be seen. At the same time, the two rotor heads are built from two parts each and trapped in the turrets fore and aft in the roof. These are left loose in case you want to play choppers and spin the blades later. The floor inside the fuselage is exposed until the external skin is inserted into the gap after drilling out some holes in it beforehand, and making up the two-layer access ramp, which has two T-shaped pins inserted to act as the pivot point when it is trapped between the floor and outer skin. Another small rounded skin insert completes the rear overhang, and at the opposite end the one-piece crystal-clear canopy is first drilled out very carefully on either side of the upper nose, then glued into the opening in the front of the fuselage. The rear rotor turret has two inserts, one fore and aft, in order to detail the structure accurately, and is joined by the two powerful engines, which are made from two halves, plus a long intake baffle on its own pylon in front of the main part. An engine is built on each side of the fuselage, and both have a conical filter fitted over the intake to reduce FOD ingestion during dusty take-offs and landings. Underneath, the fixed landing gear legs are each a single part strut, with twin wheels fitted at the front, and singles at the rear, plugging into the underside, and joined by a small forest of aerials and sensors between the front wheels, then moving aft, the winch hatch can be covered by its door, or you can install the winch on its cross-member in the opening, with another winch further to the rear. If you've elected to pose the back door open, there are a pair of ramp extensions included on the sprues for vehicular access. The exterior is detailed with a pair of antennae in the nose where you drilled the holes earlier, a blade antenna is mounted on the roof, and an extended rail antenna is created by either installing the individual supports and linking them with a piece of fine wire or thread, or using the alternative single part that depicts just the front portion if you don’t feel up to the task. A pair of strakes are finally mounted on the sides of the fuel sponsons to finish off the fuselage. The big rotors that give the Chinook its ‘WOKKA’ sound are each three blades that are installed on a central head, with a tiny pin ensuring alignment underneath, so go easy with the glue and keep them straight. The rotor bases each have a central pin and three more locating pins that line up with the actuators of the rotors, and are glued in place on each one to finish them off. Markings There is just one decal option on the small sheet, and it’s a green US Army bird. From the box you can build the following airframe: Boeing-Vertol CH-47D Chinook, A Company, 5 Battalion, 159 Aviation Regiment, US Army, Giebelstadt, Germany, 1994 Decals are by Zanchetti, which is a guarantee of good sharpness and colour density, with a thin matt carrier film cut close to the printed areas. Conclusion This is a well-detailed exterior model of the doughty Chinook in teeny-tiny scale, and with a little effort you can open it up at the rear, which isn’t usual for the average 1:144 scale kit. Highly recommended. Carrera Revell model kits are available from all good toy and model retailers. For further information visit or
-
Hi dear folks, this is my recently finished Revell's 1/48 scale Rafale C. IMO one of the prettiest combat aircraft ever made and it definitely fulfills Marcel Dassault's credo, who famously once said - "Ce qui est beau vole bien" - If it is beautiful, it will fly well. It's an older kit but it checks out. It's a bit basic at times but only in areas which are barely visible anyway, like the open air intakes. They are deep enough to look good but if you look straight into them, you will see the light coming in through the gear bays. Everything else is neat. The panel lines are very fine and considering the kit is more than 20 years old, I had no problems with flash or any warped or damaged parts or forms. The kit also nails the shape of the forward fuselage which is crucial to the planes good looks! Had an absolute blast building it. The fitment is superb, the only problem I had was the refueling probe, which ended a bit askew 😅 It was primed as usual with Tamiya grey primer, pre shaded with darker grey and finished using mostly Vallejo and Tamiya colors and AMMO washes. Although I like filthy and well used planes I went easy on the weathering this time as the real Rafales look remarkably clean. The decals are sharp but are printed on a rather thick film and did not respond that well to decal softener but with a little more patience they were still pretty easy to handle. The whole kit was sealed with Tamiya semi gloss varnish. A nice and easy kit that's great to build and looks awesome quite quickly - a big Thanks for watching. Hope you like it and I wish you a great remainder of this weekend!
- 10 replies
-
- 41
-

-

-
- Revell
- Dassault Rafale
- (and 1 more)
-
 For a year and a half I've been working on my "Hawker Hurricanes around the world" project in which I am modeling Hawker Hurricanes in the markings of all the air forces with non-RAF insignia (it's a long list!). In all my research I kept coming across this beautiful royal blue Hurricane that participated in the King's Cup Air Race at least a few times, including in 1950. It is the last Hurricane ever built, an Mk IIc, which Hawker kept and (I believe) continues to own (although it looks nothing like the above photo today!). G-AMAU does not perfectly fit with my Hawker Hurricanes around the world theme, but last year I did a "civilian interlude" and built another Hawker-owned Hurricane, G-AFKX: This GB gives me a good excuse for a second civilian interlude! One goal of my project was to build a variety of 1/72 Hurricane kits, and while my wife joined the project and used the Revell Mk IIc kit to build Greece, I myself haven't actually built the Revell kit, so I picked up another one which will serve me nicely for this build. The kit is cheap and you get what you pay for (lots of flash, for example), and I considered buying an Arma Mk IIc, which are vastly superior, albeit much more expensive, but the deciding point was that the cannons are removed on G-AMAU, and Revell's wings are already molded without the cannon fairings so will be easy to modify. It would feel sacrilegious to me to cut up an Arma wing... I ordered the Lifelike decals from a shop down under, and they arrived this week: Besides the fact that the cannons are removed, another modification to be made is this racing Hurricane carried Spitfire-style exhaust stacks, and I think I have a spare set from an Eduard Spitfire kit that I can use (will need to test fit to be sure). Otherwise I think #41 will be largely OOB. I have to confess, I already began cleaning up some pieces and assembling the wings, but should be able to resist getting much further before start date... looking forward to this GB, I expect lots of interesting subjects in the gallery!
- 81 replies
-
- 14
-
-
- 1/72
- Hawker Hurricanes around the world
- (and 1 more)
-
Wiesel LeFlaSys BF/UF (03336) 1:35 Carrera Revell The Wiesel was a development initially at the request of the Bundeswehr for a light-weight, air transportable light armoured vehicle that was cancelled before the designers Porsche could complete the prototype, but because of interest from other parties, development of the type continued, ensuring that it remained able to be carried by most NATO cargo aircraft, keeping the weight down, while remaining suitable for purpose and capable of carrying out its duties. It was named the Wiesel, which unsurprisingly means Weasel in English due to its speed and agility, and the Bundeswehr eventually bought over 300 vehicles once it was complete. Toward the end of the 90s it was decided that a new version was needed that was larger, while retaining the same qualities, with design work undertaken by Rheinmetall Landsysteme, as the company was then known. The chassis was extended with an extra road wheel to total five axles, and it was powered by a 1.9L Volkswagen turbo-diesel engine that was mated with an automatic gearbox for ease of use, ease of maintenance and availability of parts. It was named Wiesel 2, with the original version retrospectively referred to as Wiesel 1. There are several variants of the Wiesel 2, some of which look a little strange, but are capable performers despite the top-heavy look of some of the air-defence vehicles that have missiles in pods above the roofline. The Air Defence systems are named LeFlaSys, which stems from a concatenation of the German leichtes Flugabwehrsystem, or Light Air Defence System in English. The Air Defence battalions have command vehicles that aren’t equipped with weapons other than a self-defence MG3 machine gun on the top hatch, and the crew inside are tasked with managing the operations with which the vehicles are entrusted. The crew consists of the driver under the front hatch, the vehicle commander who can pop out of the top hatch to operate the gun if required, and the battalion commander, with the total interior spare now twice that of the earlier variant at 4m3. Troop carrying vehicles can seat up to seven soldiers in that space who are protected from small arms fire up to 7.62mm by the armoured shell, exiting through the rear door that is common to most variants. The Kit This is a reboxing of the 2010 tooling from Revell, with the new parts that were tooled for the 2014 triple boxing that included this variant of the vehicle, plus a radar equipped Wiesel and a missile carrier to depict the whole LeFlaSys system. It arrives in the usual shallow end-opening box that makes some modellers cry due to the ease with which it is crushed, and inside are three sprues in light grey styrene, a pair of Diehl Type 622 tracks in black flexible plastic, the instruction booklet in colour, with two lengths of bright metal wire taped to it for you to depict the aerials that are prominent on this type of vehicle. The Weasel is a small vehicle as you may have already guessed, but the detail is good, covering the exterior of the body, the road wheels and suspension, plus all the anti-slip patches that cover the upper surfaces. Construction begins with the body shell, building up the sides and rear on the floor, which has X-shaped stiffeners engraved on the underside. The narrow front and sharply sloped upper close up the body, except for the two hatches that will be filled in later. The road wheels, idler wheels and drive sprockets are all made from two halves, but aren’t installed until the idler mechanism and the other suspension swing-arms are fixed to the sides, with two small return-rollers attached to stub axles above them. The tracks are flexible, and are glued together after removing the overflow tabs on the sides of the runs, which also act as ejector-pin points to preserve the detail. You aren’t told what type of glue to use, but I can confirm that liquid glue does not have any effect on the material, so super glue (CA) is going to be the best bet. If you put the joint on the lower run, it is unlikely to be seen after any painting and weathering is completed. They slip over the road wheels without glue, but if you want to depict sag, you may consider adding some glue to the process to replicate that. The rear of the vehicle is detailed with light cluster boxes that have short mudguards and reflectors moulded-in, with a Leitkreuz “light cross” convoy aid on a shield that hangs from the rear of the vehicle, which you get a choice of decals or hand-painting it as you see fit. Several loops and grab handles are added to holes and depressions in the rear of the hull, with a few more fitted at the front. The right side of the vehicle has a half-length fender slotted into the front, with a hazard light to be painted red near the front, or snipped off and replaced by a piece of profiled clear plastic. More loops and an aerial base, then some pioneer tools are glued to the right side, with more equipment and another antenna base on the left, however the left side has a full-length fender that has the exhaust stretching back from the location of the motor, which is then covered over by a part that represents the perforated shield that protects the crew from burns. Clearly, this would have been better depicted by Photo-Etch (PE), but Revell generally don’t include this medium and not everyone wants to wrangle PE, as it takes a little experience, tools and some swearing to become competent. Looking at photos of that area however, very little can be seen of what is beneath the shield, so adding a little black wash to accentuate the depressions may well be sufficient for realism’s sake. Another grab-handle is placed next to the driver’s hatch, with a tow-cable neatly coiled on the centre of the glacis plate, and the commander’s cupola is made up from the base, brackets for the MG3, and the hatch itself, adding it to the hull along with the driver’s simple one-part hatch and a block of hidden equipment scabbed onto the deck on the opposite side. The anti-slip patches are all raised and have a very faint texture to differentiate them from the smooth deck. Some modellers use pumice powder glued to the surface with PVA to enhance the texture, but with the number of panels, you’ll need to take a bit of time to do it well. The smoke discharger fan at the front of the glacis is protected by a cage that is built out of four parts, with the discharger base and the four barrels mounted onto lugs on the sides before it is glued to the deck along with an L-shaped ancillary part. Additional lumps and bumps, lights and rear-view mirrors are dotted around the front of the glacis, including another antenna base, which is where the wire comes in handy. The instructions don’t give a length to cut the wire, but some pictures show that they are longer than the instructions would imply if they were 1:1, but others seem about right. The length of the antenna is usually a multiple of the frequency that they are transmitting and receiving on, so different lengths are entirely possible. They generally stand bolt upright though, so remove any curve from the wire before using it (easier said than done), or use some 0.5mm carbon fibre rod that you can buy online relatively cheaply. A communications expert is bound to come along with an appropriate length for the antennae, so watch this space, or check your references if you’re impatient. The MG3 machine gun is well-moulded, and bears a distinct family resemblance to the WWII era MG42 that most modern machine guns are based upon. It has the cocking handle and ammo box applied to the sides of the breech, and the mount is detailed with a long twin-rail support with a hoop over the rear, and a further support that should allow the gunner to keep on target despite the recoil. The gun’s rear slides into the covered area at the rear of the mount and glues to the front. The last part is optional, and is a single part moulded as a stowed camouflage tarpaulin that is strapped to the hull. A three-tone camouflage pattern is shown next to the colour rendition of the part, and the final step shows it in place on the glacis. Markings There are three decal options on the small sheet, all of which share the same three-tone NATO camouflage despite the difference in shades shown on the profiles due to the printing process, but there are dozens of digits supplied to personalise the number plates should you have something else in mind. From the box you can build one of the following: LeFlaBttr 100, Borken/LeFlaBttr 100, Seedorf, 2005/7 LeFlaBttr 300, Hardheim, 2011 LeFlaBttr 300, Hardheim, 2009 Decals are by Cartograf, which is a guarantee of good registration, sharpness and colour density, with a thin matt carrier film cut close to the printed areas. Conclusion The Wiesel 2 is a curious little vehicle, but it’s clearly useful and it has seen extensive service, since the original was replaced by something very similar. The kit is well-detailed, and having 120 extra digits for the number plates gives you endless choices of which one to represent. Highly recommended. Carrera Revell model kits are available from all good toy and model retailers. For further information visit or
-
Unimog 2T MilGl (03337) 1:35 Carrera Revell Unimog was the brand-name used by Mercedes for their truck, tractor and commercial vehicle range that began post WWII as an agricultural brand, initially built by another company for them whilst using their engines. The name derives from a portmanteau of “UNIversal-MOtor-Gerät”, or Universal Motor Machine literally translated. The range broadened in the late 40s and early 50s to include trucks, of which the 404 series was one, entering production in 1955. It is a small (1.5 tonne) 4x4 truck that was driven by a 2.2 litre M180 straight-6 Mercedes engine and has impressive off-road performance due to a change that had been required by a customer, the French Army, who wanted the spare tyre to be stored clear of the load compartment. The designers altered the shape of the rear chassis rails to allow the wheel to sit under the floor, the downward sweep giving the chassis extra flexibility that smoothed the ride on rough surfaces, assisted by coil springs, rather than traditional leaf springs. The four-wheel drive system could be disengaged on smoother ground, leaving just the rear wheels engaged, thereby saving fuel and wear on the front drive-shafts, and generally improving performance all round. The 400 series was the most numerous of the Unimog line, and was available as a short or long-wheelbase chassis, with the shorter option phased out at the beginning of the 70s, while the longer wheelbase continued on for another decade before it too was retired. The 437 was introduced late in the 19880s and is more of a heavy-weight that is modernised and continued to be upgraded as time went on. It is easily discerned by the squared off cab, and is available in U and L derivatives, standing for short and long wheel-bases respectively. Many variants are used by the post WWII German Bundeswehr, the 2T MilGl being one of them, certified for a load of, you guessed it, two tonnes, with a load bed that has a canvas tilt to protect the load whether it is equipment or soldiers. A total of over 62,000 of the 404S were made over its lengthy production run, with many of them still on and off the roads to this day due to their rugged engineering. The Kit This is a reboxing of the original kit that was tooled in 1995, and although it is heading toward 30 years old, it has decent detail throughout, although there are doubtless some areas that the more detail-oriented modeller might want to upgrade. It arrives in a slim end-opening box, and inside are four sprues and a cab in pale greenish grey styrene, a flexible sprue containing five sturdy tyres, a clear sprue, the instruction booklet in the old-skool Revell style on matt paper with a rough texture that invites comparison with cheap toilet paper. Ouch! It’s a product of its era in this respect, and the instruction steps are also monochrome, as are the painting and decaling guides in the rear. You get a full engine and chassis, plus drive train representations in the kit, as well as the expected cab interior, so it’s a great canvas to work your wonders upon, whether you’re an out of box modeller or otherwise. Construction begins with the engine, which I suspect is the straight 6-cylinder 5958cc diesel engine, judging by its tall, narrow appearance. The two block halves are brought together, then detailed with the complex belts at the front, and some ancillaries on the side. The motor is dropped into the front of the ladder chassis after adding a dropped hook, then the drive-shaft to the rear is inserted into the back of the engine, linking into the two-part transmission with a further drive-shaft heading back to the rear axle. The tubular muffler and short exhaust pip are fitted to a nub on the left side of the chassis, with the long snaking pipe linking the box to the engine and painted a grubby, rusty colour. The big front springs are made up from the two halves and a bottom cap, and these mount on the circular protrusions from the sides of the chassis, ready to accept the front axle, which has disc brakes on pivots installed in it during closure, then detailed with various steering and suspension links. Similar two-part springs are made up for the rear and mounted on large pivots top and bottom, then slipped over the rod passing through the chassis. This allows the rear axle to be made up with disc brakes at each end and inserted into the bottom of the suspension unit, again getting suspension links and a pair of shocks to improve handling during off-road adventures. A pair of cylinders and their associated hoses are attached in front of the rear right wheel, with another shorter one inside the chassis rail, which looks like the air brake system, as it includes a four-port manifold in the hose area. The fuel tank and a stowage box are each built from two parts, and the former has the mount moulded-in and a cap fixed to the top, while the latter is mounted on a separate bracket so both can be installed on the right chassis rail between the wheels. A foot peg and another on the other side are fixed in front of these items, with an empty bracket just behind it on the left side. At the rear of the chassis the light clusters are built up on L-shaped brackets, with clear lenses that need painting with appropriate clear shades, and finally the four flexible black tyres can be installed on the axles, after adding the two hub halves and a free-wheeling cuff in the centre, gluing them carefully if you want the wheels to rotate. The cab is begun with the floor, adding the three pedals in the left foot well, and the dash board with decals plus the gear and handbrake levers in the centre console. The driver has a separate seat, with a wider one for the co-driver that could seat two, and both have pencil-roll upholstery moulded-in, mounting on two raised lines in the floor. Finally, the steering column with stalk and separate wheel is inserted into a hole in front of the pedals, completing the interior. The cab outer is moulded separately with what must have been early sliding moulds, creating a five-sided part that just needs doors windscreens and a roof panel. The radiator grille is a separate part too, and is first to be glued to the front of the cab, with the windscreen and rear-view mirror following it. The two doors are prepared by adding three-part hinges, a quarterlight and the door card with two decals on one, one on the other. These are then inserted into the cab, and is joined by the ribbed roof panel, which repeats the hole for the machine gun ring, and also has a small hatch added to the left wing, plus a snorkel for deep-water wading on the right side, after which it can be mated to the cab interior. The machine gun ring on the roof has a circular hatch, a raised ring, and a depiction of the MG3, which is a direct descendent of the fearsome MG42. Underneath, the inner wings are glued to the cab floor, and a pair of crew steps hang from the sides under the doors on a pair of pins. The load bed is moulded with the tilt erected, and the four sides have the short upstands moulded-in, and also have some creasing of the canvas engraved into the surface. Some of the creases would benefit from softening, but that’s entirely your choice. The four sides are topped off with the roof, and then the floor, which has no detail on the top, but with the benefit of some quick research, that’s not too far from accurate. The first (and only) picture I found of the inside has one single panel line running transverse about a third of the length from the front, which shouldn’t be too hard to replicate, even if you only have a needle. Not very grippy though! Bear in mind that was a slightly non-standard dual cab variant, so further research might be in order. Inverting the load area allows you to add the various ribs and stringers, plus stowage boxes, four mudflaps, and more stowage behind them, and a rack for fuel cans near the front on the right. The cab and chassis are mated, using up the fifth tyre and hub parts to put a spare on the bracket installed on the chassis rail earlier, then the load bed is also mated with the rear of the chassis. A shield-shaped part is fixed to the rear bumper iron with added decals, then the front bumper has two lights inserted in recesses and fitted to the front of the vehicle. The cab then has windscreen wipers, a number of grab-handles and some corner lights fixed to the bonnet, with a pair of large wing mirrors attached to each door. Between the cab and load area, a shallow “spoiler” is glued onto the back of the roof to smooth the airflow between the two parts of the vehicle, and a curved plate is attached to the back of the machine gunner’s position on the roof. Now for the paint. Markings There are four decal options included on the sheet, although the diagrams are all monochrome, relying on black, white and half-tones to replicate the three colour NATO camouflage for some of the vehicle and two of the tilts. From the box you can build one of the following: 4./Panzerbatallion 33 (Green, Brown, Black Camo all over) 3./Wachbatallion BMVg, Siegburg, 2007 (Green, Brown, Black Camo, green tilt) ISAF, Kabul, Afghanistan (Sand chassis, Sand, Brown, Black tilt) Königlich Belgische Armée, 2004 (Dark Green) Decals are by Zanchetti, which is a guarantee of good registration, sharpness and colour density, with a thin matt carrier film cut close to the printed areas. Conclusion It’s not the newest kid or kit on the block, and neither are the instructions, but it’s a solid kit of this Bundeswehr staple that has been through many changes through the years. Recommended. Carrera Revell model kits are available from all good toy and model retailers. For further information visit or
-
Whenever I participate in a GB I usually jump way overboard and rarely finish anything. To remain true to my inner character, I decided to leap into this one as well, even though that Tomcat really should be finished instead. Or the Tonka. Or the Gannet,, or all the other ones that are stored... But one must look forward and not backwards, so here goes! I have one new Revell Shack, in a lovely livery: Strangely enough it comes with some new style instructions that are both readable and easy to understand: That was a welcome change from team Revell! Just get rid of the end opening boxes and all is well. Key features for me to choose Revell over Airfix is , well. it's an MR3 with nose gear! It looks almost modern (well...) and the red wing tip tanks is really dashing. But the major thing is this: Rivets! And lots of them too. 🤩 To please @trickyrich I tried to get hold of as much AM stuff as I could, but I had to stop here That big etched fret will be a challenge for sure. Sooo...can I start now?
- 43 replies
-
- 16
-
-
Eurofighter Typhoon Bavarian Tiger 2021 (03818) 1:72 Carrera Revell The Eurofighter EF2000 Typhoon started out as the EAP programme in the 1970s engineered entirely by BAe, who were later joined by a number of international partners due to a supposedly common requirement, with the constituent partners changing over time to finally solidify with Britain, Germany, Spain and Italy remaining, while France went their own way with the Aerodynamics data to create the Rafale, which coincidentally has a similar general arrangement. Delays and cost overruns seem to be a frustratingly common factor in modern military procurement, and the Typhoon suffered many, resulting in the Germans taking delivery of the first airframe in 2003. Airframes of all users have since taken part in many operations as their operators become more knowledgeable with the type’s capabilities and a greater range of weapons are certified and reach service. The single-seater Eurofighter as it’s known in Germany is a great air show crowd pleaser due to its agility at all speeds, and the impressive tearing roar of its twin EF2000 jet engines that propel it forwards with an impressive 20,000lbft of power per engine with reheat engaged. The Kit This is a re-release of Revell’s 2016 tooling of the Eurofighter, with some handsome new decals from the Luftwaffe’s 2021 display aircraft that celebrates 60 Years of Jagdgeschwader 74. Inside are four sprues in pale grey styrene, plus two small sprues of clear parts, the new decal sheet that is slipped inside the colour instruction booklet, with three pages of profiles on the rear pages. Detail is good, and if you have seen their earlier kit of the same type in 1:48, they are put together in a very similar manner as you might expect, including a simplified take on the slightly tricky intakes on the larger kit that are renowned for being a wee bit too short. Construction begins with the Martin Baker ejection seat, which starts with the cushions that have belts moulded in, has the ejection pack and headbox fixed to the rear, and two L-shaped side panels added at the side before it is inserted into the cockpit tub and is joined by the clear instrument panel, which is moulded in clear for the sake of the rounded HUD screen at the top, while the rest is painted and has a decal for the MFDs, and two more for the side consoles. A short control column is fixed into the centre of the panel, and the completed assembly is glued into the starboard fuselage half on a number of raised locating tabs. After placing 20g of nose weight in front of the cockpit, the fuselage is closed up, although you could just as easily pop it in through the circular opening in the front of the fuselage, or even load up the radome with weight. The lower wing is prepared by drilling eight holes from the inside, using the pre-thinned holes as a guide, and painting the inside of the moulded-in main gear bays, then adding the nose gear bay, which has the floor of the twin intake trunks moulded into it, and has the variable intake lips at the front, which have decals that are marked as number 90, but the decal sheet numbering stops at 75. Before joining the wings and fuselage, the exhaust trunks are glued into the rear of the fuselage, painting the afterburners that are moulded into the back a suitable metallic shade. At the front of the fuselage, the upper intake trunk and integral splitter plate are fitted between the sides under the nose, with a divider slotted in between them. The lower wing is then mated with the fuselage, joining the two halves of the intake trunking, which may need some filling and repainting. The nose cone and canards, along with the upper wings and the sizeable tail fin are next to be fixed to the airframe, making it look more like a Typhoon, with a choice of styles of exhaust petals, either opened or closed with a metallic shade mixed up from two Revell pots, or maybe use a suitable shade from another brand for simplicity’s sake. The two wingtip sensor nacelles are made up from two halves each, and clip onto the tips using the usual slot and tab method, and the spine that allows Revell to offer a one or two-seater is inserted into the trough behind the cockpit, which also has the coaming installed in preparation for the canopy. The main gear wheels are each in two halves with brake detail at the rear, and are attached to the gear legs, which have the retractor jacks added to the sides, with each one handed. They fit into holes in the roof of the bays, and have doors glued to the inner and outer sides of the bays, the outer door having a link and landing light between them, while the inner door has a retraction jack of its own. If you plan on posing your model wheels-up, the same doors are laid flat over the apertures after cutting off any hinges. The same is true of the nose gear bay, although the wheel is a single part, and there is only one door that opens sideways, with a retraction jack moulded-in. The rest of the airframe’s parts offer you a choice between having the nose-mounted refuelling probe in the open or closed position by using different parts. The air-brake on the spine behind the cockpit can be posed open or closed, adding a retraction jack to hold it at the correct angle in the open position. The canopy can also be posed open or closed, and is prepared by adding a palette to the rear of the part, closing over the rear area, so make sure you paint it first. The windscreen is glued in place at the front of the cockpit over the coaming, then the canopy is mounted either in the closed position, or open by slotting the peg on the rear of the canopy into the slot in the sloped part of the deck behind the pilot. Because of the ‘blown’ nature of modern fighter canopies that improves the situational awareness of the pilot, the canopy and windscreen parts have a fine seam down the centre on the outer surface because of the three-part mould, which you can either choose to live with, or sand down with progressively finer grades of sand paper and polish back to clarity. The rest of the build revolves around the items carried under the wings, with a pair of large fuel tanks with separate aerodynamic fins and some bright decals for the wings, plus four AIM-120 AMRAAMs carried under the fuselage on semi-conformal stations, with alternative Meteors for those same positions. Under the wings are a pair of AIM-9 Sidewinders on pylons, again with alternative IRIS-Ts on the same pylons. Another fuel tank is supplied for the centreline, and it too has some bright decals that are applied over a white paintjob. Markings The decal sheet for this special edition is as comprehensive as it is impressive, with large decals for the blue tiger striped upper surface that has a wavy demarcation near the leading edges of the wings, a feature that is carried over on the upper surfaces of the canards. The tiger eyes near the rear of the wings are particularly well done, and there is a narrow clear section where the flying surfaces pivot, and the whole airframe is overlaid with stencils and the usual national markings worn by a standard Luftwaffe bird. Underneath the aircraft is a large circular logo with ’60 years’ underneath. Additional diagrams show the painting and decaling of the pylons and fuel tanks, as previously mentioned. From the box you can build this handsome aircraft: Decals are by Cartograf, which is a guarantee of good registration, sharpness and colour density, with a thin matt carrier film cut close to the printed areas. Do those eyes follow you round the model shop? Conclusion IMHO this is a gorgeous scheme that will appeal to a great many modellers, myself included, although 1:72 isn’t my preferred scale, so I’ll have to wait for another boxing of the 1:48 kit. This one has plenty of detail, the decal sheet, and it takes up a lot less space in the cabinet than the bigger one too. Highly recommended. Carrera Revell model kits are available from all good toy and model retailers. For further information visit or
-
F-86D ‘Dog Sabre’ (03832) 1:48 Carrera Revell The F-86 Sabre was the first advanced jet fighter in widespread use with the US Air Force, but it was a fair-weather fighter that was bereft of radar that was to become more important as time went by during the Cold War, and essential today. The project to create an all-weather, radar-equipped derivative of the Sabre resulted in a substantially different aircraft, with a longer, wider fuselage that had a radome inset into the top of the intake trunking in the nose, a different canopy, and larger tail feathers. By the time the D variant reached service, the engine had also been upgraded, including an afterburner that gave it additional power and drove it closer to the sound barrier than its sibling. Its armament was different than the six cheek-mounted 0.5cal Brownings carried by the standard Sabre too, eschewing machine guns in favour of a conformal twin rack of Mighty Mouse rockets that would drop down into the airflow before firing, exposing 24 x 70mm FFAR Mk.4 rockets in a curved holder that would retract to clean-up the aerodynamics of the aircraft after firing, although a ripple-fire salvo must have had some choking effect on the engine, being mounted so close to the intake. There were over 2,500 D variants made, with subsequent updates making additional changes, some of them substantial, some such as the G less so, getting lumped in with the Ds during production, possibly to fudge some figures, knowing the sneaky history of aviation financing of most countries. Many NATO countries flew the Dog Sabre, some later K variants built under license by FIAT, which is a terrifying concept, given their reputation at the time for terrible cars with dodgy electrics. Some were still flying operationally into the 1970s, although not under combat conditions, as by then it would have been hopelessly outdated. The Kit This is a reboxing of the original Monogram tooling from 2001, but looking at the sprues for the first time in a long time, it’s surprisingly modern looking, although the bags are non-standard for Revell, having heat-sealed ends, and no tape, which to be fair can be annoying on occasion. It arrives in a medium-thickness end-opening box, and inside are four sprues in grey styrene in two bags, another bag containing the clear parts, the instruction booklet in colour, with the decal sheet and safety sheet hidden in between the pages. At the rear of the booklet are colour profiles to assist with painting and decaling. As already mentioned, this is a well-detailed model of the type, and is the only current relatively modern kit of the Dog in this scale, with other manufacturers reboxing it on occasion. It benefits from engraved panel lines and rivets, offers separate flaps and slats, detailed cockpit and wheel bays, and even a pilot figure with separate arms, and a surprisingly well-sculpted form. Construction begins with the four-part frame for the basic ejection seat, which inserts on a seat-shaped platform and receives the actual seat with rear headrest within, plus rudder pedals and control column first, then the instrument panel that has five additional parts installed on it before it is slotted into the front of the cockpit tub, and has another two short levers added to the left side console. Sadly, there are no decals for the panels, but a bit of careful painting should see that remedied. Like many fighters, the cockpit is positioned over the nose gear bay, but there is an intake trunk in between them, which is made from two halves, with the bay details moulded into the lower half, having two side walls added along with the nose gear strut and retraction jack. The pilot is made up and painted, and inserted into his cockpit at this stage if you plan to use him, after which the cockpit is glued to the top of the intake on a pair of upstands. Before the fuselage can be closed up, the exhaust must be completed, which consists of a tube moulded to a bulkhead, into which you insert the rear face of the engine, then attach the exhaust lip to the rear, fitting on a lug to ensure correct orientation. The inside of the forward fuselage is painted dark grey, and has three holes opened up in the underside, a small clear light near the nose, and an insert with an intake on the sides of the fuselage, using different parts for USAF or DK (Danish?) options. I find that confusing however, as both decal options are USAF, so it may be a hangover from a previous boxing. The inset marked DK has a recessed NACA intake, if that helps to deconfuse you. The fuselage is closed around the cockpit/intake and exhaust assemblies, plus a palette of equipment in a recess behind the pilot, 20g of nose-weight, and the radar-equipped nose cone, which also includes the intake lip. The lower wing is full span, and has six holes drilled out from inside before the bay walls and top detail insert are added inside, to be covered by the upper wing halves, which have more detail for the gear bays on the inside. The fuselage and wing are mated at the same time as the slats are glued to their actuators along the leading edge of the wings, leaving the flaps until later. Meantime, the main gear legs are built from a single part strut and two-part wheels, with a captive bay door on the back, and a C-shaped actuator joining them together. The inner bay door has a short jack on the forward edge, and behind the wing, repeating the process on the other side and placing a small rectangular insert into the fuselage underside. The nose wheel is a single part and is added to the strut that was fitted earlier, and has a side opening main bay door, plus a two-part folding front door to finish it off. The flaps are simple, each one consisting of a single part that fixes to the trailing edge of the cut-outs on two pegs. While the model is inverted, the two-part fuel tanks and pylon with forward stabiliser post is glued to each wing, and a clear peg has been included on the sprues just in case you didn’t include enough nose weigh to prevent a tail-sitter. The FFAR palette is fabricated based upon the outer skin, with four walls fitted, the front one having 24 holes that show the tips of the rockets, and the rear face having an impression of the rear of the rockets and their fusing wires, which are glued to an upper surface that fixes to the fuselage underside on two pegs behind the nose gear bay. If you have decided not to deploy the rocket pack, remember not to bore out the holes in the fuselage beforehand. Like its sibling, the Dog Sabre had fuselage-mounted air-brakes just in front of the tail, and these can either be mounted flush, or exposed by adding a V-shaped strut inside the bay to hold it at the correct angle, with scrap diagrams showing how they should look from behind. The elevators have long overlapping tabs that pass through the tail, and should give a strong joint with little chance of sag, plus a small blade antenna that is added under the port elevator. Finishing off the model begins with the canopy, which unusually for its era includes a pair of styrene inserts within the lower rails of the opener, plus a clear rear-view mirror. A platform with a clear part fixes into the rear of the canopy too, giving it a more detailed look, especially if you can find some Tface masks from Eduard to paint both sides of the clear parts. The windscreen is fixed, and the canopy can be posed closed by cutting off small sections of the deck at the rear of the cockpit, or opened clamshell-style by leaving those intact, and gluing it into position at the rear, with a curved clear part inserted into the fairing behind it. A choice of a crew step or a small insert to depict it retracted are provided to fit into the port side, and two tiny clear lights are popped into the leading edge of the wingtips. Markings There are two markings options on the decal sheet, although I initially thought there were four, as the usual 39 and 39a style numberings haven’t been used on this sheet. I’m easily confused though, and reading the headings makes it clear within moments. From the box you can build one of the following: F-86D-20 Sabre Dog S/n.51-2989, McConnel AFB, 1956 F-86D-40-NA Sabre Dog S/n.52-3722, 15th Fighter-Interceptor Sqn., 34th Air Division, Davis Monthan AFB, Arizona, 1957 <ul style="list-style-type:upper-alpha"> Decals are by Cartograf, which is a guarantee of good registration, sharpness and colour density, with a thin matt carrier film cut close to the printed areas. It’s a shame there aren’t any instrument decals, but the wealth of stencils more than make up for that minor disappointment. Conclusion Although the kit hasn’t become rare while out of production, it’s nice to see it back on the shelves with some modern decals and stencils. Detail is good for the era, and still holds up well by modern standards. Highly recommended. Carrera Revell model kits are available from all good toy and model retailers. For further information visit or
-
The Revell 1/28 Dr1 is about the first model I remember seeing. I was maybe 4-5 and remember the triplane and Camel sitting way up on a bookshelf out of reach. I could see them closer as I walked up the stairs peeking under the banister but no touchy. I have for years thought it would be a great idea to build these three kits, (now four) in the original kit markings but with just some scratched tweaking here and there. Enhancing the kits but still keeping them the old Revells we all grew up with. The Camel and SPAD are easier because the original markings for those kits are correct, for the Dr1, we have a problem. Molded in bright red plastic with no painting required, re-boxed in later years but with better decals. Originally, it was FI 102/17 in red and we know MvR never flew 102 like this in red. 102 was an FI and light blue with streaking finish. I wanted to use the maltese crosses as that was in the first kit. Newer issues gave me the 425 I needed to use the maltese crosses if I cut away the excess white panels. Problem solved, close enough. I got the kit off Evilbay for cheap and was thrilled to find a copy of an Ed Boll article on how to improve the kit. Don't know the date but would like to find out. I was born in '56, it's as old as me. The wings were flimsy so I used Tamiya thick slathered around and let them set up over night making sure they would stay straight. The Boll article says the prop is fine but I thought I could improve. I corrected the right aileron with some .10 styrene and putty by tracing the left. Boll would have me swap the throttle and fuel pump as Revell got them backwards but I left them as is. I did do the cloth screen behind the seat as suggested. I will add belts from yogurt cup foil and a seat cushion. Engine next.
-
These are a pair of vintage kits, assembled with minimal tweaking. Both represent planes involved in fighting over Casablanca during Operation Torch. The first is a Grumman F4F-4 Wildcat of VF-41 on USS Ranger, piloted by Lt(jg) 'Windy' Shields. The second is a Curtiss Hawk 75 of GCII/5, operating from Cazes aerodrome outside Casablanca in French Morocco, piloted by Lt. Yves Fabre-Garrus. Over Casablanca at the start of Operation Torch, fighters designed for the US Army fought against fighters designed for the US Navy. The Army's Curtiss design was flown by French pilots against Navy pilots in Grumman's design. The Wildcat and Hawk were of roughly the same vintage, being products of the late thirties, with the Hawk coming into service not long before the Wildcat began production. Among the Vichy units at Cazes operating Hawk 75s was GCII/5, which continued the heraldry of the Lafayette Escadrille of American volunteers during the Great War. USS Ranger carried two Wildcat squadrons, VF-9 and VF-41. VF-9 strafed French airfields unopposed. GCII/5 put up the first French fighters, which drove off Navy observation planes spotting for the fleet's bombardment of French warships in harbor. These Hawks returned to Cazes with VF-41 at their heels, even as more French fighters were taking off. The result was a sprawling fight fairly near the ground. Six Wildcats failed to return to USS Ranger, though two pilots survived in French hands. Seven French pilots of GCII/5 were killed, others wounded, and many planes managed landings but could not be repaired. After the first few hours of fighting the French could offer little opposition in the air. The decisive result owes much to VF-41 having such a tactical advantage, but the Wildcat was sturdier and more heavily armed than was the more maneuverable Hawk. Lt(jg) 'Windy' Shields of VF-41 is credited with two French fighters downed. He was then bounced by a Hawk, and bailed out of his burning machine into brief captivity. Lt. Yves Fabre-Garrus of GCII/5 was wounded over Cazes and managed a successful belly landing. The Vichy Hawk scheme is a guestimate, based on descriptions of the usual dark grey on uppersurfaces being repainted in a 'sand' color. There was apparently a French color dubbed 'Sahara Yellow' at the time. Here's the build thread, in the Revell/Monogram Classic group build:
- 11 replies
-
- 17
-
-
- dogfight double
- Revell
- (and 1 more)
-
’65 Shelby Cobra 427 (07708) 1:24 Carrera Revell The Cobra began life as the AC Ace, which originally ran with a straight-six Bristol engine that was growing long in the tooth, and coincidentally with the engine ceasing production, the racing specialist Carroll Shelby contacted AC enquiring whether they could prepare their chassis to receive a larger V8 engine, that ended up being a Ford block. Completed cars were shipped over to the US to be fitted with engines and transmissions, and various alterations and accommodation were made, including a Mark II with rising popularity resulting in the type being sold in the UK and Europe in addition to the US. The Mark III was a total redesign although it looks similar to the uninitiated, but using larger diameter tubing for the chassis, a bigger radiator aperture and coil-spring suspension to replace the aged leaf-springs of earlier models. It also had more aggressive, wider arches and a gigantic 7.0L Ford motor that was also known by its 427 cubic inch displacement, which formed part of the name. The Mark III reached production in 1965, but not soon enough to join that racing season, so some race-tuned examples were de-tuned and given the non-racing niceties such as windscreens. There have been many variants, copy-cats and look-alikes over the years, and I’ve even had a ride in one kit car made from all manner of bits with a fibreglass bodyshell. It certainly scared like a Cobra! The Kit This is a reboxing of an earlier tooling from Revell with a copyright symbol dating from 1988, and judging by the design of the sprues, that seems reasonable. It arrives in a medium-thickness end-opening box, and inside are three sprues and the bodyshell in white styrene, a large sprue of chromed white styrene, a clear sprue and four flexible black plastic tyres on a cruciform sprue. There is a decal sheet inside the colour instruction booklet, which has profiles on the rear to aid painting and decaling. Detail is good for the era, and time has been very kind to the moulds, especially the important bodyshell. It’s a full kit and includes a detailed interior and engine, with plenty more detail on the underside, suspension and chassis rails. Construction begins with the rear axle and differential, which drops into the rear of the chassis, with lots of detail painting going on throughout. The suspension metalwork and coil springs are placed over it, and at the front a similar, but more involved assembly is added to the front, then detailed with the steering rack and anti-roll bar. The two-part block is painted blue and has the sump glued to the underneath, followed by the intake airways and airbox with the Holley carbs and an eight-pin distributor that just needs wiring up. The two four-pot cylinder blocks are painted blue and have a chromed rocker cover and four manifold pipes added for later installation, while on the block the many pulleys and alternator are fixed to the front, with more parts added on the sides, then the two cylinder blocks and air inlet assembly are mated to the block to complete the engine. It inserts into the chassis with a surprisingly short drive-shaft joining it to the rear axle. The radiator core is fixed to a fairing, with a feeder pipe that connects to the motor, and has a small decal applied, which is one of many added to the engine during the build. The interior of this two-seater is cramped and only as long as a seated person, with pedals and gear lever fitted to the left side, and hand-brake in the left side of the right seat well, including a decal for the gear knob and both of the pedals. The area under the scuttle is a single part with lots of detail painting and another decal, and the dash is covered in decals, one for each of the seven dials on the left side, which also receives the steering wheel. Those two assemblies are added to the front of the cockpit and glued in place, with the pencil-quilted seats filling the rest of the space and mounting on a lateral rail each. There are four-point seatbelt decals for both seats and an adjuster mechanism fixed to the wall next to each seat. More engine bay detail is painted up and made ready to fit under the front edge of the bonnet aperture later on, along with the interior and the bonnet panel, which hinges on a linked pair of half-circle shapes. The bodyshell needs to be painted and decaled before you add all this though, with three views of the part showing the correct decals to apply to each side, front and top of the shell. Two small holes are drilled through from inside to mount the single roll-over hoop behind the driver, and the interior of the bodyshell is painted black, as is the bonnet panel. After the bodyshell structural work is completed, the wheels are made up in pairs, as they are both handed and sized, with smaller rims at the front and larger ones at the rear. The sprues mark them out as 200 and 300, and each hub is made up from chromed front and rear halves, plus a three-spoke knock-off wheel-nut in the centre of each one, and an optional blue stripe around the outside sidewall and white Goodyear logo into the bargain. The smaller wheels fit to the front and the larger, wider ones at the back. They’re old-skool rubber, so while they’re probably lower profile than many of the day, they have a fairly deep sidewall, and each tyre is solid, so shouldn’t sag over time. The rest of the parts are mainly chromed, including the stubby bumper irons front and back, the boot handle, backing plates for the back lights with clear lenses, the afore-mentioned roll-over hoop and fuel cap on the aft deck, wing mirror for the driver’s side which lives up to its name by being on the wing, a dash-mounted rear-view mirror and two chromed windscreen washer jets. The windscreen frame is chromed too and has the windscreen glazing installed from behind, painting the sun visors black and the windscreen wipers too. There are a pair of small quarter-light windows on the sides of the screen, and these can be set at an angle if you wish, as they’re useful to deflect the wind. The headlights have chrome reflectors inserted into the holes in the front, and have clear lenses with a mesh pattern moulded into them, gluing the indicators under them after painting the lenses amber orange and inserting the bumpers into twin holes in the front. Down the sides are the monstrous side exit exhausts with their muscular quad manifold tubes rounding the corner at the front and a diagonal exit at the rear. The exhausts are made up from two halves, so scrape off the chrome from the mating surface to help the glue adhere, or strip all the chrome with your preferred method, build them up and sand the seams clean before adding some metallic paint of your own to give it some more realistic shades due to heat discolouring. Incidentally, there’s a racing windscreen on the clear sprue, and a tonneau cover for the cockpit on one of the white sprues if you fancy going off-book with your build. It’s a free country… Kind of. Markings There is one decal choice on the sheet, and it’s an impression of the Gulf blue and orange scheme, with twin orange stripes provided as decals that cover the bonnet’s power-bulge with a ‘427 cu.i.’ logo for the sides. There are some black 98 and 5 digits for the white racing number circles, and a quantity of small advertising decals for the front wings. The interior decals for the engine, dashboard and even the seatbelts are very nicely done too, with cylinder head decals adding the ribbing on top along with the Cobra 427 branding. There are even a pair of circular silver mesh decals for the headlamps, and pin-striping for either side of the orange stripes. Decals are by Zanchetti, which is a guarantee of good registration, sharpness and colour density, with a thin gloss carrier film cut close to the printed areas. Conclusion We know a lot of people love the Cobra, partly for its looks, partly for its terrifying turn of speed, and it’s good to see it back on the shelves. Highly recommended. Carrera Revell model kits are available from all good toy and model retailers. For further information visit or
-
Porsche 934 RSR Jägermeister (05669) 1:24 Carrera Revell Everyone knows the Porsche 911, and it’s a design classic for reasons that are already clear. The 934 was the race-prepped variant of the 911 Turbo that was produced for two years, and began its racing career in 1976 with a grand-total of only thirty-one made from start to finish. It drove to success in Europe and America at the hands of some talented drivers, and continued to win late into the decade. The 934 and 935 were highly successful until after the turn of the decade, which when looking at its statistics is hardly surprising. It began with 480bhp, but was later tweaked to produce 550bhp, with many fibreglass panels giving it a great power-to-weight ratio as well as an aggressive stance, requiring some additional weight to be added for it to comply with some competition requirements, hurling itself to 60mph from a standstill in a shade under 4 seconds. The 934 and 935s both raced in the garish Jägermeister colours, and Jägermeister’s relationship with motor racing is a long-standing one, starting in 1972 and now spanning 50 years, which is at least part of the reason for this boxing that celebrates that anniversary. Also, who doesn’t love a bright orange Porsche with wide arches? The Kit This is a reboxing of the 2017 tooling of this type, which was also first issued in a similar bright orange livery under the Jägermeister banner. The kit arrives in one of Revell’s medium-thick end-opening boxes, and inside are several bags containing two sprues and the bodyshell in bright orange styrene, four sprues in black, one in muted aluminium, one sprue of chromed styrene, a clear sprue, four flexible slick black tyres, a bag with six thumb-pots of acrylic paint, a small pot of glue with needle applicator and #2 paintbrush. The package is rounded out by a handsome decal sheet and the instruction booklet, which is printed in colour on matt stock, with profiles on the rear pages. Detail is as you would expect from a modern Revell tooling, and should be more than adequate for most modellers, with a depiction of the flat-six engine in the rear, and the 30+ gallon fuel tank and ancillaries in the front under the bonnet/hood. Construction begins with the transmission, which is built from halves, as is the flat block, which is mated to the wide end on a large peg. The airbox and intakes are added on top, and at the front the pulley system and engine mount are fitted, along with the turbo system and other ancillaries, then the twin exhaust manifold is inserted into the block from below, mating with the turbo system where the two become one pipe. Another set of pulleys are added to the rear of the motor, and the drive-shafts and their gaiters are inserted into the transmission block, which has moulded-in checkerboard strengthening ribbing all over it. The floorpan has its details painted, then has the front axles added onto turrets, to be linked together by the steering arm, which has its end-pins mushroomed by applying a hot screwdriver blade and some pressure to the tip. Just don’t use a screwdriver you’re fond of, as the heat might soften the metal of the blade. A section of the floor pan is applied over the axle, and a bumper iron is added to the front, then at the rear, another engine carrier beam is placed across the front of the bay, with the block and transmission assembly dropped onto it, then layered over with suspension arms and anti-roll bars. There is predictably a wheel in each corner, and each one is made up in a similar manner, but each one is handed plus differently sized fore and aft. Each wheel has a three-part brake disc with a free-rotating (hopefully) cup in the centre, into which the thick pin on the rear of the chromed rim is pushed, with the flexible tyre snugged over the rim, and a large chromed nut inserted into the centre. Carry that task out four times, then put the relevant wheel on the pertinent corner to finish off the rolling chassis. The interior is begun by detail-painting the tub, then adding pedals, gear stick, hand brake (remember those?) to the driver’s area on the left, and a box under the parcel shelf at the rear. The bucket seats have separate headrests, and there is a choice of one or two seats to be fixed to the floor, both of which have deep lateral cushions moulded-in, and decals supplied for the four-point ‘Autoflug’ seatbelts. Around that fits a four-part roll-cage that has the two door cards slotted into the grooves in the sides of the interior. Before it can be inserted in the bodyshell part, there are a number of substantial sprues carriers between the front and rear windscreens, and one more in the engine bay, all of which will need carefully removing from the part, taking care not to damage the edges, as those of the windows at least will be very visible once the model is finished. There is detail painting to be done around the bodyshell as well as inside the front compartment that is known colloquially as a ‘frunk’ in modern parlance, where there is also a trio of decals and a couple of additional detail parts, plus another chunk of roll-cage that fits beneath the bonnet cover, which was probably non-structural fibreglass on the real machine. One of the extra parts in the frunk is an intake, which corresponds with a thinned section of the bonnet lid, which can be optionally removed after a quick check of your references. The rear bumper has additional detail painting to do, as does the clear full-width rear light strip, which is painted transparent red and orange to depict the lights before they are inserted in the rear of the vehicle. The boot has the big spoiler moulded-in, with a drop-in louvre section on top, and small chromed ‘button’ inserted into each side of the boot lid. It has two large V-shaped hinges that clip into place on two raised areas per side, which will trap it in place once the interior is inserted. The dash is a well-moulded part that is shown with detailed painting instructions and seven decals to give it some extra realism, plus the steering column and wheel, the former having stalks moulded-in. Another stalk grows from the centre of dash, almost out of range of the driver, and I will admit to having no idea what that is. The completed dash mounts inside the bodyshell under the scuttle, and once the glue is dry on that, the interior can be popped into place, trapping the boot lid/spoiler. After that, you can mate the bodyshell and floorpan assembly together without needing glue before completing the structural work and detailing parts of the model. This starts with the front bumper, which has three black mesh styrene inserts pushed into the front before you hang it on the front irons, adding a pair of indicator glasses in the corners, and a towing eye to one side. Above them are a pair of cut-outs for the main lights, which have separate reflectors with trim inserted, then are covered over with a clear lens after painting the bulbs. Glazing the windows is next, with each part having black rubber seal or trim painted around the edge, then the windscreen and rear screen both insert from outside. The side windows are each in three sections, pre-painted with their trim before they are inserted into the cut-outs around the doors, adding a wing mirror with chromed lens and a door handle under each one. The final act is to insert the emergency cut-off handles on the scuttle in front of the driver’s side, and pop the twin windscreen wipers into their sockets in the scuttle after painting them a suitably black/rubber colour. Markings There are two decal options included on the sheet, both from vehicles that raced in 1976. Both are a bright lustrous orange shade, which if you use Revell paints will require some mixing on your part. I believe that there is a specialist colour available for Jägermeister orange somewhere, so that’s always an option if you exercise your Google Fu. From the box you can depict either of these two race schemes: DRM Eifelrennen, 1976 1000-km-Rennen Nürburgring, 1976 Decals are by Cartograf, which is a guarantee of good registration, sharpness and colour density, with a thin gloss carrier film cut close to the printed areas. Conclusion A nicely appointed reboxing of this recent kit from Revell, in a fascinating scheme celebrating Jägermeister’s 50th anniversary of sponsoring motorsport. Highly recommended. Carrera Revell model kits are available from all good toy and model retailers. For further information visit or
-
 Hello all, Here is my entry for this GB - Revell's recently released 1/48 SR-71A Blackbird, which will be marked as 61-17972 which holds 3 individual speed records: 1st September 1974: New York to London in 1 hour, 54 minutes, 56.4 seconds (Average speed of 1806 mph). 13th September 1974: London to Los Angeles in 3 hours, 47 minutes, 35.8 seconds. 6th March 1990: Palmdale California to Dulles in 1 hour, 8 minutes, 17 seconds (flew at a max cruise speed of Mach 3.3). Staggering numbers I think you'll agree! 972 first flew on 12th December 1966 and during 23.5 years of operations, it flew for 2801.1 hours. 972 became the 'Skunk Works' test Aircraft before being flown to the Udvar-Hazy Museum, at Dulles International Airport. I had the pleasure of visiting the museum way back in 2013 (when my camera wasn't great ) Now, to the kit: Extras: I'll be using Caracal decals, Quinta cockpit set, New Ware masks and I've ordered a set of ejection seats from Hypersonic models and will most likely order a set of exhaust nozzles from BAM. Some essential references: And some online sources: https://www.sr-71.org/photogallery/blackbird/17972/ http://www.habu.org/sr-71/17972.html I'll take some hints and tips from both @Alan P's and @Serkan Sen's builds. Stay safe Dave
- 24 replies
-
- 12
-
-
-
 I built one of these a few years ago and painted it in Swiss post-war livery. I'll post a photo or two of that as well, but for now I have decided to go with a less esoteric set of marking and built this OOB and as the famous ace's aircraft--as soon as I have some bench space to do so. I checked on Scalemates and this one goes all the way back to the mid-60s, so I think it qualifies. Here's the Swiss... --John
- 28 replies
-
- 11
-
-
- Nieuport N.28C-1
- Eddie Rickenbacker
- (and 1 more)
-
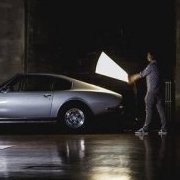
 Here's my attempt at Revell's 1/72 Eurofighter Typhoon from the "British Legends" kit. I'd heard that the Revell kits don't have the full set of weapons pylons to accurately represent the RAF versions, so these were part of the modifications (new pylon set from Air-Graphics models), along with some Brassin weapons and Eduard etch set. Assorted other ground support bits were from Flightpath, LP, and ReedOak figures, for the 'night shoot' pics. Airbrushed in Hataka acrylics and weathered with oils. Decals were another aftermarket eBay buy (from an Airfix kit) to represent the Coningsby aircraft I wanted. I also modified the etch FOD covers (adding plasticard strengthening and guide vanes) so they could be added / removed as required. The whole thing isn't perfect but it's been fun [mostly!] and good photography practise too. Thanks for looking.
- 45 replies
-
- 92
-
-
-
- Eurofighter
- RAF
- (and 1 more)
-
 Revell's old widebodies (A330 and A340) are rare models. Unless they are for sale on eBay for an exorbitant amount of money. As a model maker, my initial concept was to have in my model collection, at least 1 model of each plane, either Boeing or Airbus family. But for lack of kits, this goal was kinda difficult. The adventure of finding an A340 at an affordable price was a difficult task, but not an impossible one. It was still 2021, and in one morning I decided to spontaneously start looking for Revell models that could be for sale on a Portuguese second-hand shopping site. Out of the sudden, I came across an ad for an old Revell A340 for sale. As the seller was close by, I soon said I would buy the model and we set up a meeting to do the business. I bought the kit for only €20, when I had already seen the same kit for sale for €90 plus the cost of shipping on eBay. I was indeed a lucky bird! The box was still the original, but it already showed the years passing through it, with some duct tape corrections in the corners. The sticker with the price (in German marks) was still in the box, which confirmed what the seller had told me: that he had bought it in Germany, shortly after the fall of the Berlin Wall in the early 90's. I started to open and inspect the kit and quickly realized that a wing was missing. I panicked and thought I had burned a €20 note. Without the wing it wouldn't even be worth trying to assemble the kit. I contacted the seller and he apologised and said he would look for the missing wing at home. After a couple of hours I got a call saying that he hadn't found the wing, but that was no problem, he would refund me. Conclusion. This kit was like a gift. The next task was to find a wing for the plane. I sent an email to Revell, who replied that they no longer manufacture parts for the kit in specific. I had no other solution but to ask my modeler friends for help. I contacted an Austrian friend, and he told me he had the wing, because at the time he was converting his kit from an A340-300 to an A340-600. Lucky me (again)! I could start the kit now. I waited for a more favourable time to start the assembly, but I decided to start making the first parts and then in the painting phase, joining my other planes, so that they are all more or less in the same phase.The paper of the instructions was already yellowed for being so old, and it is curious to see that Revell's graphics have only recently changed. After having done a quick reading of how and what this project would be like, I officially started the assembly. I started with the main fuselage, covering the windows' holes. This time, I decided not to use Revell's Plasto entirely, but plastic putty instead, and use only Plasto on windows that effectively need to disappear to comply with the airline's layout. As a rule, I don't worry too much if the window holes are 100% filled because they will be covered by decals later on. With this, I just want to leave a surface for them to settle in the last stages of the process. After the windows I went to the emergency exits. The A340 as a rule has emergency exits number 3 narrower than the others. On the A340 that I'm going to do, this is exactly what happens, so with a 600-grit sandpaper I completely eliminated the emergency exits and reduced the size of the rain gutter. The major work on the fuselage was complete. According to Revell's instructions, we start with the landing gear. As a rule, I like to take care of the landing gears at the end, so they don't break or something like that. Here it was mandatory to at least mount the central and front landing gear. I confess that for an already quite old mold and kit, the fittings and small pieces all come together like a small puzzle in perfection. On the central and front train I had no big problems and all the parts are super detailed. There was only one small problem with the whole process: Revell printed the instructions wrong and I glued one piece backwards. I only realised later when I saw some pictures. I cut it with a scalpel and re-glued it on the opposite side. I think the mistake is imperceptible, since the piece was in a V shape. I hope everything is uniform in the final paint adjustments! As with any kit I make, I like to collect a lot of pictures for later in the painting and decals stage to make things as they should be, and also to guide me on what colors I should use. The colors for the landing gear bays were one of the hardest I had to choose. In some the photos it looks like it's a mix of gray with oil residues, in other photos a more orange tone. In order not to create more doubts and confusion and after seeing a video on Youtube of this kit, I chose the reference 71.117 “Como Brown” from Vallejo. I confess it got a little darker than I expected, but it served the cause. After the paint dried, I applied Tamiya's black panel line. For the landing gear legs, I opted for 71.064 “Chrome”. The end result was this: The landing gear parts fit in the right places without any major problems. I let it dry so that I could then glue the central section to the main fuselage, so that I could then join the two main parts together. Here the process was not complicated but became complex, as the two main parts of the fuselage assumed a convex behavior, joining in the front and rear parts but moving away in the center. In the end, with the help of a lot of tape, the parts were joined together for a whole and here Revell continues with its characteristic gaps. It took a considerable amount of Plasto, especially in the central section, for the flaws to at least disappear.
 -
 With 3 aircraft builds on the go I felt it was time to spice up my workbench with some wheely goodness, so I'll be building this... The kit has its origins in a Monogram 1971 Plymouth Satellite kit (first released in 1984). I'm not exactly a big officionado on US muscle cars but apparently the kit isn't a great representation of the movie car (I think the actual car in the movie had different rear bumper sections from a later model, and the side skirt detail removed, etc.), I'm not planning on going overboard with the accuracy though - just going to pretty much do an OOB build, with the addition of the resin bloke as hopefully a fun build. Here's what greets you inside the side opening box... So the body section is heat sealed into a sub compartment thankfull to stop it getting box-rash, but the other half contains another poly bag? Inside that there are sub-bags for various parts - chrome tree, clears and wheels (though they may have been stuffed into the body shell). Here's all the bit laid out... Kit instructions are the new style Revell colour booklet and the decals seem reasonable, nothing too intense to worry about other than those bonnet stripes. Here's the contents of the aftermarket figure, just some scant instructions on how to form the shotgun trigger from the PE, I might leave that out, the resin looks fine for me. Nothing too stressful looking in terms of the kit parts count, though I need to figure out how much of the bodywork I can assemble pre-paint. I had a bit of a test fit of the body and chassis rails and it's tight without the interior tub and engine getting in the way. I might be able to get the rear sections attached and front grill but the front lower bumper would need to be added separately which is a bit annoying (looks like there'll be a seam line). Maybe I can 'cut and shut' the lower chassis later then drop the engine in through the hood opening? Something to ponder as I cleanup the parts. I'm also wondering about the chrome parts - I'll need to de-chrome with some bleach but I wonder if I could put a bit of liquid mask into the light openings to keep those bits chrome?
 -
Boeing 767-300ER British Airways (03862) Revell 1:144 I'm amazed to recall that it has been nearly 40 years since I first saw the Boeing 767 back in 1982 at the Farnborough airshow, where it was making an appearance with it's stablemate, the Boeing 757. Since then over 1200 of all variants haver been delivered, with the cargo version still in production nearly forty years after the types first flight. Engine options were the Pratt & Whitney JT9D/PW4000, General Electric CF6, or Rolls-Royce RB211. British Airways opted for the RB211 as it was common (in sub-marks) to their 747 and 757 fleets, a choice made by only one other airline buying new (China Yunnan). There was also a lot of commonality between the 767 and 757 flight decks, which made crew training and availability more flexible. Entering service with BA in 1990, their 767's remained in service for 28 years until November 2018. In the early 2000's 7 aircraft were sold to Qantas, making them one of the few airlines to operate the RB211 powered 767.The initial variant was the -200, joined in 1984 by the -300 as modelled here, which had a 21 foot fuselage extension increasing seating capacity by around 50, depending upon layout. Revell's kit was first released in the early 1990's (the date moulded inside one wing is 1992), and has appeared in various different boxings over the years. This latest release is packed in one of Revell's end opening boxes featuring a painting of G-BNWB climbing into an evening sky. Inside is one polythene bag with all the sprues for the 'standard' 767 kit, and a separate bag containing the RB211 engines particular to this version. Also included is booklet of instructions in Revell's usual style, and a very nice A5 sized decal sheet. As far as I know only the previous Gulf Air/British Airways boxing has featured the Rolls-Royce engines, so they make a welcome return here. RB211's below: Produced in white plastic, the moulds are obviously holding up well the mouldings are very sharp with no evidence of flash. Detail is engraved, and comparatively few parts make up the whole kit. A separate clear sprue is provided for the cockpit glazing, but no provision is made for the cabin windows. This is not really a problem as most airliner modellers fill the cabin windows anyway, and use decals to represent them. A set of 'full' windows and a set of window frames are provided on the decal sheet, so you can make your own choice. Construction begins with the nose gear bay, which is inserted into the fuselage halves, which can then be joined. There is no cockpit interior provided, unlike in some of the more recent airliner releases. Wings and tailplane halves are then assembled and joined to the fuselage in a construction sequence which is simplicity itself. You have the choice to build the model 'in flight' with retracted undercarriage, or with it deployed for when on the ground. Finally the engines are added to complete construction of the model. The kit still contains the original engines which represent the Pratt & Whitney JT9D/General Electric CF6. As such they are a little 'generic' but useful if you plan to use aftermarket decals and build a non-BA machine. Aftermarket engines are also available if you wish to go down that route. Here they are, but are marked as not for use in the instructions: The decals are beautifully printed with good colours and razor sharp detail. The Chelsea Rose was one of my favourites from the 'World Image' era, so makes a great choice for this model. Plenty of stencilling is provided, and the tiny 'Roll-Royce' logos are little works of art. Your guarantee of quality is assured as sheet states it was designed by DACO, who only produce the highest quality. The painting/decaling instructions are in full colour, with paint numbers called out from Revell's own range. 767 window and door arrangements can vary by airline, so it is always worthwhile checking references for the particular aircraft you are modelling. The instructions show the correct layout for a BA 767. However the fuselage mouldings do not tie up with the drawings, particularly with reference to the door by the trailing edge of the wing. It is not present on the kit fuselage, which is not a problem, but at the very least you will need to fill some of the windows where it is located. I expect though that most modellers will anyway fill all the windows and use the decals provided, which have the correct pattern, and door outlines. Conclusion. It has been a while since this kit was last available, so it is great to have it back. The provision of the RB211 engines is also welcome, as this is the only 767 kit that can give you the BA option straight out of the box. Add to this the provision of a beautiful decal set that would cost a fair bit as an aftermarket sheet, and this is a great package all in one. Recommended. [edit] Some useful tips on building this kit from member Skodadriver here. [/edit] Revell model kits are available from all good toy and model retailers. For further information visit or
-
Finish no9 for 2022 is Revell's F101B Voodoo in RCAF livery, No409 Sqn RCAF Nighthawks based at CAFB Comex BC. Built OOB less the Belcher Bits decals and the air brake area had a rivets panel added made from a aluminium can. This is the later scheme in a semi gloss version of US air superiority grey on the second batch of Voodoo the RCAF received from the USAF. The first batch did not have the IR sensor on the nose while the second did but did not have formation lights so these were removed from the kit moulding along with some of the antenna under the nose and behind the cockpit. The Belcher bits decals work okish but don't like Microsol, I had to remove a couple that wrinkled badly and used the kit decal instead along with some of the stencil data. Painted with just Tamiya acrylics this time as I couldn't find the correct Mr Hobby colour in my area. As usual all comment welcome. I didn't realise how big the Voodoo was when I started but its bigger than the F102 Delta Dagger I finished earlier this year.
-
Straight off the back of the Meng F102 Delta Dagger I'm starting another century series aircraft, Revell's F101B Voodoo from 1991. This was purchased from Rob at my local model club last month for the princely sum of £5, I'm pretty sure this is from 1991 as the original price tag of £6.95 was still on the box and the instructions are dated 1991. Apart from the decals looking a bit yellow the parts look good moulded in very 1970's "airfix" like soft silver plastic and were all still on the sprue. I have ordered a set of Almark decals from Hannants which has the choice of US and Canadian aircraft as I haven't decided on air superiority grey or NFM. Sprue shots first and then work started on cockpit.
-
Century series fighters, gotta love them. Here is F-101B Voodoo - the two seater interceptor variant. Kit is the Revell 1991 tooled 1:72 kit which is slightly difficult to come by these days. I liked the kit no real issues with the construction and the details are mostly pretty decent. Might lack some of the finesse of brand new kits but does not look bad for it's age. Decals were beyond saving so I used Microscale decals instead. The sheet did not have national insignia so they were sourced from another sheet, Added some details with Reskit wheels, Pavla cockpit and Master pitot tube. Painted with Vallejo Model Air acrylics and weathered with Flory models wash and oil paints. Built for Century Series GB but missed the deadline. Build thread can be found here : Thanks for looking, feel free to comment!
- 21 replies
-
- 63
-
-
-
- F-101 Voodoo
- 1:72
- (and 1 more)
-
Maverick's F-14A Tomcat (03865) 1:48 Revell The Tomcat was a much-loved and capable aircraft that had a unique look, and was brought fully into the mainstream media by the original "Top Gun" in the 1980s. It has its origins in the late 50s and a need in the 60s for a replacement to the (also much loved) Phantoms with something more agile and adaptable. After much faffing about (does all defence procurement do this?), a Grumman proposal was picked for development and to avoid any further flip-flopping by the then US Defence Secretary, building of a prototype was ditched in favour of development airframes. Only four years after first flight, the F-14A Tomcat went on its first deployment in 1974, serving with the US Navy until it was retired in 2006, accompanied by much gnashing of teeth and name-calling of its replacement, the F-18, which took some time to abate. The F-14A was the first model, and because of a change of heart by the powers that be, which resulted in the Marines leaving the list of potential operators, it did not have the air-to-ground capabilities it was originally scheduled to possess. Instead it with a pure interceptor/fleet protection aircraft, armed with AIM-54 Phoenix for Beyond Visual Range (BVR) engagements for up to 100 miles in perfect conditions. It was also capable of carrying AIM-7 Sparrow and AIM-9 Sidewinder for self-defence and closer intercepts. Later in service, the ground attack capability was added to upgraded A variants, Bs and of course the later D that was dubbed the "Super Tomcat" because of its vastly improved capabilities. The Kit Now in a tie in with Paramount Pictures and the new Top Gun Film, Revell are re-issuing kits from their back catalog. Despite the optimistic date of 1993 on the sprues, it would seem this was when it was re-issued back then by Revell, and the kit is the original 1978 tooling from Monogram. While this is not Monograms worst kit of the time, it is not one of its best either. The best thing to say is that its a product of its time. In addition to the original kit parts there is a sprue with what looks to D model engine exhausts, and a small black sprue with chin camera pod on it. Construction starts with the cockpit. Here there are separate seats unlike some monogram kits of the period. Each seat is 4 parts with separate ejection seat handles. There are decals supplied for the instrument panels and side consoles. Once the instrument panels and seats are in the complete cockpit goes into the upper fuselage. While you get a 1/48 Mav for the front cockpit Goose must still be in the bar. Next on the underside fuselage engine faces are added followed by the intake trunks. The wings (which do move) are fitted into the lower fuselage and the top half is joined. To the now complete fuselage the nose cone is added along with the gun vent on the left hand side. Underneath the front gear leg is fitted along with the doors to the front gear well. At the rear the three part exhausts go in, and the arrestor hook goes between them. Four Phoenix missiles are provided along with two weapons pallets for the underside if you wish t fit them. Next up back on top the vertical stabilisers go on. Flipping the model back over (again) the main gear and their doors are fitted. The underwing weapons pylons have the Sparrow missiles moulded in so leaving them off would involve some surgery and scratch building. The side pylon for the sidewinder, and the sidewinders are separate parts. To finish up the canopy and under nose camera pod are fitted. Decals The decal sheet from Zanetti in Italy (so no issues there) provides the one option to do the Aircraft from the film, so no surprises there. Conclusion If you really want a model from the film then this will do the job. Revell model kits are available from all good toy and model retailers. For further information visit or
-
 I'm so glad I discovered this GB. This website is so vast and filled with all sorts of excellent topics there are so many I miss. Perhaps a good thing I discovered this late, I have dozens I could have submitted, especially all those old Revell fighters... As an indication of the madness, I have 64 images like this in my album,....insane... Anyway, after a couple of days with this GB simmering on the back burner and poking around the stash to listen to what would be calling me I remembered this old kit in a bag. After just completing the Monogram SE5a, I was looking for an excuse to build this and here you are. I'm sure there are others here but it occurred to me this kit answers to all three companies in the GB, Aurora, Revell and Monogram all made this kit. In the spirit of the GB building older kits, I will not go crazy on this as I did the SE5a, no real need to anyway. I will tweak it a little here and there however. I've always wanted to do Brown's aircraft in the generally excepted scheme it wore when he engaged Richthofen on his last flight. Thanks for this GB !!!
 -
HNY to everyone. Last year was a very busy year for me, so have not been able to get on here as much as I would have liked. I guess my new years resolution will be to visit BritMod more. Thought I'd show off my conversion of the new LWB Revell III series Land Rover into a SWB version. If useful, I will post some of the pics I took of the deconstruction stage. Cheers Richard
- 23 replies
-
- 19
-
-
- Revell
- SWB Landie
- (and 1 more)
-
I thought I’d have a change from my usual diet of European airliners and here is the result - the Revell A320 finished as Iran Air’s veteran EP-IED. I used the final (Lufthansa) release of the Revell kit, probably better described as a box of flash with some rather forlorn looking bits of A320 attached. The kit was a mess and bashing it into shape wasn’t a lot of fun. I added a few details from plastic strip, attended to the usual corrections to the wings and replaced the winglets. Paint is Halfords Appliance Gloss White and Holts HL Grey 01 with Revell Aqua 374 representing the Aeroflex on the upper wings. Metallics are by Tamiya and Revell. Decals are by F-DCAL with Authentic Airliners windows. I doubt if any two Iran Air A320s are identical and if accuracy is important a careful study of photographs is needed to ensure the correct combination of details for a particular registration. Engine type, wing colours, winglet colours, the stripe on the leading edge of the fin, stab mounting plate colours and RDF fairings all vary between individual aircraft. Despite my comments about the state of the kit I still prefer Revell’s A320 to Zvezda’s and I’d rather have it with flash than not at all. I actually built two back to back and the other one, which was just as bad, is currently in primer. It should appear in Aegean livery eventually. Thanks for looking and constructive criticism is always welcome. Dave G
- 14 replies
-
- 39
-
-