Search the Community
Showing results for tags 'revell'.
-
Hi guys, I will build a Mistel I in 1/32 scale. I will use a Revell/Hasegawa Messerschmitt Bf-109 G2 as the leading airplane. For the flying bomb I will use the Revell Junkers Ju-88 A4 kit with the Aims Mistel I conversion set. I think I have some extra's for the Bf-109. I will place some foto's later. Cheers,
-
Hello everyone, Yet again, I have for you is my Revell Emirates A380. If you would like to see pictures, visit my Instagram page: airplanemodelshd . For now, I have uploaded the build video below. Included in the model are LED's, though the Anti-Collision lights are not accurate, I still am pleased with the final results! Thanks for viewing this post!
-
 Hi guys, well I fancied building the Russian helicopter gunship that was flown in the Rambo 2 movie, it was supposed to look like the Hind, the Puma was modified for the task. I picked up this 1/32 Revell kit as the basis for the build, lucky for me I got it off eBay for only £15 including delivery. It's a pretty rough kit, very basic and crude in some areas but not too bad in others, but it's more than adequate for this project. I will have to scratch build the wings and pylons but thankfully the weapons are available from Trumpeter.
 -
P204(f) Armoured Scout Vehicle Revell 1:35 The Model Originally issued by ICM in 2015, Revell have now re-released the kit with new decals. The kit is packaged in the standard Revel end open box, (I wish they’d stop this habit), with a nice representation of the vehicle on the front. Inside there are four sprues of grey styrene, four rubber tyres, and a small decal sheet. All the parts are very nicely moulded, with no sign of flash or other imperfections and very few moulding pips. Since the kit has a full interior there are quite a few parts, also the fact that there are a few versions of this kit there are also quite a few parts that will end up in the spares box. Construction begins with the fighting compartment floor being glued to the lower hull, followed by the rear driver’s bulkhead and both drivers seats. The longitudinal bulkhead between the rear driver’s compartment and engine compartment is then glued into position, followed by the eleven piece engine. The drivers steering columns and steering wheels are next, along with the gear sticks and foot pedals. The rear drivers transverse bulkhead is then fitted as is the rack of shells for the main gun, which is glued to the fighting compartment bulkhead. Each of the two sides of the hull has a door that can be posed either open of closed. On the inside of each side there is a plethora of ammunition drums, for the machine gun, to be glued into position, along with the driver’s instruments and a spare machine gun. The sides are then glued to the lower hull, followed by the front and read bulkheads and front glacis plate. The rear mounted engine deck is then attached, along with the fighting compartment roof. The engine louvers and rear mid-bulkhead hatch are then attached, and can all be posed open should the modeller wishes. The rear wheel arch mounted storage boxes are then fitted and finished off with their respective doors. Fortunately, the running gear an suspension on this kit is really simple, just the two axles with two piece differentials and drive shafts are assembled, the four suspension spring units are then fitted to the underside of the hull, followed by the axles/drive shafts. The steering linkages are then attached, along with the brake accumulators, drop links, horn and towing hooks. The wheels are each made up from two part wheels and a rubber tyre. Once assembled the four wheels are glued onto their respective axles. The rest of the hull is then detailed with grab handles, door handles, pioneer tools, headlights and a rack on the rear bulkhead. The turret is then assembled; beginning with the co-axial machine gun, which is assembled from three parts before being fitted to the left hand front of the turret. The main gun comes in two halves, which once joined together are fitted with the trunnion mounts and elevation wheel. This is fitted to the turret ring along with the turret traverse mechanism. The turret ring and turret are then joined and the commanders and gunners seats are assembled and glued into position. The commander’s hatch is fitted with a handle and vent before being fitted into position. The two rear hatches on the turret can be posed open or closed. There are two, two piece periscopes fitted forward on the turret roof, and two lifting eyes on the rear sides. The completed turret is then fitted to the turret ring on the hull, and the last parts added. These include the two, two piece drivers viewing ports, which can also be posed open, the two piece exhaust silencer, wing mirrors and four miscellaneous panels. Decals There are two decal options, the decals are ok, although they appear a little fuzzy around the edges, although they have good opacity and are in register. The options are:- Wehrmacht, Operation Barbarossa, Eastern Front, Russia, 1941 – 1942 in overall panzer grey. Wehrmacht, Anti-Partisan Role, France, 1944 in overall yellow, with red and green squiggles. Conclusion It would be nice if Revell actually produced more kits of their own, but while we wait for them to do that, we can have at least this nice kit from ICM. With the interior it allows all the panels and hatches to be posed open, and the grey plastic is actually better than the original ICM colour. It would certainly be a good kit to practice your internal weathering on. Revell model kits are available from all good toy and model retailers. For further information visit
-
Hi guys, Not really proud of this one alot of mistakes errors due to me and the kit faults. Frustration started when I had detai painted the cockpit and the weat obsures almost 3/4 of it. The fusalage halves have been in different thickness. Decals are thick. A big wash is nice but Vallojo really loses grip fast and the points where gloss varnish hasnt sealed enough lost paint. Positive is that it seems to work well to make my own canopy mask. No show winner but I guess nice enough for my shelf. Enjoy.
- 12 replies
-
- 15
-

-
 This is a year 2000 re-release from Revell USA of the ancient Boeing 707 kit. Originally boxed as United Boeing 720 by Revell USA,its still the same old Boeing 707-100 from many decades ago. There had been some changes in the molds over the years;There are the depicted one that has no cabin windows and the cockpit has holes instead of a clear part ,smaller tail fin without antenna and the very early Pratt & Whitney engines. Later it was released with a clear part cockpit and the taller tail fin with the antenna included and the Pratt & whitney engines that were common on most of the 707s. When I started this kit,I planned to build it OOB with the decals included.As being a relatively new kit (2000) the decals looked great. But when I came to the stage of decaling the model,I soon found out that the decals were not as good as they looked...they completely dissolved into thousands of small pieces floating in the water.... As I already had some troubles with the kits fit,I didnt want to look for a repalcement aftermarket decal set,so I decided to use the Northwest Orient decals from my Minicraft 707-320. This also then included the change of engines to the later ones.Luckily I had a complete set in my spares box. As the Revell 707 more resembles a 707-100 with a shorter fuselage,I had to cut down the decals to fit on the Revell kit. I know its not 100% accurate,but this was more of a salvation job rather than creating a replica of the real thing. The coroguard panels and other details on the wings come from the superb Flying Colors Boeing 707 detail set and these decals cover up some of the blemishes The kit has some serious fitting issues esp.the two wing halves,who are a nightmare to get together and also the engines that won't really fit into the slots. Also the wings were seriously warped,probably they had been in a hurry to get the parts out of the moulds and into the shelfs... I have one more Revell 707 and I think I have to forget about building and painting each components before assembling the whole thing. The finished product is not of my usual standard,there are some flaws,esp. around the engine-wing connections.I didnt bother to fill the small gaps there as I would have to repaint the whole area,but overall it looks quite nice,and when its behind glass the flaws wont stick out much. Hope you like her anyway. Cheers,
 -
 Will be moving onto fitting the Masts to my 1/400 Titanic in the next couple of weeks and I'm not overly optimistic the styrene Masts are going to work with the rigging. Way, way to much flex so no hope of doing nice, tight rigging. I'm thinking of cannibalising a couple of paint brushes that are close to the size and shape I need. Nothing a Dremel and some sandpaper won't take care of. However, how to fit? What would be be the best glue to join wood and plastic? CA? Should I place a small block under the deck for the mast to sit in or something else? Any way to strengthen the original kit Masts? I know some have soldered brass rods of various diameters, but that's beyond me at the moment. If if any of you used or made replacement Masts for your models how did you go about it? Any advice would be greatly appreciated!
 -
Hi folk's this is the first of my foray's into 1/32 scale for a while,I had the kit a year part started but the 109 GB took it off the shelf of doom and onto completion.It's a very nicely molded kit and apart from a little over engineering on the wing/wheel well assembly is pretty stress free build wise,I had a lot of help scheme wise from the usual BM suspect's and for that the WIP is worth a look. http://www.britmodeller.com/forums/index.php?/topic/235020774-revell-132-g10finished/&page=1
-
This is my first RFI as a newbie member of the forum. When I decided to get back modelling I picked up a few cheap and basic kits to practice on with a view to trying out at least one new technique with each. In this instance the goal was rigging but I ended up trying out a whole lot more. Despite the age of this kit it was a real pleasure to work with and it's whetted my appetite for more! I've already started on the next two 'practice pieces' from the (rapidly expanding) stash. As I intend building another, more detailed, Swordfish in the future this one was was built in the radar equipped (pic 3), rocket toting, Mk III guise. WIP is >HERE< Swordfish RFI 1 by Martin Fay, on Flickr Swordfish RFI 2 by Martin Fay, on Flickr Swordfish RFI 3 by Martin Fay, on Flickr Any feedback, criticism and advice welcomed! While researching for the build I found myself intrigued by the aircraft, the missions it was involved in and the men that flew them. As a result I've ordered copies of "The last Torpedo Flyers" and "War in a Stringbag" to learn more on the subject. Cheers, Martin
- 14 replies
-
- 36
-
-
Hi, First Work-In-Progress build here so bear with me if the quality is poor Got this Revell 1:72 MiG-21 F-13 "Fishbed C" for just £2.00 at the Air Tattoo 2017 because apparently, they weren't selling well for the £8.00 asking price . Either way, it was a bargain so I bought it - and seeing as I have all the paints needed I can start work straight away. Box The three sprues (plus a clear sprue) were very nice (sadly I have no images of them before I got at them with my blades) in Revell's metallic-silver plastic. There was no flash apart from a large chunk on the exhaust that I easily removed with a cutting knife. The clear parts seem high quality - with the canopy being in two halves so hopefully I can model this with the canopy open. Sadly there is no pilot - as with all other Revell kits - so I'll need to try and do a decent job with the cockpit. There is a very small decal sheet lacking in detail from what I usually expect from Revell - however it's a 1:72 model so I guess it's understandable. There are options to depict one from the "Air-Defence-Garde-Regiment", USSR 1961, or one from East Germany (GDR), 1963. I will be modelling the USSR one I will hopefully model with the gear down also. So I hope you enjoy this build I guess... again apologies as this is my first time documenting a build - any suggestions for improvements would be greatly appreciated! Cheers, Adam
-
 Revell-USA is to release in first quarter 2014 a 1/48th Lockheed Ventura Mk.II RAF "Promodeller" kit - ref. 85-5533 Source: https://www.facebook.com/RevellUSA/photos_stream#!/photo.php?fbid=671343499564587&set=pb.105923262773283.-2207520000.1383675581.&type=3&theater V.P.
 -
After a lot of thinking I've decided to build Revell's 1:72 Buccaneer for the Made in GB group build. This is a Matchbox kit that has been reboxed, and unfortunately doesn't have the signature folding wings and airbrake. However, ever since I saw the Buccaneer at the London RAF museum I've had a soft spot for the aircraft. the kit is made up of 3 sprues, all pretty clean and flash free, as well as a small clear sprue for the canopy. There is a small decal sheet, so the graphics will be minimal, but I love the mean appearance of the aircraft in its desert pink colour scheme.
-
I've had the revell hunter for a while and wanted to build it but just haven't had the time since i gave been very busy for the last few months with exams. However, with my final exam this week the group build seemed like the perfect motivation to start the hunter as a summer project, since i never seem to finish models without the pressure of a GB! Im going to be building the hunter without aftermarket parts although i may get aftermarket decals as i am very tempted by the idea of modelling XE601, the 'rasberry ripple' hunter which was sold for spares use a few years ago, as it is a much more exciting scheme than the green and grey camoflage. I've been taking abit of a break from modelling and this will be the first ket of the year for me, and also my first 1/32 kit so im excited to see what it will be like making a larger model. So far i have only started the ejector seat but more progress should follow soon. Work has started on the ejector seat. I need some new paints as they have all started to dry up! Will
-
Hello Everyone, I was going to add a ship into this goup build, but I couldn't find a ship I liked the look off. I did think about the Typhoon, but ruled it out. I was then going to get one of the Sovremenny class ships as I have been playing alot of WarGame Red Dragon the last few days, but haven't been bothered to get one yet, yeah I know I am lazy. So looking at my stash, and I noticed I have lots of Russian things in 1/144. I haven't seen any Bears yet, which I really find surprising! So I thought I would join in with that, nothing fancy, just getting the bugger done OOB too. So onto the pictures... I bought this a little while ago after I came back to the hobby, I'm pretty sure this was in an end of year sale for ModelZone. I've had it stored ever since then just waiting for an excuse to build it. Horizontal split for the fuselage, haven't seen that since the Airfix 1/72 Buccaneer I built when I was 8 I think? Was part of a Gulf War set with the Jaguar. Anyhow, this kit doesn't look like it has too many parts to it. Shouldn't take too long to build. Wing tops and engine pod things... not much to see here. It is really strange the part breakdown of this model... I even have the raised copyright notice on the wings, gonna have to get rid of that. Still not 100% sure what version to do, although I guess they are pratically the same with little changed here or there. If I get this one done in time (which I will be shocked if I don't) I will add something else from my 1/144 collection. More to come soon! Kind Regards, Dazz
-
Good afternoon! Now that the exams are all over, time for a bit of a celebratory build. I have made the 1:144 Concorde from Revell in the past (albeit very poorly, it has since been binned) and yet I can still remember the substantial amounts of flash and poor fit that punctuated my previous encounter with this kit. Well, here we are now; the kit still has flash, awful injection markings on the outside of the fuselage (see photos below) and a lack of detail (notably the landing gear is missing A LOT of bits and bobs). ....But it does have some terrific decals which should make the whole thing worthwhile *ugh* Now, this is what I've just completed (I need to touch up the paint on the canopy), my first Spitfire in years: (RFI soon-ish?) Armed with the excellent website that is http://www.concordesst.com/ and a copy of "Concorde: The inside story" by Brian Trubshaw, I feel suitably equipped to begin this Endeavour! Wish me luck Kind regards, Sam
-
Revell released the Fokker 100 kit back in 1995. Its very nicely molded and well detailed. Since then I had this kit in my stash...when I bought it,I started it right away but back then I was still using brushes on my builds. After some parts were brush painted,I thought I wasn't very happy with the outcome,so the kit was put back to the box were it had stayed ever since. Due to some home movings I managed to lose the cockpit clear part and for some time I had no idea how to fix it. Recently,and now with more experience,I took it off the shelf of doom and thought that now its the time to fix this kit and build it properly. All pre-painted parts were cleaned,primed and re-painted by airbrush and also using the correct colors for the Swissair version. The decals had yellowed badly in all those years but I was lucky to find another Swissair Fokker 100 which had pristine decals. The missing cockpit window was replaced by putty and a 3D window from Authentic Airliners. The cabin windows were filled with clear. The build itself after the cleaning and repairs was straight forward as the parts fit well and filler is needed at an absolute minimum. Painted with my usual Revell and Testors enamels. I am very pleased to add this nice little kit into my collection after more than 20 years on the shelf of doom... Sadly its out of production for some time now and sometimes gets high prices on ebay.Would be nice if Revell would do a re-release like they did with their Boeing 727-100 kit. Swissair was launch customer for the Fokker 100 and received its first example in 1988.It was in service until 1996 when Swissair replaced them with Airbus A319 and A320s Today some Fokker 100s are flying with Helvetic Airways,so they are still a common sight at Zurich Airport altough their days are numbered as well. Cheers,
- 18 replies
-
- 26
-
-
- Revell
- Fokker 100
- (and 1 more)
-
 The North American A-5/RA-5 Vigilante W.I.P. by Andrii Dzhuran, Revell kit 1/72 History: The rapid evolution of aircraft design in the 1950s led to new aircraft types with sleek lines and impressive performance. One such aircraft was the North American A-5/RA-5 "Vigilante". The Vigilante was designed as a carrier-based strategic nuclear bomber, but would see action over Vietnam as a fast reconnaissance aircraft. In the postwar period, the US Navy was determined to obtain a nuclear strike capability, first acquiring the North American AJ "Savage" and Douglas A-3 "Skywarrior" bombers. These were both subsonic aircraft, and since aircraft design was evolving quickly at the time, both soon became obsolete for the missions for which they had originally been designed. The new aircraft was originally referred to as the "North American General Purpose Attack Weapon" and later given the company designation of "NA-233". After discussions with the Navy, the NAA-233 concept took shape as a twin-engine aircraft with advanced combat avionics, Mach 2 performance, and an interesting "linear bomb bay" in which a nuclear weapon was popped out the tail to give the aircraft a better chance of escaping the atomic blast. North American engineers also considered fitting the aircraft with an auxiliary rocket engine powered by jet fuel and hydrogen peroxide for an additional burst of speed over the target area -- but the Navy didn't like the idea of handling a nasty, toxic, reactive, and unstable substance like hydrogen peroxide on board a ship, and so it didn't happen. The Vigilante was long and sleek, with a relatively small high-mounted swept-back wing, and all-moving slab tailplanes and tailfin. The aircraft had tricycle landing gear, with the main gear retracting into the fuselage. All three gear had single wheels and retracted forward, with the main gear rotating 90 degrees during retraction to fit into the wheel wells. The Vigilante was powered by twin General Electric YJ79-GE-2 engines, with engine bays made mostly of titanium, and covered with gold film to reflect heat. The aircraft had a large fuel capacity to give it long range and permit extended flight in afterburner. This period of history is interesting to me. Also, you might be interested. My new build in the WIP chapter “The North American A-5/RA-5 Vigilante” by Revell`s old kit begins with: Day 1 - Review of the kit; - Instructions study;
- 237 replies
-
- 10
-
-
Some of my recent builds are 2 Revell Boeing 727-100s. This kit was re-released earlier in 2016 with Germania decals,which is on my workbench at the moment among other projects. Its a very nice kit given its age and quite accurate compared to the Airfix kit. The build is pretty straight without any bigger issues.It needs a fair amount of filler though,esp.the windows. The cockpit windows are "holes",while the cabin windows are engraved only.So its unavoidable to fill them and use decals,otherwise one needs to drill out all windows if clear ones are desired. My 2 kits are early Revell and Revell/Lodela releases,both came with Lufthansa decals. For the Lufthansa 727,I chose the best decal set from the box and some spare decals from an Airfix 727,such as the doors and the tail logo. The cockpit window and other details come from a 727 detail set. For the First Air 727 I bought the decal set from V1.Its the old livery of that airline which I find quite attractive. The decals are of top quality and fit on the model very well.Once applied,they look like printed on.The carrierfilm is completely invisible. Both Boeings were painted entirely by airbrush using Revell and Testors enamels. Revell's Boeing 727 is a very good kit for its age and its nice that its available again. Currently I have 3 Airfix Boeing 727-200s ,2 Airfix 727-100s and the re-release Revell 727-100 on the assembly line.The Revell one will probably be done sooner as the Airfix kits need more correction work. Cheers, And a group shot...
- 24 replies
-
- 31
-
-
- Revell
- Boeing 727
- (and 1 more)
-
BMW M3 DTM "Martin Tomczyk" 1:24 Revell The DTM race series is the German Touring Car Championship (Deutsche Tourenwagen-Meisterschaft) was formed in 1984 with cars based on modified versions of the cars you could buy from the dealers, but as technology moved on the cars became more advanced, other than a basic silhouette they have nothing in common with the vehicle on your drive. The DTM rules say that the car must be built on a standardised carbon fibre monocoque chassis and have the standard large rear spoiler, which means all cars have the same basic dimensions and rules on engine size and power provides a close race series. The BMW M3 DTM has a carbon fibre monocoque body powered by the BMW P66 V8 engine with an output of 480bhp. BMW provide cars to 3 teams, and Revell have made the 2012 BMW Reinhold Motorsport BMW (Team RMG) car driven by the German driver Martin Tomczyk. When I opened the box the first parts to catch my eye where the body and bonnet parts, moulded in white, carrying some nice detail that isn't readily apparent in the pictures. The vents and grills are very delicate and the shape mirrors the 1:1 DTM car very well. There are some locating pins on the scuttle panel of the body to help locate the bonnet/hood assembly as on the finished build this is removable to allow you to see the engine and front suspension parts. The kits comes on 4 sprues, moulded in a light grey or white plastic. The parts are well moulded with no flash or flaws on the review sample. Construction starts with the BMW V8 engine which is acceptable, but only the top half is moulded, with some basic detail on the finished engine. If you want to have the hood off to display this, some extra details would need adding from scratch or from the spares box. A quick look on your preferred search site will throw up some pictures that are sure to help. The chassis is a single part with not much detail, as under the real car it is smooth for the best air flow, flicking up at the rear to throw the air out via the rear diffuser. The large side skirts are built up and added to the floor, along with some working front steering, basic suspension and roll bar detailing. The prop shaft and the rear mounted 6 speed gearbox come next in the build, along with some suspension detail, which looks like it will be hidden on the finished model under the interior module! The painting instructions are somewhat confusing, and Im not sure how much you can build before painting, you will need to scrutinise them in advance, and plan what sub-assemblies you can make before painting. Some decals will need to be added during construction, as some may be hard to apply later on. The interior comes as a single section, with the details and seat to add. The seat has belts moulded onto the part, so this will need sanding away if you are using some aftermarket parts. The inside is well detailed, but as in the real DTM car it is spartan in order to save weight. A single clear sprue has the windows for the car, along with the lights front and rear. The parts are packed in a separate bag to protect them while in transit and subsequently in the stash. The detail on the parts is good, and the plastic is thin enough to keep any optical distortion to a minimum without being too flimsy. There is also a chromed sprue, and this has some nice backing parts for the head and tail lamps, which helps give a nice depth to the lights on a model. This is good to see, as I hate lights that have no depth on a model! There are 4 chromed wheels, but all pictures Ive seen show the 18 Hankook Ventus wheels in a matt black so they will need stripping and repainting for an accurate replica. There are 4 rubber slick tyres for the car, a rub over with some sandpaper will weather them and give a nice "scrubbed" look, and some Hankook logo decals for the side walls are included on a small separate decal sheet. A large colourful decal sheet includes the BMW and race team logos and sponsors. The sheet is as expected from Revell, and is well printed with sharp deep colours, and some very small fine details on the individual decals. Conclusion A nice kit of a DTM BMW, adding to the growing range of DTM cars from Revell in 1:24. Revell model kits are available from all good toy and model retailers. For further information visit or
-
 You’re never alone with a drone Revell 1/48th scale General Atomics MQ-9 Reaper/Predator B More on this page of my web site: https://everardcunion.wordpress.com/plastic-models/#Drones
 -
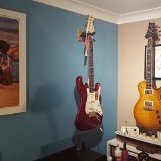
Evening folk's I had considered a couple of Hobbyboss easy kit's for this GB as I have a dozen or so 109's on the shelf from various manufacturer's in a variety schemes but despite a catalogue of half finished larger builds in the cupboard I decided to re-visit this one from a couple of year's ago. It's a beautiful kit as hopefully the build will reveal I did start it but only progressed as far as the cockpit so within the 25% rule I, think the belt's were masking tape painted.I'm not rushing with this one unlike most of my build's Here's where I am to date.
-
Fw 190D-9 1:48 Revell The Fw.190 was designed by Kurt Tank, and initially gave the RAF a bit of a fright when it first appeared. The D, or Dora, was often known as the "Long nose" due to the elongated nose cowling to accommodate the liquid cooled Jumo 213A engine. It came into production in late 1944, and over 1800 examples were manufactured before the end of the war. The Kit Even though this is a Revell box the plastic inside is from Eduard. There are 5 sprues of grey plastic, one clear sprure and a small decal sheet. Construction starts with the cockpit. Instrument panels sides are added to the cockpit tub along with the control colum, side parts and then the main instrument panel. The seat is added along with the rudder pedals. Forward of the cockpit is the nose machine gun bay, which can be detailed with a large number of parts if it is to be left open, or with the omission of the MGs and their ammo boxes, the bay can be closed up with the use of a pair of MG stubs that glue into the bay cover. As the engine ancillary units (including the super-charger and engine mounts) are in the same bay as the MGs, it may be as well to leave open the MG bay, to show off the nicely rendered parts. The main part of the engine is not depicted in this kit, but the exhaust stacks are mounted from the inside of the fuselage in their own boxes, and are held in place by the front bulkhead of the MG bay. The detailer will need to open up the exhaust stubs to add a little realism here. Once these are installed, the modeller can close up the fuselage. The wing underside is a single piece unit, with a long spar running along the back of the landing gear bay, to which additional ribs are added to detail the gear bays themselves. The wing mounted cannons go through the bays here, and must be added at this point due to their tapering shape. It may be wise to chop off the last section and replace it later in the build with a piece of fine tubing if you are a tad clumsy like this reviewer. The upper halves of the wings can have the cannon bays left open to expose the breeches of the 151/20 cannons, or if left closed, a blanking section can be substituted. The flaps are moulded integrally, but the flying surfaces can be posed at an angle to give a little extra visual interest, and are added after the wing halves are joined. The whole wing is then offered up to the underside of the fuselage, so plenty of test fitting would be sensible here. The rear empennage is standard, irrespective of which tail you have opted for, and the rudder is pose able, while the horizontal tails fit to the fuselage with a large attachment tab, so should stay horizontal with very little trouble. The landing gear on the 190 is long and canted in slightly, which is shown by the helpful diagram, and the modeller has a choice of two wheel types here with either smooth or treaded tyres. The wheels themselves should be installed at an 8o angle to the oleo strut, which would be fun to measure, if it weren't for the 1:1 scale drawing that is provided - good idea, Eduard! The retraction jacks fix within the bay to large contact points, so a strong landing gear should be the result. The modeller can choose to pose the cowling flaps open or closed, which are provided as separate rings that slot in behind the main cowling onto a large cylindrical spacer. The super-charger intake is installed at this point, as are the gun troughs on the forward fuselage. The nose gun bay cover is installed, along with the wing mounted gun bay covers, which if modelled closed, receive a nice set of PE piano type hinges once installed. Although the clear sprue includes four canopies, only two are actually used, with the choice being open or closed. The head-rest & armour is installed in the canopy, as well as a tiny PE grab handle, and a standard windscreen mounts over the coaming to complete construction, other than choosing to mount a bomb or fuel tank on the centre line pylon. Decals The smallish sheet is printed in Italy for Revell and should pose no problems. As it is Revell no swastikas are provided. There are two decal options provided; Werk Nr 500666, II./JG 301, Erfurt-Nord, May 1945 Werk Nr 210194, I./JG 2, Aachen, 1 January 1945 Conclusion Quality plastic from Eduard, and quality decals from Revell so you cant go wrong. Revell model kits are available from all good toy and model retailers. For further information visit or
-
We have some new Revell plastic model kits for pre order and purchase including the brilliant Red Baron! https://www.wonderlandmodels.com/blog/article/brand-new-revell-kits-more-july-2017/
-
I like desert colors, I like to build models in 1:72 scale. The model was built from two sets of Legato and Revell, I added a few more details, such as a rearview mirror.
- 11 replies
-
- 38
-
-
- Hurricane Legato
- Rafhart
- (and 1 more)
-
My next effort. This has also been sitting in the loft for a while. I think this is the Hasegawa kit in a Revell box. Lovely kit, goes together really well. The option I chose has the larger Ta152 tail assembly. I chose to finish the kit in the colours of "brown 4" of JG26 and example found in April 1945. This particular machine has the subject of many discussions about its colour scheme, all based on a couple of black and white photos. I've chosen what seems to be considered to be the most likely colours. Eventually I used 7 colours. It has RLM 75 and RLM 71 on the wings, RLM 81 and 82 on the fuselage, the made-up RLM 84 on the centre fuselage and RLM 76 on the nose and tail undersides. The underside also a natural metal section as well. All were sprayed on Vallejo colours except the RLM 76 whcih an Xtracolour shade. I didn't like the Vallejo colour. I had a problem with decal silvering, something I haven't had for years. Being used to Xtracrylic colours all being gloss, silvering has never been an issue. I struggled with the Vallejo gloss varnish to get smooth even finish. The flat coat was fine.I'll try another gloss coat n the next kit. Anyway, here it is. Thanks for looking.