Search the Community
Showing results for tags 'resin'.
-
 This kit is nothing less than a little miracle, from the works of Master Matías Hagen of Argentina. That a kit of this incredible quality can be produced within the severe financial and market limitations that the economy and the general conditions of the country imposes, is indeed miraculous. A fragile economy exposed to recurrent changes of policy, many times making imports/exports a challenge, is not the best environment to practice modeling in any form. Supplies, tools and imports often reach inexplicable high prices (if and when available) and the lack of incentives combined with very limited average income make the modeler's life anything but easy. Ten years ago I acquired and built one of Matías' first endeavors, another resin jewel posted here: And I am now the proud owner of the first of many projects that are soon to be released. What a pleasure when I opened the box! The exquisite quality of the masters and casting, the care put into every single part, the unbelievable level of detail, a subject that is charming and significant for the local history, all made me very happy. The box contains groups of resin parts in several bags, assembly instructions, a parts' map, historical notes (in Spanish, more on that later), a decal sheet (more on that later), detailed decoration drawings and color calls, vacuformed transparencies (two sets, for different variants) and one of those codes you point your smart phone to access a large group of reference images of the plane on Google Drive. The decal sheet is printed on clear stock with continuous carrier (i.e. you have to cut and trim individually the separate subjects), and you are advised that you have to provide the white backgrounds for some of the images that may need it (white decal stock may do, or painting the area white where required). Two different sets of props and wheels are provided, to cover different variants. This is a translation of the historical context provided with the kit instructions: The "Boyero" (a bird found in Argentina that takes its name from an oxen -"buey" in Spanish- driver) was born from the necessity of the aero clubs for a civil training plane, affordable, modern and easy to maintain. During the 30's the Dirección de Aeronáutica Civil (Civil Directorate of Aeronautics) was the authority that regulated the civil private activity and also provided the planes for the country's aero clubs. Although the Fleet 2 and 10 accomplished the role of basic training, towards the end of the decade a more up-to-date plane was required. It was recommended to the FMA (Fábrica Militar de Aviones, Military Airplane Factory) the study of a project with those characteristics, but limited to consider products from the US to shorten development times. Because of the predilection for the side-to-side configuration, it was decided to utilize as the base for the design the already known Taylorcraft B. Although the Boyero would be strongly inspired by it, it was a local development with characteristics and solutions of its own. The Boyero had a larger span and fuselage length, of rectilinear and simplified shape, wingtips with washout to delay stall and loss of lift, and single joystick that could be located in the other position. The "FMA 20" (as it was originally called) flew for the first time in the province of Córdoba in November 1940, and the second prototype followed on January 1941. After successful tests it is approved for manufacturing, the rights being ceded to the private company "Sfreddo y Paolini", but WW2 thwarted the plans. As the US entered the war, all strategic material like the Continental A50/A65 engines and chromoly tubes were no longer available. In 1942 production is suspended, the prototype goes back to Córdoba, and the second prototype is sold to the private market by Sfreddo and Paolini in 1944. Things will have to wait until 1948, a reorganization of the FMA -that will incorporate an "Instituto Aerotécnico" (IAe) -Aero-technical Institute- and the resumption of the delivery of parts, and a new license for series production. The company "Petrolini Hnos." (Petrolini Bros.) will be now in charge of revitalizing the production of the now called "IAe.20 El Boyero" that will be produced until 1952, when the last batch is delivered. The total production of the Boyero was of 129 units between 1940 and 1952. Two prototypes fabricated by the FMA, and 127 by Petrolini under license, of which 24 were assigned to the Air Force, 1 bought by a private person, and 104 assigned to diverse aero clubs through the Dirección General de Aeronáutica (General Directorate of Aeronautics). In 1965 the last Boyeros under military service were sold to the private market. Currently 24 of them survive in flying condition. Span: 11,50 mts. Lenght: 7,10 mts. Height: 1,80 mts. Weight, empty: 325 kg. Maximum take off weight: 550 kg. Engine: Continental A65 of 65 HP (Continental C75 of 75HP) Maximum speed: 158/167 kph. Cruise speed: 138/140 kph. Ceiling: 4,000 mts. Range: 650/630 km.
- 68 replies
-
- 5
-

-
- Ligh plane
- resin
- (and 1 more)
-
Hello everyone! Here is my Anigrand Craftswork 1:144 Horten Ho XIIIb finished in fictitious JG5 markings. I built this one back in 2013. The kit was built OOB and I only thinned the undercarriage doors as much as I could. Painting and varnishing was all done with brush and decals came from various sources since the kit's insignias were wrong for late-war fighters. Thanks for looking Miguel
- 3 replies
-
- 11
-
-
- Luft 46
- Anigrand 1/144
- (and 1 more)
-
Hello everyone! Here is my FE Resin 1:144 Mikoyan-Gurevich I-250 (MiG-13). This was a mixed-propulsion fighter design with a piston engine and an air reaction compressor jet or motorjet that first flew in March 1945. Only 12 pre-production machines were built and an initial order of 50 MiG-13s was placed. Trials were carried out until April 1948 when the design was cancelled. This kit represents a pre-production machine used for tests by the 176th Guards Fighter Aviation Regiment of the 324th Fighter Aviation Division, PVO, from October 1946 onwards. This machine was also tested by the Soviet Naval Aviation at Riga from October 1947 to April 1948. I built this tiny resin kit in 2009. I added a seat in the cockpit. The main undercarriage parts and the propeller had to be replaced from parts taken from my spares and sanded to shape in the case of the propeller. The canopy was a vacform part. I also added the radio mast and wires and the wing probe from stretched sprue. The kit was fully painted and varnished with brush. Thanks for looking Miguel
-
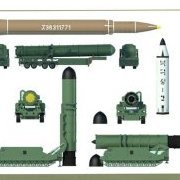
I am not sure how to post this in the section for manufactures, so if admin can move this to that section :), I just wanted to let everyone know I have moved forwards with production of my 1/144 scale model kit of DPRK ICBM TEL this was conversion of my model that was used on the front of Jane's Intel Review that I then converted into 3D printable model. Model kit goes for 60$.. although I also have just the missile and detachable launch stand bucket for 25$ on site without the TEL Anyone that would like to place a reservation for kit can place order here. https://armamentsinmini.myshopify.com/
- 1 reply
-
- 2
-
-
- Kits For Cash
- 3dprinted
- (and 1 more)
-
Here are is Anigrand Craftwork's 1:144 Focke-Wulf Fw 191 V1 which I built back in 2013. This came in a set of four resin kits covering the four proposals for the ill-fated Bomber-B programme and represents the first prototype in early 1942. Apart from adding some details in the cockpit I thinned the gun barrels and added missing ones for the nose from stretched sprue as well as the wing pitot tube and the radio mast, also from stretched sprue. The rear end of the underside gondola was moulded solid and is clear so I cut away the section and added a part made from a clear piece in my spares box (Airfix Do 17 I believe!). The u/c doors were thinned as usual. Internet references were needed to place them properly. The kit was fully painted with brush except for the final coats of satin varnish which were airbrushed. I ignored the colour call outs of the (minimal) instructions and painted the kit RLM02 overall with the propellers in RLM70 Schwarzgrün and placed the wing crosses in a more correct position. Due to the little use of the prototype I didn't apply any weathering and only highlighted the panel lines of moving surfaces. Thank you for looking and, as usual, all comments are welcome. Miguel
-
I've just built the Tamiya Challenger (and what a lovely kit it is to build!). OOB it has the usual plastic/rubber tracks so I decided to use some accurate Armour resin tracks (the same configuration as the Chieftain). Not knowing any better, I just snapped the track off from the sprues, thinking there was going to be a natural break at the edge. Unfortunately, NO THERE ISN'T - so I now have all of joined tracks with the ends missing (the "metal" part of the track). GUTTED! I've tried supergluing the two pieces together, but there is so little to push against it just won't stick. Moral of this story? Remove AA tracks from their sprues using the correct tool. (I don't think nippers will do as it will either compress the ends of the tracks if used one way; or cut too far away from the sprue if used the other). I COULD still use them if the damaged sides were placed towards the inside and heavily weathered - but... Hey ho! Happy New Year everyone!
-
In a very welcome turn from its usual choices, some years ago Planet Models released a number of civil kits, of which I have built these delightful Focke Wulf A.16 and Monocoupe: I have also acquired their Lockheed Air Express, their passenger-carrying Messerschmitt M.20b-2 and their Focke Wulf F.19 "Ente" (Duck, or "canard" -French in turn for duck- as the configuration is mostly known), the type that occupies our attention today. It makes me smile that many modelers and aviation enthusiasts find the Ente and similar planes "weird", when the truth is that the canard formula was prevalent at the beginnings of aviation, and even today is used with some frequency (Rutan's designs, Saab Viggen, JAS 39 Grippen, XB70 Valkyrie, Dassault Rafale, among many others). Here is one example of a "Gee Bee" "ente": For years I have been gathering reference material on the F.W. Ente, feeling attracted to its unusual, yet elegant lines. There were two Entes, 19 and 19a. In the earlier 19 the support that holds the fore plane was slim and completely faired. In the 19a that support changed into a complex multi-member exposed cabane structure. The 19a had added downward-pointing vertical "fins" on the main wing. They had different propellers and engines (Siemens SH11 the 19 and SH 14 in the 19a), as well as changes in color in the metal surfaces and in the marks applied. The 19 flew in 1927, eventually killing its pilot, non other than Georg Wulf, one of the founders of the firm. The 19a flew in 1930. You may find of interest this downloadable NACA pdfs on the type: 19: https://ntrs.nasa.gov/archive/nasa/casi.ntrs.nasa.gov/19930090641.pdf 19a: https://ntrs.nasa.gov/archive/nasa/casi.ntrs.nasa.gov/19930090260.pdf And here is a link to a newsreel, courtesy of Getty Images, showing the -predictably- so called "tail first" aircraft: https://www.gettyimages.com/detail/video/coming-or-going-kent-eng-the-vice-versa-bird-visiting-news-footage/1080308752 An excellent reference in the very interesting and well-informed German ADL site (in German, unfortunately): https://adl-luftfahrthistorik.de/dok/focke-wulf-f-19-ente-entenflugzeug.pdf This same article can be found at Jet&Prop 3/02 There is such an abundance of readily available reference material and photos on the Net that ignorance while building this kit is inexcusable. Kits in 1/72 have been previously released by Lüdemann (resin) and Airmodel (Vac+resin). I have not seen them first hand, so I can't comment on their particularities. A number of modelers feel certain reluctance to build resin kits, being that because of the general lack of locking devices, the annoying pouring blocks and casting webs many parts come with or in, the toxicity of the dust produced during sanding, the fact that there is little or no adjustment time if using CA glue, their dislike of the alternative (for certain parts): epoxy, or just because their price tends to be high due to different fabrication processes (that is more of the manual type). I have built a large number of them, as well as vacs, so to me they are, in a way, the same. As there are differences between injected plastic kits, there are also differences between resin kits. Some are despicable blobs full of blemishes and air bubbles, bent parts and dubious shapes, and some are exquisitely mastered and cast. Personally, I find Planet Models kits somewhere in the middle-upper range. They are not subtle or have delicate detail, they feel -and are- chunky and heavy, but they can render a nice replica with a bit of care. Planet Models' Ente is not a new kit, I believe it was released about 2005, so it has certain things that will need correction, if you are the type that takes pleasure in provide some fair degree of accuracy to your models. The kit has been reviewed in the Flugzeuge-Modell Journal (3/2007) where the reviewer points out to a few areas that need care, and builds a magnificent model, but, as usual, read everything, but trust only photos of the original. Contents. I got a brochure from CMK, product no doubt of the convoluted relationships between companies in Eastern Europe. I have some times bought a kit that in the box showed one brand, had in the sprues stamped a different one, and yet had another logo on the instructions.
-
Here's couple of shots of Tywin Lannister (Lord of Lion by Nuts Planet) - my final GoT figure. Just finished him tonight and he'll go on display with Tyrion and Daeneris at the weekend. Tough choice for my next one, as I have four wonderful contenders - Mirai (from the AD.2074/Ghost in the Shell range) ; The Sea Wolf (Jurgen Prochnow in Das Boot) both by Life Miniatures : Lilith Bust by Nocturna Models or Abyssal Warlord by Scale75. But I may take a break from figures for a while and complete some other projects that I already have in progress (1/35th Takom WWI Mk. I Male Tank; 1/48th Hasegawa Typhoon Mk.I; 1/12th Tamiya JPS Lotus Mk.III) - all of which are for customers or friends. Thanks for looking Kev
- 12 replies
-
- 15
-
-
- Nuts Planet
- Game of Thrones
- (and 1 more)
-
Yet another field vehicle to pose with 1/72 models, this time a fuel truck. This resin kit by Classic Plane Diorama Resin comes with the parts bagged in three compartments. The cast is smart and refined, and removal of the parts from their pouring blocks easy. The detail is very good and goes to depict for example the bolts on the wheel hub, the undercarriage, the exhaust and many other minute things. The break-down is sensible and assembly proceeds without major hitches. My only two nitpickings: a) As it invariably happens with extremely delicate resin parts, a few came already bent and/or broken in the bags. The curse of delicate resin. b) The instructions are poorly printed, there is no parts map, exploded view or assembly guide. The photos are of bad quality, grainy, and barely serve as a guide. You may struggle to realize what goes where. Other than that, this kit can be built into an interesting and detail-filled model, useful as a complement for "ambience" airplane model photography. I could find no other photo of this specific vehicle on a long search through the Net. The manufacturer states that it can be safely assumed that the vehicle was used on airfields (as well as its other common fueling uses) from 1916, through the 20's and even 30's. I do not find any reason to disagree, having spent hours looking at airfield vehicles and seen all sorts of different arrangements, brands, and adaptations. It took me a couple hours to separate and clean the parts, an hour to assemble the main components, l/2 hour to paint and another 1/2 hour for final assembly. Decals were added in about 20 minutes. Any modeler with some reasonable experience can add this little darling to his or her airfield in a weekend provided some skill and dedication (and no house chores!). Decals by Arctic Decals, and thanks to my dear friend for the gift of the kit! It will be put to good photographic use. In this image I already assembled the main components: Adding a couple things that broke in transit: Addition of MV lenses to the front lights:
- 16 replies
-
- 17
-
-
- Fueler
- diorama prop
- (and 1 more)
-
A build from 9 years ago, a beautiful very limited production run kit cast by master modeler Matías Hagen from Argentina: The detail of the parts of this resin kit is outstanding and the instructions are very clear. The dedication on the making of the parts becomes evident when you see that the cushion, a separate part from the seat, has a teeny tiny arrow in the back pointing the right direction for its position, since the cushions also have some relief depicted. Although some components (fus sides, wheel pants) are keyed (they do have pins and correspondent tiny holes) I opted for sanding the fuselage mating surfaces carefully flat. The guiding pins are very useful though regarding the tail surfaces, wings and other pieces that need alignment. You get about 60 parts. No decals for this hot rod, since the original had no marks, which comes as a relief. Exquisite kit of a delightful plane, a true pleasure. Matias' blog: http://72topia.blogspot.com/ Matías painstakingly produces limited runs of unbelievably detailed kits in resin. He is working now on future releases, check it out.
- 12 replies
-
- 35
-
-
- Yakovlev AIR-7
- Ayacucho Maquetas
- (and 1 more)
-
I know this is a naive question but I am intrigued. How are such complex small parts designed for resin reproduction? I continue to be asstounded by the detail produced and woyld love to know how it is acheived. Thanks. Martin
-
Picked this up from the UKGK show a few weeks back,was originally produced about 1997,but has been re-produced.
-
Another goody picked up from the UKGK show,its a bit of a vintage kit dating to about 1997. (Well I had to do an Alien type thingy May start this before the Shape of Water bust as its in my comfort zone,and its called a comfort zone for a reason!Its comfortable.) Only came in three pieces,the Big chaps head, junior,and base
-
On the 25th June 1955 at Prestwick the Scottish Aviation Twin Pioneer first took to the air. Some 4 months earlier a few miles away in an Ayrshire hospital I made my entrance to the world. So with such close geographical gestation and delivery to the world a Twin Pin seems appropriate. However, my relationship with this aircraft is not just timing and geography. Although my father was a PO airframe articifer in the Royal Navy when I was born he finished his term in the Fleet Air Arm not much long afterwards. He then went to work at Scottish Aviation where amongst other aircraft he worked upon was the Twin Pioneer. So the fact my dad helped build a number of the Twin Pioneers makes this a must do aircraft for me. I bought the Combat Kits Twin Pioneer at Telford last year as I had always wanted to build one as a tribute to my father. I know Valom have just introduced an injection moulded version but it is quite expensive and I suspect it will not just fall together, so I'll stick with the resin kit. I think this is the old Magna kit but on opening the box the resin looks much more refined. Hopefully it should go together with epoxy and cyano with minimal amounts of swearing. On opening the box there are two large bags of resin parts and two small bags of parts. A further bag has some white metal parts and a bag of clear resin parts for the transparencies. Hurray! No vac formed canopies. Instructions are basic but there's a great transfer sheet With transfers for 6 versions, 4 RAF, 1from the Empire Test Pilots School and a civilian version.
- 9 replies
-
- 9
-
-
- Combat Kits
- 1:72
- (and 1 more)
-

Hauler Workbench with Table Grinder & Vice (HLU35116) 1:35
Mike posted a topic in Diorama & Accessory
Workbench with Table Grinder & Vice (HLU35116) 1:35 Hauler Many workshops will have a workbench. I'm sitting at one writing this, and back in the 30s and 40s these looked a lot like office desks, and some still do. This set from Hauler gives us a workbench with a vice and bench grinder, all in resin. It arrives in a small cardboard box with a ziplok bag of resin parts and a small instruction sheet within. There are ten resin parts, the largest of which is the carcass of the bench, followed by the door, drawers and then the smaller parts of the grinder and vice, which are all attached to a single pouring block. Construction is fairly simple and begins with removing the thin pour blocks on the large parts, which have been placed on the back or bottom to minimise potential damage and as usual with resin, take the precaution of wearing a mask when cutting or sanding it, as the tiny particles are harmful to your health if breathed in. Washing the parts in warm water will also improve the adhesion of paint, as there may still be some mould-release agent on the parts when you receive them. The bottom drawer of the pedestal is moulded in place, but the two other drawers are separate parts and can be fitted open or closed at will. The right pedestal has a single door and an internal shelf, which can be left open and festooned with equipment if you wish. The vice is made up of two parts and is moulded open, but with a deft cut the jaws can be moved to meet your needs or just clamped shut by a tidy-minded operative. The bench grinder has a lozenge-shaped body with an abrasive wheel at either end, one of which has a guard while the other is open with all the health & safety issues that brings with it. Both devices can be placed anywhere on the desktop as needed, with a suggestion shown on the boxtop and at the bottom of the instructions. Highly recommended. Review sample courtesy of -
"Snailien,In space no one can hear you eat your greens." Dont normally go for Novelty items,but couldnt resist this little fella
-
Hi All, Quick question, does any one have any experience with parts from Big Blue Boy? I've a 1/350 Hood in the 'stash' and keep an eye out for buys for her while I work on other stuff. I've seen a resin turret set to correct the awful trumpeter ones from a company called Big Blue Boy, it includes turned barrels and blast bags. I've had a look on the Hood website and a search on here but can't find any real reviews as to if they're worth the money. The only other thought was Fkyhawks turret set but I'd then need to find turned barrels to fit blast bags, Any input gratefully received Thanks Sam
-
After my brief flirtation on the Frog group build(Who am i kidding,I loved building 1/72 scale aircraft) I have returned with a couple of Alien figure re-paints,figures are about 4.5 ins tall,cast in resin,all base coated and re-painted Base colours based on the film of origin. Alien 1979 Aliens (1986) All together with the Alien 3 creature
-
This set convert Revell Bf109G-6 into Bf109G-6/AS with standard oil cooler. The set is cast from polyurethane resin. For the photo is painted Tamiya AS-12.
-
 Finally finished my Resin Prentice, Aluminium with flat, Bright spark decals and spare serials. the miscellaneous stenciling silvered even on glossy paint!! the buckled and did the canopy framing with painted masking tape, lets see how long it lasts!!The orange tinted canopy parts were painted in local craft glass- hobby paints. All brush!!. the cockpit came with lots of details, all of course gone now!!
 -
So, I've had this kit from the 90s, a kind Englishman was involved I think!!. Lots of flash, so here are some initial shots.
-
AIM-120 AMRAAM 1:32 Zactomodels The AIM-120 was developed as a longer-range all-weather air-to-air missile with Beyond Visual Range (BVR) capabilities, entering service as the A model in the early 1990s with the US Navy and Army, as well as a substantial number of other foreign operators. It was upgraded to the B with improved electronics, and later on it was further uprated and fitted with clipped winglets to allow it to fit within the stealthy internal bays of the then-new F-22 Raptor. ZactoModels have taken it upon themselves to create the most accurate AIM-120 in 1:32, and now we have two types to represent the A/B with its pointed fins, and the C after its pruning. The set arrives in a heat-channelled Ziplok bag that holds the parts separate from each other to reduce the chances of damage in transit and in the stash. The instructions are printed on A5 paper, showing all your options, including live and Captive Air Training Missile (CATM) exhausts and nose cones, which require the removal of the front and rear sections of the missile bodies, of which you get two. You also get two trees each of the relevant set of fins for your purchase, either the more pointed ones, or the clipped ones, as mentioned above. Each of these have a small pin moulded in the base that corresponds to holes in the missile body, which you'll just need to arrange at 90o to each other. Each part is highly detailed with all the panel lines, rivets, raised and recessed detail that you could wish for, some of which is more visible under paint, so we've included some of Chris' original photos at the bottom of the review so you can see it all before you cough up your cash. There aren't any decals supplied with the set, but it's likely you will have some in the kit you're putting them on, but on the off chance you don't, Two Bobs decals produce a set. Extremely highly recommended. Review sample courtesy of
-
I have never built a Resin kit and I have bought some from Russia. I have paid for them and have heard no more!!!!!!!! If and when these kits turn up I would like to have built a resin kit so this will be the first. I wonder if Moa has built one of these? Box and instructions. Decals. Kits bits still in their plastic bags. I will take some better shots when the parts are removed from the bags. Thanks for stopping by. Stephen
-
Hawker Hunter Brass undercarriage set (for Airfix) 1:48 AeroCraft Models By now you've probably noticed there was a Hunter theme going on yesterday. We reviewed the flying surfaces here, and the corrected pylons here, and now it's time to finish the triple with the landing gear, or undercarriage as we sometimes call it. As usual with AeroCraft sets, it arrives in a ziplok bag, with the brass parts within a smaller one to prevent chaffing between the disparate materials. Inside the bag are five brass parts and one resin part. The main gear legs are ostensibly the same as the kit parts only stronger, but the nose gear leg has been strengthened and augmented to improve its accuracy, with the new resin nose wheel of the correct spoked type. The brass parts give you extra strength in that department, and I'm sure everyone's had some kind of gear breakage in the past due to mishandling or weakness in the original design. You will need to remove the casting gates that have already been nipped off, which you can do simply by sanding them smooth with a good quality file. While you're doing that, any slight imperfection and mould seams can be cleaned off too, leaving you with a smart and strong set of gear. The resin wheel is cast within a thin wafer that can be scraped/cut off with a sharp blade, and then any left-overs sanded away with a fine grade stick for a much more detailed and strong nose wheel. Highly recommended. Review sample courtesy of
-
Hawker Hunter Underwing Store Pylons (Airfix) 1:48 AeroCraft Models We've got a new Hunter from Airfix, and it's very nice thank you. It does however have a few foibles, as do all models. If you're planning on using the weapons pylons on your build, you might want to know that the kit pylons are a little undersized and have some top and bottom "flanges" missing from out of the box. You can either fix those yourself if you're minded, or pick up a pleasantly inexpensive set of resin pylons from Ali, which should be pretty much a drop-in fit once you've removed the individual casting blocks. They arrive in a small ziplok bag, but if you order for delivery, you'll likely have your purchase tip up in a letterbox friendly card box. There are four pylons supplied, and both pairs are handed as well as marked with letters on the stub. The inner pylons are the larger of the two, with the skinnier ones on the outer station, all of which have the same pin layout as the kit, so they should just fit right in, as should any weapons you want to hang off them. As usual with resin, take the precaution of wearing a mask when cutting or sanding resin, as the tiny particles are harmful to your health if breathed in. Washing the parts in warm water will also improve the adhesion of paint, as there may still be some moulding release agent on the parts when you receive them. Review sample courtesy of