Search the Community
Showing results for tags 'rcaf'.
-
Hey All So *Spoiler Alert* I'm throwing together a what-if RCAF Mirage 2000, however, I can't rightly decide on what camouflage scheme to use. Seeing as how it was in competition against the F-18, using the CF-18 style low-viz camouflage would make sense, however, every real Mirage in the world has some sort of two/three tone scheme which makes me think that the CF-5 or CF-104 camouflage would look good. Any ideas? Regards ANS
-
Hey All Keeping with the theme from by CF-14 Tomcat, I present the Revell 1/72 F/A-18F finished as a what-could-be CF-18 Super Hornet Here in Canada there has been a lot of controversy with regards to replacing our thirty plus year old fleet of F/A-18 "Legacy" Hornets. A similar problem faced by many other air forces around the world. With blatant disregard for established procedure, the Government and the Department of Defence announced that Canada would be acquiring the F-35 Joint Strike Fighter to replace the Hornets. This was done without tendering a formal competition, i.e, without doing a little browsing first, they just decided to buy the first thing they saw. In their infinite wisdom, they have since gone back on the decision. For more information I will direct you to check out "Gripen 4 Canada" or "Best Fighter for Canada" http://gripen4canada.blogspot.ca/ bestfighter4canada.blogspot.ca Personally, I am in favour of either the Saab Gripen or the Super Hornet. The F-35 is proof of concept of the old saying "Jack of all trades, Master of none" Anyway... on with the model . . . . . What can I say, the Revell /72 Super Hornet is a fantastic little gem. The fit is superb, the panel lines may be a little heavy for some, but I found them just right. The cockpit is a little sparse on detail with most coming from decals, however this didn't bother me as I shut the lid on all my canopies anyway. The only aftermarket additions were a set of True Details resin seats and of course the decals once again being the wonderful Canuck Models product. The weapons are a mixed bag of those from the kit, some from a Hasegawa weapons set, and an Academy F-18. The model was painted with Vallejo Light Ghost Grey Primer as a general primer and as the lighter camouflage colour; the darker colour being Model Master Medium Grey. This particular aircraft is finished with the markings of 433 "Porcupine" Squadron in honour of their recent reactivation. For those of you wondering, I did the twin seater because I've always found that the twin seat cockpit and canopy fill out the long nose of the Hornet and looks more balanced than the single seaters. However, I may yet do one, only time will tell. Thanks for looking Regards, ANS
- 10 replies
-
- 13
-

-
I'm calling this one "done". I had started the Goblin back in early 2014 - likely somewhere between February and March. It started out to quite simple. Fit was decent, not a lot of filler needed for the fuselage or lower wings; and then came the interplane struts which began my slow decline into insanity. I put the kit aside for the rest of the year. Then I made myself a resolution: any kits that I had started in 2014 or prior that I still had (i.e. that were not tossed into the bin) would be finished before starting any "new" kit. This helps keep my better half happy because I'm not only not creating more clutter by adding to the "I'll get to it when I get to it" pile but also it should help the budget - no new kits being purchased because I'm busy with the current stash. So here it is - first one of 2015. The port wing is just "not right" - but it's close enough that I would call this "done" (as opposed to "finished" :D ) - the aforementioned interplane strut didn't have the correct angle so both the upper and lower wings are a bit askew on the starboard side. The rest of the kit though, well, it ain't half bad in my opinion Cheers, Dave
- 14 replies
-
- 21
-
-
Hey All Today I present Academy's 1/72 F-14A Tomcat finished as a what-if CF-14 of the Canadian Armed Forces. In the late 1970s the Department of Defence was looking for a replacement for the CF-101 Voodoos and CF-104 Starfighters that were starting to show their age. The aircraft that made the short list were the Panavia Tornado, F-16 Fighting Falcon, F-15 Eagle, Mirage 2000, F/A-18 Hornet, and F-14 Tomcat. The list was eventually whittled down and the F/A-18 Hornet was chosen as the winner of the New Fighter Aircraft competition. Over 30 years later the Hornets are still going strong, but like the Voodoos before them, they too are soon do for replacement (a highly controversial and much debated topic). The F-14 was struck from the list as it was deemed too expensive in the numbers required; a conclusion the US Navy had already come to. According to some internet sources, Canada had offered to purchase the Iranian Air Force's fleet of F-14As for a bargain-basement price after the post-revolution US arms embargo had left them grounded. Due to political reasons the offer was declined. Whether this is true or simply hearsay, I don't know, but what I do know is that it makes for good modelling inspiration. I give you Tomcat "123" of 441 Squadron, Canadian Forces Air Command (Didn't have enough zeroes to do "100" ) The Academy F-14 is a pretty nice kit. The build is relatively straight-forward with the only problems being at the nose to rear fuselage join. Panel lines are sharp and deep enough to hold a wash well, except around the nose where they are a little soft. The cockpit is not the most detailed but with the addition of some True Details seats looks presentable under the canopy. With careful gluing the wings are still functional after assembly, but will scrape the paint off the wing surfaces, so are best glued in your favourite position. The AIM-54s are from the kit, with the Sparrows and Sidewinders coming from a Hasegawa weapons set. If I were to do this again, I would probably replace the forward AIM-54s with Sparrows so as not to hide the False Canopy. The model was painted with Model Master Light Ghost Grey and Medium Grey, these being the closest matches to the colours used in the CF-18's camouflage, with Gunship Grey used for the "False Canopy". Exhausts were done in Humbrol Metalcote Gunmetal, with a gentle spray of MM Jet Exhaust on the inside. Decals were from the excellent Canuck Model Products sheet "CF-18 Hornet - Symmetrical Scheme" to depict the aircraft as it would (may) have appeared in the early 1980s. Seriously, these are hands down the BEST decals I have ever used. Thanks for looking and keep on whiffing! Regards, ANS
- 10 replies
-
- 13
-
-
So this was posted to the RCAF Facebook page today: "Today in aviation history March 3, 1965 – RCAF Flight Lieutenant Kenneth Abraham Harvey, while flying an F-84F Thunderjet to Edmonton, Alberta, finds his engine vibrating. At length the engine fails. Rather than bail out and leave the aircraft to crash in a populated area, he carries out a safe landing. For this action he is awarded the Air Force Cross." Assuming this is true, has anyone heard about this before? If so, please share any additional information and/or pictures. Regards, ANS
-
Hey all Carrying on the theme of my last post, I present another 1/48 Tamiya Mustang. This time, a P-51D from 402 "City of Winnipeg" Squadron. Like my Mk.III Mustang, this one was completed out of box with only the addition of Hussar wheels and an Ultracast seat. I cannot recommend Ultracast products enough, well cast, well detailed, well priced. and made in Canada. She was painted with Tamiya Titanium Silver as I find this a good representation of the Aluminium Lacquer finish RCAF Mustangs wore later in their service life. Decals came from Leading Edge Models' "RCAF P-51D Part 2: Eastern & MB" decal sheet, this includes enough markings and stencils for FOUR complete airframes! If you have plans to make an RCAF Mustang, Leading Edge is as far as I know, the only game in town. These aircraft were well maintained, so I restricted weathering to a simple panel wash with MIG Neutral Wash. This is a nice medium grey-ish colour which works well on very light and relatively dark colours. Enjoy... In the immediate post-war period the RCAF acquired 100 P-51Ds from American stocks to equip two regular and ten auxiliary squadrons. The Mustangs in regular squadron service were replaced by Vampires and Sabres in 1949-50, but the auxiliary squadrons soldiered on until 1956 when they too were replaced. Most of the airframes were sold on the civilian market, which means that your favourite air show war bird might very well be an ex-RCAF aircraft. The RCAF Mustangs were virtually identical to the rest of the herd. The only noticeable difference besides the direction finder transponder (the black thing on the rear fuselage), was in the cockpit. Canadian Mustangs were modified with a gun selector switch which allowed the selection of either two, four or six guns for firing. This was, I believe, mostly for ammunition conservation when conducting gunnery training. They could also be fitted with bomb racks on the wing hardpoints which could carry six or eight concrete practice bombs. For the history of this particular aircraft, I'll paraphrase the decal instructions: "9258" P-51D-30-NA USAF 44-74865 Feb.1951 received at RCAF Station Uplands from Texas Engineering Co. Dec.1951-Nov.1952 posted to Training Command at RCAF Trenton Nov. 1952 Sent to MacDonald Bros. for modification and overhaul Served in 402 City of Winnipeg Sqn. from Nov. 1953 until Sept. 1956 when placed in storage. Sold at auction in May 1959 This particular aircraft now flies with the civilian registration N8677E as "Sweet Mary Lou" of the 357th FG Thanks for looking and for the feedback on my previous build. Regards ANS
-
Canada: 1:144 RCAF CC-150 Polaris
Speckled Jim posted a topic in Lesser Built Air-Forces Group Build
Ladies and Gentlemen, Welcome! I've had a little down time from modelling and this GB gives me an opportunity to build an aircraft outwith my normal scale range and away from my normal profile of British or American aircraft. I've had a look through the various aircraft used by the RCAF, the RCAF and the RAF share a lot of historical aircraft so WWII was fairly out as it was just for me what I would build normally. The next option was the popular jets - the CF-18 in Canadian demo colour schemes - and there are some exceptional schemes. Then of course there is the Arrow, the Canadian answer to the TSR-2. Very much bombs and bullets and for coming back into the hobby I wanted something a little off field. So I searched and settled on the Polaris - an airliner turned military jet out with my normal scale, that's a good start. I initially wanted to build the new blue, white and red scheme however there are not yet any decals for it and normally I would ask the very good Mr Park's of Paul Park's decals to run me off a set to make the aircraft however I want to break myself in softly so I will be building the Grey scheme seen below. Simplistic, minimalistic but very smart and military looking, with the very distinctive Transport Command style band. The aircraft I will use will be the Revell 1:144 A310 shaken straight from the box with a custom paint do and some CanMilAir Decals. All to be bought as well as a full new modelling tool-kit, not at home any more so this is also a test of whether of not I can do this remote from my stockpiled bunker of a man cave, in early Jan so watch this space! If anyone has any suggestions, ideas or warnings please let me know! Ta Jim -
 KIT: Hobbycraft 1/72 CF-100 Mk.4B Canuck KIT # 1391 PRICE: Less than CDN$20.00 (2015) DECALS: One aircraft: Mk.4b REVIEW & PHOTOS : Gilles Pepin NOTES: Aftermarket: Obscureco Detail Set (Mk.4/5) OBS72009 and CanMilAir Decal Sheet (custom made for airframe 18597) Contact information: www.CAHC/CCPA.com Photographs available upon request. The CF-100 Canuck was the first fighter aircraft to be designed and built in large quantities in Canada. Avro Canada started development in 1946 in response to an RCAF requirement for a two seat, all weather fighter. The CF-100 first flew from Malton (Toronto) in January 1950. Although not quite as fast as smaller contemporary fighters, its excellent climb, fine radar and fire control systems, twin engine reliability and all-weather capability made the CF-100 probably the best all-weather fighter of its time. It entered RCAF service with No. 3 OTU, North Bay, in July 1952 and at its peak equipped nine interceptor squadrons across Canada. In 1956, a further four squadrons were moved to Europe to serve with NATO. The CF-100's main role was interception of Soviet bombers that penetrated Canadian and Western European airspace. Early sidered second to none. When compared to its American counterpart, the F-89 Scorpion, the CF-100 is considered to be superior in all aspects. The Canuck also served in the Royal Belgium Air Force from 1957 to 1960 (Belgium purchased 53 Canucks). When retired from their interceptor role by the RCAF, some aircraft were fitted with electronic countermeasures (ECM) equipment. It was intended originally that the CF-100 should be replaced with the Avro Canada CF-105 Arrow, but this project was cancelled in 1959. The CF-100 was replaced eventually as an interceptor by the McDonnell CF-101 Voodoo in 1962. The Canadian Forces continued to operate the CF-100 until December 1981, when it was finally phased out. A total of 692 CF-100s, spread over five marks, were produced between 1950 and 1958. The Canuck was affectionately known in the RCAF as the Clunk because of the noise the front landing gear made as it retracted into its well after takeoff. The aircraft depicted here is a Mk.5, airframe 18597, in service with 414 (EW) Squadron and AETE (Aerospace Engineering Test Establishment) at RCAF Uplands (Ottawa), as flown by the current president of the not-for-profit Canadian Aviation Heritage Centre (Montreal, Canada) and retired RCAF pilot John Lawson (who also flew CF-101 Voodoos, ...) CONSTRUCTION This being a Hobbycraft kit, forget Steps 1 and 2 (Interior assembly and Cockpit assembly) of the rather vague instruction sheet. Obscureco (OBS) (Google Obscureco; email address [email protected]) cockpit all the way. Remove the shelf between the front and rear cockpits. Follow the OBS instructions for fitting, installing, and painting. The Martin-Baker Mk.2B seats are terrific, but once painted should only be added at final assembly, making masking of the cockpit during painting much easier. Google MB MK2b images for clear paint guidelines. A word of caution: these OBS resin parts will ALL require serious sanding; so a respirator mask is de rigueur, as is a Dremel-type rotary tool with an 80 grade rotary sanding brush. Keep fitting until just right. Use thick-gel CA to attach to the upper front fuselage and some Milliput to fill in the gaps between the sidewalls and the cockpit tub, and thin styrene to close the gap behind the rear cockpit seat frame and the arch of part B1. Step 3: install the OBS wheel well as instructed. Then follow the OBS instructions for their excellent air intakes, again using thick-gel CA to attach. Do not worry about outer fit; simply putty, sand, putty, well, you know the routine. As I am modeling a Mk.5, I did not have to worry about the anti-icing system; Mk.5s were not equipped with these. Then install the kit-supplied engine exhausts as indicated. Step 4: the small windscreen (dipped in Future) should only be attached at the end. If building gear down, stuff as much lead/putty in the nose as will fit (the weight of the OBS resin cockpit helps prevent tail-sitting). Step 5: straightforward. Sand wing root joints of assembled wings. Step 6: first, the empennage/rudder assembly: remove 1mm from inboard portion of elevators, then cement horizontal stabilizers to rudder (be patient, as it is time-consuming to get just both the correct location and angle). Then the kit-supplied electronics cooling scoop: way too narrow for this particular aircraft, but fine for all other Mks.; install it at this time. Wings/fuselage assembly: how in the world are the wings supposed to remain attached to the engine nacelles for more than 6 minutes? Hmm Hobbycraft at work again. Resist using CA, as the wings will eventually snap off under pressure. Use a 3 long brass rod, making sure you drill the two holes next to the engine nacelle slits FORWARD of the wheel well, but aft of the nacelle slits, and insert the rod (refer to photograph); carefully drill matching holes in the wing roots. Cement the wings to the nacelles (putty, sand, putty, ). You can adjust the dihedral much more accurately (not to mention easily) by using this homemade spar method. Leave the clear canopy aside for now (you can dip it in Future now, and let dry vertically, with the forward end pointing down, for 24 hours). Last but not least, attach the tail section to the fuselage (ignore the temptation to line up the main fuselage and tail section side panel lines, as they do not line up perfectly). Step 7: the wingtip tanks. If you look very closely at the photograph of the tanks, you will see that the light enclosures cover the entire tip of the wingtip, are transparent, and that the upper inboard quadrant of each is painted black, so as not to interfere with the crews night vision; my solution: I purchased some Pure White Indoor/Outdoor LED X-mas tree replacement bulbs, carefully cut the tips off, glued these on with Formula 560, Future-dipped the tips a few times, then masked the whole glass. Step 8: refer to Step 9.5. Step 9: attach the 8-gun part A8 cemented in position (trick: use a toothpick: the pointed end will fit in one of the gun holes, acting as a guidance tool). Gear up: install. Gear down: secure them for primer/paint. From Step 10: attach the wingtip fuel tanks (did I mention putty?), but not the pitot tube (you should replace part B11 with hollow K&S Precision Metals 1/32 x .006, .79375mm round brass tubing brass #815035). Step 9.5 (while something is drying/curing): flat black, flat aluminum, getting the landing gears ready for installation, using the OBS main landing wheels and the kit-supplied nose wheels. PAINT & DECALS Cover the cockpit well and prime the aircraft. I am painting 18597 flat aluminum (Tamiya X-16), with the radome semi-gloss black (Tamiya X-18) and all anti-glare surfaces flat black (Tamiya XF-1). Wheel wells and inner landing gear doors are done in light grey (Tamiya XF-66). Seal with many airbrushed coats of Future. Washes for wheel wells, engine intakes and exhausts and whatever else works for you come next. I highlighted the air brake lines and flap/ailerons/trim tabs with a Sigma Micron 005 pen, as I have a love-hate (mostly hate) relationship with washes and other weathering solutions (they turn out to be more of a problem than their name implies). Once the ink is perfectly dry, tone the lines down with a fresh pencil eraser; the excess ink not in the engraved lines came off like a charm. Refer to photographs. CanMilAir (www.canmilair.com/) custom decals, complete with positioning instructions, were next. These decals are custom-printed using solid resin inks; the images are transferred from the colour ribbons onto the decal paper using a thermal print head; you will need a hair dryer, liquid decal film, and setting solutions; follow the very clear instructions. A word of caution: these superb decals are THIN, so if you are positioning, for example, an RCAF roundel over a split-colour pattern as I did for the upper wings, you will have to paint the surface that will be covered by the white portion of the decal the lighter colour of the split (in this case flat aluminum, recoated with a light application of Future). Then seal the aircraft with Future. DETAILS Add kit-supplied control column and ejector seats to cockpit and touch up cockpit details with dry-brushed silver. Attach landing gear sub-assemblies, landing gear doors, brass pitot tube (in sanded down and drilled out port wing pitot stub hole), and dressed-up canopy in fully slid back position (note the proper angle on the first photograph), once you have separated (and attached) the front windscreen from the sliding portion of the canopy (I use a fine metal Dremel saw at high speed). Attach the small windscreen from Step 4 now, creating a slit between the back of the pilot seat and the radar console, using the same Dremel saw. Do not forget to paint the windscreen deck flat black. Et voila! CONCLUSIONS For many of us Canucks wishing to build Canucks, Arrows, Norseman, ..., Hobbycraft and Modelcraft are the only games in town in any scale. These kits all suffer from the same deficiencies, a normal consequence of their relatively short-run nature: Coke crate cockpits and infuriatingly generic landing gears. The confinement of cockpit tubs, seats, and assorted items to your unused parts stash is inevitable; the Obscureco detail set for this CF-100 is an absolute must; the kit-supplied decals are, hmm, Hobbycraft, so aftermarket decals are a must; the CanMilAir decals are prototypically accurate and available in any configurations/scales; consult their web site for any of your RCAF models. An excellent model can be achieved from these Kanuk Kits. The end result of this build is now on display at the Canadian Aviation Heritage Centre (www.cahc/ccpa/com ). Gilles Pepin is a retired investment banker and is the researcher/model builder for CAHC REFERENCES The Avro CF-100 by Larry Milberry (CANAV Books, Toronto, Canada) William Burns, proprietor, CanMilAir Decals Canadian Aviation Heritage Centre (we have nearly 6,000 publications in our library) Canadian Warplane Heritage Museum - Avro Canada CF-100 Canuck
 -
 OK, I'm calling this one done. Back in February I posted pics of my Tamiya Spitfire Mk.Vb (link), and now I've finished off it's Airfix sibling. Whereas the Tamiya kit was basically OOB with a few minor shape corrections, this one has a few additions to it (but no shape corrections): - Master brass cannon barrels - Wing trailing edges thinned and surface detail added to ailerons - Sutton harness from Tamiya tape - Added missing fasteners on the engine cowls - Added wing root fillet fastener detail - Prop, spinner and main wheels from the old Hasegawa Mk.Vb - Tail wheel from the Hasegawa Mk.IXc - Kit exhausts drilled out and detailed with weld seams - Main markings/insignia painted with home-made masks - Barracudacals airframe stencils - Added the sliding hood knockout panel cut from an old "Fast Frames" sheet Questions and constructive criticism are always welcome! The markings I chose are for a 402 Sqdn (RCAF) aircraft flown by Flight Lieutenant Henry Percy Duval of Saint-Jean-sur-Richelieu, Quebec. F/Lt. Percy was shot down near Dunkirk in late May 1940 during the Battle of France and managed to return to fight in the Battle of Britain. Later, on 27 April 1942, he was flying AA834 on a "Rodeo" to Lille and collided with another Spitfire over Le Touquet and was KIA. F/Lt. Percy was not famous, nor was he an ace, but to me he is representative of the thousands of airmen who gave their lives. Cheers, Tony
- 23 replies
-
- 26
-
-
Harvard Mk. IV RCAF Moose Jaw, 1953. In Canadian service the Harvard was often referred to as 'The Yellow Peril', or 'Two Ton Tessie'. Many thousands of RAF and RCAF pilots must have undertaken their training on these aircraft over the years, flying over the vast Candian praries getting to grips with the beast. I was reminded of it again, reading an excellent book "Stalins' Had it now!" by James Stevenson, an RAF pilot who did his training on Harvards & T-33's in Canada before returning to the UK to fly Vampires. I thoroghly recommend it, it's a good read. I built the Occiental 1/48th Harvard when it came out about 15 years ago, so dug it out of storage and dusted it off, to what you see here. This particular aircraft was flown by 'Viking senior' (my father) who was in the RCAF at the same time as the James Stevenson book covers, I still have his wings; And a couple of photos of him in the air. I now notice that the 'GT-F' lettering on my model is not the right font, but hey-ho! There is no doubt that is Canada down below! Like James Stevenson he went on to T-33's, so i built one of those as well 15-odd years ago,and also dusted it off and photographed it. This is the Academy 1/48th kit, representing on of the T-33's he flew at RCAF Gimli; Just need to build that Hasegawa Sabre V now, to complete the set. Thanks for looking, John
- 18 replies
-
- 17
-
-
It spent 74 years beneath the surface of freshwater Lake Muskoka in the middle of Ontario, Canada, about a 2.5 hour drive from Toronto. The Nomad's tail was raised yesterday (October 28, 2014) but it was originally found in July of 2010 after an approximately 3 year search. (http://www.thestar.com/news/gta/2011/07/24/71_years_later_missing_plane_found.html ) Associated articles from today's news: http://www.thestar.com/news/canada/2014/10/28/downed_second_world_war_plane_recovered_from_lake_muskoka.html and background information from the RCAF website from September of 2013: http://www.rcaf-arc.forces.gc.ca/en/news-template-standard.page?doc=the-northrop-a-17-nomad-3521/hlouaj92 It may not be as thrilling as finding a Halifax but I believe this is another good find and it allowed the airmen to "come home" after 70 long years. Cheers, Dave
-
Hi folks, hoping I can find some help here on the above listed subject matter. I'm trying to figure out the following for this particular airframe: what type of prop? (two blade or three blade?) what type of wing? (fabric or metal) Based on current research I have found the following info on the airframe: first date: 2 March 1939 - Taken on charge at RCAF Station Sea Island, BC Ex RAF L1762. Shipped to Vancouver. Used by A Flight, No. 1 (F) Squadron, at RCAF Station Sea Island, BC. To No. 3 Repair Depot, Vancouver on 6 June 1939. To Western Air Command 1 April 1940. Sent to UK with No. 1 (F) Squadron in 1940, coded "YO*L". Returned to RAF shortly after, but retained RCAF serial number. Operated by No. 6 (later No. 56) OTU, RAF, late 1940 / early 1941 via Bill Walker's site. I would like to build one of the new Airfix kits but if this airframe was not fabric winged then I'm looking for another Canadian subject. Also if the airframe was fabric winged I am trying to figure out whether three or two bladed prop would be appropriate. I would like to build the airframe as it was after it returned back to the UK from Canuckland Cheers, Dave
-
Afternoon all Some more classic pics from a friend across the ocean. Taken at RCAF Station Rockcliffe Ottawa on 6th June 1664 the pics show Vulcan B2 XM646 with IFR Probe and probably XM647. 6th June is the date of the third National Air Force Day at Rockcliffe. The 40th Anniversary of the RCAF" was the theme and an RAF Vulcan was scheduled to display. The nose shot shows the markings of the Coningsby Wing with 9, 12 and 35 Sqn markings along with the Coningsby Crest although the castle on the crest looks a bit thick. The pilot’s name on the crew access door is AVM AHC boxer who was SASO at Bomber Command The Victor B2 pic was taken non 11 June 1964 but the date on the pic file gives no location. XL233 carries the tail marking of the Wittering Wing which comprised 100 and 139 Sqns. Any further info, corrections and the like would be very welcome - Hope they are of interest All photographs are courtesy Canadian Forces Joint Imagery Centre, Ottawa via Steve S Regards Frank
-
 Hi This is another older completion, Monograms old 1/48 Typhoon with a bit of work. I rescribed it complete, modified it for 3 blade prop (kit part with blades repositioned), corrected rad intake, replaced cannons with tubing, opened up exhaust, complete scratchbuilt interior (which is very hard to see, now!). The bombs are from a Monogram Hurricane, and the pylons are scratch built, detailed gear and wells, replaced nav lights with coloured "Bingo" chips, scratch built boarding step and painted with Tamiya acrylics, weathered with pastel chalks and oils. Comments always welcome, thanks for looking, Colin
- 23 replies
-
- 13
-
-
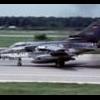
Afternoon all Woke this morning to find these in my inbox sent by an old friend in Canada! Pictures taken on 9 April 1964 at RAF Wattisham of Flt Lt Robert Chisholm RCAF an exchange pilot with 111 Sqn for 3 years. Later became a Major General in the CAF. Pictures also show Sqn Ldr Later AVM George Black Hope they are of interest Regards Frank XM973/T XM184/A XM216 XM192/K All photographs are courtesy Canadian Forces Joint Imagery Centre, Ottawa via Steve.
-
Evening all, Having recently finished a 1/72 Airfix Mustang in post war RCAF colours.. http://www.britmodeller.com/forums/index.php?/topic/234952128-airfix-172-mustang-new-tool/ I couldn't help thinking how nice it would look in 1/32nd, which is a bit daft because I've got a load of kits to make and I'm halfway through a 1/72nd Airfix Hurricane build, but despite promising myself I wouldn't - another being must have overcome me, because I still seem to have ordered the lovely, but pricey, Tamiya kit anyway.. In addition I also got the beautiful HGW seatbelt set (with resin dinghy pack), the Barracuda resin sidewalls, the Eduard interior photo etch and the Leading Edge RCAF decal set Whilst waiting for the kit to arrive I made a start on the HGW set which had already arrived... Thanks for looking, Guy
-
 Greetings. I'd like to announce, that by popular demand, 1:48 scale Avro CF-105 Arrow markings are now available from Canuck Model Products. For those that have one of the old Hobbycraft kits sitting in their stash, now you can finish it up properly. Package comes with two sheets, all stencil and warning markings, numbers for all 5 MK1 prototypes, intake bleed ramp markings, and complete wing walkway lines. enjoy David
 -
Italeri has released some test shot photos and decal images of their new 1:32 scale CF-104 / F-104G boxing. It looks like an improved version of the Hasegawa kit. https://www.facebook.com/media/set/?set=a.544555952283696.1073741837.454765391262753&type=1 There are multiple issues with the RCAF markings and the stencils appear to be genericized (so not accurate to the RCAF). Looks like it has both types of seats (covering both the CF-104 and F-104G) but the forward IP looks to be only the F-104G type. Canuck Models offers correct markings for this era and I have other Starfighter sets in the works. So if you're planning to build an RCAF version, you'll be covered. thanks David
-
I have an urge to build a Canadian F-18 Hornet in 1/48 but I'm unsure about what kits I can use. I have seen that there are some CF-188 kits by Hasegawa but they are both very rare and very expensive. I'm not a great authority on the finer details of aircraft but am I right in thinking that the Canadian birds were as the US F-18A's with a search light added somewhere around the nose? So can anyone help me with what options I have, even if requiring aftermarket? I really like the pretty simple examples (ie not brightly coloured anniversary aircraft) as I loved the fake cockpits painted on their undersides. (I plumped for putting this in Cold War as I'm thinking that this would be an early example possibly a German based aircraft. - I'll need to do more research!)
-
Hi Folks, I've decided to drop the new Airfix P-51D mustang into the post war RCAF livery. As such, I was curious about a couple things that you would think I could find online but my Google-Fu is failing me. I'm interested in the following as it relates specifically to the RCAF mustangs: Canopy Shape - Airfix provides two canopies in the kit that have a slightly different shape; for those that have seen the kit or know the differences, which canopy (part number) would be correct to use for post WWII service? (or does it matter?) Wheel well colours - The Airfix kit calls out for Humbrol 56 (Aluminum) for the interior of the gear doors and the wheel wells - I can't locate any reference specifically for RCAF but seeing as the aircraft came from the U.S. can I "assume" that this is correct? I know these questions could apply to any mustang of any scale for the RCAF but 1/72 seems to be where I'm at right now And as a caveat; I'm not building for competition or for extreme accuracy - I'm just building for myself but I would like it to be "somewhat close" Cheers, Dave