
Search the Community
Showing results for tags 'oob'.
-
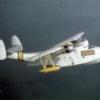
Hi folks, Here are some glamour shots of my completed Beaufighter. Apart from tape seat belts, it's completely oob. I wanted to get the 'vibe' of the kit, before building the others (4) in my stash more seriously. Scheme is brush painted with Xtracrylix. I am seriously impressed by the kit. The vast majority of the build sequence is sensible, parts fit where they should and overall assembly is pretty simple. Two things I will mention though: 1) Engine cowlings: Suggest you glue the cowling pieces together to form the complete cowling, let dry, then add the engine, rather than assemble the cowling around the engine as the instructions suggest; 2) Undercarriage leg supports. Ensure these are trimmed to fit neatly in the slots provided. The fit is tight and it's a somewhat awkward squeeze to install them. Anyway, here are the shots: RFI thread here: http://www.britmodeller.com/forums/index.php?/topic/234989610-airfix-172-beaufighter/ regards, Martin
- 18 replies
-
- 36
-

-
 Hey guys, after some fails this year (try and error building) I started to build the 1/32 Eduard Bf 109 E-1 Weekend Edition with Spanish Masks from Montex. There are some smaller mistakes I did (was a bit too fast in some points of the build) and I still have to learn how to handle and paint the canopy correctly because the Montex Mask left some touches at the Canopy. This learning phase should then lead into the build of a Tamiya A6M2 Zero in 32 scale. However (still not finished) if finished this will be the first model in about 13 years which I do complete. This is also a bit a quick & dirty build as I wanted mainly to train my airbrush skills for a one color-plane. So There are small gaps here and there and she may not be perfect build, but this was not my personal task for this baby. So I started last thursday with the build and here is what I did so far: 1. Fuselage Inside and Cockpit Elements primed with black and added RLM02 2. & 3. First time building HGW Fabric Seatbelts, took a while for the first belt but it is just great! 4. & 5. & 6. Main Cockpit parts in place (except upper instrument panel). Wash and dry-brush done as well as subtile chipping at some corners. I decided to not add any Instrument decals or so because the Eduard Instruments are very badly done so I don't wanted to invest some decals at it. The Pro-Packs do Include Photo-Etched Instruments. Also you may note that the Rudder-Pedals are missing - again PE Parts within the Pro-Packs so it is totally missing in the Weekend Editions of the 109's. 7. First try of handling those small parts in the pit. I "glued" them with Clear-Coat in the end. 8. & 9. Upper panel and Revi installed, as I said above, I decided to not use any decals / add-ons for the Instruments. 10. Base-Coat of white applied, pre-shading done and added the base colors for the markings. 11. & 12. Added the Montex Mask for the Insignia and the Fuselage Markings 13. & 14. Painting progress starts with some RLM02 to the Fuselage first and RLM65 to the underside 15. To get back the pre-shade over the markings I added another layer of white and pre-shades 16. Removing the second color masks and add yellow paint to the spanish insignias and red to the fuselage smybol 17. & 18. & 19. & 20. Mask removed - isn't this nice?! In the second image the daylight reveals that I can be happy this far 21. I'm also very much happy with the pre-shades 22. & 23. Masking of the sides for the black stripes 24. & 25. Black added and...voila! Mask seems to have been good 26. Current state of this morning. So all the main parts are now colored, I'll add the main landing gear as next step and lookout to work on an antenna for the 109 with EZ Lines. Then some of the stencis will be added (not all, as I didn't see any photo with every stencils in place - mostly only the basic 87 Octane Fuel and Medi-Kit Markings). Then a wash and some weathering will follow. Hope you like it
- 3 replies
-
- 7
-
-
- OOB
- HGW Seatbelts
- (and 5 more)
-
Finished today, a really nice kit, that goes together very nicely, only thing to watch is the rear drive sprockets which needed a little work. Painted with Ammo IDF Sand Grey, and Alclad Steel for the tracks, then weathered with Pigments and Oils Peter
-
 Finally I managed to finish a model - also finished it in under a month!!! Revell kit, out of the box. No added bits, just a straight forward build. I stumbled across a framed photo/painting - call it what you prefer, and though that would go well in my room. One day, I stumbled over this kit, and lobbed it in my room, along with the picture. And it was here, that I noticed that the painting I had bought, was in fact the boxart of the kit I had just bought! So it was a pretty easy decision, to choose what plane it should be built as. So, here goes: Revell 1/48 Spitfire Mk IXc, No. 43 Squadron RAF, Klagenfurt, Austria June 1945 Robin
 -
 OOB.build,painted with mixed Tamiya acrylics and Vallejo acrylic varnish,through and Iwata HP-B and Neo respectively. Thanks to "Nachtwulf" for the combat flap info. There wasnt much interest in the WIP thread,but hope springs eternal that the completed project will attract some comment. Good or Bad.
 -
Canopy is only tacked on ,awaiting the fitting of the rear machine gun. The kit decals went down pretty well with the exception of the red stripe across the cowling,that just would not lay down over the compound curve,for me,so that will be painted as soon as I can mix the correct shade of red. I need to touch up a decal break on the wing walkway as well. Im thinking a bit of weathering/stain will do the trick. Kit Hasegawa painted with Tamiya acrylics through an Iwata HP_B I have a couple of more schemes in mind but I think they will be in 72nd scale,the Kate takes up quite a bit of space and with hindsite I should have done the 48th one with the wings folded. Ah well mice and men and all that. As always your comments input etc gratefully recieved.
-
Mixed Tamiya acrylic through an Iwata HP-b I know Hasegawa are expensive but like Mr Kipling they do make exceedingly good kits . Thanks to Nick Millman (www.aviationofjapan.com )for his input of the late war olive/brown colour
-
 1/48th Scale Revell Reboxing of the Hasegawa kit, Built quickly over 2 and a half days without making a lot of fuss, just blasting through playing with a couple of new techniques. Painted with Gunze throughout. Great fun kit, though the 12 year old decals weren't great, had to resort the DACO strong setting fluid to get them to behave. Peter
- 13 replies
-
- 16
-
-
Finished today for the 'Actung Panzer GB', the Bronco Humber Armoured Car Mk II OOB. This is a lovely kit but not for the faint hearted. It doesn't have a full interior, it's a complete armoured car - chassis, control linkages, engine, gear change and lots of gear inside. Painted with AK Interactive Light Stone ( From their Caunter Set ), Tamiya paints for the rest of the cammo, and Vallejo for the details. Weathered with a full range of AK Interactive / Ammo / Mig potions and pigments. Build thread is available here Peter
- 10 replies
-
- 17
-
-
 Hello all! So this is my first WIP on Britmodeller. Thought it would be nice to contribute to the many fellow modellers around. In this WIP thread I'll be building the new Revell Torando IDS on 1/48. I bought the kit pretty soon after it was release in 2014 because I really like the looks of the Tornado. Next to that I've seen many many Tonka's flying while I'm also a keen aviation photographer. I already posted some WIP shots and stories on a dutch forum, and now I'm sharing this here too. Many of you probably know the kit but here are some inbox shots. The one I'll be building dates back in the 80's where the grey/white scheme was replaced by a three tone scheme, the so calles Norm87e scheme. This a three tone scheme. In the Revell box a EADS recce pod is supplied, I won't be using that. The typical 80's MarineFlieger (FAA) loadout was two fuel tanks together with Kormoran missles. Typically that would be fueltanks on the wing hard points and the kormoran on the belly hardpoint. But I found this image on © Airliners.net: You can see the fueltanks are on the belly and the Kormorans on the wing. Well that's the loadout I'll be doing. First of all I (still) have to find good Kormorans. I know there is a resin AM one, but those are around €20 for two, which is quite expensive for two missles (IMHO). I'll using Harald Hensel excellent decals to make this Tornado a Marineflieger Tornado. Enough talking some photos of the build so far: Cockpit is OOB here with a dryfit of the two side parts. You can see the construction as made by Revell. First the wheelbay for the front suspension. On top of that the cockpit tub is put. Alignment is good. Now on to the rear wheel bays. These have a few sinkmarks (visible on the photos), so sanding is required. The bays lack wiring, that's why I'll be adding some wiring to make it look a bit more realistic. I recently purchased some lead wires on Ebay. Very nice stuff to bend and create a more realistic look. More on that later on. Next step are the intakes. I glued them, and you can see some seems. A well known trick to solve this is to use some white latex and poor that in the intakes let it cure for a few minutes and then release the back to let remaining latex poor out. I'll be doing that. You can see on this photo I have put some put in the seams and after that I've sanded it. (grid 600). This gives a fairly good result Now on to the Latex trick. Got some latex from my neighbour. I filled the intakes and let it for about 10min. After that I released the tape. I spilled a bit, but Latex is cheap so no worries. The picture below shows the tape removed and with a little space between the latex was able to poor out. After some comment on the dutch forum I decided to add the kit decals to the cockpit to make it a bit more realistic. I'm OK with te result. After the Belgian Mirage that I built (many rescribing and other challenges) I wanted to build a nice 'new' kit OOB. That's why I picked the Revell Tornado. Now after building for about a month this build is getting difficult in some ways. Main issue is the breakdown of the plane. This results is many parts for building up the plane. Especially the tub and the underside combined with the other parts making up the sides under the wing. But also a factor is that the plastic is quite soft, with my knife I sometimes remove to much simply because it's so soft. Next to that I started scribing the panellines. That's needed because they are really soft and far from deep. I tested that with a small part and some primer, but after the primer not much was left of the details. So that means that I'll be scribing the whole plane in order to be able to do a wash in the painting process. Starting with the wheelbays combined with the main section of the intakes. The plastic is soft an despite carefull cutting and sanding sometimes you get some annoying cuts. Seen here is the main section, cockpit attached, intakes glued and also the side panels for the rear part. A lot and I mean a lot of dry fitting was needed in order to a descent alignment of the parts. Sometimes I needed to glue it in differten steps in order to get the result I wanted. What you see here is the section of the intakes and the side panels. It took me an hour sanding, fitting and glueing to get this result. I even grabbed my girl friends hairdryer to get stiffness out of the plane in order not to put to much pressure on the glued parts. You can see some cuts here, this shows how soft the plastic is. So that's it for now, comments appreciated and hope you like the build! Cheers, Evert
 -
Kit - Italeri 1:72 (0144) Paint - All Tamiya acrylics. Decals - Kit & Xtradecal 72-103 (thanks John) Extras - None Martin B-57B Canberra 71st BS, 38th BW (Light) Laon AB, France 1957 Finished just this morning (NZ time), when my kids saw it they immediately said, "Dad, it looks just like 'Toothless' from How to train your Dragon...", and I think they have a good point: This was built for 'Micro Modelling Month' on another forum - basically build a small-scale kit within 28 days. Given that this is the original 1980's Italeri release it simply fell together with virtually no filler needed and the decals behaved impeccably, yep even those skinny red walkways, so BIG Kudos to Italeri for that. Public thank-you to John (Canberra Kid) for sending the Xtradecal's all the way out here to NZ for this project. Really appreciate it, mate. This is my second completion for 2015 and my second 1:72 model, not too shabby for a confirmed 1:48 (or larger) fan. As ever thanks for taking the time to look and/or comment. All questions, comments or criticism welcome. AFN Ian.
- 10 replies
-
- 19
-
-
Hasegawa 1/48th Special Edition kit built OOB. Painted with Tamiya Acrylics and weathered with Pigments and Oils. Build thread is available here Peter
- 11 replies
-
- 17
-
-
 My first project wrapped up this year and also first vessels ever. There are many flaws in the kits, yet I am rather happy with the result. I hope you like it WIP pictures (sort of) can be found here.
- 8 replies
-
- 7
-
-
- submarinehobby boss
- 1/700
- (and 1 more)
-
Hello, this is my first take on vessels in a scale. These are 1/700 from Hobby Boss. I'm about to apply clear gloss varnish and put the decals on. I'm welcoming any hints for weathering
- 9 replies
-
- 2
-
-
- 1/700
- Hobby Boss
- (and 1 more)
-
Finished this morning, built as a quick simple build after the Spitfire. This is the same aircraft as the Walter NOWOTNY scheme, but with a different pilot at a later time in Winter Distemper. This was done to try AMMO Washable White paint, which works really well. Painted with Gunze throughout, apart from the AMMO Washable White, and weathered with Oils. Peter
-
Started today as something quick and simple after the Spitfire, so I picked out on of my many Eduard 190's. As i've built a few of these before things go quite quickly. Work starts with the cockpit, sprayed Gunze RLM66, with all the PE and an oil wash Then added the PE belts, matted down, and added some light chipping and dirt Next up - close up the fuselage with some 'assistance' from some berna clamps Then make up the wing - as per normal the spar needed some light sanding to get a decent fit . Also needed some Mr Dissolved putty on some edges, and a small plastic shim at the back - nothing major. Peter
-
Amusing Hobby 1/35th VK 16.02 Leopard Built OOB, painted with Ammo Paints then weathered with various AK, Ammo and Wilder potions, and Pigments and pastels. The kit tracks deserve special mention, plastic individual link tracks with pins that work !. Build thread is available here Peter
- 15 replies
-
- 10
-
-
- Amusing Hobby
- OOB
- (and 1 more)
-
A completely out of the box build of Trumpeters excellent Dauntless after a year off. Really liked this kit it's a cracker. Here's the build> linky Thanks for looking Nick
- 21 replies
-
- 15
-
-
Accurate Minatures kit OOB, using the supplied masks and decals to do "Dora". "Dirty Dora" was apparently named after a woman met on leave by the pilot who had a 'colourful' sense of language. The woman in question did get to see the aircraft after the scheme was applied, and was singly unimpressed. Painted with Gunze Acrylic for the Olive Drab / Neutral Grey, weathered with Mig Oils, True Details acrylic resins and pastels. Fun kit - only closing the fuselage and the dorsal turret causing any real problems Built thread is available here Peter
- 13 replies
-
- 13
-
-
Dragon Kit, OOB, Painted with Tamiya Acrylics and weathered with Oils and Mig / AK / Ammo potions. Hated this kit or more precisely the 'instructions' which were by far and away the worst i've seen, with a massive mixed box of bits from various kits. Spent more time hunting parts than building. Build thread is available here Peter
-
Hey guys, i hope you wont mind one more topic from me for this GB. Definitely last one untill i finish at least one of the started kits! So my other builds are in the (quite) boring stage of filling, sandpapering and such a stuff.. I needed to do something fresh and also wanted to test some new paints and varnishes And because i have few of AZ Model Bf-109s in stash, i thought making one just out of box should not hurt. The kit is very nicely detailed i have to say, the fit seems to be better than their spit (though the spit is also greatly detailed and the bad fit could be caused just by my clumsy hands) and the instructions are faaaaar ahead of the spit´s ones. Nicely drawn and even all the details are painted in the exact colours right in the instructions so you dont have to riddle what colour is used here and there. I dont like to build german planes, because i dont think i could do good enough mottling schemes, but hell i think i will have to learn it, because these 109 are realy great kits and deserves more than just OOB attention. But for me now only OOB it is :/ So far i completed only the cockpit. I wanted to try alclad gloss varnish as base for washing. I know lacquers and enamels doesnt like to work with each other, but still i had to try it and because the cockpit will be closed, i thought some errors there wont hurt so bad for now. It was as expected - using enamel based thinner resulted in sticky surface and on testing areas (wings inside) i used more thinner on purpose and all the varnish + acrylic base paint went off in no time. But i m going to try the clay based (water thinned/cleaned) washes in future, so it wont be problem later. For now, in the cockpit i used the white spirit gently and could remove the excessive wash, though i realy would not recommend it to anyone, based on their nature the lacquers and enamels just wont work together I see its known fact all around, but it was ment for those thinking "but maaaaybeee..." - no, just no. Anyway, here is the cockpit, just painted, "washed" and its got matt varnish + some light drybrushing + i tried some progresso silver pencil to give some edges a bit of metal look, because i dont like to use silver chipping in darker cockpits.
-
Spitfire LFMk.IXc, ML135, flown by Jerry Billing, No. 401 Squadron, Tangmere AB, June 7, 1944 Finished today to clear the decks for the Korean War GB. Lovely kit, with no real vices other than the roundels being wrong, and a little transparent. Fixed the roundels by making some masks and spraying them - in hindsight I should have sprayed the other roundels too. Painted with the Tamiya Acrylics. Work in Progress is available here Peter
-
Started yesterday the lovely Eduard Spitfire Work naturally starts with the cockpit - quite a lot of stages and parts but it does build up nicely Then after adding the PE the cockpit is done Button up the fuselage - first tiny bit of filler just in front of the cockpit but it is a tiny smear of Vallejo plastic putty Then added the wings, tails and cowling - once again a couple of tiny smears of filler but it's a tiny amount I know it's been said before but this is a lovely kit so far, everything fits so well, and the detail is exquisite. Peter
-
I'm calling this one done, mainly due to being sick of having to patch the Alclad polished aluminium. Why that particular shade causes so many problems is a bit of a mystery. Apart from the Alclad this was a fun kit, only minor issue being the fillet to cover the space for the second seat which needed a little filling, and me putting the nose on upside down at first Build thread is available here Peter
-
Once again something simple Work starts with the cockpit, and building up all the internal components and getting the fuselage closed up. Peter


