Search the Community
Showing results for tags 'mosquito'.
-
Here is my KUTA entry. Tamiya have the deserved reputation for producing some of the best engineered kits on the market so it is to my eternal shame that i have one unfinished/uncompleted in the stash. Looking in the box i have appeared to have taken a scatter gun approach by building a few sub assemblies then giving up the ghost. So its time to put things right and get things going again. Here's where i am...... As you can see a small pile of bits and pieces, albeit in not too bad shape. I shall endevour to revisit the instructions and get back in the saddle (again!)
-
 Here's my current WIP project, the famous "wooden wonder": the De Havilland Mosquito. This is actually my first British WW2 project since I started doing 3D some fifteen years ago! About time too, as I lived in the UK for the better part of a decade! I've started with the most common version, the FB Mk VI. The Mosquito served in no less than two dozen countries and about 60(!) pilots made ace on the Mosquito, so it's a nice and versatile subject! Some more images of its current state: Still some modelling left to do, but it's starting to look like a Mosquito! As per usual there were no "perfect" drawings available, so it's a combination of known dimensional data, scale plans, engineering drawings, manual drawings, DH fuselage lofting data generously supplied by Mark Gauntlett (many thanks Mark!), AAEE reports, NACA reports and hundreds of photographs. I.e. plenty of research! Mark's drawings are the most accurate around, by the way, and form the basis of this model, though especially on the tail, wing and engine nacelles I've deviated from them were necessary. My goal is to make this an absolutely accurate 3D Mosquito. The Mosquito will go well with the Junkers Ju 88 I made last year. These two aircraft are perfect adversaries and during the course of WW2 they fought eachother around the clock, over sea and over land, in all bomber, fighter and recce roles. Interestingly the battle between the Ju 88 and the Mosquito started even before the prototype was finished! On 3 October 1940 a well-aimed attack by a single Ju 88 flying at just 60 ft destroyed most of the jigs and killed 21 De Havilland staff, while injuring another 70. The prototype escaped major harm luckily, and as a sign of things to come, the Ju 88 was shot down by small arms fire... I should be rounding this up this month, so stay tuned!
- 34 replies
-
- 2
-

-
- de havilland
- mosquito
- (and 8 more)
-
Hello and thanks for your interest, this is my 1/72 Hasegawa Mosquito B.IV. The kit was started about 5 years ago. I ran into serious trouble with the split canopy section which consists of 4 clear parts, and they just wouldn't go together. I was left with a split line along the top canopy seam and gaps on the side windows with the blisters. Therefore, the model ended up in my 'box of doom', destined to become a source for spare parts. In early December I cleaned up my working room and rediscovered the Mosquito, almost finished, with a base coat applied already. After close inspection I decided to finish the model, since I felt it would be a pity to throw it away. I did not do any corrections on the flawed canopy section, just left it as it was. That's why you don't get any close-up pictures! The model was painted with Gunze/Mr.Hobby acrylics. Code letters for the Decals were sourced from a Tamiya kit as the Hasegawa decals looked to green-ish to my eye. They represent a plane from 105. Squadron in 1943. So here she is, not my best effort, but finally resting in my display case next to my Tamiya B.IV (shown here:http://www.britmodeller.com/forums/index.php?/topic/234920784-172-tamiya-mosquito-b-mkiv/). I am hoping for a new mould Mosquito series from Airfix in 2016! All pictures by Wolfgang Rabel, IGM Cars & Bikes With best wishes from Vienna, have a nice holiday season!
-
 Airfix's 1/24 scale De Havilland Mosquito FB.VI has arrived into stock, just in time for Christmas! https://www.wonderlandmodels.com/products/airfix124-de-havilland-mosquito-fbvi/
- 1 reply
-
- 3
-
-
- new release
- airfix
- (and 8 more)
-
Decals for Mosquito Mk.IV and Mk.VI Eagle Editions 1:32 For many years those modellers who chose to build in 1:32 scale were limited in their choice of Mosquito kits to build, particularly injection moulded kits. Now, in this golden age we have the choice of two super. Modern injection moulded kits of the Wooden Wonder. EagleCal decals have now released two sets, one for the HK Models kit and one for the Tamiya kit. Both are contained in zip lock bags and come with an A5 pamphlet, which opens out to A3 size. The decal placement for the models are mostly in colour with large side views, smaller top and bottom views on one side, plus the stencil placement and aircraft colour call-outs on the other. Each of the two sheets in each set are beautifully printed, in register, nicely opaque and with a thin carrier film, of which there is very little as the decals are quite closely cropped. Set EC#167 is for the HK Models Mk.IV and contains five aircraft options but with stencils for only one aircraft. The Options are:- Mosquito Mk.IV, DK310, LY-G, Grim Reaper of No.1 PRU, August 1942 Mosquito Mk.IV, DK333, HS-F of No.109 Sqn 1944 Mosquito Mk.IV, KB195, AZ-B of No.627 Sqn, June 1944 Mosquito Mk.IV, DK337, GB-N, Uncle Sam, of No.105 Sqn, May 1943 Mosquito Mk.IV, DZ415, AZ-Q of No. 627 Sqn, Early 1945 Set EC#169 is for the Tamiya Mk.VI and contains four aircraft options, and again one set of stencils. The four options are:- Mosquito Mk.VI, HR551, UX-P of No.82 Sqn from the Summer of 1945 Mosquito Mk.VI, HP913, SM-W of No.305 Sqn, November 1944 Mosquito Mk.VI, NS927, SM-C of No.305 Sqn from Autumn 1944 Mosquito Mk.VI, MM403, SB-V of No.464 Sqn, September 1944 Conclusion As with the P-47 decals I reviewed some time ago, these are so well printed it seems a shame to actually use them. They have almost a vibrant quality that you don’t often see, even on aftermarket sheet. Whichever option you choose, they look like they will be nice and easy to use and will look great once flattened with a good varnish. Very highly recommend. Review sample courtesy of
-
Hi guys, Does anyone know where the drift sight was stowed on the bomber versions of the Mosquito? On the FB it was right in front of the nav, above his chute but on the bomber?.... Thanks in advance! Erik.
-
Hi guys, I've seen photos of restored Mosquitoes that feature coloured bezels on the port side-panel. Hairy Hippie, Flickr, TA634, Mosquito Museum Eduard copies this in their 1/32 set: eduard.com But I've also seen instrument panels that had bezels in their natural colour: Brussels Air Museum Restoration Society - bamfbamrs.be Mosquito NF.30 Belgian Air Force Besides that, in my earlier years I have been a train engineer, also driving diesel locomotives. The colour coding used at the Dutch Railways was the same as used by the WW2 Luftwaffe: -Blue; air. -Yellow; fuel. -Brown; lubricant. -Green; coolant. Unless the RAF used very different colour coding (Always a possibility, of course!), these colours don't really make sense to me. Can anyone shed light upon the matter if these colours are post-war / restoration mods (like the ubiquitous red crowbars in Spitfires...) or indeed used on production Mosquitoes in the RAF during WW2? Thank you in advance for your insights! Erik.
-
I'm interested to find out more about the use and provenance of the grey over black post-war scheme. Does anyone know of the scheme as applied to NF Mossies? The example in the link below looks as if it's come from a Squadron Signal book, so one would hope it's based on something concrete, but you never know... http://img.wp.scn.ru/camms/ar/77/pics/9_36.jpg Doubts (aside from being unable to find a photo) are twofold: - The Sharp/Bowyer tome suggests that Mosquito night fighters wore the Dark Geen/MSG scheme to the end of their service. - Thirsk's Illustrated History (Vol. 2) has a photo of 139 Sqn B.35s in the scheme, and it's described as the RAF Night Bomber sheme. All the NF.36s in this book appear to be in DG/MSG. The scheme also appears on Beaufighters & Brigands (Malaya?) which presumably were not classed as bombers, so there's some evidence in favour of the scheme on fighters. So what were the circumstances which would dictate the application of this scheme rather than DG/MSG? I've also just remembered the Lucas volume on post war schemes, but checking that will have to wait until this evening. TIA, Jason
-
Hi, this is my finished Tamiya Mosquito B MkIV (1/48 scale). technically this kit isn't finished as i haven't painted the cockpit frames yet as i have to wait for the masks to arrive, but i didn't think it was worth putting it in WIP just for that. this kit was a dream to build, as the only fit issue was a small one with the fuselage halves, which was solved by the removal of the rear firewall/bulkhead. the decals however were a big letdown. they had lots of silvering (i didn't apply gloss varnish as previously i have never really had any silvering on the cartography decals I've used) and even when micro sol was applied they had difficulties adhering to the details. also, i rather clumsily moved one of the decals that was covered in micro sol out of line, and when i try to move it back it split (my fault). before i built this kit i had little interest in the mosquito, but after building the kit and doing some research i am quito fond of it.
-
 All, I present you with the latest off the bench, Tamiya's 1/72 Mosquito FB VI with Xtradecal's 617 Squadron set. I have really enjoyed building this kit from start to finish. I'd recommend it to anyone. Built out of the box, with the addition of some brake pipes, air filters over the carb intakes and small detail to the wheel wells. I fear that I may have over weathered it slightly behind the radiators, but hey I still like it. Apologies for the poor lighting on the photos, I struggle to get good light. Over to you for your comments. Thanks for looking. Leon
- 22 replies
-
- 37
-
-
FIRST POST WOO! before i start i will say i am no model magician limited tools and limited skill i am aware of the inaccuracies in this particular model however as i lack the means and skill to modify i think ill just build as is also note im almost done building this as i only just found this site sorry any tips and tricks are welcome, i have done more than the instructions ask when it comes to painting, adding as much detail as i can with what i have. the kit itself is a pain not very well cast and needs a lot of work to fit together at an acceptable standard but like all mozzy kits, good fun thank you for looking
-
News from EagleCal showing the newest decals for the Mosquito Mk VI which will be available in 72, 48 and 32 scales. Considering also the 24th scale as well, Enjoy! http://www.eagle-editions.com/decal-page/?___store=default
-
With the release of the new Tamiya 1/32nd Mosquito coming soon, I remembered, that I had made a couple of 1/48th scale Tamiya Mosquitos when they were first released, that had been put up the loft. I made both the FB Mk VI, and the B Mk IV. They have been up there, in a box for the last 16 plus years. This is the FB Mk VI released way back in 1998. It is painted with Aeromaster acrylic. The decals are from Aeromaster Set 48-426 Mosquito Raiders Part 11. 248 Squadron, Banff Strike Wing. The starboard fuselage roundel has lifted a bit, and a crack has appeared around a panel underneath the fuselage. I had not discovered weathering at this stage, so no panel lines or exhaust stains have been applied. Thanks for looking, Joe Can't wait for the 1/32nd Mosquito. Thanks for looking, Joe
- 24 replies
-
- 37
-
-
- Ready for inspection.
- Tamiya
- (and 2 more)
-
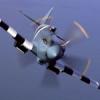
Here are some photos I took Sunday, May 17, 2015 at the Virginia Beach, Virginia Military Aviation Museum airshow. Mostly WWII aircraft. The camera was a Canon 1Dx with a 70-200mm f2.8 II with a 2x converter.
- 17 replies
-
- 11
-
-
- WWII aircraft
- mosquito
- (and 1 more)
-
Hi everyone! I have decided to try my luck in building my first WWII aircraft! The unlucky kit chosen for this ordeal will be the Revell 1/48 Mosquito, I will try some new things like camouflage painting for example. It´s one more step for me in this hobby! So, I will leave the first pictures of this build! Thanks for looking, iuri
-
Quick OOB Build. Promised myself not to use the Usual Eduard Dash and seatbelt etc and see how I do on an OOB Stated on the dash basically the whole inner section is almost the complete model. This is the 90% underside done which includes an AK Interior wash Cockpit - blue radio nobs more prominent in real life. I am not the best photographer A top view Hopefully I will get to the base coat this weekend
-
Hi folks, Just finished* the Airfix 1/48th DH Mosquito FB VI as a 235 Sqn Coastal Command machine, LR437 'T', based at Portreath in June '44. The ol' Airfix kit is not state of the art anymore but by jingo, it's a fun build with sufficient detail for me and good fit**. I was particularly happy with the way the cockpit scrubbed up. It was built for a 'Classic Airfix' GB on another forum and, as I've had this kit in the stash since the late '80s, I thought it was high time I built it. I used it to try out some weathering techniques I hadn't tried before on a 1/48th aircraft (I usually build in the gentleman's scale), and I think it turned out quite nicely. Hope you like it. regards, Martin * OK, so I lost the tailwheel and am awaiting the arrival of a replacement c/o Airfix spares department **Apart from the fit of the wings to the fuselage; that was appalling! They're none too robustly joined at all.
-
My latest completed build for 2015. This is the old Airfix Mossie "upgraded" with radome nose and the option to build the Swedish J20 version with the 4 blade prop. I wanted an RAF type so the radome is the only different part from the nice early seventies moldings most of you may be familiar with. For an old tool kit it builds up very well. As is the norm with old school airfix there is nowt in the cockpit other than the seats, a flat cockpit floor, and an instrument panel. I added some boxes to replicate the radar equipment to fill out the void and blanked off the rear area so you don't see way into the fuselage. The decals with this set have invasion stripes printed with the roundels on but as i can never get these to work i opted for leaving them off and put on wing roundels from the spares box. Still a nice kit when its built up, and way cheaper than the Tamiya version. Thats one less in the stash.... room for some more! Comments please, hope you like.
- 22 replies
-
- 25
-
-
de Havilland Mosquito Mk.IV 1:32 Revell Prior to WWII there were specifications for a twin engined medium bomber which lead to the Manchester and the Halifax. There were also plans to use non strategic materials for aircraft production. Geoffrey de Havilland recognised this and the company embarked on a project to design such an aircraft. A design team under Eric Bishop moved to Sailsbury Hall to start on what would become the DH.98. Originally the design of the DH.98 was too radical for the Air Ministry. However with the outbreak of war they became more receptive, but also sceptical about an unarmed bomber as it was thought The Germans would produce faster fighters. They were also opposed to a two man crew as it was thought a third crew member was needed to reduce the workload on long flights. Finally in Early 1940 the RAF & The Air Ministry met with de Havilland to finalise the design and order an unarmed prototype to be built. The call at this stage was for a light bomber/reconnaissance aircraft powered by two Merlin 21 engines. This was to be followed in March 1940 with an initial contract under Specification B.1/50 for 50 aircraft. By June of 1940 the DH.98 had been named the Mosquito, although it was often called The Wooden Wonder as well. The aircraft would go one to be manufactured as a Bomber, Fighter-bomber, Fighter, Night Fighter and Reconnaissance aircraft. The would carry a wide variety of weapons including the 4000Lb cookie bomb, Rockets, torpedoes, and even the High Ball bouncing bomb. A grand total of 7781 aircraft would be built. Due to the wooden construction a great deal of the construction was carried out not by traditional aircraft factories, but by furniture companies. It is worthy to note that the prototype of this famous aircraft was saved and now can be seen at The de Havilland Heritage Centre at Sailsbury Hall, along with both a Fighter and Bomber version. The Kit Revells kit of the Mosquito in 1/32 scale represents a Mk.IV Bomber. This kit was first issued by Revell back in 1971. The moulds though seem to have held up fairly well looking at the sprues. The kit arrives at 6 sprues of light grey plastic, and one clear sprue. As a kit of this age would suggest such detail as there is on a wooden aircraft is mainly raised, though details such as the crew door are recessed. Construction starts with the cockpit. The instrument panel is completed, this also has a back part as it with be seen through the nose. The instruments are provided as a decal. Pilots figures are provided if needed, if not the seats have moulded in belts to paint. The whole cockpit area is fairly sparse on the detail front and some scratch building will improve things in this scale. Once the cockpit is complete the tail wheel assembly needs to be made up and attached to its bulkhead. These two sub-assemblies can then be attached into the main fuselage and this can be closed up. The tail cone can then be added. The next step is complete the two part main wings, remembering to include the large radiator fronts at this stage as well. The main wings can now be attached to the fuselage. The tailplanes and vertical fin are also constructed and added to the main fuselage. It is then onto the engine nacelles. A basic Merlin engine is constructed for the Port side as a panel can be left open if wanted to show this. For the other side the modeller will just attach the exhausts to the inside of that nacelle. The landing gear is constructed and attached to the underside of the wings. Once this is done the engine nacelles can be carefully fitted over the gear. The gear doors can then be fitted. To complete the model the propeller assemblies are made up and added, the canopy also needs completing and adding to the cockpit. Due to the limitations of the mouldings when the kit was made the main canopy is in thee parts. However the main seam is down a panel line with a large clear insert in the middle. Canopy The canopy is clear but a little thick which shows the age of the kit. Decals Decals are provided for two aircraft. They are printed in Italy for Revell and up to the now usual standard. They are in register and colour density looks good. No.627 Sqn RAF, Woodhall Spa, June 1944 (With D-Day stripes) No.105 Sqn RAF, Marham, England, December 1942 Conclusion It maybe an older kit but its the only game in town for 1.32 Mosquito. Despite its age it should make up to be a good looking model. recommended. Revell model kits are available from all good toy and model retailers. For further information visit
- 13 replies
-
- 3
-
-
- de Havilland
- Mosquito
- (and 1 more)
-
 After my last model, I thought I should return to the shelf of doom to see if I could finish this one. I am not sure why I put this aside, but it has been sitting there for the best part of 2 years. I suspect it may have been I had lost heart after having some issues with the decals and also because I didn't want to deal with the under carriage, which I had found fiddly the last time I made this kit (as a B Mk IV), and made a hash of that time. I was reminded of it when rummaging in my paint supplies and finding the pot of own-mix PRU blue (and no, I cannot remember the recipe, other than it contains Tamiya acrylics). So here is what I had to start with: And some close ups: Those radiators need redoing - what was I thinking? First task - dealing with the undercarriage and wheels. Painted and lightly weathered the wheels. Ok, it was fiddly but I persisted and ultimately once complete was actually a pretty sturdy item. Cut back the aluminium finish by a wash of acrylic raw umber in floor polish. Finished off the props,which were 90 % done. Test fit to see how it all looks.
 -
Continuing with some "Shelf of Doom" sitters that I have been finishing up over the summer break, I had actually forgotten I had this one at the back 80% complete with a very thick layer of dust. Completed straight out of the box as a machine from 105 Squadron RAF, December 1942. Brush painted Tamiya acrylics. I managed to screw up applying one of the serial numbers and the two-piece canopy was a sod to work with but I think she has come out OK, and has encouraged me to finish the Tamiya 1/48 Mossie that I also have as a long term hanger queen. Thanks for looking.
- 14 replies
-
- 16
-
-
I purchased Airfix's big mossie just before Christmas after seeing one in my local model shop. Sadly that one had no fuselage halves so I picked this one up on the net as I was eager to get my hands on one. After getting the box open I managed to resist for a couple of days before tearing into it and have devoted most of my modelling time to working on it since. I've started with the cockpit and spent time filling in ejector pin marks. Some of them won't be seen when the model is finished but the views with the cockpit dry fitted show the ones that might be seen. I have drifted away from the kit instructions slightly as I want to assemble as much as I can before I get the green paint out for the interior. I sprayed the control column cover with Humbrol 98. Big Mossie 007 by Mark Maclean, on Flickr Big Mossie 006 by Mark Maclean, on Flickr Big Mossie 004 by Mark Maclean, on Flickr Big Mossie 003 by Mark Maclean, on Flickr Big Mossie 002 by Mark Maclean, on Flickr Rear bomb bay section also had some ejector pin marks which have been filled Big Mossie 005 by Mark Maclean, on Flickr A view of the airframe dry fitted together. It's bigger than my model desk! Much bigger! Big Mossie 001 by Mark Maclean, on Flickr Before I get the green paint on the interior I want to add some of the small plastic discs to the fuselage sides along with some wiring. I wil be painting the Aircraft as Group Captain Pickard's Operation Jericho mount as he was from Sheffield so there's local interest there.
-
A while back there was a thread that mentioned a Mosquito in Canada being rebuilt by Victoria Air Maintenance and a link requesting donations to complete a documentary about the plane's restoration process. For a very modest donation, you would get a T-shirt, a poster, a video and credits in the video for being a donor. Well, I really want to see a Mosquito fly and I thought why not and hoped it wasn't a scam. I would occasionally get an email indicating there was progress being made on the documentary and the plane restoration. Today, I got the T-shirt and the video. Both are amazing. Here is the T-shirt I have watched the first part of the video and it is very nice. Now I just have to figure out how to get to Canada and see this beautiful aircraft in person. Kudos to the restoration team and the documentary team.
- 1 reply
-
- 3
-
-
- Mosquito
- Restoration
- (and 2 more)
-
 Hi, everybody! First of all - let me present you some information about prototype: Unit: 105 Sqn, RAF Piloted by S/L Darling (DFC) and crewed by F/O Wright on 30th January 1943 when hit by flak and crashed near Altengrabow, Germany where both airmen were buried on 4th February 1943. Their graves are now in the 1939-1945 War Cemetery in Berlin. This was the first Mosquito to be reported missing from a raid to the German capital. Delivered to the Squadron on 6th November 1942, it had flown 62.5 hrs when lost. Kit is wonderful, but I do not advise you to use resin set from Pavla for cabin - because kit transparency details are not the same size. At the same time - set to simulate the "bomb bay" is quite possible to use.
 -
Tamiya 1/48 DH Mosquito FB MkVI Tamiya Sky underside Xtracrylix RAF Extra Dark Sea Grey top side Scratch built lead wire seat belts Self designed and produced canopy cut out masks I made this kit to be given to my father. He's the one who started me modelling many moons ago, and the Mossie is his favourite aircraft. A nice detailed interior with home made lead wire seat belts. I decided that I wouldn't paint iot the 'normal' cammo pattern, and upted for the Extra dark sea grey to side with Sky underneath. I designed the canopy masks using Adobe Illustrator and cut them out on a cutter/plotter using masking film. Thanks for looking.