Search the Community
Showing results for tags 'monogram'.
-
 This Monogram model of the General Dynamics F-16A Fighting Falcon was built in 1988. It was the third model I finished after returning to this hobby in 1987. By this time, I had slowing gathered some modeling supplies and a little knowledge mostly through reading FinescaleModeler magazine among a few others. I recall having to make a pitot for the nose of this model back then, and tried to duplicate a photo from some magazine in those pre-internet days. The kit featured an operative canopy but a pretty sparse load out. I used kit decals (and see at least one that's upside down 😉-no surprise from a newbie!) and painted it with either Humbrol or ModelMaster enamels sprayed through the Paasche H. It has sat in my display cabinet for all the years since and had never been photographed until I took my recently finished Tigercat out to the Cameron Municipal Airport for a photo session. I decided to take the old F-16 out there and see how she looks in that setting. Before I could even get it out of my truck, I reached across the seat for something and snapped that pitot clean off. I did have a modeling first aid kit with me and found the pitot and the small sensor-piece too. I managed to finally get the pitot back together and glued back on but now it's developed a bad case of droop. Oh well, it was too bloody hot out there to putz around with it too much so I left it as is for the pics. I've often thought of this model as a "place holder" in my collection until I built a newer, nicer F-16. I still hope to do that some day but until then, squint those eyes my friends and please have a look at an old four-footer from 1988.
- 13 replies
-
- 22
-

-
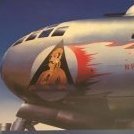
(510x640)-Copy(95x120).thumb.jpg.33073138e01aa81779639a845926753e.jpg) A completion for the Harvard/Texan GB, this is a local aircraft for me. PH-NKD as she is known in her former life is an original WW2, 1942 built North American AT-6A Texan with C/N 78-6922, 41-16544. (stats: https://www.t6harvard.com/dutch-harvards/n13fy-t6-harvard-t6-texan/ ) Bought by an enterprising local business man, and registered as PH-NKD, the AT-6A was equipped with a Diesel tank in place of the rear seating from which the oil was injected into the stretched exhaust. Mr.Color Metal 211 Chrome Silver, Vallejo 71.078 RLM04 Yellow, Vallejo 71.124 Dark Green ANA612 for anti-glare, Mr.Color H58 Interior green (and generic black/white/red for details) Dropped the flaps, added ignition wiring on the engine, diesel tank in the rear and an extended exhaust from drilled-out sprue with scrap PE as brackets. Decals: custom printed white logo, registration letters home-made. And this is somewhere in there - the thick frames make pictures look silly if I put the canopy open
A completion for the Harvard/Texan GB, this is a local aircraft for me. PH-NKD as she is known in her former life is an original WW2, 1942 built North American AT-6A Texan with C/N 78-6922, 41-16544. (stats: https://www.t6harvard.com/dutch-harvards/n13fy-t6-harvard-t6-texan/ ) Bought by an enterprising local business man, and registered as PH-NKD, the AT-6A was equipped with a Diesel tank in place of the rear seating from which the oil was injected into the stretched exhaust. Mr.Color Metal 211 Chrome Silver, Vallejo 71.078 RLM04 Yellow, Vallejo 71.124 Dark Green ANA612 for anti-glare, Mr.Color H58 Interior green (and generic black/white/red for details) Dropped the flaps, added ignition wiring on the engine, diesel tank in the rear and an extended exhaust from drilled-out sprue with scrap PE as brackets. Decals: custom printed white logo, registration letters home-made. And this is somewhere in there - the thick frames make pictures look silly if I put the canopy open -
Reserving my spot Waay back then, when I was a small alt-92 we could frequently hear the buzz of a Harvard (well, everything Texan we called a Harvard then) high up and see it writing advertisement in the sky: The plane in question was (rather - still is) an original WW2, 1942 built North American AT-6A Texan with C/N 78-6922, 41-16544. (stats: https://www.t6harvard.com/dutch-harvards/n13fy-t6-harvard-t6-texan/ ) Bought by an enterprising local business man, and registered as PH-NKD, the AT-6A was equipped with a Diesel tank in place of the rear seating from which the oil was injected into the stretched exhaust. The company, Skylight, was based at my local airfield Hilversum (EHHV) until the mid-1990s. A falling out with the Dutch CAA in 1993 resulted in the aircraft being re-registered as N13FY in the USA. What the FY stands for, I'll leave to the imagination She's still based at Hilversum airfield, albeit under different ownership. --- The kit: Monogram's classic 1979 original release. All raised detail, of course. But that's fine. Decals are totally shot - I might try and save some stencil data but not too worried.. I'm in the process of having custom decals printed for the Skylight logos and registration letters, so once they're in I'll start the build proper.
- 20 replies
-
- 10
-
-
Hello guys, I'd like to know if someone could provide me with a sprue map/photo of the sprues of the 1977, 5406 kit, Monogram model. I'm looking to build an A-4E without the hump and with the smooth fairing. I've checked everywhere, but I haven't been able to locate a page with the sprue map. TIA!
-
SS as in Super Sport, Chevrolet's simple way of branding the sporty performance versions of their normally not so sporty not so performance oriented models. But oh boy, what a change those two letters in some cases could lead to! This time it's the mid-80's boxy GM G-body mid size Monte Carlo, if you're interested, you better read more here: https://www.hagerty.com/media/car-profiles/1983-88-chevy-monte-carlo-ss-buyers-guide/ I bought and built one of these Monogram NASCAR models when they became available back in 1983. My build back then was Darrell Waltrip's 1982 Piston... erm, Winston Cup winning, Mountain Dew sponsored Buick Regal. Believe me, this Chevy Monte Carlo kit is at least 98% the same plastics! I bought this kit last week, with an intention to build it in the Revell-o-Gram GB next year. Yeah, right. Instead, there's now three more of these on order . Tonight I started messing with the parts, and a few hours later I had only managed to assemble these small subassemblies Shouldn't these go together the other way around? Anyway, this bud's for me
-
 A 1/48th Monogram F-15A Eagle painted in the very early and short lived air superiority blue colour scheme. Humbrol enamel paints applied with an airbrush, decals by Caracal models. The kit dates back to 1979. I have always wanted to build an F-15 in this scheme and despite a few small mistakes I am very happy with the result. 20200819_141334 by Ghostbase, on Flickr The story behind this bird is interesting. She was F-15A serial 71-0284 and she was the fifth full scale development Eagle. She was used for armament development including the rotary cannon and when her test career ended she became an instructional airframe. She was photographed in these markings at an airshow (possibly Sheppard AFB, TX, date unknown) with "City of Iowa Park" nose art. Her FF code stands for 'First Fighter' for the then 1st Tactical Fighter Wing based at Langley. How she kept her blue colour scheme is unknown but it was very unusual and it certainly adds some interest to this model. 20200819_141449 by Ghostbase, on Flickr I used Humbrol 47 which is enamel gloss sea blue as that looked to me to be the nearest to air superiority blue in their range. I would say that it is just a tad darker and 'richer' than FS35450 however for some reason the camera on my phone has processed the photos to a lighter shade! I do have the Hataka acrylic Air Superiority Blue (HTK-A155) in my paint stash but I am really struggling with acrylics at the moment and just wanted an easy paint without my airbrush clogging up after 60 seconds. This coat went on well and just one application too. 20200819_141509 by Ghostbase, on Flickr I must also mention how impressed I was with the kit. It was first released in 1979 and it went together very well, I only needed a little filler where the nose section slots into the main fuselage. I did like the detail around the cockpit and also the radar as well as the open air brake and I think they really add to the model. Yes, it is raised panel lines and for this build I was comfortable with that. 20200819_141756 by Ghostbase, on Flickr This is the first time that I have used Caracal decals and I am very impressed, they were really easy to apply and they make an average model look good! These were from their F-15 "The Early Years" set and I am building a second F-15A using this set as well. 20200819_141808 by Ghostbase, on Flickr Apologies for the rather makeshift photo studio but these were taken at my alternate man cave! 😊 This build really has helped get my mojo back. Michael
- 24 replies
-
- 35
-
-

-
Sorry for being late to the party, but Affairs of State, took precedents over.... the Affairs of State😜. Todays entry for your edification and amusement, I'm going to try, (operative word try) to take this old Monogram A-4E, strip down and restore to an A-4C configuration. I built this originally wayy back better than 20 years ago,. Rattle can and hairy stick thick coatings all over. If I remember rightly I got more paint and glue on me than the model. THis was the original Box art And as always any comments , suggestions, or ideas are always welcome. Lets begin shall we?
-
Kit: Monogram Paint: All enamels Decals: Old Models Decals 0799, Aeromaster generic RAF roundels Extras: Eduard pre-painted seat belts. NA Harvard III 2 FTS, Woodbourne, New Zealand Late 1943. This is an original 1979 issue of the Monogram SNJ kit that I've had sitting in my stash since there were Brachiosaur's roaming around . Built in just over three weeks without instructions - lost those so many years ago - I've finished my Harvard as the same aircraft that is in our local museum here ( http://www.tatatm.co.nz/ ), but just after it came into service in 1943. IMO the camo & yellow scheme is really eye-catching and rarely seen on a model, and I like finishing a project in something just a wee bit unusual. Not too much to say about the build, given the aforementioned lack of directions, it actually went together really easily with very little filler or 'modelling skills' needed. The camo pattern is sprayed freehand and isn't too bad if I say so myself, weathering is limited to just an exhaust plume as these machines were kept hangered at Woodbourne and were well looked-after generally. A quick and truly enjoyable build, and isn't that the essence of the hobby, or am I talking out of my a*se again ?. As ever all comments, criticism and questions welcomed. All the best from NZ. Ian.
- 14 replies
-
- 25
-
-
-
 #6/2021 After the Beriev and the Rufe, here´s my dad´s next finished seaplane. The good old Monogram kit. First released in 1966, this is the "Hi-Tech" version from 1993 which includes PE parts. Built mostly oob, the thin main float to fuselage struts were done with plastic rods, so were the whip antennas, additional side float struts done with plastic stripes. EZ Line used for the antenna wires. Painted with Gunze H54 Navy Blue and Tamiya XF-18 Medium Blue, both ligtened up with white and some Tamiya White for the underside. Build thread here https://www.britmodeller.com/forums/index.php?/topic/235086105-aquatic-eyes-in-the-sky148-vought-os2u-kingfisher-us-navy/ The model shows a Kingfisher that was stationed aboard the battleship USS Wisconsin in 1944/45. DSC_0001 by grimreaper110, auf Flickr DSC_0002 by grimreaper110, auf Flickr DSC_0003 by grimreaper110, auf Flickr DSC_0004 by grimreaper110, auf Flickr DSC_0005 by grimreaper110, auf Flickr DSC_0006 by grimreaper110, auf Flickr DSC_0007 by grimreaper110, auf Flickr DSC_0008 by grimreaper110, auf Flickr DSC_0009 by grimreaper110, auf Flickr DSC_0010 by grimreaper110, auf Flickr DSC_0011 by grimreaper110, auf Flickr DSC_0012 by grimreaper110, auf Flickr DSC_0013 by grimreaper110, auf Flickr DSC_0014 by grimreaper110, auf Flickr DSC_0015 by grimreaper110, auf Flickr DSC_0016 by grimreaper110, auf Flickr DSC_0017 by grimreaper110, auf Flickr DSC_0018 by grimreaper110, auf Flickr DSC_0019 by grimreaper110, auf Flickr DSC_0020 by grimreaper110, auf Flickr DSC_0021 by grimreaper110, auf Flickr DSC_0022 by grimreaper110, auf Flickr DSC_0023 by grimreaper110, auf Flickr DSC_0024 by grimreaper110, auf Flickr DSC_0001 by grimreaper110, auf Flickr DSC_0002 by grimreaper110, auf Flickr DSC_0004 by grimreaper110, auf Flickr DSC_0001 by grimreaper110, auf Flickr
 -
Besides the Russian Beriev in progress, my dad starts the next seaplane. A Mongram classic....the kit dates back to 1966!! This is the HighTech version with PE parts released in 1993. DSC_0005 by grimreaper110, auf Flickr
-
I did most of my growing up in Chicago in the 1980s. My first few years were in Poland and later West Germany, but I didn't really build models at that very young age. We had a great hobby shop in my part of town, and I would go there with my uncle and we'd both get Tamiya and Italeri (italierie back then) tanks. They were about $5-10 back then. I remember when my uncle got a Tamiya churchill that was over $20 and it seemed like a fortune. Time permitting, I'll revisit one of these early tanks, bit first some unfinished business... Around 1990 I became interested in aircraft models, and suddenly it became easier to find models for sale, because almost every toy store, department store, corner five & dime, and junk shop carried Monogram and Revell kits. They were our equivalent of Airfix and Matchbox in 1970s UK. My first airplane was a Testors (ex Hawk) P-51D. That model is best left to nostalgia, as even back then I remember thinking it was a dud. Shortly afterwards came a Monogram P-40 and Harrier. I actually remember my mom getting me the harrier at the Toys R Us at the Brickyard Mall. And I may be conflating memories here, but I think when we came home that day, my dad was watching Hammer's "You Can't Touch This" on TV. I think it was late summer, shortly before the start of the school year, because I recall feeling anxious. I don't know, it was 30 years ago, and I was 12... Anyhow, one reason the harrier kit stands out is because it was the first kit i never finished. I remember trying to paint it with whatever colors I had, and that meant a a set of gooey, clumpy, ultra glossy Testors enamels from the little square jars. I had some random shade of gray and green, and the result was junk! This kit was the first one to die on my shelf of doom. Today I'm determined to reverse this, and maybe close the loop on unfinished kits. I was able to find the same boxing of this kit as I had in 1990. I actually bought it about five years ago. I had grand designs to upgrade and tweak things, but I kept putting it aside. This GB will be my chance to finally build it. I think I'll build it largely the way Monogram intended. I'll probably need new decals, and I might try to hunt down fuel tanks, as the snakeye and sidewinder load seems unusual. But maybe I'll leave it. Who knows? Here are the pieces. It looks like I painted a few sometime in the last five years. I glued a few together as well. But we'll under the allotted limit. Yes? Wish me luck, boys and girls.
-
Hello All, This is a kit I bought many years ago and it has sat in my stash until I was finally motivated to build it when I saw a friend of mine build his. I acquired it when I lived overseas but realised building it there would create a monumental transport issue when getting it home. Even so, building it at home also posed some storage challenges so I decided to try and address that in the build. It is an interesting kit as it was repackaged by Hasegawa with decals from Aeromaster. The aircraft was Rattle n Roll of the 6th Bomb Group. Being a "vintage" model, it has some flash issues, but not too bad, and, needless to say, raised panel lines. And here all are the parts in the box, with a "under construction" 1/48 Spitfire to give an idea of size. In terms of extras, I also added the Eduard canopy masks (EX367), wheel set (648132) and exterior photo etch (48744).
-
 This kit has been part of my life for a long time, it seems. I started the build thread back in September 2020; it's been a challenging journey in places, partly because of the design of the kit and partly because of the decisions I made during the build process, but I think the end result was worthwhile. Why did I get this kit? I've always loved 1960s GT cars - Jaguar E-types, Ferrari Lussos, Aston Martin DBs and the like - but I'd sort of forgotten about the Maserati until different examples popped up on Jay Leno's garage, Fantomworks and Chasing Classic Cars all within a couple of weeks. That prompted me to see if anyone made a kit and there were a few available on eBay. This kit was slightly incomplete but much cheaper than the "vintage" sealed in box examples. I didn't know what exactly might be missing when I bought it but I could see that all the major stuff was there and apart from the things I fabricated to enhance the kit I think I only had to make four bits; the tail piece of the gearbox, the two front wing grilles (I had one but it would have looked odd if they weren't a matching pair even though you couldn't ever see both sides at the same time) and the fuel filler neck in the boot. In terms of additions the biggest was reshaping the front grille, and that provided a convenient excuse to replace the solid moulded grille itself with something open. I'm not sure that the grille shape is entirely correct, but it's more correct (at least to me) than the way the kit was designed. I wasn't brave enough to tackle the windscreen shape, which is also slightly off from the real cars. I also added wires to the spark plugs (12 as this is a twin-spark straight six) and a few other under bonnet details. On the interior I slightly reshaped the seats and gave them runners, changed the steering wheel and indicator stalk for aftermarket metal parts, reworked the door cards, tweaked the handbrake placement and added seat belts. The colour scheme was inspired by a real 3500 GTI (body is Tamiya TS-58 Pearl Light Blue, upholstery is TS-33 Dull Red). Anyway, you didn't come here for a load of waffle, how about some pictures? A quick "before" a bare shell, if you like, pulled out of a barn and ready for restoration. Technically the script is wrong, the typeface should be slightly different and read "Maserati 3500 GT" while the spear through the trident badge should be script spelling out "Injetzione" (or something like that), but I had to make do with what I could get from eBay. Apologies for the improvised boot prop, not many people will ever see this view but it's quite pleasing to know that the boot is nicely finished. Build thread is here, if you're interested and haven't been following along. Thanks to everyone who has liked or commented on the build thread.
- 18 replies
-
- 21
-
-
I feel a bit bad about starting another build, but I'm struggling to find enthusiasm for the Airfix Aston Martin (it's the moulded plastic one-piece wheels and tyres) and having had a bit of a setback with my metal TVR (I wasn't happy with the paint finish). This kit has sat tempting me for a few weeks. The funny thing is that I came buy this almost by accident; I love classic 1950s and '60s GT cars, they are so stylish and redolent of a more glamourous age (a world that was probably mostly a creation of books, films and television). It happened that three of my favourite car shows (Jay Leno's Garage, Chasing Classic Cars and Fantomworks) all featured examples of the Maserati within a week or two of each other. That set me wondering if there was a model of the 3500 GT and it turned out there was; of course it was made ages ago and any sealed examples were silly money. This one was reasonably priced because it had been opened and parts cut from their sprues. However, the pictures with the listing showed at least enough parts to make a passable model (all the body parts, glass, wheels and tyres, I figured I could bodge anything else I needed even if it ended up as a kerbside model rather than fully detailed). This is what I saw when I opened the box; it seems very much of its time with the opening features, colour moulding and (although you can't really see here) all the engine parts were chromed. As I often do with build projects I've done a fair bit of internet searching to find out more about the Maserati 3500 series. This kit represents one of the later 3500 GTI cars, which were Italy's first production car with fuel injection (produced by Lucas in Britain). Being a low-volume car it seems that the history of most examples is known, the closest match I've found for the car represented by the kit is chassis number 101-2334, which was a USA-market 1962 3500GTI in a similar colour to the maroon plastic but with a slightly darker tan interior and wire wheels. The combination of maroon (which is sometimes described as red) with biscuit or light tan upholstery as depicted by the kit does not appear to be a catalogued combination; but that doesn't mean that it couldn't have been done to special order. I'm not sure whether to paint the body in a similar colour to the plastic (I have some suitable paint) or go for a colour change? I quite like the idea of blue with dark red leather. I've made a bit of progress on the build; cleaning up the body and assembling the engine so I'll post some progress photos tomorrow.
-
.thumb.jpg.0bc57cb4bb3dec8e063e1951db6690c2.jpg) Out of the box except brass rod for the pitot tubes on the tail. Superb Caracal Decals. Tamiya white and Xtracolor International Orange for the main paints. Great old kit.
Out of the box except brass rod for the pitot tubes on the tail. Superb Caracal Decals. Tamiya white and Xtracolor International Orange for the main paints. Great old kit.- 16 replies
-
- 29
-
-
- Caracal Decals
- monogram
- (and 1 more)
-
 Hello everybody, Here is another double build I finished recently: the Accurate Miniatures reboxings of the old Monogram F-4D kits. I built both kits largely out of the box, adding only some wiring to the backseater's IPs, gunsights and spare PE mirrors. Construction was pretty straightforward, but filling and sanding is required, especially around the intakes and exhausts where fit is somewht problematic. Open airbrakes and lowered flaps are options in the kit. Despite their age, I really enjoyed building these two classics: the level of molded detail in the cockpit and around the airframe is just great!! For the 23rd TFS / 52nd TFW aircraft, operating from Spangdahlem AB, Germany, I used a (very, very old) Superscale sheet, showing the aircraft during the 1976 Tactical Air Meet at Twente AB, The Netherlands. These Superscale decals worked surprisingly perfect. This particular aircraft was credited with downing a Mig-17 over North-Vietnam in October 1967, hence the killmark on the splitter plates that was maintained. Stencils are taken from various spare decal sheets. Paints are Gunze. The travel pod is modified from a spare napalm cannister, the gun pod is taken from the kit. I also replaced the kit’s LORAN antenna with a spare one from a Hasegawa kit, as this is molded much finer, and finally I used an ECM pod from Revell's F-4F. "Ripley's believe it or not" flew with the 13th TFS / 423nd TFW, being stationed at Udorn AB, Thailand, during 1969 operations over Vietnam. I added a chinpod taken from the Italeri F-4C/D. Bombing load-out consists of Mk.82's from the kit (on Hasegawa TER's) and spare box Mk.83’s on the outboard pylons (found in the Fujimi kit). Sparrow missiles are Hasegawa items and the ALQ-87 is from the kit. Again, Gunze paints were used, followed by Eagle Strike decals. Hope you enjoy seeing my 2 SEA Phantoms, comments/feedback always appreciated! Thanks for looking and regards, Patrick
- 15 replies
-
- 50
-
-
-
This is my Monogram Phantom in 1/48 scale. It took me quite some time to finish. Especially the intakes took quite some filling and sanding. It's more or less OOB, but I used a decal sheet from Caracal (ANG Phantoms) and an an-alq119 from the Italeri RF-4E kit. Paints I used were mainly Vallejo and Mig Ammo acrylics. Some oils for washing and weathering. When kit has raised panellines I use nail buffers to remove the paint from the panellines. O, and I added some RBF tags from Eduard and scratchbuilt rear-view mirrors and some other stuff for the cockpit. Hope you like my Spook.. Kind regards, Gerben
- 24 replies
-
- 55
-
-
-
Monogram kit, OOB with Caracal Decals and five miles of tape.
-
 Well as a result of looking for references for @stevej60's potential A-1E build and after seeing the simply fantastic job that @SoftScience is doing on his Tamiya A-1, not to mention our Glorious leaders ( @trickyrich ) brilliant looking 1/32 resin A-1E I fell into the trap of getting caught up in Skyraider research, a truly dangerous trap for which there is only one way out, build one! So off to the stash I went and I pulled out an anonymous looking cardboard box; The keen eyed among you may well be able to read what has been written on it by it's previous owner, Skyraider, Monogram, 1/48. Lets see whats inside shall we; Lots of bits loose from the sprues but after having a closer inspection all appears to be complete. In fact a good many of the parts are for the underwing stores, the actual airframe doesn't have that many parts. I have decided to build the kit OOTB complete with the ( deal breaking for many) raised panel lines and with the cockpit which has the seat moulded as part of it. Well thats the kit sorted, now what about the markings? Well I have long thought that the part played in the Vietnam War by the VNAF is often overlooked in favour of the various American air arms and I don't believe that this is correct as the crews of the VNAF fought a very long and very hard war and were fighting for their country and their families and at the end a great many of them lost everything, including their families. So with this in mind I will be building my Spad as a VNAF machine and am leaning heavily towards one of the early ones in the all over grey scheme with large national markings and a colourful band around the rear fuselage, I shall be building one of the options from this Cutting Edge sheet which I have had for a long time; I really like the bottom one with the swirly Tiger stripes. I have a couple of reference books which will come in handy; Perhaps I should have started with " my name is Craig and I have a Skyraider problem". I shall be making a start soon as an antidote to the ongoing T-28 build, not a lot of fun, and hope that it will be a relatively quick and painless build. So there you have it, thanks for looking in and any comments and criticisms will be gratefully received. Craig.
- 96 replies
-
- 12
-
-
My next build is a factory sealed Monogram P-51B: This was a "sorry I goofed up your order" gift from an ebay vendor. I initially wasn't too interested because of the raised detail and all, but now I think I can tackle it and maybe do it a little justice. I'm not a rescriber -- it just looks terrible when I do it, so I have other plans, but more on that later. Can you imagine spending 99 cents on a model? I felt weird taking the shrink wrap off what I figured to be about a 45 year old kit. But, I did it and here's what I was greeted with when opening the box: I remember I had that same catalog when I was a kid! My dad gave it to me after one of his Monogram builds. Now I don't know when the kit came out, but it was probably pretty close to this: So that means the plastic in this box hasn't seen the light of day for around 45 years! I was amazed that decals were just about perfect, even though I won't be using them. So, I have done this kit before. When I was 12 or 13 I swiped it from my Dad's stash, along with the aftermarket decals he bought for it, and created this... erm.... "masterpiece"... That wasn't the first time I'd done "Shangri-la" either -- I'd swiped my Dad's Revell 1/32 P-51B which had "Shangri-la" as the scheme. So, my plan is to make a replacement using these decals: After that I will probably take the old kit, strip it down and re-make it with some other decals I have. Anyway... after that long preamble... The first step I plan to do on this build is to do something about the wheel wells, as seen here on the old model: I will attempt to scratch build some better looking wheel wells. BTW, does anyone know what those tabs sticking out around the opening are? It seems like they would interfere with the gear door.
- 127 replies
-
- 11
-
-
Hello All, Thought I'd post some pictures of my completed 1/48 Monogram F-4C. This kit dates back I think to 1979, this is the most recent Revell boxing. It looks every bit the Phantom to me. I did not do much to it at all really...but being an older kit that brings it's own challenges. The paint I used is Tamiya acrylic as a primer as it adheres very well to washed plastic and the the colors are Vallejo Vietnam set. I really like this combination of paints. The gloss coat is Pledge (formerly Future) and the Matt is Vallejo. The exhaust area is Vallejo metallic which look really good over a Tamiya gloss black. The decals are Furball Gunfighter Phantoms Part 2. They worked great as did the kit decals. In any case I hope you enjoy the pictures. Any comments or questions are appreciated. All the Best! Don
- 17 replies
-
- 30
-
-
- Furball Decals
- Monogram
- (and 1 more)
-
For some strange and inexplicable moment I obviously don't think that I have enough on my plate already so here goes with build number three in the GB. Following hot on the heels of my Skyraider comes another Monogram classic in the form of the A-4 Skyhawk, this has been boxed in a variety of slightly different forms over the years and can basically be built as either an A-4E or F out of the box, my boxing is for a Blue Angels F; Fresh from a certain internet auction site the very blue plastic came still sealed in it's original plastic bag; Upon opening the bag, and getting past the blue colour, the raised detail is actually very good and restrained; And some of my Skyhawk references that I shall be using for my build; And that brings us on to the subject of markings to be used for the build, I am lucky enough to have one of the excellent decal sheets by Victory products which covers various US Navy A-4's from the Vietnam War; There are a couple of options missing, one used for an earlier build (Jim Stockdale's A-4E) and one donated to a fellow BM'er for a build but I am still left with some nice options. I am leaning heavily towards the aircraft flown by Michael Estocin on his Medal Of Honor winning mission on which he unfortunately lost his life; The decal sheet shows it without the dorsal hump but some profiles I have seen show the hump fitted, unless anyone knows better I will go with the decal sheet variety with no hump. I am also tempted by another option on the sheet; I am quite drawn to the tartan bands, not something you see on aircraft very often. So there you have it, build number 3 and my last one for the GB. As per usual any comments and criticisms and help will be gratefully received. Craig.
-
Hi, the very old kit from Monogram, converted it from a "A" to a "B" model Cheers Macki
- 12 replies
-
- 38
-
-
- Douglas RB-66B
- Monogram
- (and 1 more)
-
Two thing's were a certainty for this GB,I'd do more than one subject and there would be an oldie involved.I was determined to build Monogram's kit which was a KK buy in a Revell box,it is for it's age beautifully molded with fine raised panel lines and clear well defined glazing looking forward to this one. Number two was an e-bay buy which was part of the seller's Grandad's collection which I got for a reasonable £13 still factory sealed so I'm determined to do this one justice,again nicely molded but not as refined as the Monogram offering but with some of the best glazing I've seen from Frog,it'll be interesting to see the two built side by side.
-
Hallo again This time I did a break on vehicles, and I am back on a/c. This particular a/c is a good example of learning aerodynamics. The area rule is applied, to reduce drag by flying speeds exceeding Mach 1. The angle of intersection of fuselage and wing surface is more than 90°. As the Me 262. This also reduces drag. The delta wing concept also reduces drag, because the surface of the elevator is omitted. The kit is an old one, with all the negative accounts, but something else after the newest plastic tank kits with interior. Now I start the F-102. Happy modelling