Search the Community
Showing results for tags 'kitbash'.
-
 We have a group-build comp on at the moment at Riverside model club where we can take the more-recent (1997!) Tamiya Jeep and do pretty much whatever we want with it as long as we end up with a single vehicle. After having so much fun building my 'Rommell's Uber-Halftrack' a couple of years ago, I though I would do it again with an M45 quad mount on the back of a Jeep with GMC running gear. All very nice and period. When I create one of these monsters I do try and keep everything at least contemporary. Donor kits sourced: Basic layout to make sure it will at least fit together: Believe it or not, I can get the GMC donk to fit in the Jeep engine bay without touching the grille or the firewall! The air cleaner will, however, be protruding through the bonnet. Quick dry run: After 4 or 5 mockups in paper, I found a gundeck layout I was happy with. And now the gundeck exists in plastic:
- 29 replies
-
- 10
-

-
MIG-21 PFS, 1/72. Kitbash from two Eduard kits: - fuselage and canopy from PF kit; - tail is a mix of the two - mostly PF with lower part removed and replaced by parachute container from PFM; - wings and almost all the rest - PFM. Eduard resin cockpit (PF), resin engine, modified MF resin speedbrakes, resin missiles (R-3S). Small alterations to jetpipe cone (thinned walls, added internal structure). Roundels and fin flash from PFM Profipack kit, tactical number airbrushed with homemade viny masks. All comments are welcomed, Iulian work on the specific PFS Tail detailing the jetpipe Eduard resin engine
- 11 replies
-
- 37
-
-
 I was wondering for a long time what to build in this GB. The problem was primarily an excess of ideas, so selection based on my own limitations was necessary. I love building models from scratch, mainly using polystyrene sheets. This material makes all rounded, arched and curved surfaces virtually beyond my reach which is why most of my SF models have very "classic" shapes. They are like 80's Volvos but in zero gravity 😝 So it will be this time. A spaceship full of sharp edges and angles. I also love spaceships that are vertical in shape, very tall, but short and narrow like a knife stuck in the ground. This one will be like that too, hence the name: Space Cutter. Such a little pun. And that's my "kit": Lots of polystyrene in sheets (restocking shipment just arrived). Engine module. The only rounded element for now. These are used filters for coffee machine emptied of carbon insert. Unfortunately, they are made of polyethylene, which IMO is a terrible material for modeling, because it is very difficult to glue and paint. But it has a nice shape. And this is the title phoenix rising from garbage. An incomplete 1:35 Jagdtiger I got as a bonus when buying modeling parts. Someone assembled it and painted years ago, which made it easier to separate the hull parts. I'm only going to use the top part. Maybe it's hard to imagine anything further from a spaceship than a German World War II tank but I will try to meet this challenge 😝 In the photo below is a sketch of the goal I want to achieve. The tank hull is just a shortcut. Instead of building frame for a deck in the middle of the ship, I'm going to use this element. I'll turn it 180 degrees and cover with HIPS panels and greebles to mask the characteristic shape, and I think it will be ok. A sketch is not a blueprint, but rather a general concept. At the end of this work, my spaceship will certainly look a little different. Or even more than a little. However, taking into account the proportions of the ship's elements and the size of the tank's hull, I estimate that the entire model will be about 60 centimeters high. Several boxes of greebles collected over the years will provide the necessary details. Maybe I'll use some parts of this as well (another bonus). I'm particularly tempted by the cannon's resemblance to a space telescope. All right. One more important thing. It will be a long and dangerous journey through the galaxy of my laziness. There is a high risk that it will never end. Or it will end up with nothing 😉 Cheers, Wiesiek.
- 113 replies
-
- 19
-
-
- Scratchbuild
- kitbash
- (and 1 more)
-
Hi all, This is going to be my first of two entries (I had previously mentioned what I was planning in the chat thread.) This will hopefully be the easier of the 2 and the quicker and … my favourite (but ssshh don’t tell the other!). It’s a small-ish diorama/vignette of a beaten up post apocalypse Gepard. I’m gonna stick a whole bunch of random bits to it to make a sort of ‘across the ages’ tank with a mix of ww1/ww2/Cold War/sci-if items included. Two figures on the edge of a sinkhole/crater. I want people to look it and think “what the hell is that?”. I have never looked so forwards to a model or group build as this and have held back from it for over a year now. So super psyched. The model itself I saved from a so called box of ‘junk’, comes complete with many random faults which I would never have thought to have added. It also comes with its own entrophy… lots of mould, dust, broken parts, parts missing or in the wrong place. Plus the massive amounts of poly cement everywhere. It’s an older tamiya kit I think which was in a box in an artic for the past 20 or 30 years. The first thing I did was take it apart and give it a good clean with hot soapy water. As I took it apart more bits fell off… which is just the sort of natural random destruction I want. Then I started to add some of the bits I wanted to change to the turret. I thought the Gepard looked a little under gunned (joking!) so added a pak 38 to where the radar once sat. I also moved the mount for the top radar to the rear, closer to where it should be. I’m gonna add a new scratch built radar to replace the one missing from the top and a dozer shield for its front, amongst a few other bits and pieces. The hole on the top of the new gun mount I added an armoured plate, cut down from a spare part: I’m gonna add armoured textures, flame cuts and new weld seems along with additional armour plate next. This will cover up any gaps. The large hole beneath the new gun mount will be filled with putty or milliput which will look like the mount from an m48 Patton, with the canvass cover. The camo scheme will be of my own design, one of my sons is into mine craft so going to give it digital camo blocks and Enderdragon purple eyes. The main scheme will be black, white, silver and greys. With the digital blocks being carried through out in a combo of these colours. I’m going to keep the rubber band tracks, maybe cut one off and keep the other attached. Spikes will be added to hatches and barb wire wrapped around each gun. One of the AA guns will be broken off, laying on the ground and the second will hang loose with scratch hoses and electronics gubbins hanging out it. I may add schurzen, but will see how I go. I had to make the base to see if it fitted (anyone for a large cheese roll?) It’s very rough cut insulation mounted on a Poundland mirror. I need to carve the crater out from the centre to place the tank on its rear end sticking up, to see if it fits ok. I was originally going to cut the end off the tank off (engine end) but as the base is so chunky I may leave it on and use this to help keep it up right on the foam. You’ll see what I mean better later on, probably doesn’t make much sense at this stage. Then I made up the figures: filled a couple gaps with plastic putty, added a gun sling and wires to the flame thrower: I’ve added the axe to the modern day figure as well. I’ll further explain my colour choices for these little chaps once I have the paint on. I’m wanting to add to the ‘across the ages’ look to them, similar to the tanks theme. All the best, Paul.
- 58 replies
-
- 13
-
-
Just a little diorama to get me back into the swing of thing, not the best dio but I had a lot of fun putting it together. Cheers all. Brian.
-

Pod racer kitbash scratch build.
rockpopandchips posted a topic in Work In Progress - SF & RealSpace
Hi, its been a while but I have been loitering, but now it's time to build something again after too much time away from the bench. So I have cleaned off the brushs, sorted the airbrush and dived right in. I had parts of a micro machine land speeder kicking about for years so I decided to make a 1/35 scale pod racer that has very quickly turned into a diorama. I pulled the insides out of the land speeder and added a seat from some car kit and a few bits of piping from the same car I think it was, stuck a few wings and other odds and ends and the pod is done. I will have to fes up as the engines came from a spacecraft I have previously built but have taken apart. I have pulled part a 1/100 tank and turned that into a tank/ security droid and I using a 1/100 Gundam gun as one of those tatooine vaporator prop-type things. I will have to add more pictures later as imgbb is playing up for me at the moment.- 19 replies
-
- 9
-
-
- Star wars
- Scratchbuit
- (and 1 more)
-
So I started this one for the Salty Sea Dog GB. I've been thinking about doing the Akagi in all three 'variants,' from the proposed battlecruiser, its conversion to an aircraft carrier and then its last refit to the full deck. But as happens a lot, my drive dropped off and my attention wandered. (It wandered to the Three-Decker, but that's another thread!) As of now, the GB is not over, but I know it will not reach the finish line there. But nor do I want this to languish at half status - along with so many other kits! So, hopefully, this will keep me working on this so I can get it into the DUN Column. And just to be up front, I'm no expert on ships and such, so I hope you'll forgive some gaffs.😉 So, to start the 'base' of the project is Fujimi's 1/700 Amagi kit. I know now that they also have a battlecruiser Akagi kit, but the only difference between the two is pretty much just the name of the ship on the box, so all is good there! Except that it is a waterline kit and I like to see the full hull. Bum, bum, buuuummmmm! No worries though, I had bought more kits! I think five in total, the one battlecruiser and a Fujimi full hull full-decker and two Hasegawa versions, the three-deck and another full decker with a full hull. Between them I had enough bottom hull pieces for all three ships, although I had to mix-match in order to get a good fit for the battlecruiser. The bottom from one of the full deck Hasegawa's was a 'good enough' match, with that kit having then been sold off as a waterline kit. Compared to the Fujimi lower hull from the full deck kit, this one is more flat-bottomed though and lacking in some 'shape' near the stern. Here's a pic of all the parts, starting with what came in the Fujimi kit. And the rest, And the wood deck. The first thing to do was to check the fit of the hull pieces. I had chosen the best fit for the Fujimi upper hull but there were still some discrepancies. From the side, the bow looked really good. Though there was a bit of an 'under bite' at the stern. None too bad, as that can be dealt with, especially as going down the sides, the parts lined up pretty well with only a little bit of sanding needed. First though, was the shape of the bottom, Again, the Fujimi hull (top) has some better looking curves to it compared to Hasegawa's more flat-bottomed version. It also has more of a 'keel line' going forward, which I mimicked by gluing on a thin strip of styrene. This also helped during sanding, as it kept me from sanding across the center line. After a little bit of sanding I got this. A shot of primer and it looks pretty good. I snipped the strengthening cross members in order to allow for flex and movement while gluing them together. Which left me with a canoe! For the seams, I tried Perfect Plastic Putty first, but that made a cake of it, and I ended up using CA to further bind the sections as well as act as a filler. And sometimes you (I) just sand a little too much... I ended up with a shallowness to fill on the starboard side. To fix that I pulled out some stryene strip and glued one to either side to keep symmetry. Those were then sanded in which fixed it up. With that self-inflicted wound fixed, I moved onto mounting. For that I got some bolts and lamp parts from the local hardware store. And then drilled some holes. (Yeah, one was out of place...) Those were glued in with CA. With that I moved to the upper decks. For the PE I sanded off some unneeded details. And drilled through some holes for the chains. I sanded the under bite off of the stern, and though there is some PE for the 'Captain's Walk' I left the plastic in place as it looked well enough. I started doing some PE after that, which was a little miss... And a little hit... I've since taken off the smaller T-shaped piece and used parts of it on the kit part. Then it was onto the gun barrels. The Fujimi barrels looked pretty good with open muzzles, but I already had the brass ones, two sets in order to account for all of the turrets, so the plastic ones were lopped off and replaced. And some super structure PE started. The next part going on top of that though looked a little off... I sanded the front posts now to level it out. And that's where I'm at now. As usual, I got side-tracked, this time by the Three-Deck version for the Transports Loaders and Carriers GB, which won't be finished for that one either!😄 But I'm getting the hull on that one to a 'good place' and I'm now awaiting some more PE to show up for it, so I'll be coming back to do more work on this one soon. Keep on modelling! Thom
-
This is probably my first model that I have completed since I joined Britmodeller almost two year ago . There are some of my things in RFI but done before. P.E.A.C.H. was pretty quick project by my standards: I finished it in three months. That's the combination of trashbash, kitbash and scratchbuild. The build log is here The base is ready too. It's basically a separaet model, a mini diorama, so I briefly considered putting its RFI in the diorama section. But PEACH and the base started together, so they will finish together. Thanks for accompanying me in this work. Regards Wiesiek
-
I don't have the enthusiasm to finish my current projects, but I'm tempted by the workbench (apparently I'm best at doing rather than finishing 😉). So I started another project. The intention is to build an armed low-wing hover/jet with a vertical profile (height greater than length). The shape on the front is supposed to roughly resemble an inverted T). It will be a combination of trashbash kitbash and scratchbuild, because I want to use scrap and spare parts, but to compose it well I also need a lot of styrene constructions. A few days ago I was cleaning my room and found two things. First was an old Dell PC mouse (which I kept because it has a great shape). Second was the Academy MiG-29 1:48 kit (scrap I got from a friend). It occurred to me to combine these two things. Or at least to use some parts from the MiG. The model is in bad condition: missing parts, no decals, poorly glued elements. I decided to use the wings pictured in the middle and a few other parts. At this stage, I also gave up using black mouse overlays (clicking element). The easiest way would be to glue the wings to the mouse but I don't think it would look good. So I needed connecting elements. As it is not easy to combine a rounded mouse to flat sheets of styrene, this "connector" is constantly growing and becoming more and more complicated This part is an extended wing attachment at the initial stage. It has a sandwich form to make it look better. The hole in the center is the landing gear section. The triangular structure on top is the lower fuselage element. The mouse will be angled approximately 30-40 degrees to the wings to add dynamism to the ship's outline. Here you can see the next stage of building the fuselage. I glued a styrene wheel to the lower section, and on it I started to build the middle section (where the mouse will be placed). The ribbed gray elements are the air outlets from MiG (only one is visible here). The styrene rods are matched to the screw holes in the mouse, which makes it easy to fit and remove. Other gray elements are parts of some plane or helicopter from my resources. I put the cable cover only for the photo, I will glue it after painting the cables. The Fulcrum's air outlets are clearly visible here. On the right: part of the fuselage of another unidentified plane. Attaching the engine nozzle caused me the most problems. First I had to make the bottom part of the mouse. It only worked the second time. I used another styrene wheel but the mouse is not completely flat so it didn't fit perfectly (there were gaps). I masked them with a narrow strip of styrene. Around the mouse there is a groove for attaching the lower part, which greatly facilitated the attachment of the strap. Then I glued a nozzle to the wheel. As you can see: it doesn't fit well either, but it's the only part of this nozzle I have, so I had to use styrene again. I decided that I could not make a cylinder of such a complex shape so I decided to go a different way. It took me about a week to build so far. The fuselage is basically ready for the applying details (kitbash phase). The two big tasks for the near future are landing gear and cockpit. Especially the cockpit can be problematic, because I would like it to be glazed. I have some canopies but it will be difficult to fit them to the mouse. Cheers. Wiesiek.
-
 I was out with an old mate at the weekend and we got talking about old tv shows - as you do... We were both big fans of the old Gerry Anderson puppet shows and the various craft that appeared. I casually mentioned that, a few years ago, I'd built a model of the submarine used by Agent X-20 (Exx two zero...), the Peter Lorre-soundalike baddie that popped up in several episodes of Stingray. He hasn't seen it (the model, that is. He's seen Stingray. Hundreds of times....), so I promised I'd send him a few photos. And, seeing as I've taken said photos, I thought I might as well share them here. The original studio model was apparently based on Revell's 1/48(?) kit of the Bell X-5 swing wing experimental aircraft, with wings removed (and the roots covered with tubular mouldings which could be drop tanks) and suitable fins added, which appear to be cut from the original kit wings. Here are some photos of the original model. Nowadays it is difficult to obtain one of the old Revell kits and, in any event, in 1/48 scale it would be too big for my shelves especially when sitting alongside some of my other Gerry Anderson models. However, I discovered that Mach2 made a 1/72 version... perfect! (Perfect for my purposes - please do NOT take that as a comment on the quality of the Mach2 kit...). So that was my start point. It was everything you would expect from a Mach2 kit.... Luckily, I wasn't trying to make a model of a Bell X-5... So here's my completed model - fins made from the discarded wings of the kit, the two side pods (which cover the wing roots) made from bits of old ballpoint pens... And here's a rather cruel close-up: Best viewed at the bottom of a deep, dark ocean... Although, because I added it to a display base, it is the ONLY one of my models tolerated by Mrs G in its position atop a shelf unit in the living room... Nige
- 4 replies
-
- 22
-
-

-
- Stingray
- Gerry Anderson
- (and 1 more)
-
 Hello A couple of photos with my latest kit. Arma Hobby 1/72nd PZL P.11c modified into a PZL P.11f with parts from Azur-FRROM (engine, cowling, proppeller) and IBG Models (ailerons, stab and elevator). P.11f were produced under licence at IAR Brasov and only used by Royal Romanian Air Force. Comments are welcome 001 by Iulian Macovei, on Flickr 002 by Iulian Macovei, on Flickr 003 by Iulian Macovei, on Flickr 004 by Iulian Macovei, on Flickr 005 by Iulian Macovei, on Flickr 006 by Iulian Macovei, on Flickr 007 by Iulian Macovei, on Flickr 008 by Iulian Macovei, on Flickr in the last image, alongside an OOB P.11c from ArmaHobby.
- 16 replies
-
- 35
-
-
I finally called this Tiran 5Sh done that I have a thread about in WIP. A Tiran tank is a Soviet T tank that was captured by the Israelis and then 'Tiranized', this included swapping out machine guns, radios ect, Breaking up the tanks silhouette by adding large storage bins and in some variants swapping out the main gun for an L7/M68 gun (giving the Sh or Sharir designation). Using this battlefield salvage and refitting them was a lot cheaper for Israel than buying additional M60s or Centurions at the time. A Tiran 4 was a T-54, Tiran 5 is a T-55 and a Tiran 6 was a T-62. This kitbash contains T-54 and T-55 parts from the Ammo, PST, Revel. Trumpeter, Italeri and Ace kits, some scratch built bits and an aftermarket barrel, although I tried to keep the majority of it plastic after being a little disappointed by some of the resin Tiran conversion kits available. Cheers and thanks for looking. Calum
-
 Hello everybody, as I'm quite new here I decided to finally contribute something meaningful and treat you all with a build of mine. Since I'm working from home at the moment I figured this to be the perfect time to start one of my long-term projects, a Sukhoi Su-17 (Fitter-C) in 1/48. The Real thing The Su-17 started life as a project at Sukhoi to improve the low-speed and take-off/landing performance of the basic Su-7 design. Liftjets proved to be a not feasible as they were dead weight most of the time and occupied much needed space in the airframe. Variable-geometry wings on the other hand seemed to offer a perfect solution to this problem. The outer part of the Su-7 wing was redesigned to be moveable and a demonstrator, based on the Su-7BM, was built and proved successful during tests. The first Su-17 variant (Nato Code: Fitter-C) that went into production was basically an Su-7BKL with Variable-geometry wings, a dorsal spine holding additional avionics, a clamshell canopy instead of a sliding one and a hydraulic drive system for the moveable wings. Still, the performance left something to be desired compared to the Su-7. While low-speed and take-off/landing performance improved markedly, range and payload did not. This was largely because the Su-17 retained the old AL-7F engine while overall weight increased. Only with the introduction of a new engine, the AL-21F, all performance data finally improved significantly. This variant went into production as the Su-17M ("M" for "modernized"). The References The subject of my build will be “Red 16”, a Su-17 assigned to the 217th Fighter-Bomber Air regiment based at Kyzyl-Arvat (todays Serdar, Turkmenistan), patrolling the Iranian border in the early 80s. They received second-hand Fitters in 1979 to replace their old MiG-21PFMs used as fighter-bombers until then. Inspiration came from these articles from the site “easternorbat.com” (fantastic site for all Soviet aviation aficionados): http://www.easternorbat.com/html/217th_reg_su-17_bb_eng.html http://www.easternorbat.com/html/217th_regiment_80s_eng.html I have a soft spot for Soviet equipment stationed at the remote parts of the Soviet Union and in recent years, many photographs from private collections emerged, showing daily life on some of these remote spots at the edge of the red empire. Often these places lacked even basic commodities like running water: https://ok.ru/kizylarvat/album/51975801143379?st._aid=Groups_Photo_Album_List_openAlbum Then I've collected some walkarounds for detailing the kit: https://www.scalenews.de/suchoi-su-7-fitter-walkaround-46/ http://walkarounds.scalemodels.ru/v/walkarounds/avia/after_1950/su-17_omsk/ https://www.scalenews.de/ngg_tag/suchoi-su-17-walkaround-39/ http://litnik.in.ua/walkaround/reaktivnye-samolety/walkaround-su-17m-ot-peps-chast-2 The Kits Till now, there are no kits available in 1/48 to build the earlier marks of the Su-17. Therefore, the only possibility to portray one of these variants is to combine several existing kits. In this case it will be: The Kopro Su-7, which will be used mainly for its fuselage: The Hobby Boss Su-17, which will provide its wings, landing gear, weapons and various detail parts: Of course, some aftermarket help is thrown into the mix too, namely: Eduard Brassin Su-7 ejection seat Eduard photoetch Su-7 cockpit Quickboost Su-7 air Master Su-7 pitot and gun barrels Wolfpack Su-7 exhaust Reskit Su-17 wheels Master Su-17 pitot and gun barrels Although quite a complete package, some scratch building will be required too. Thanks for reading and hope to see you along my journey! Cheers Markus
 -
Well, time for the usual year-end roundup. 2021 has been an odd year, but I got some more done: First up, the 1/72 F4H-1 Phantom Prototype conversion, using no aftermarket parts: A few challenges, but worth it. For those interested, more pics HERE which will then link to the build thread proper. Same process will be repeated for all the models... Next up, the Curtiss A-18 Shrike resin build: More pics HERE Next, the F3H-1N DEMON conversion: More pics HERE Next, the Lockheed YF-97/YF-94C kitbash/conversion: More pics HERE Next up, the diminutive XF-85 Goblin: Build thread HERE Next, Lt Guy Bordelon's F4U-5N Corsair night fighter, all gussied up with aftermarket goodies: More pics h Next, LF Model P-30 resin kit: More pics HERE Next the P-26 Peashooter, also all gussied up with aftermarket: More pics HERE Next up the Lockheed YF-94D conversion, my personal favorite: More pics HERE Next, the Lockheed T-33 Twin-Tail conversion, also called the TV-2: Build thread HERE Next the Platz Shiny T-33 squadron hack: ore pics HERE Next up, the resin Consolidated TBY-2 Sea Wolf: More pics HERE And finally, the last and most difficult of the year, the Lockheed XP-80 conversion in the garb of it's initial flight: More pics HERE All in all, a challenging but rewarding year, whittling down the bucket list a bit! Thanks for looking and a great New Year to everyone! Ed
- 12 replies
-
- 17
-
-
- kitbash
- conversion
- (and 1 more)
-
Life’s left me a bit short on modelling time of late, but things are calming down so I might have a chance of some bench time again. While I probably should continue with the choppers, aircraft are my main interest and this one’s been nagging away as something I want to start on. This hasn’t been helped by reading through @shortCummins and @Pete in Lincs kitbashing threads (though I do swear that the concept & kit purchase predates that). So what am I actually building then? I’ve had this kit in the stash for around a decade. Admittedly most of that time I wasn’t modelling, but coming back to the hobby this sent me on a hunt for possible colour schemes that didn’t require mottling as I don’t currently possess an airbrush and don’t fancy trying it without one. Having failed to find any, I decided to go down the whiff route and make something up, and if I’m going there, I might as well go all out. Not only is this going to be a non-military scheme, but I’m going to put it on floats as well. The backstory I’ve concocted is that at the end of the war a young American pilot managed to get his hands on a reasonably complete Fw190D-9 and “arranged” for it to make its way back home. Our intrepid pilot subsequently made his fortune in the booming economy of the early 50’s and with it had the funds to make his prize airworthy again. Living around the great lakes, he decided to fit it with floats and subsequently used it to explore the Canadian wilderness during vacations. Eventually he felt he was too old to fly and passed the plane down to his son, who had the plane restored and repainted in a livery similar to the Reno Warbirds. He decided the plane needed a name commemorating it’s interesting past, christening it “Dora die Erkunderin” (or Dora the Explorer in German). And yes, the entire backstory was conjured up so that I could make an awful dad-joke with the name of the model. As for the plastic, the main kit is (I think) the 2009 boxing of the 1976 tooling, which would explain the large amounts of flash in places. I picked up a PM Spitfire floatplane to provide the floats, with the side thought that as it’s a simple kit I might be able to convince one of the offspring to have a go at it once I’ve taken the bits I want: I’ve also picked up some etch and a resin cockpit as the Airfix kit is devoid of any real details. Neither are intended for this kit, but I’m hopeful I can make it work: At some point in the past I’ve taken some of the parts off the trees on the Fw, and assembled the prop: (Ominous drums & bass) Flash! Aa-aahhh! I think it’s safe to say I’ll be spending some time on the clean up. I’ll replace the pitot with brass tube: The PM kit has some flash issues as well, to the extent that the port tailplane slot is almost completely filled in. Luckily, I don’t need the fuselage for this build. If I can’t get the kids interested, it’ll probably become a paint mule. The floats are ok, I’ll have to do some work on the shaping of the tops of the struts to get them conforming to the underside of the Fw wings: Looks wise, I found one other D on floats, which was very nicely done https://modelingmadness.com/review/axis/luft/scze190w.htm I also found a couple of A variants on floats (including one nicely done on a 3 float Rufe-type setup), but this one captures the essence of where I’d like to be shape wise. I’m still mulling over the final paint job as well, though the main colour will be Ford Deep Impact Blue, by virtue of the fact that I’ve got a big aerosol of it to do one of the choppers and there’s more than enough to do this as well.
- 22 replies
-
- 11
-
-

1/72 Nieuport-Delage NiD 42S Frankenheller
2996 Victor posted a topic in Work in Progress - Aircraft
Hi All, I hope the Hosts won't mind me throwing another chapeau into the ring while I've already got one build in progress in this GB? I'm not sure whether this one will make across the line, but we'll see how it goes. What, you may ask, is a Nieuport-Delage NiD 42S? To be honest, until a couple of days ago I had no idea either! Two were built to compete in air races with one, flown by Joseph Sadi-Lecointe, winning the 1924 Coupe Beaumont. Nieuport's designer, Gustave Delage, drew heavily on the company's concurrent fighter designs - they were very much "developers" rather than "innovators" - for the NiD 42S, and thus the fuselage is virtually identical to the NiD 42C.1 parasol-wing fighter (hence also the NiD 622 - see where I'm going here?), but with the wings mounted at shoulder height. The engine used was a variant of the fighter's unit, a Hispano-Suiza 12Hb developing 600hp. The radiators were incorporated into the upper surfaces of the wings. Nieuport-Delage also incorporated an aerofoil on the undercarriage axle, and referred to the aircraft as a "sesquiplan"! The NiD 42S' cockpit was positioned slightly further aft than that of the 42C.1, which was possible due to the method of manufacture where a hollow plywood fuselage was built in two halves around formers, joined, and an 'ole for the driver's head was cut out. The completed fuselage was then covered in doped fabric et Robert est le frère de ta mère. There are a few leads on t'interweb, but finding a drawing has been quite difficult. A couple turn up in other articles, and are in any case relatively small. However, they can be enlarged and printed, and their scale determined using known dimensions. Here are some links in case anyone is interested: Wikipedia AviaFrance Les Ailes 19 Juin 1924 The Last Racer Produced by Nieuport There is also a similar build here on Modelling Madness, which in part inspired the one I'm planning, although the builder does confuse the designations a bit and what he actually built is a 1921 Coupe Deutch de Meurthe racer, not a NiD 42S. There seem to be very few photographs which show the upper surfaces of the wings, so some guesswork and cross-pollination from other similarly-equipped aircraft will probably be needed. Interior? Who knows; probably very sparse! Colour scheme? I would imagine a rather fetching shade of Bleu Français and aluminium dope/polished aluminium. For the basis of this kitbash, I'm using Heller's venerable Nieuport-Delage NiD 622. Obligatory box and sprue shots: http:// http:// http:// http:// http:// http:// http:// There we are, then. Should be an interesting little project without being too taxing Cheers for now, Mark- 34 replies
-
- 12
-
-

-
I’ve wanted to build a piloted Mech/Powersuit with the driver in an open roll cage for a while now. I recently picked up a set of Polish tank crew figures and decided to have a go. I don’t really have a clear design in mind, other than I’d like to have exaggerated, cartoon proportions, with large arms and shoulders and small legs. Kind of like Bluto from the Popeye cartoons. I started by building the seat out of some leftover polystyrene scraps. The joysticks and foot rest are Gundam parts. They’re kind of chunky and possibly scale-breakers, but I’m playing this one fast and loose. Next, I built up a frame to support the huge arms. This was printed in five parts and assembled around the chair. On either side of the pilots head , I drilled the mounting holes for the roll cage. This will (hopefully) be bent up from some acrylic rod. A bit hard to see, but the black textured piece behind the drivers head is from a video cassette. I also filled out the back with sheet styrene and started to add some kit part details. Under the seat, I’ve added a piece to attach the legs to. I’m happy so far, but slightly unsettled as I have no real plan. I will trust that the Spare-box Muse will lead me down the golden path to kitbash Elysium. that’s it for now. Thanks for looking in. Pete
-
I've read the various threads on Britmodeller regarding the lack of a Spitfire XII in 1/72 and the various options for making one but I'd like some simplification of where the various bits would come from to do my own kitbash. I understand that I need the C wing which I can get from the Airfix Vc. I understand that I need a Griffon engine and 5-blade prop which I can get from a Fujimi XIV Where I'm confused is with the rest of it. Could I also use the Vc fuselage as far back as the tail? Which mark of Spitfire would I need to source the tail (fin and rudder) from? I believe that the retractable tailwheel was not fitted to all airframes. Many thanks. Clive.
-
Hello everyone. Let's all hope for a happier new year. Some time back, I acquired a DB Models F4H-1 Phantom II Prototype conversion kit for the Hasegawa F4B/N kit. I had earlier decided that building this combo would be my first build of the New Year. But, after successfully building my kit-bash of the Republic XP47J, and with new-found courage, I decided instead to swim upstream again! After all, how many of us 1/72 modelers are going to ever be able to find such a conversion kit (or possibly afford one!). The odds aren't good. SO, I decided to fight back, and see whether any reasonably skilled modeler could do it themselves, without an expensive conversion kit. This will be that attempt -- wish me luck! In any event, I have determined to try and use NO part of the conversion kit, although I WILL use the parts to help convert my own, and to gather the info on how to do so, which I will pass on to you. Here's the Hasegawa kit, one just re-released. The Hasegawa kit has a few irritating small fit issues, which can be overcome. Also an old complaint of this kit are very fine panel lines -- probably close to scale! -- which will mostly be obliterated in some areas. I can live with that, as all I want is the shape of that very first F4, and I will be happy. I sort of suspect that any of these Hasegawa F4 kits could possibly be used, but I'm not certain that all of the kits come with all of the optional parts parts that will help here. Other maker's kits -- I have no idea. Above right, the DB set comes with new intakes, a nose, and some metal parts, such as an ejection seat, nose probe instrument panels (plain) and some very nice decals. I shall shamelessly copy these as closely as possible, but out of plastic, except for the decals, of course. In looking at the project, it seems to me that the hardest conversion would be the intakes, so that's where I'll begin, on the theory that if I can't get past that, why continue? Just quit and fall back on the conversion set? As seen below, the Hasegawa kit (hereinafter referred to as "HAS") has two parts for the intake backplate, kit parts J3,4,5, and 6. They are shown in the photo as temporarily joined together: A little work to do here, to remove the front edge, leaving about 4.5mm as shown, and removing completely the other more-or-less arrow shaped parts on top and bottom. Above right, the modified parts are on the left, the stock kit parts on the right. The arrow points to where the tips of the splitter should be rounded slightly; in the case the upper one perhaps a little too rounded. Next, looking at the right intake, when the front edge of the splitter is shortened, it the becomes too thick at the leading edge, and needs to be thinned item "B". Line "A - A " needs to be glued up as straight and flat as possible, as the thinning will change the angles a bit. "C" shows where the upper leading edge if the kit intake is trimmed back a bit, to allow more gluing surface for a new front edge to be glued on: Above right, figure "C" shows the thicker, trimmed edge. My next thought was just to glue on a thin piece of plastic, which extended forward a bit more, to reshape the intake: Above right shows this idea a bit better, as well as showing the vents which will need filling. After filling and sanding on this area for a while, I soon found that getting the upper hood to curve down properly was not going very well. Suddenly, the light came on, and I determined that a curved piece added onto the front would would work much better, giving material to make the hooded, curved shape required. So I used a strip of the same plastic, held it over a screwdriver with a 8mm diameter shaft, and used a paint stripper gun set on medium heat to warm the plastic. As soon as it got warm enough, I set down the heat gun and used my fingers to bend the softened plastic into a 90-degree curved shape: Above right, this gives a better material around the curve. I suspect that a hair dryer, even the flame from a candle might work as well, care taken NOT to burn the fingers! Below, preliminary result are looking good compared to the resin parts. Just needs more refinement of the leading edge on both pieces: Above right, the toughest part of all may be replicating these vents, shown atop the DB Models resin part. Fellow modeler JohnR accomplished this on his build of a few years back, by using some decals, which he has stated he will try to find the masters of for my use here. Anyway, while not a build thread, his final product is outstanding! I will provide a link for your perusal HERE I doubt that my effort will look nearly as good as John's, but I will do what I can. As I've often said, I'm a much better builder than painter! Johnr, if you're watching, feel free to chime in with whatever comments or tips you'd care to share! Anyway, after a bit more massaging, they are coming along: Well, that's all for now. Hopefully, there will be more, when I figure out the next step... Thanks for looking in! Ed
- 54 replies
-
- 16
-
-
Have been playing around with sticking bits of plastic together on a bit of a 2001/Silent Running inspired build. Started off as just a little probe, now seems to have grown into something a bit larger. Lots of Plastruct and Evergreen helping to detail this. Current progress below:
-
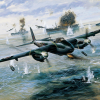
 All: Here is ZE396, the subject of a walk-around in Britmodeller, as she appeared in the mid-80's, https://www.jetphotos.com/photo/9775977, when the world was different. Lumps and bumps came later, as did other paint schemes. She was one of the last group of four to be retired in 2015. As "working" military aircraft, these jets were clean, but not spotless. They served the RAF loyally for 30+ years. To build the CC3, I had to bash three kits together: Sword's U-125A, Matchbox's 1974 HS.125-600, and bits from Airfix's Dominie T1. I approached this build with some trepidation, but it worked out to be a fair representation of the real thing. Hope you enjoy it! ey served the RAF
 -
It should not be difficult to convert Academy's 1/72 F-4J into a C or D. Just needs Air Force inner pylons, an updated cockpit (if you are into that), a Rhino sensor for the C, and some other small sundries. All that could fit in a 10$ resin set. opinions?
-
Dear Colleagues: As there has been some discussion on the airliner part of this forum about the relative merits of the Airfix and ESCI kits, I thought I'd share the model I finished about 10 years ago. The base kit is the 1962-vintage Fokker Troopship. To complete it as an F-27-200, I drew heavily upon others' suggestions contained on a Dutch modeler's site. I deepened the fuselage with laminated sheets of styrene, cut to the the rough shape of the underside, and modified the tail, ailerons, and engines. I ensured the cockpit retained the V-shape through its curvature. I also employed parts of the ESCI kit's nose, heat-exchanger intakes, tail fairings, landing gear, etc, as well as added LORAN antennas from an ESCI C-47. Given a choice between the two kits, I'm partial to Airfix, which gets more correct, shape-wise, than ESCI's, especially with the cockpit and engine nacelles, including the pronounced fairing that extends up and over the wing trailing edge. I tried to replicate AirUK's periwinkle blue using Southwest Canyon Blue. The white is PollyScale.
- 23 replies
-
- 46
-
-
This is a project I’ve been quietly working on (and off) in the background over the past year. It’s a sort of chance meeting on an operating table between a sewing machine and an umbrella, or in this case, between a 1:35 scale Hitachi Zaxis excavator and a couple of Gundam kits. It’s based on a model that I saw on a Japanese social media site a couple of years ago by a modeler called “Surume0407”. You can see his work here: <https://twoucan.com/profile/surume0407> I really liked it and wanted to try to make my own version, but while the use of the Hasegawa excavator kit was obvious, I had no idea what kits were used for the robot bits. I bought the excavator kit, figuring it would be fun to build regardless if I attempted the kit bash or not. Some time later, while looking at pictures of other people’s models on the web (a hobby in itself), I recognized some of the major bits in a photo of a Gundam ‘Graze’ figure. And with that, I was off to the races. This will be a fast one, so I’ll let the pictures do the talking. Hang on, there's a years worth of work squished into one post. The chassis was 3D printed out of polystyrene. It took a few tries to get proportions that I liked. This shows the underside. The white tubes are attachment points for the rear legs. The feet are 1:35 tank wheels and some styrene tube. 5/32” is close enough to 4mm that it seems to work ok with the Gundam poly-caps. I had to add some Tamiya putty in some cases to tune the fit. Leg armour squared off with epoxy putty to somewhat reduce their ‘gundamosity’. The extension for the counterweight was modeled in Fusion 360 and printed in polystyrene. I was unable to identify several of the armour pieces, so I decided to make my own. Here's the prototype sheet styrene knee armour and the printed final. Scratchbuilt a new piece for the top of the shear to match the size of the one on the claw and to make room for the Gundam ball attachment. The manipulators were made from a combination of the 1/144 scale leg and arm parts. The main Gundam torso was glued to a printed stryrene bar that fit into a groove in the chassis I busied up the sides of the chassis with some kit parts. So here are most of the parts laid out. All that needs to be done at this point is prime and assemble. Primer A lot of the original Hitachi parts are not glued to make painting easier, so everything is a bit precarious at this stage. All of the Gundam points of articulation are still functional, making posing this thing rather difficult (Much respect to Mr. Ray Harryhausen). Phew! So this is where things stand as of today. There are a lot of detail bits still to attach and the possibility of a driver, we'll see. Next up final assembly, paint, decals, and weathering. Stay tuned and thanks for following along. Oh, I also have another sci-fi build in progress in the diorama section, if anyone's interested. Thanks! -Peter
-
 it’s been over thirty years in the making, the bridge between my first modelling era and my second. It’s almost a scratch build as I’ve only used the fuselage, spinner and wheels with a scratch interior, wings, tail plane. Pretty happy with the result, feels weird to be finished it after so long. One step closer to restoring the balance of power on the WWI shelf. From left to right, ( front row) the Albatros, scratch Pfalz DrI, Sopwith Triplane, scratch Wight quadraplane (back row) DFW Floh, scratch Sopwith Pup, Scratch Sopwith Snark. Next build to finish is my Scratch Junkers JI.