Search the Community
Showing results for tags 'kinetic'.
-
 After months and months of searching (basically since the aircraft was released for DCS in 2018,) I finally was able to get my hands on this beauty! Of course, the "bug" needs no introduction, currently flying for a number of foreign Air Forces. I apologise for having already started her before starting this thread, but the excitement was too great!
 -
Hello folks, The Tornado has just cleared the bench, I started a big beastie: Kinetic Flanker D. Some friends warned me this kit was a pain in the sub-tropical regions, some others told me it was a breeze, I had to see by myself. So. Paints are from Mr Paint. The cockpit details have been done using Posca ink pens. The instrument panel was a bit more entertaining: first a coat of laquer white, then Tamiya acrylic black. The instruments were masked with disks of tape (I love my DSPIAE circle cutter), then the panel was sprayed with Mr Paint Sukhoi interior colour. Some creative scratching on the bezels later, and with details picked out with Posca pens: TBH, it was an exercise in futility, as the instrument panel is about invisible from the outside... Then, the main wheel well walls. Chassis red as a base, and piping highlighted in yellow. The cockit as it sits in the fuselage: The wheel well: The front wheel well: The fuselage taped together: So far, I'm more on the pain in the nether regions side, but if I resist the urge to blast it to tiny little bits (I've had one ejection seat explosion so far...), it should be a hell of a beast. Ah, I forgot: I wish the people in charge of the instruction booklet live in an entertaining Garth Ennis' nightmare. Cheers, S.
-
 #1/2020 Let the new season begin! Kinetic kit, needs some filler, a molding issue appeared on the left side of the tail fin in the area of the leading edge. The tip tanks are one piece parts and molded both the same way, to say both for one side and not differently molded for different sides. Some work to make the "wrong" one fit, you may see it on the frontal pic, the tip tanks have a slightly different tilt. Used a resin seat from the Wolfpack edition of the Kinetic kit. Decals for the main markings from Print Scale, not that bad but took a while to losen from the carrier paper and tended to wrap. Stencils were taken from the kit. MRP White and Dark Aluminium used for the NMF. Build thread here https://www.britmodeller.com/forums/index.php?/topic/235062626-persian-thunder148-northrop-f-5a-freedom-fighter-imperial-iranian-airforce/ In the early 60ies Iran looked for an aicraft to replace the aging F-84 and F-86 fleet. They found it in the F-5. The first batch of F-5A and F-5B were delivered on Dec. 6th 1964, the last ones were delivered in 1971, some in NMF and some already in Asia Minor camo. The NMF ones were soon camouflaged too. iran was the first export customer of the F-5. When the IIAF received the newer F-5E/F and F-4D/E, Iran and the USA negotiated, under project Enhance and Enhance-plus, to deliver most of the old Iranian F-5s to other US allies, especially to South Vietnam. Other recipients were Ethiopia, Jordan, Greece, Morocco and Kenya. The model shows an aircraft that was stationed at TFB-3 Shahrokhi. In 1971 it crashed near Vahdati Airbase during an air to ground exercise. DSC_0001 by grimreaper110, auf Flickr DSC_0002 by grimreaper110, auf Flickr DSC_0003 by grimreaper110, auf Flickr DSC_0004 by grimreaper110, auf Flickr DSC_0005 by grimreaper110, auf Flickr DSC_0006 by grimreaper110, auf Flickr DSC_0007 by grimreaper110, auf Flickr DSC_0008 by grimreaper110, auf Flickr DSC_0009 by grimreaper110, auf Flickr DSC_0010 by grimreaper110, auf Flickr DSC_0011 by grimreaper110, auf Flickr DSC_0012 by grimreaper110, auf Flickr DSC_0013 by grimreaper110, auf Flickr DSC_0014 by grimreaper110, auf Flickr DSC_0015 by grimreaper110, auf Flickr DSC_0016 by grimreaper110, auf Flickr DSC_0017 by grimreaper110, auf Flickr DSC_0018 by grimreaper110, auf Flickr DSC_0019 by grimreaper110, auf Flickr DSC_0020 by grimreaper110, auf Flickr
 -
After the IIAF T-33 is finished (gonna post it in RFI tomorrow), my father starts the next IIAF project. Because it still takes some time until the first ever 1/48 decals for an IIAF F-5E are released by Hi-Decal, we decided my dad should do an imperial F-5A using the Kinetic kit with Printscale decals. DSC_0008 by grimreaper110, auf Flickr DSC_0010 by grimreaper110, auf Flickr it´s gonna be an aluminium scheme DSC_0001 by grimreaper110, auf Flickr
-
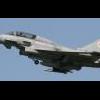
Last of my three recent finished models is this F-16 aggressor of the US Navy from the Eduard (Kinetic) kit. Difficult kit to build but looks the part when finished! Paint job was fun to mask too! I used AK paints for this build. Thanks for looking! Chris
- 11 replies
-
- 29
-

-

-
Here is a build of the Kinetic M-346 Master in the colours of the Republic of Singapore Air Force, albeit with a special scheme tail celebrating 20 years of training partnership with the French Air Force. In addition to the home-made decals for the tail, I also included the Yahu cockpit set. Aside from that, it's entirely from the box contents. Some of you will know that this is the first kit from the new "Gold Standard" in the Kinetic range and thus sets expectations for better quality. I think it meets mine and there really are no dramas putting the kit together, except the ones of your own making (e.g. trying to figure out the main undercarriage arrangements, just like the Rafale. You shouldn't need any filler and there's more than enough reference photos around for detailing beyond the kit. It's brush-painted with Hataka and Vallejo acrylics and finished with a Winsor & Newton matt varnish. Minimal weathering applied. My thanks to Tim for help with the tail decals. A delightful little kit of an interesting aircraft and I recommend you have a go at building one. As ever comments are welcome.
-
Hi all here is one of my recent work completed : a mirage IIIE 3-IO N°547 based at Nancy Ochey during the eighties : EC 1/3 Navarre. equipped with anti radar missile AS37 and counter measures pods PHIMAT and BARAX. happy to hear your advices. olivier
-
 as if I would not have to do enough elsewhere... but where else should I build one of these? not sure yet on the Squadron, but a grey one I'd like! maybe 3/75 Sdqu at Butterworth to even better fit to the Asian frontline topic? and I'd probably load t for some attack mission using the Kinetic RPK-10 with 2 Snakeeyes each? a 1300l tank on the center (from an AMk Kfir should do well I guess!) and Eduard Magic Missiles on canted Mirage IIIO 3 /75 Squadron, RAAF Butterworth, Malaysia that is what I have found in my stock that could be useful ? what puzzles me a bit is the ejection seat... acording to the above brilliant book , an MK6 should be fitted from 1981 instead of an Mk4.... left Mk4 from SBS, mid Mk4 from Pavla, right Mk4 from HPM they are not all that similar and specific I think.... who can help me out? as I understand it, the MK6 introduced a zero zero capability adding a rocket motor.... and double hand rails in addition to some additional part on the rear rail.... interesting accident story by the way: http://www.3squadron.org.au/subpages/Last_Sacrifice.htm RAAF serials: http://www.adf-serials.com.au/3a3.htm
 -
#31/2015 And another one finished. Kinetic kit mostly oob, nose guns and rocket pods were donoured by the AMK kit. Seatbelts were made of masking tape. The camo was done with Tamiya XF-52 Flat Earth and a mix of XF-17 Sea Blue with XF-18 Medium Blue. For the 6-Day-War in 1967, the Israelis equipped their Fougas with weapons and used them in the ground attack role.
-
 Scaleworx is currently working on a 1/48th Cheetah E resin conversion set for the Kinetic's Kfir C2/C7 kit (http://www.britmodeller.com/forums/index.php?/topic/234935583-148-iai-kfir-c2c7-by-kinetic-sprues-decals-released/?p=1251802). Scaleworx has in its catalogue similar sets dedicated to the Heller & ESCI/Italeri Mirage III kits - ref. SW48-01 (Cheetah C), SW48-02 (Cheetah D), SW48-03 (Cheetah E), SW48-08 (Cheetah B ) (https://www.facebook.com/scaleworx/photos/a.235132476686101.1073741852.212054182327264/363249607207720/?type=1&theater) In time, the rest of the Scaleworx Cheetah sets will also be modified for the Kinetic kit. Source: https://www.facebook.com/scaleworx/photos/a.235132476686101.1073741852.212054182327264/383498791849468/?type=1&theater V.P.
 -
These groupbuilds are coming thick and fast. Still to complete my entry in the Maritime Patrol GB and yet to start my DC-3/C-47 STGB entry. My plan for this GB is to build Kinetic's 1/48 T-45 Goshawk. I have some aftermarket decals to complete it as an aircraft of VT-22 'Golden Eagles'.
- 22 replies
-
- 10
-
-
Hi Chaps, I really enjoyed the 2 Hawk builds so with my Meteor NF11 nearly complete in the Specialist GB and another 2 weeks before the Lockheed GB I've decided to go for a 3rd entry to this GB. Subject will be the US version T-45. There's only one scheme seen so far so unless I find some pictures of the prototypes then this will be white and red. The kit today. Box crushed in a suitcase last summer between the big H and Bangkok. Colin
-
We have just taken delivery of a selection of Kinetic kits with more due soon. Check out the selection here! https://www.wonderlandmodels.com/brands/kinetic/
-
Detail set for Kinetic Su-33 Flanker-D in 1/48. Made of steel with a thickness of 0.05 mm.
-
 The Kinetic Harrier is at long last complete. Kit has been fighting all the way, with fiddly assembly and confusing instructions, a good documentation is needed to avoid the version mix. Decals, however are a dream. But in the end it's a Harrier and certainly a gain over the old Airfix kit. Painted with Gunze acrylics, (H333 extra dark sea grey), been adding the Neomega cockpit, initially intended for the old Airfix kit. Complete photo album of the build can be found here : SHAR build photo Hope you'll like her. Best, Stef (#6)
 -
Hello guys, Been working lately on my last model of the year, the Kinetic 1/48 FRS1 Sea Harrier. Been adding the Noemega cockpit resin kit, intended for the old Airfix kit. Iyt requires a bit of surgery to fit but nothing so complicate. You need to retain the kit cockpit back panel, and thin a bit the cockpit sides, and you're done. She'll be in overall dark sea grey, a Falkland war machine. Hope you'll like her .... Best Stef (#6) Clik piccies to enlarge
- 22 replies
-
- 7
-
-
- kinetic
- sea harrier
- (and 1 more)
-
G'day people, I was originally intending on building a Grumman Tracker but as I already have one of those underway, I have chosen to build this instead, Confession time, I had already started this kit before I realised that there was a Grumman GB organised, however I believe that I satisfy the <25% completed criteria as I have mainly been preparing the fuselage for the addition of resin and PE details, I have not decided on a scheme yet, or even a timeframe as the platform has undergone significant upgrades throughout its career. The Kinetic kit provides several options but OOB the instrument panel is for an ICAP III/Block 89, if I you want to do an early scheme and/or backdate to EXCAP/ICAP I or Block 82 you will need to do some research to determine which details to omit or add. The instructions do provide some help but I do not trust them to get it right. I believe that the Italeri kit is basically the same plastic re-boxed but I would be interested to hear if there are anydifferences Anyhoo, roll on the start of the build! cheers, Pappy
-
 This is the Eduard Top Falcon F-16. As many of you will know it's Kinetic plastic and Eduard resin and etch. I used probably half of the extras because some of the resin bits were more effort in terms of fit. There are a few inaccuracies with the kit, most of which I didn't address.. It's one of those kits you wonder why you started in the first place and I wanted it done! Paint is my own mix as the colour call out was incorrect in my opinion. All in all I'm happy with the way it turned out. Onto the pictures then.. Please note, the canopy is not permanently attached yet. The rear canopy section is crazed as per my reference pics (done by spraying Tamiys Flat Clear XF-86 on the inside). I was going for a patchy, grimey look as is characteristic of these aircraft. Thanks for looking. Questions and constructive comments welcome!
- 37 replies
-
- 39
-
-
The Kinetic's German partner, Wingman Models (http://wingmanmodels.com/wm/Pulsar/en_US.CMS.display.65./superior-military-aviation-model-kits-accessories), is to rework the chinese new 1/48th Dassault Mirage IIIE/O/R kit (http://www.britmodeller.com/forums/index.php?/topic/234959104-148-kinetic-mirage-iii5/) to propose a Belgian Dassault/SABCA Mirage 5BA & BR in its Superkits range (http://wingmanmodels.com/wm/Pulsar/en_US.Store.display.80./superkits) - ref.WK48014. Source: https://www.facebook.com/wingmanmodels Now what about the two-seat Belgian variant, the Mirage 5BD? V.P.
-
ROCAF S-2A/E/G Tracker (K48074) 1:48 Kinetic Model via Lucky Model Designed from the start as an Anti-Submarine warfare aircraft, the Tracker was powered by a pair of Wright Cyclone engines, the same type that powered the B-29. It entered service in 1954, and quickly acquired the nickname Stoof, from the S-2F variant. It was eventually replaced by the S-3 Viking in 1976 after a long service career with the US Navy, but continued to serve with other navies long after, with Taiwan being amongst them, using their airframes until the 90s, when Grumman upgraded the engines on most of their fleet to turbo-props, removing the big cylindrical cowlings and replacing them with a streamlined prop that looks really out of place when you first see it. The Kit The original Tracker kits from Kinetic have been with us now since 2011, and this is the first reissue in a while, portraying the Taiwanese Republic of China Air Force (ROCAF) airframes that were used until they were turbo-propped. It is also the first boxing to encompass the A, E & G models by adding additional fuselage, elevator, nacelle and outer wing panels that were originally included in the S-2A boxing into the E/G boxing to give a wider range of options. The A fuselage is shorter than the others, and as such a small portion of the weapons bay is removed to accommodate this lack of length. The A wings were more squared off, and have wingtip lights included, while the engine nacelles are broken down differently and have a completely different panel line arrangement for the A, with much shorter elevators. A simple cockpit is included, with the two crew seats as single parts, but with a nice instrument panel, that has a large central screen and plenty of raised detail. The seats are a little basic, but little will be seen once the fuselage is closed up, although the open access door on the rear bulkhead might need a cover, or perhaps a curtain making, to avoid a view into the empty rear fuselage. A few holes will need opening up before your choice of fuselage is closed, with the ventral radome and bomb bay shell trapped between the two halves, the latter needing shortening if you elect to build an A. Curiously, there is an open crew hatch on the starboard side, although there is no interior within - some scratch building will be required if you want to leave this open. The cockpit windows are part of a larger insert that encompasses the top section of the fuselage above the compartment, avoiding the trap of installing fiddly individual glazing parts. This assembly is split into two halves, with the seam running down the middle along a frame-line. An overhead console piece gives the joint strength, although the part is oddly still devoid of any switch detail all these years later. The inner wings have two large tabs that give it a strong attachment to the fuselage, ensuring that the correct angle is obtained. Onto these parts, the correct engine nacelles for your version are built up and attached to the wings once completed. It might be wise to assemble them in-situ instead, to avoid any complications with incorrect angles of the parts, and to ensure a good seam with as little sanding/filling results. Only the front row of pistons are depicted inside the cowling, with a spacer taking up the slack behind. The purists would probably obtain some aftermarket Cyclones here, but with a little careful painting and some ignition harness detail added, it should be adequate for most modellers. The long outer wing panels can be depicted open or folded, and have separate leading edge slat parts, with the aforementioned shorter wingtips of the A. To build the wings open, a pair of short plugs fill the gap, but I'd again be inclined to attach the parts earlier in the build than the instructions suggest, to ensure that the mating surfaces are joined accurately, and the wings end up straight. The folded option requires a detail insert installing, and the outer panels are then held in place by two pre-formed hinges that hold each wing at the correct angle to the airframe. The tail is fixed, and there is no option for posing the flying surfaces at an angle, other than getting out your razor saw. The large bomb bay can only be modelled as open from the box, and an alternative closed bay isn't shown in the instructions. That's a shame, but as a pair of torpedoes are included to busy up the otherwise blank bay, it's not the end of the world. The gear bays are nicely detailed, and have a good level of detail in them, although the super-detailer could of course go mad with the scratch-building materials here. Landing gear struts are made up from a number of parts, and should prove sturdy enough for most of us, while the wheels have separate hubs to please those that don't like painting wheels. There is no weighting to the tyres, but that is easily remedied with a few strokes of a sanding stick. A trio of rocket launcher tubes is included for under each wing, and a slipper-style radome affixes to the starboard wing to add a little visual interest. The large paddle like props with their square cut tips are well depicted, with a light panel line where the protecting strip appears on each blade's leading edge. Markings There are four ROCAF decal options on the large sheet, with a nice split between camouflaged and grey aircraft, although not much information regarding the individual aircraft is given. From the box you can build one of the following: S-2E Sea Blue/Light Grey/Mid Grey Camouflage (new Roundel) Tail No. 2128 S-2E Sea Blue/Light Grey/Mid Grey Camouflage (old Roundel) Tail No. 2150 S-2E FS36622 Grey (old Roundel) Tail No. 2123 S-2E FS36622 Grey (old Roundel) Tail No. 2127 S-2A FS36622 Grey (old Roundel) Tail No. 2102 The paint call-outs are given as AMMO codes on the black and white profiles, but there's a helpful chart on the rear that gives conversion details for Vallejo, Gunze, some Tamiya and a few Humbrol codes, which should make it easier to convert to your preferred paint system should that be required. Oddly, there aren't any decal options for the G, but hey-ho, as they say. The decals are designed and printed by Bestfong from Taiwan, who specialise in Taiwanese subjects, and they are very nicely printed with good registration, sharpness and colour density, plus a thin gloss carrier film cut close to the printed areas. As well as the decal options from the box, there are also strips of digits that could enable you to portray other options, but be aware that these numbers are all over-printed with a single layer of carrier film, so must be cut out individually. The stencils are shown on separate pages, using separate diagrams for the different camouflage variants. The A model's stencil layout seems to have been omitted from the instructions however, but I'm sure it's not too difficult to work it out. Conclusion A welcome re-release of this kit, and as it adds the A variant to the roster, it should appeal both to anyone wanting to model an early ROCAF S-2 (pre-turboprop era), and folks that might have missed out on the older boxings and wanted to play catch-up with their own aftermarket decals from another provider. Highly recommended. Review sample courtesy of
-
 Hi all, This is the fantastic Kinetic F/A-18B Hornet kit. It's already that accepted go to subject for a 1/48 legacy Hornet as most options can be built from the various boxings that have been released over the last two years. I'm building this one as the first assembled in Australia' Hornet A21-103 done up in 3 squadron markings. 'The decals will come from the now defunct Afterburner Decals sheet for RAAF Hornets. The build has been vice less so far with my available time spent doing up the cockpit tub. I've not chosen to go the AM route here as the kit tub is more than acceptable and when dressed up looks the part. Kit decals adorn the instrument panels and side consoles and funnily enough don't look to bad. I've had a good look at the kit plastic and photos from the Reid Air Publications book and the correlation between kit and real life is good. The seats are almost done, though I need to install the Aussie specific harness pattern to make them SJU-9/10 seats. Though perhaps not accurate the idea is to load it with training rounds to demonstrate what stores it can carry. So the idea is Stn 1 - Training ASRAAM Stn 2 - LGTR (BOL pylon and LGTR adapter) Stn 3- Tank Stn 4- Captive AIM-120 Stn 5 - CL LITENING Stn 6- ELTA-8222 Stn 7 - Tank Stn 8 - Training GBU-38 (BOL pylon) Stn 9 - ACMI pod or TCTS pod depending on the time frame. There's other assemblies I've worked on but this is the main output so far. Hope you like it. Michael The real thing. Airliners.net photo removed The kit tub so far. The fit is absolutely spot on. Pardon the instrument coamings as they aren't complete and are a bit on the glossy side. And the supplied seats are really nice too, just no harnesses. The full length intakes are really nice And all of the other jiggery-pokery
 -
Two-Seat T-Harrier (T.2/T.2A/T.4/T.4N/T.8) 1:48 Kinetic Model The Harrier is an iconic (in the truest sense) example of what was possible when British Aviation was at its prime. It was a revolutionary design back in the 60s, and has seen many improvements and even a complete re-vamp in the shape of the Harrier II, which saw McDonnell Douglas get more heavily involved, giving the US Marines their much beloved AV-8B, and the British the Gr.5/7/9, all of which had new wings, massively upgraded avionics and improved versions of the doughty Pegasus engine, which was always at the heart of this legendary design. The Harrier is a difficult aircraft to fly due to the high pilot workload, and requires the best pilots to do it justice, which means that trainer variants are essential, as simulators can only offer so much realism, even now. The first trainers rolled out in the 1970s, and have been upgraded along similar lines to their operational brethren to provide as close to real-world training conditions as practical. The fuselage was extended at the nose, with a huge blister canopy encompassing both seats, with the instructor sitting substantially higher than their pupil to afford them a good view ahead, and a long, weighted "stinger" tail extention to equalise the centre of gravity with the single seater. Although it disrupts the sleek lines of the single-seat variant, the Trainers have a strange charm of their own, and there have been some interesting schemes, including the Raspberry Ripple and Qinetiq liveries over the years. The Harrier II trainers have the new composite wing, and are designated T.10/12. The Kit For many years modellers of the Harrier have been crying out for a good quality kit in this scale, and also the two-seat variants, with only a partial answer being forthcoming until now. Kinetic have put a lot of effort and research into creating models of the two Sea Harriers already the FRS.1 and FA.2, both of which we have reviewed in the past, and have been well-received for their overall level of accuracy. Now we have this new tooling, which has a substantial cross-over with the original, and sold out so quickly that we have only now received our sample for review from the second batch that have been commissioned. Something tells me this won't be the last re-pop of the moulds. This kit deals with the earlier "tin wing" Harriers before the introduction of composites, so the most recent variant is the T.8, and anything earlier, all from the same box. There are nine sprues in grey styrene, three of which are new, plus one that has been slightly tweaked for this edition. There are two sprues of clear parts, a small fret of Photo-Etch (PE), a large decal sheet and the instruction manual. The big changes are forward of the engine intake "ears", but the rear boom is also extended for balance purposes, which helps achieve the ungainly look of the finished model, and that of course is exactly how it should look! The cockpit has two ejection seats with separate cushions and headbox details, plus slightly simplified PE crew belts and the pull handle between the pilot's knees. These are fitted into the stepped cockpit tub with rudder pedals, dual control columns, instrument panels that have separate painting guides, coamings, HUD and the big windscreen-within-a-windscreen that shields the pilots from ejection backwash in the event a quick exit is required. Detail in the cockpit is good, and will come up well once painted with a fine brush and some patience. In order to close up the fuselage the main gear bay boxes are built and painted, as is the bell-shaped intake trunking, having the front section on the nose gear bay attached to the underside of the cockpit tub, and the aft section to the fuselage sides. The rear bay is attached to the mechanism that allows the exhaust nozzles to rotate, which must be positioned opposite their exits before you can close up the fuselage. A choice of open or closed auxiliary vents are provided, which slot inside the intake lips, and the closed ones depict the characteristic gravity droop of the upper doors, which is as it should be. The wing is top mounted, with the anhedral moulded into the full width top panel, and the lower panels separate parts that bracket the fuselage sides. Separate flaps and their actuator fairings are provided, and although undocumented in the instruction booklet, these can be replaced by parts E1 to pose them dropped. Clear wingtip lights are supplied, which makes adding them a breeze, as their location would be a pain to fabricate your own. More good things! There is a choice of three tail fins, each with a separate rudder, and the elevators have a separate swash-plate and pivot lug for attachment to the fuselage, and the wing panel can be fitted nose-first, using a small lug at the front to find the correct location and alignment. There are no LERX to worry about on the older tin wings, and just a tiny PE mesh insert covers a vent at the rear of the cockpit spine behind the air conditioning. At this point the airframe is ostensibly complete, so spare a little time here to whoosh it around the room making suitable jet noises and ensuring you don't get caught doing it. The smaller assemblies are then built up, including the bicycle wheels, the canopy parts with some additional PE and plastic parts, plus a set of plastic rear-view mirrors to finish them off. You have a choice of laser or a pointy nose cone, which varied between airframes, as detailed in the accompanying chart, with another chart showing which tail stinger was fitted to which airframe to ensure you get both ends just right. Another choice of undernose inserts is made between T.8s and the rest, and the main gear can be fitted along with their respective gear bay doors, and a choice of small or large air-brake, which has its own chart of which one was fitted to which airframe. It makes a lot of sense to choose your decal option at the outset. Lumps, bumps, aerials and antennae are fitted on almost every spare inch of the airframe, plus an optional shoulder-mounted refuelling probe, PE stays for the side-opening canopies, after which you just need to decide what to hang under the wings and fuselage of this ungainly but beautiful aircraft. You have a choice of gun pods or strakes under the fuselage, which was always fitted with one or the other to keep the airflow from the engines diving under the fuselage too soon, and when the outer pylon is not used, a small cover is fitted instead. Kinetic are usually generous with their weapons, and here you a decent array too, most of which are on two identical sprues, with a few others knocking about on the others. The parts most fitted are as follows: 2 x 190 gallon fuel tank 2 x 100 gallon fuel tank 2 x Aden gun pod There are various other weapons on the sprues that would usually end up in the spares bin, as most training sorties would be flown with either a clean airframe, or with extra tankage as required. The trainer is technically combat capable however, so can carry other munitions should the need arise. Typically, this seems to consist mainly of Sidewinders of rocket pods depending on training requirements. Markings The decal sheet is A4 sized, and printed by Cartograf, which is a guarantee of good registration, sharpness and colour density, with a thin matt/gloss carrier film cut close to the printed areas. Design was carried out by CrossDelta, and includes a host of stencils that are covered on a separate page, plus ten options for different airframes and operators. From the box you can build one of the following: Royal Navy Fleet Air Arm T.8, ZD990/721, 899 Naval Air Squadron, RNAS Yeovilton, 2004-2005, RN Fixed Wing Standards Flight to April 2006 – gloss black overall, with black or grey tanks and winged fist on the tail. Royal Navy Fleet Air Arm, T.8 ZD605/720, 899 Naval Air Squadron, RNAS Yeovilton, 1996 – gloss black overall with outlined winged fist. Royal Navy Fleet Air Arm T.8, ZD604/722, 899 Naval Air Squadron, RNAS Yeovilton, 1996 – Gloss black overall, with outlined winged fist. Royal Navy Fleet Air Arm T.8, ZD605/718, 899 Naval Air Squadron, RNAS Yeovilton,1985 – Dark sea grey overall, with outlined winged fist. Royal Air Force T.4A, XW265/W 233 OCU RAF Wittering, 1992 – Grey green camo overall. Royal Air Force T.4A, XW266/51 233 OCU RAF Wittering, 1975 – Grey green camo over light grey undersides. Royal Air Force T.4A, XW272/Z IV(AC) Squadron, RAF Güttersloh, 1980 – Grey green camo over light grey undersides. US Marine Corps TAV-8A VMAT-203, MCAS Cherry Point, Late 1970s - Grey green camo over light grey undersides. Armada Española (Spanish Navy) TAV-8S 8a Esquadrilla (8th Squadron), 1988 – gull grey over white. Royal Thai Navy TAV-8S, 301 Squadron late 1990s – Gull grey over white. The intake roundels are sensibly broken into sections with separate parts for each of the blow-in doors to ensure good settlement into the shapes found there. I would have liked to have seen some decals for the instruments, but with a detailed painting guide for that area it's not a major problem, and even if it is, Eduard are bound to be along any moment now with a PE set that will give you all the detail you need. Conclusion We now have a rather nice Trainer Harrier in 1:48, and I for one couldn't be happier. Two of them is better of course, but a modern, detailed model was much needed. How long will tranche two of the mouldings last? Not long, at a guess, so if you're planning on getting one, I wouldn't hang around. I'm also getting the prayer mat out to wish for the composite wing 2-seaters. Very highly recommended. Review sample courtesy of
-
 Well spring has supposedly spring and the cricket season is finally getting underway. As a result I have decided to put the Chu Lia Phantom on hold as I will have less time and don't want to stall on a big build. I wanted something smaller and I could do with a break from Light Gull grey and White, lovely though it is. So after a failed ebay attempt at a Corsair I went back to the stash and pulled out the Kinetic F5B I bought a while ago. It gives me a chance to practice the SEA camp scheme so when I finally land a corsair or an F100 I should be well practiced. A bit of background on the F5 in USAF service in Vietnam. I thought incorrectly that the USAF didn't use the F5 in combat, but the Skoski Tiger program was a real combat test of the F5. In October 1965, the USAF began a five-month combat evaluation of the F-5A titled Skoshi Tiger. A total of 12 aircraft were delivered for trials to the 4503rd Tactical Fighter Squadron, and after modification with probe and drogue aerial refueling equipment, armor and improved instruments, were redesignated as the F-5C.[58] Over the next six months, they performed combat duty in Vietnam, flying more than 2,600 sorties, both from the 3rd Tactical Fighter Wing at Bien Hoa over South Vietnam and from Da Nang Air Base where operations were flown over Laos. Nine aircraft were lost in Vietnam, seven to enemy ground fire and two to operational causes.[59][60] Although declared a success, with the aircraft generally rated as capable a ground-attack aircraft as the F-100, but suffering from a shorter range,[61] the program was considered a political gesture intended to aid the export of more F-5s than a serious consideration of the type for U.S. service.[58] From April 1966, the aircraft continued operations as 10th Fighter Commando Squadron with their number boosted to 17 aircraft. (from Wikipedia) As well as the F5A Skoski Tigers there were 2 combat capable F5B's. After the trial the aircraft became the first modern aircraft operated by the Vietnamese airforce. On to the kit. the Kinetic kit gets generally good reviews, with only the join between the front and rear fuselage sections attracting any criticism. It seems to be a common failing of this sort of two seat conversion kit. I managed the Cougar, so this can't be any worse, we'll have to wait and see. A shot of the end opening box. Fortunately I kept the box from the Skyhawk an the sprues were a nice fit in the top opening box. Sprue shots Two seat fuselage Tiny wings Rear Fuselage Few bits of flash, but nothing serious Weapons, fuel tanks and other bits and bobs Overall nicely moulded with fine lines. I am going OOB for this one as I want to work on making my own seatbelts and painting the IP's. I have been hitting the aftermarket add ons a bit too much lately and want to see what I can do myself. The only purchases the AK paint set, it will come in handy for the Corsair and the Hun I have my eye on, so is good to have in stock. I have always got good result with the AK paint sets, so hopefully this will be the same. Thats it for now, I have got some photo's of the progress so far, but will post them later. Thanks For looking Yeoman
 -
Hi all Here is my take on the 1/48 Kinetic Harrier T.4 Finished it a few weeks ago but haven't got round to taking any pics until today. Its built straight out of the box with the exception of the scratch built intake blanks. and while the suns shining I took a pic of the T.4 with my other 48th Harriers. Enjoy Harrier T.4 XW927 by Scott Clayton, on Flickr Harrier T.4 XW927 by Scott Clayton, on Flickr Harrier T.4 XW927 by Scott Clayton, on Flickr Harrier T.4 XW927 by Scott Clayton, on Flickr Harrier T.4 XW927 by Scott Clayton, on Flickr Harrier T.4 XW927 by Scott Clayton, on Flickr Harrier T.4 XW927 by Scott Clayton, on Flickr Untitled by Scott Clayton, on Flickr Comments welcomed ScottC
- 12 replies
-
- 28
-
-
Time to stake my place in this GB with kinetic's excellent new 1/48 2 seat Harrier. I don't need to give much of an introduction to this kit as there have already been some great reviews and builds here on Britmodeller so you will already know that it is a very nice kit indeed so no doubt any problems or mistakes will be my own. Here is the ubiquitous box top shot; And the sprues all tightly packed inside and still sealed; The options available from the kit; And the very comprehensive decal sheet; As you can see there are markings for every operator of first gen Harriers on there and pretty much any one built can be made from it, which is good as as per usual I will not be sticking to an out of the box example and want to do something a bit different and having a liking for winter camo schemes have found this; Now if I can find a picture or serial number of one of the T4's which went with 1 squadron on one of there Norway deployments and received a proper wrap around job I will build that one instead. And here are some of the references I will be using; Hope to make a start on Saturday so hopefully won't be too long before the next update. Thanks for looking in. Craig.
- 68 replies
-
- 16
-