Search the Community
Showing results for tags 'jaguar'.
-
Hi, For my next project I just wondered if I could get peoples opinion on how best to paint up the alternative scheme on the Italeri 1/72 Jaguar GR1. The art work on the box is as follows: I presume I paint the standard Grey/Green pattern, mask off and spray the flat white, pretty obvious but the question I have is would you apply the decals before the white goes on as the artwork seems to indicate this would be the way to go. Is there anything I need to take into consideration if I do apply decals before the white coat is applied, and can anyone foresee any issues in doing it this way. i was thinking I should maybe apply a couple coats of Klear after decals and before the flat white, do you think this is advisable? Thanks in advance! Mark
-
I am in need of some data for my Jaguar project. I'm in the midst of creating the CAD for the main landing gear. I'm running into a problem with my intake tube and specifically the position of the engine face. The tube as built in my CAD model does not allow enough room for the main gear so I think I have my engine placed incorrectly. What I really need are the angles for the thrust centerline from the aircraft centerline. Also is there any toe in? Thought I read that but I can't verify. Anybody have the manuals they'd be willing to dive into and find some numbers? I appreciate any help!! BTW big update to the build in the works. Best, Timmy!
-
 Well it's finished(!) one Jaguar GR.1 by Italeri in 1/72 scale with Pavla cockpit and ejection seat. Minor modifications made from bored out rear vents to custom nose cone using clear plastic. Primed with Humbrol acrylic grey undercoat from a spray can, followed by Tamiya paints, Humbrol Clear and Vallejo Matt Varnish after decals and weathering (oil paint wash with turp substitute). WIP here: http://www.britmodeller.com/forums/index.php?/topic/235007242-jaguar-gr1-172-italeri-operation-granby/#entry2466792 Comments welcome as always and I hope you enjoy the pictures. James
- 20 replies
-
- 27
-

-
- Desert Storm
- Operation Granby
- (and 4 more)
-
Good evening fellow BM's. I have decided to let you all into the hell that is my Italeri 1/72 Jaguar GR.1. I have had nothing but trouble with this kit and it's nearly gone in the bin on a few occasions. The build is mostly OOB with the exception of a Pavla cockpit set which needed quite a bit of fettling to get in place. Perhaps the casts are getting old or this is just a bad example but there's copious flash, poorly aligned seems and just bad fitting throughout. The pictures start at the priming stage: Poor fitting intakes, front nose section and gun module. The result so far is far from perfect but I have lost the will... Some nice ejector marks... where's the filler! I had all sorts of problems with this intake, fortunately it's finally settled in after filing, scraping and sanding. Good ol Humbrol primer has finished the rest off. One of the better sections of the build... Nightmare gun module and the underside of the original cockpit butchered and glued to the base of the Pavla replacement. More panel scribing, filling and so so much sanding! Poor fitting front nose cone. The parts simply didn't align and I've had to sand down one side so much that I was afraid it would perish! I also removed the plastic with panel lines where the front nose glass should be. I'll make my own clear parts instead of painting it to look clear. Pavla cockpit in place. The gaps will be hidden by the canopy. Bluetak around the back is protecting the part from all the sanding. Primed and pre-shaded. Maskol used ready for some chipping later. First coats of my attempt at desert pink (Tamiya Deck Tan and Flat red 10:1) Subsequent coats... I'm not 100% sold on the colour. I may add some lighter shades... what do you all think? Cheers, James.
- 18 replies
-
- 6
-
-
- Jaguar
- Desert Storm
- (and 1 more)
-
 Hello everyone and also hello 2014. Quick update: 2013 was the year I started modeling again after a 30 year hiatus. I managed five builds last year when Real Life reasserted itself. So this one was started last year, but is my first finished build for 2014, and my 6th build in total. Ooh! All those maths classes weren't wasted! Sadly, during the last 5 months Real Life meant I didn't have much time for poking my nose in here. Slacker I am! So here we have a Jaguer GR1, Johnny Fartpants, in my very vague approximation of its Op Granby scheme. Artistic license applied by me as usual. It's mostly an OOB build of the Italeri 1/72 Jaguar GR1 with the decals from Modeldecal. I actually bought this kit and decals about 15 years ago. Yes! I was actually going to start building 15 years ago and bought this in preparation, but life took over and I had to wait another 15 years before starting again. I think it was worth the wait as I wouldn't have access to all the hints and tips I do today and I don't think it would look quite the same. Hopefully I'll have the time to bang out another couple of kits this year coz, well, I kind of enjoy this thing we do. In the meantime I hope you enjoy this one. Thank you again for your attention. JaguarGR1_180114_04 by IrritableRabbit, on Flickr JaguarGR1_180114_05 by IrritableRabbit, on Flickr JaguarGR1_180114_07 by IrritableRabbit, on Flickr JaguarGR1_180114_08 by IrritableRabbit, on Flickr JaguarGR1_180114_10 by IrritableRabbit, on Flickr JaguarGR1_180114_11 by IrritableRabbit, on Flickr JaguarGR1_180114_02 by IrritableRabbit, on Flickr JaguarGR1_180114_01 by IrritableRabbit, on Flickr JaguarGR1_180114_03 by IrritableRabbit, on Flickr
- 39 replies
-
- 30
-
-
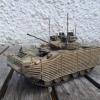
So in our Dutch Opschaal.net forum we decided to have a Group Build to mark the 25th Anniversary of Desert Storm.. And what says more Desert Storm than a Jaguar? The kit I have is Kitty Hawk's.. that's right.. a proper job. And to complicate things further I will be using Aires.. and some Quickboost, but that almost never gives a problem.. So a bad fitting kit with some more bad fitting resin.. Wanna join me? Review of the kit here.. Nice manual with seperate correction sheet because they forgot some steps.. Darn.. wrong Aires pit (French Jaguar), wheelbays and speedbrakes since they were open on the ground.. Quickboost and Master goodies.. scratch: QB Gun barrels, only for French Jags.. I will also be using Lifecolor Desert Pink and the correct Aires English Jaguar pit. Anyone interested in a French pit? IP, right side of the tub and the seat are apparently different. I will be having two choices in decals, Xtracolor and KH. Don't know yet which I will be using. Some issues to address: - speed brakes open (Aires) - wheel wells (Aires) - close the hatches on the nose - engine bays closed - different wheels (I ordered Mastercasters and these still look ridiculous, now ordering Armory) - AN/ALQ-101 (Flightpath) - ALE-40 chaff/flare dispensers: as is with KH - antenna update for an updated GR.1 (Quickboost) - Updated: underwing pylons incorrect size and shape (again French pylons?) - Updated: fuel tank too small - Updated: leading edge wing has shape issues The hatches do fit reasonably with some TLC.. Compared Aires pit with KH pit.. some plastic needs to go from the inside sidewalls.. Aires wheelbays are likely to fit .. way thinner.. which side of the cockpit top cover is wrong? let's dryfit the fuselage.. backside.. spine is taped toegether and there are some shape issues.. the instructions for placing the bulkheads are vague at least.. that may be discarded if you want to use the Aires speed brakes.. so the left part is not right.. and suddenly it does look like a Jaguar.. strange fit issue compared to the rest.. cockpit to fuselage looks to better with a tiny piece of plastic card in between the halves.. Holy moly.. Kitty Hawk could learn a thing or two about mold releases.. inside of the engines.. This is the way the bulkheads should be.. take careful notice..
-
Hi A couple of builds I started back in 2014 and struggled to finish until recently. Sorry for the photo quality, just have phone today. The first is Jaguar XX965. It's the Italeri kit with decals from a Hasegawa boxing and a Model Master pitot. I've seen this plane a few times at Cosford and love the yellow on black. This was very early on in learning to use an airbrush, sadly some of the paint came out a bit rough, but I certainly learnt from it. The second is Vulcan XH558 (the airfix kit, but built OOB without the corrections to make it a proper XH558). Again, the painting was a stuggle on this, I must have repainted the whole thing nearly a dozen times before settling. The grey is a little darker than usual, but it does resemble some of the photos I've taken of her inflight (on dull days) over the past few years. Steve
-
Hello all. I am hoping that by posting a WIP I actually commit to finishing something. After a recent visit to the Air and Space Museum outside of Paris I really became enthralled with the Jaguar - never really appreciated it until seeing it up close. This is the one that I got a good look at: And during a recent trip to the hobby shop, I came across the Hobby Boss Jaguar E in 1/72. Now please bear in mind that 1/72 is not my preferred scale, and this is my first French plane, new or old. I will endeavor to make small fixes where possible within my abilities, but outside of that I'm trying to actually finish something. The only thing I have decided to add is the correct number to correspond to the one I saw. As for unit markings, well, I hate to sound tight, but I'm not spending another $11 on top of the $44 for the kit and the $8 for the numerals. I might just leave them off. Please feel free to post observations and comments, just leave out the "Hobby Boss sucks" remarks - you're just wasting bandwidth and all of our time. Next post will be the start...
- 39 replies
-
- 4
-
-
- Hobby Boss
- Jaguar
- (and 1 more)
-

Jaguar GR3a 16(R) Sqn 1/48 Kitty Hawk
Phone Phixer posted a topic in Ready for Inspection - Aircraft
After a break of some 30 years from the hobby, I decided to get back to work. I decided my subjects would be examples of the aircraft I worked on during my time in the RAF. So, here is my first project from my time on 16® Sqn 2001 to 2004. Jaguar GR3a XZ392 PF, the Jag display aircraft in its day job. It's in the not often seen LGB self designation role fit. Sometimes brought out during the heavy weapons phase of the QWI course. The Kitty Hawk kit took a bit of wrestling to put together, the fit of some parts is not great. Also areas like the wing leading edges and pylons are completely the wrong shape. I added copious amounts of aftermarket to make up for the kits and my failings. Here is my first offering on BM. -
Afternoon All, Posting up my completed Airfix Jag 1/48. Not a fan of it, went together with no problems at all, then I started painting it and everything went down hill. Pete And a group shot of my completed models:
-
Here's my second Op Granby effort, following an RAF Buccaneer.... Out of the box, depicted as "Saddam Kicker" - hope you like! Next is a Revell 1/72 Tornado to complete my British Gulf War 1 trio... Rob
- 10 replies
-
- 13
-
-
There maybe interested people on here regarding the Bentwaters Cold War Museum Project to return RAF Jaguar XX741 to full fast taxi status. The museum has launched an appeal to raise some much needed funds to take the project to the next level. http://www.bcwm.org.uk/jaguar-xx741-appeal/ XX741 Julien
-
 After the single-seat 1/72nd Jaguar A - ref.87258 (thread is here: http://www.britmodeller.com/forums/index.php?/topic/234965083-172-sepecat-jaguar-a-by-hobby-boss-released/) - Hobby Boss is to release a two-seat SEPECAT Jaguar E kit - ref.87259. Source: http://www.primeportal.net/models/thomas_voigt9/trumpeter_hobby_boss/index.php?Page=3 Box art V.P.
 -
SEPECAT Jaguar T.2 XX829 at Newark Air Museum. Pics mine.
-
RAF Jaguar GR.3A XX116 decommissioned from 6 Sqn, and now at the Ministry Of Defence Fire Training and Development Centre, Manston. Pics thanks to Alex (Acky190).
-
Never able to make much of a showing in quality, I continue my efforts to make headway in the quantity department. Finished since January 1: a TSR.2 prototype (Airfix), E.D. "Rosie" Mackie's Tempest V (Academy), Bohdan Arct's Mustang III (Academy), an IRIAF F-14 (Hobbyboss) and an F-5E (also Hobbyboss), a CFS Gnat (Airfix) (surprisingly tricky build, which may tell you how poor my skills are), a 54 Squadron Jaguar GR1 (Hasegawa), and a Voyska-PVO MiG-21bis FISHBED-L (Zvezda). I have made a jillion mistakes, including forgetting to add the anti-glare strip on the Tomcat, but by that point I was so fed up with it I was long passed caring. There! My shame, laid bare for all to see. Also, in retrospect, I would have masked the Tomcat's camouflage, rather than trying to freehand it, as the masked F-5E's scheme came out much better, I think. One thing I am surprised at is that I've seen a number of Jaguar builds where the LRMTS window is painted silver; this seemed to me to be something that I might be able to actual use some "basic modelling skills" (almost all of which totally elude me, I'm sorry to say) to improve upon, and so I drilled some holes in it with a pin vice and then slowly expanded the hole until it was more or less LRMTS-window-sized, whereupon out came the micro-crystal clear. I think it looks quite nice.
-
HobbyBoss is to release in late October a new tool 1/72nd SEPECAT Jaguar A kit - ref.87258. Source: http://scalemodels.ru/news/7809-Hobby-Boss-oktjabr-2014.html V.P.
-
 One of the sleekest supercars ever designed. And don't believe all you read about how the car was compromised by replacing the V12 of the concept with "the engine from a Metro". Not exactly... the engine is a custom version of the TWR racing engine that powered the Jaguar XJR-11 Le Mans car, so its racing heritage is strong (it also powered the Metro 6R4 bonkers rally car, which is where the Metro jibe originated). Interestingly, the output of the engine in the XJ220 is almost exactly the same (540-odd BHP) as that of the V8 that powers today's XKR-S and F-Type R coupe. The engine is where most of the extra work on this kit went in, since the Tamiya original lacks most of the "plumbing" that is shoehorned into the engine bay. A wide range of wire, solder, jewellery elastic and even cigarette packet foil served to "busy up" this important part of the car. There's also a fully wired distributor in there, but you can't see it! (For anyone building the kit, the small cylinder at the rear end of the cam cover of the left hand bank of cylinders is the distributor, and it should be painted red!) Otherwise, the kit is great in terms of shape, fit and detail. The cabin responds really well to simple detail painting (though I did add some seat-belts, which are kinda obvious in that pale interior). The working headlight covers do work, somewhat surprisingly... It is possible, as you can see, to make the rear engine bay cover open. I ground out the slots on the body into which the hinge pins moulded on the clear part fit so that they were deeper and bigger from front to back than moulded. This allows the the cover to slip backwards as you lift it, so the front edge can clear the roof in front of it. When it shuts again, it slides forward and drops into place as gravity does its thing. The fit of the chassis into body is easy enough, but it's lacking positive locations, so you really do have to glue it in place at the front end and at the sides of the rear diffuser. All the pictures were done in exactly the same lighting. The difference is the tone of the card background -- the "brighter" shots later were taken on dark grey card, the earlier ones on a more neutral grey. It helps explain why pictures of a "Brooklands Green" XJ220 can look like anything from almost British Racing Green to zingy turquoise (check out "DK Engineering XJ220" to see the inspiration for this build...) Thanks for watching! bestest, M.
 -
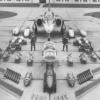
Hello, With the arrival of the airbrush and compressor yesterday I've decided to take the plunge and build two kits at the same time. the two kits I'm building are the 1/100 Academy F-14 and the reboxed Italeri/Tamiya Jaguar GR-1, here is the usual box shots for the moment. Box Shot of both kits: Academy 1/100 F-14 Tomcat: Stand for the Tomcat: Sprue A: Sprue B: Tamiya/Italeri Jaguar GR-1: Sprue A: Sprue B: The Tomcat is going to be finished in White, and at the moment I'm unsure about the Jaguar, its either going to be in the Gulf War Colours or the Grey/Green scheme which it can also be built in! Thanks for Looking.
-

Heller (Airfix) 54 Squardon 1/48 Jaguar GR3
SimonR posted a topic in Ready for Inspection - Aircraft
Hi all, First RFI for ages, i've been fiddling with this kit for so long i'm calling it a day despite some obvious flaws, such annoying things like i've lost both of the tiny probes that are on either side of the nose, have to do some after market research to see if I can get replacements (and my build skills need honing in various areas!). Its already had new main wheels from Mastcasters, pitiot tube from Quickboost and seat from Pavla. I got the kit from ebay unboxed and listed as a Jaguar A, when it arrived it was actually GR1/3 sprues with A decals & instructions, so fellow B'modeller John T kindly supplied some spare decals. Anyway, having a break from adding RBF tags while the suns out - so here it is... cheers Simon- 18 replies
-
- 13
-
-
... you know how sometimes a project just seems like the right one to do right now? Well, I've been noodling with the Murcielago SV, but I suddenly got the urge to build an XJ220. Don't ask me why... The usual start with Zero Paints for the body. This is meant to be "Silverstone Green", one of the exclusive colours for the XJ220. It's NOT meant to be any kind of British Racing Green, and I found some excellent pictures of a car on sale that categorically is Silverstone Green. This is specially mixed by Steve at Hiroboy -- a "Pacific Green" originally found on a Mustang. The colour codes for the original paint are not in the 15 pages of database entries for Jaguar colours on Lechler mixing tool, so I had to get something close. One source pointed to Boyd "Chezoom Teal" which is available in a Testors can, but is not in the DB either, so this is the closest I could get after rather a lot of online research. I wanted to keep the wing painted with the body to make sure it was exactly the same colour -- I learned that lesson the hard way! As always, the clear coat transforms the colour. I'm quite happy with this, since it matches my reference pictures pretty well. It's hard to photograph! The headlight covers raise and lower, and fit rather well -- these are taped on for effect and came slightly loose before I took the pix. On to the rather neat engine now... bestest, M.
-
Ok so I just picked out my Kitty Hawk Jag as my next project and am still marveling at how they squeeze that kit in to such a small box! I think I am going to do the Gul machine "Sadman" (XZ364) and wanted to get some advice on the desert colour and shading. First the colour - I have used Humbrol 250 in the past but not sure how accurate this is? Are there better alternatives to this?? Also as regards the shading what would i best use under that colour to 'weather' it effectively? Thanks Chris
-
Hi there Just wondering if anyone knows if decals for Jaguar xx965 in the black paint scheme with "the saint" graphic on the tail fin are available? I know they are included in the Hasegawa 2 Jags kit, but already have a model and would really like to try this scheme. Thanks Steve
-
Hi all I have kindly been aloud to enter this old kit I got from Telford. I love old kits and I really love Matchbox. The plastic the look the nostalgia its all there I can remember when they were everywhere and at my local paper shop.. Them was the days.......... I also picked up a heller bobcat t4 harrier, a matchbox hunter T7 and with the many old kits I have I am spoilt for choice, I really like this GB and might enter more yet. I have a plasticart Comet 4 That I would love to do as and RAF bird but cant find decals or possible livery options for that one. I may enter Frog Vulcan too ... Lets see how this goes. I am a huge fan of the Jaguar and oh how I miss them. They really were beautiful. The kit is very nice and fit is excellent so far. I only started her this morning over coffee. Cheers Rob
-
Ok so I am doing the Heller 1:48 Jaguar GR1A from 54 Squadron from 1991. It is XZ112 and has the blue fin with the yellow and blue chevrons on the drop tanks. Now the Heller kit gives you these decals but they are black not blue and also the are frankly awful! Xtradecal looks to have done a set in 1:72 and 1:48 but I can't seem to find any so I thought I would ask on here to see if anyone had any? Happy to purchase! Thanks Chris