Search the Community
Showing results for tags 'italeri'.
-
My intention for the group build is the Italeri SdKfz 232 6 Rad heavy reconnaissance armoured car. The 232 was a prewar Wehrmacht design based on a conventional truck chassis and unlike later Wehrmacht types was simple in design with 6 x4 drive train mounted on a ladder chassis with leaf spring suspension. It had limited off road capability and was used in the Blitzkrieg campaigns. It was latter replaced by more modern complex types such as the SdKFz 232 8 rad. As it was based on a truck chassis it was produced by Bussing Nag and Magirus. Italeri`s kit was first produced in 2004 and was re released this year. Nicely moulded it is a simple kit of a conventional armoured car. Some photos. Grahame
-
I’ve been thinking about adding more heavy metal to my USAFE collection, and what better way than a classic 80’s Phantom. Despite numerous holidays to East Anglia and bases such as Lakenheath, Mildenhall and Bentwaters, I never did manage to get over to Alconbury, so I never went to the apparently legendary ‘Owl End’ to see the Aggressors and Recon Phantoms. The best I can do, therefore, is to try and recreate one of the latter in its halcyon days, hopefully to look like this: This is what I’m starting with. Not ideal apparently but about one third the price of a Hasegawa kit! It looks like I’ll need to change from these slotted E stabilisers to flat ones. Anyone able to confirm? Two different camera noses in the kit though. Sloped or angled? I’m guessing either is possible … Aftermarket decals ready.
- 102 replies
-
- 15
-

-
 Hi folk's this has sat in the stash for ages so time the beast was set free,records galore and a few first's too.A simple kit with minimal parts but a few idea's to liven up the the painting in mind.box art for now spru shots ASAP.No drone version mind!
 -
Remember Italeri's Model Kit Preview 2021: link & link I suppose we'll soon see the Preview 2022 folder. So it's time to open a new dedicated thread, isn't it ? What we can expect: the new tool 1/48th Lockheed-Martin F-35B Lightning II kit - ref. 2810 - thread - or the other long announced 1/48th Supermarine Spitfire Mk.I... Wait and see. UPDATE Italeri downloadable Model Kit Preview 2022 is here: https://www.italeri.com/uploads/news/v3MVLXcbbQoOMhc7K6EQf04r6mGnCp3M2cEDY6a6.pdf Three "new tool" aircraft kits announced in 2022 : 1/72 - ref. 1460 - AMX International A-11A Ghibli - thread 1/48 - ref. 2810 - Lockheed-Martin F-35B Lightning II - thread (already announced in the Model Kit Preview 2021) 1/32 - ref. 2518 - Macchi MC.202 Folgore - thread V.P.
-
Back in 1975 Matchbox released a fairly basic kit of the Ju 188 and I bought it shortly afterwards. At about the same time and unknown to me (no internet back then) Italeri also released one, and when I was first made redundant back in 1990 and had a bit of spare cash I bought one for my "retirement cache", where it has sat until now. This GB hasgiven me a reason to build it so here it is _ This is the 1980 reboxing I gather and exactly why they decided to call it a "Fighter Bomber" is a puzzle - certainly the various versions of the original Ju 88 fulfilled both functions but I don't remember seeing a fighter version of the 188! Having said that I think that both the proposed J and S versions could perhaps be classed as fighters but were probably never built. My normal source would be Green but as his Warplanes of the Third Reich is getting a bit long in the tooth, more modern research may shed a different light on the subject. Certainly he says that few A-1 models were produced but I suspect that may not be totally correct. Pete
-
The model has been finished for a long time and it is also high time to take photos for the gallery and post them on the forum. I treated it as a typical rest and straight out of the box. It's just a pity that the extras for it are not available from Eduard. That's the way I would have gone over it a bit and pootled it. The model itself was very pleasant to build, well-fitted, the very pluses. By the way Italeri has just reissued it in their range, only the decal is for other camouflages. Gallery below, enjoy. The workshop is here:
- 23 replies
-
- 56
-
-

-

1/72 Vought XF4U-6/XAU-1 Corsair Prototype
TheRealMrEd posted a topic in Work in Progress - Aircraft
Hello again. Lately, I've working on some bucket list type projects, some perhaps more interesting than others. This time, I was looking to build a Vought AU-1 Corsair, as it is one of the last two Corsair types that I plan on building, to complete my own collection. As the actual build is mechanically almost exactly the same as my earlier F4U-5N detailed build, I will forgo repeating all the details, and give you a link to that build, instead: F4U-5N Last Propeller USN ACE? There are a few detail differences between that build and this, and I will try to provide a little information in that regard also, but because of the above-mentioned "duplication" of work, this won't really be a "build thread", but more of an "information thread". And, while there will be a few photos of the finished model, this also more than a real "RFI thread" -- maybe we need a new category...🙂 Briefly, the AU-1 was based on a desire by the U.S. Navy and U.S. Marines for a better ground attack aircraft, since during the Korean War, we discovered that prop aircraft were better suited for this role than the then current crop of jets. The Navy started out by taking a Vought F4U-5N, BuNo 124665 and creating what would originally be designated as the XF4U-6, which featured among other things, a new engine, removing the high-altitude supercharger, and adding more armor and armament. At that time, the Navy became enamored with the "Attack" designation, and soon, the effort was renamed the "A" (for attack) "U" (for Vought) with "1" as the model number, and of course, since it was a prototype, we have to have an "X", hence "XAU-1". I don't know whether there were many other differences between this prototype and the later AU-1 models, but a lot more useful information can be found on the internet, if you are interested, starting HERE I started with the old tried and true Italeri F4U-7 kit, which has the parts for the AU-1 as well. Despite the fact that it's nose cowl/engine area has been criticized, it is workable: However, it was because of this criticism, that a firm called Hi-Tech made a nice conversion set, which adds a boat-load of detail: As I was not originally going to do any thread on this kit (after all, it's basically a basic AU-1), after finding photos of the XAU-1 prototype, I decided to back-track and post this. That explains why the bucket seat, cowl flaps, and trim tab actuator rods are all cut out of the PE fret shown! Anyway, more detail on the included items are shown below: Top-to-bottom, left-to-right, these items are (top row): wing flaps, underbelly weapons pylons; (second row): vac canopy, metal "paddle-style" prop blades, resin cockpit, and F4U-7 style cowl, which needs to have the lower chin inlet filled and sanded down for the AU-1 variant (basically and F4U-4 cowl without the chin scoop). Next row, the rudder, 10 new wing pylons, the tail-wheel well, and thick/thin tires -- as always, the Navy craft of the era used thin tires for carrier use, thicker tires for land use. Since the AU-1 was used on land (I think the tail hooks were also omitted), the thicker ones are needed here. Lastly, the detailed PE fret, sans the afore-mentioned items. A lot of detail is included for the landing gear, all of which is a bear to figure out (see F4U-5N build, linked above). One last thing here, these Hi-Tech kits are scarce as hen's teeth, and getting more so. If you are a 1/72 scale Corsair fan and one of these goes by, grab it! I've owned three, built two, and the last one I found on-line was a painful $42.00 US. It is worth every penny! Of course, all these problems would vanish, if anyone made a stat-of-the-art new kit, but I'm afraid they are going to F4 and F-15 us to death instead -- all of which is good, but, hey, kit makers, spread the love! Now, I guess it's time to show you what the real thing looks like: Under the horizontal stabilizer in the last pic above, it appears that they just left the original F4U-5N, and NAVY marking alone, so that's what I did, using the kit decals, and modifying them with needed tiny white numbers from a Gold Medal Models 1/350 WW2 USN Aircraft Markings Sheet (Korean War, 1947 to present) sheet. As far as I know, they still make this sheet and are available on-line or by direct mail, Gold Medal Models, PO Box 670, Lopez, WA 98261,USA. At least, I hope they still make them, as they are the perfect size, thickness and font for 1/72 USN blue aircraft. Thank you, ship modelers everywhere! Perhaps I should note that I jumped on this particular scheme, because 1) I needed an AU-1, and 2), it's a prototype -- a two-for-one opportunity! One last thing before showing the finished product. The "TEXT" and "XAU-1" were hand-painted, and vary from standard USN stencil specs, especially the "E", "S", and "U". I'll let you figure out how they vary, but they do. So, I had to load up the USN Stencil font into my ancient version of Photoshop, and make the needed modifications by hand, a pixel at a time. Then, I had to reverse the colors to end up with white letters, and massage the blue background color to match as closely as I could the True North Gloss Sea Blue that I used on the model. After a few tries, trying to compare to color on a computer screen to the painted color, I decided "close enough" and quit there. As with my XB-40 build decals a new years back, I had to slightly feather the edge of the decal after they were applied on the model, with a slight over-paint of the decal edges, which also hides the white edge of the decal paper. I only have access to an Epson Ink-Jet printer, so that's the way it goes. To rant just a bit more -- IF ANY PRINTER MANFACTURER would just give us an inexpensive modern version of the Alps printer, all would be well. In any event, for your edification, as well as possible use, here are my versions, which are free to use for anyone, for any non-commercial use. First, one you can play with, if needed, and second, the actual 1/72 scale image I used: Even though the bottom image seems large for 1/72, it is a 350 DPI, rather than the usual 72 DPI used to display on computer screens (I think). In my case, the dark blue background was still a shade lighter than the paint on the model. See if you can tell the difference, after my touch-ups, on the real models below: Because my home-made decals are painted on "thickish" white decal paper alone, they appear a little darker than the white of the star. I could have backet them up by applying white deal paper first, and then my actual decal over the top. I did not do so, because that would have made the decals even more thick, so I considered this the lesser of two evils. Or, I could just blame it on the guy who painter the real aircraft, and say he used cheap paint... Anyway, that's what the model looks like. Not perfect, but as always, much better than the "one I had before", and I'm glad to add it to the collection. Perhaps I should have titled it "And Now For Something Only Slightly Different"? Thanks for looking, Ed -
 #27/2021 And my dad has finished another one. This time a French Thunderstreak during the Suez Crisis in 1956, using the Italeri boxing of the Kinetic kit. The fuselage stripes come as decals. There are also decals for the blue wing tips but they didn´t fit. So my dad painted them, the black lines are decals from the sparesbox. Nose and exhaust ring are painted with AK Xtreme Metal Dark Aluminium, the rest of the model with AK Xtreme Metal White Aluminium. As you can see, the kit has rather crude panel lines, therefore my dad did only a subtle panel wash with a light brown wash. Build thread here https://www.britmodeller.com/forums/index.php?/topic/235100131-opération-mousquetaire148-republic-f-84f-thunderstreak-armée-de-l´air/ Aircraft of EC 1/3 "Ardennes", Akrotiri AFB, Cyprus in October 1956 DSC_0001 by grimreaper110, auf Flickr DSC_0002 by grimreaper110, auf Flickr DSC_0003 by grimreaper110, auf Flickr DSC_0004 by grimreaper110, auf Flickr DSC_0005 by grimreaper110, auf Flickr DSC_0006 by grimreaper110, auf Flickr DSC_0007 by grimreaper110, auf Flickr DSC_0008 by grimreaper110, auf Flickr DSC_0009 by grimreaper110, auf Flickr DSC_0010 by grimreaper110, auf Flickr DSC_0011 by grimreaper110, auf Flickr DSC_0012 by grimreaper110, auf Flickr DSC_0013 by grimreaper110, auf Flickr DSC_0014 by grimreaper110, auf Flickr DSC_0016 by grimreaper110, auf Flickr DSC_0017 by grimreaper110, auf Flickr DSC_0018 by grimreaper110, auf Flickr DSC_0019 by grimreaper110, auf Flickr DSC_0020 by grimreaper110, auf Flickr DSC_0021 by grimreaper110, auf Flickr
 -
My entry is the Italeri 1/72 CF-116A I bought about 20 years ago with the intention of making a Canadian one with lau-5002 rockets as printed out image. Completely untouched for a long time, and I have done too many grey planes in the last couple of years so now's the chance. Apart from Master pitot it was going to be OOB, however looking at decals I have realised the slime lights are egg-yolk yellow, and there are a lot wrapping round the tip-tanks, so I need decals for a CF-116. Oddly a Canadian decal supplier has equally egg-yolk yellow slime light decals so I'll be ordering the Xtradecal set which is the only other option in print. And that will save me having to paint the blue fin stripes exactly correct for narrow red decal borders which is the kit option. Still two other GB entries in progress, but I am seeing this as a fairly quick build. The kit has white for u/c legs and bays, photos suggest aluminium; any thoughts? Chris
- 64 replies
-
- 12
-
-
I started new project because Lancia S4 project is slow and waiting some paints to get forward. I was hoping this to have simple and fast project, but looks that this is not true and this will be more challenging that I wished. General information This car was developed for season -83 to replace Gr.6 car LC1 that was built for previous season. LC2 was made to meet new Gr.C regulations. LC2 was built with Dallara who designed the chassis and engine partner Ferrari. Engine was in first season 2.6 liter twin turbo. Turbos were from KKK and four valves per cylinder. Transmission was from Hewland Race History -83 Car was raced first time in Imola -83 and was able to take pole position. This race was showing what was coming for this car. In good and bad. Leading car got out due to tyre problems and second car was 12 laps behind winning car. Next time Lancia managed to finish race in 5th race of season. In seasons two last races Lancias managed to finish second place. Kit This kit is originally done by Protar and is typical for period. First it was released in 1984 and I was not able to get this kit at period. Re-release was done by Italeri in 2019 and this is what I have in my hands. There is no updates done in kit, so it is what was also in Protar boxing. When I look this kit I have a bit mixed feeling. Based on decals kit should present season -83 car. I need to look my reference materials how close to this season car this really is. Le Mans car clearly needs some changes at least in head lights area. Good things: Main body looks quite good, there are some sink marks, but these should be quite easy to fix. Decal sheet look good and contains full sponsor logos. Even that in box art spnsor logos are covered in black. Cockpit details are ok for this scale and can be improved with small work. Mass produced kit is available, so we have starting point for build. I am aware that there is Modellers kit available. But this kit is really rare. Tamtech also made one, but this is designed for slot racing and I am not sure how accurate it is because it was fit for slot racing rules. Not so good: This is curbside kit, so there is no engine detail or anything for gearbox. Gearbox end should be somehow visible from rear and even partial part would have been nice in this area. Suspension have nothing to do with real thing. In rear there is only straight rod going and that is all. In real thing there is double fish-bone. In front there is toy like steering that front wheels can turn, but nothing that looks like real thing. Body is very thick molding I have understood that kit was also sold as a metal kit. This explains this and I think explains some sink marks in molding. These thick parts look some areas really bad. Lowers above front wheels look also really bad and unrealistic. Definitely need replacing. In body is also strange cap. Lower side of body have a 0,5mm mismatch both sides. In real car is nothing like this. Air intake in front looks too small and floor fitting in front looks also too thick in front also side exhaust part looks really unrealistic. Door windows also look too small and need to look how to fit these correctly. One issue is also that kit can be built to fit only certain races in season. Rear wing configuration was different between races. if someone want's build a later wide-body car heavy modification is needed. This time I don't have photos of un-started kit, but some first steps. Cockpit started General view of body Issue in body molding. So wish me a good luck. This is not going to be fast build I was hoping yesterday evening.
-
I like trainer, I like 2-seater airplane, especially with a huge canopy but with a short tail. BAE Hawk T is exactly my cup of tea. Started with cockpit, spray a layer of GSI #1500 black primer as the base, and applied GSI 305 (dark grey) and GSI 306 (med grey). Decals was good and easy to apply. Applied a layer of gloss clear on the cockpit, #306 on the side wall of the cockpit and black on the inner wall of the air intake / exhaust. It is Modo T024 silver on the "engine" and MX-02 on the exhaust. I doubt if the engine can be seen after the build. Test fit the fuselage too - seems to be a nice match without any major gap.
-
After many weeks of researching the Land Rover TACR1 fire truck, I feel able to attempt a part scratchbuild of one, or two. Over that time I have received lots of helpful advice and contributions from fellow BMrs, to whom I am very grateful. I must admit that I would not be able to attempt this without such help and I shall acknowledge their input within the relevant stages of my build. The donor kit will be an Italeri [6508] Land Rover series III Starting off with basic chassis from the kit. No changes need to be made at this stage. I would like make two TACR1s, one in Royal Naval livery and the other in Royal Air Force colours. Herewith the two kits in progress, note the different chassis rear ends, I think the lower vehicle had late series IIa chassis, similar to the one on the right in this view. The chassis front for both should be the same To make the TACR1 coachwork, I first need to cut back the kits rear side panels. Only the front 6mm will be used as part of the cab rear. The doors were tacked into place with GS-Hypo gel, in order to line up the cutdown rear panel sections. This conversion make take a fair bit of time, mainly as I am still trying to get the design right for the upper sections of the cab. I am attempting to draw that complex shape in CAD, with the intention of making 3D prints. Whether I will be successful only time will tell! Cheers, Mike
-
Wedge-TailedEaglePortraitRaptorDomains.thumb.jpg.41a306d3445a68f0f2df773e01776ea6.jpg) For my entry I intend to use decals from this sheet: to build Harrier GR5 ZD402 in the very nice midnight blue and white scheme when used by Rolls Royce in the development of the Pegasus 11-16/Mk 107 engine destined for the Harrier GR9. I haven’t decided on a kit yet, I have the Italeri GR5 and also the Revell boxing of the same kit, but these do not include the under fuselage strakes, only the gun pods. I also have, if I can find it, the Airfix GR5 which has the option of the strakes- but it seems to have gone missing. If I cant find it I’ll have to use the Italeri kit and pinch the strakes out of an Airfix GR7/GR9 kit. AW
For my entry I intend to use decals from this sheet: to build Harrier GR5 ZD402 in the very nice midnight blue and white scheme when used by Rolls Royce in the development of the Pegasus 11-16/Mk 107 engine destined for the Harrier GR9. I haven’t decided on a kit yet, I have the Italeri GR5 and also the Revell boxing of the same kit, but these do not include the under fuselage strakes, only the gun pods. I also have, if I can find it, the Airfix GR5 which has the option of the strakes- but it seems to have gone missing. If I cant find it I’ll have to use the Italeri kit and pinch the strakes out of an Airfix GR7/GR9 kit. AW- 40 replies
-
- 13
-
-
So I'll be building this little beauty... It's going to be pretty much OOB, with just some aftermarket paint masks and maybe a resin pilot, if I have one that will fit. I'll probably model it in flight / undercarriage up. Instructions seem clear enough, there are 4 decal schemes - I'm not sure which I'll go for but really don't fancy doing the invasion stripes. All parts are bagged up in a giant bag containing smaller bags (the coloured plastic being 2 sprues to a bag). Looks like there's individual prop blades which I'm not looking forward to! I have no idea why there are stickers with 'made in South Korea, imported by Italeri' everywhere? Some new EU regulation?
-
A quickie build for the long weekend. It's the Italeri kit which is surprisingly good, I picked it up second hand for a couple of bucks without knowing much about it. About the worst I can say is the canopy is a bit thick and required some thinning on the inside to fit and it would probably require a vac replacement to pose open. Other than that this is a decent kit. Decals were reasonably good, I did have one shatter but that might have been because of age. I did make a couple of errors, but for a quick build I'm not too bothered. Note also I only roughly painted over the spinner and white cap to the radome, they appear to have been roughly painted over in reality to dull them down, unlike the markings which were very nicely toned down. The model represents the aircraft flown by Guy Bordelon. Bordelon earned his wings in 1943 but did not see combat in WW2, posted state side as an instructor. Having various positions post war, he ended up taking charge of a detachment of all weather interceptor F4Us in 1952. He flew 41 low level interdiction missions against communist supply lines earning 3 Air Medals. In the summer of 1953, Fifth Air Force required help in dealing with North Korean night time nuisance raids, as several jet fighters had been lost trying to intercept Bed Check Charlies. VC3 post 3 aircraft to Pyongtaek on June 28th. They were immediately in action with Bordelon inception and shooting down two La 11s and two Yak 18s over the following 2 nights. On the 17th July he shot down another La 11, making him the only piston engine and only night fighter ace of the Korean War. He is also the last man to become an ace in a piston engine fighter. Post war he stayed in the Navy, being a part of, among other things, the recovery of Apollo astronauts. As for Annie-Mo, the Corsair in which he claimed his 5 kills, she was less lucky, being written off a week after the final victory by another pilot.
-

1/32 - MRCA Tornado by Italeri - GR.4, ECR & IDS released
Homebee posted a topic in The Rumourmonger
Italeri is to release a new tool 1/32nd MRCA Tornado GR.4 kit in 2018-2020 - ref. 2513 Source: http://www.britmodeller.com/forums/index.php?/topic/235015790-news-italeri-2017/ V.P. -
Just spotted on Hiroboy site a Bugatti 35 in 1/12 scale by Italeri for December release £169.99 .
-
My first armoured car, I couldn't wait until the group build later this year. I've started getting interested in German AFVs outside of the usual stars of the show, no big cats here, and I've always liked some of the more obscure subjects. Sd. Kfs. 231 6 Rad Schwere Panzerspähwagen was a heavy reconnaissance armoured car. I picked up this kit on a whim and was inspired by a Grey and Brown camo for it over on the tank encyclopaedia. The camo didn't quite pan out as I had planned. It is Dunklebraun over Dunklegrau however I still need to work on the scale affect especially how it relates to 1/72. Painted with Vallejo model air, enamel washes and pigments. Thanks for looking. Calum
-
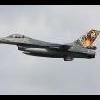
 The F-5 is such a tough looking little jet, made cooler by the huge variety of schemes and operators, as the many fantastic subjects in this GB attest. My little contribution will be another VFC-111 Sundowner bird, but, thanks to an Xtradecal set winging its way to me, rather than in a traditional aggressor scheme, I'll model it as F-5N 761547, which wore a retro USN WW2 VF-11 ‘Sundowners’ Hellcat scheme. Maybe it still wears this scheme - in the photo gallery of this neat 2020 profile on VFC-111, you can see 761547 in the maintenance hangar still in the WW2 colours. I can't find any open source images I can post here, but there are some great images on Flickr and elsewhere, such as this one and this one. I'll post pics of the decal sheet when it arrives. My kit is the humble little Italeri 1/72 F-5E, which I'll build out of the box, aftermarket decals aside. Appropriately it's a Swiss F-5E boxing, as all the F-5Ns are refurbished ex-Swiss AF jets. There's not a whole lot to this kit, especially as the upper fuselage and wings are a single piece. So there's the promise of a quick build. But the join between the fuselage top and bottom halves might prove tricky to clean up, especially with the prospect of collateral damage to the lovely raised panel line details, and the join does not represent panel lines on the aircraft itself. But still it promises to be a fun little subject and project - am looking forward to taking part. Fight's on! Gerard
 -
Italeri is to release a new tool 1/48th Lockheed-Martin F-35B Lightning II kit - ref. 2810 Not a bad news considering the only other available 1/48th F-35B kit is the Kitty Hawk one. Now we'll just need a better F-35C. Source: https://www.italeri.com/uploads/news/AY8p8Mc4VebT1GVJ5SVhR0wRFuvMlyG6nbu5dgSD.pdf Box art V.P.
-
Here's my build of the Italeri 1/48 A-10C "Black Snakes". Very nice kit, good fit and details. The following after market sets were used: Eduard (48854) - A-10C exterior Eduard (491026) - A-10C interior Eduard (648382) - AN/ALQ-131 (Deep) ECM Pod Master (AM-48-081) - GAU-8 Avenger gun tip and Pitot Tube Quickboost (QB 48 173) - A-10A Thunderbolt II Correct Fan Blades ResKit (RS48-0192) - AGM-65 Maverick missile with LAU-117 Painting was done with Gunze lacquers, the main colors are Dark Ghost Gray (C307) and Light Ghost Gray (C308). The aircraft was finished with a coat of mat varnish. Build photos here: https://flic.kr/s/aHBqjA7r2u
- 5 replies
-
- 55
-
-
-
- Thunderbolt II
- 1/48 A-10C
- (and 1 more)
-
 Built this a short time ago as part of the Northrop F-5 STGB, build thread here: Here is my build of an F-5E Tiger II using the Italeri in 1/72, built OOB in a 'wheels-up' configuration and is destined for the ceiling. Thanks for popping by. Stuart
 -
Hi all, This is my first time posting on this forum, and I'm not sure I'm quite up to snuff yet to wow any of you seasoned old dogs, but here goes. I started this model in July 2022 and just finished. I like to write about the process in some depth, but understand this is not the place for that. If anyone is interested in reading more about how this model came together (probably only of interest to beginner types like me), please check out my blog: https://meatchicken.wordpress.com/ Thanks for looking and for any comments/suggestions! Cheers.
- 24 replies
-
- 55
-
-
Hi all This is the Italeri (Dragon/Trimaster) 1/48 Ta152H, finished as 'Green 8' of Geschwaderstab JG 301, one of the aircraft identified in Axel Urbanke's recent JG301 research. No pics of Green 8 are known to exist, but it's depicted here without the familiar JG 301 red/yellow tail band, as it seems that some of these were painted over before the end of the war. If a pic ever emerges of it wearing the tail band, I'll paint it back on Markings applied using Montex masks, with the octane triangles from the kit decals. Anyway, hope you like the pics
- 20 replies
-
- 50
-
-
I'll be building 2 NF-5B's from 314 squadron Royal Netherlands Air Force. One will be the original ESCI kit and the other one the Italeri re-issue. Link to the Italeri F-5B: https://www.scalemates.com/nl/kits/italeri-1275-f-5b-freedom-fighter--105831 One NF-5B will be K-4021 in the grey/green scheme. Underside will be RAL 7001; top colors will be RAL 6014 and RAL 7012. The second one will be K-4018 in the F-16 scheme. Underside will be FS36375; top colors will be FS 36118 and FS 36270. Decals will be Dutch Decal and I'll be using the Wolfpack-D F-5A/B update set. Drop tanks for K-4021 will come from AK3D and paint masks from LF Models ( https://www.scalemates.com/nl/kits/lf-models-m72105-northrop-nf-5a-freedom-fighter-rnlaf--1408872 ) These paint masks are for an NF-5A and with some slight modifications on the nose can also be used for an NF-5B.