Search the Community
Showing results for tags 'hobby boss'.
-
Hello again! At Ellesmere model show last Sunday I got a Sea Hawk for £2. It came without decals, only in the bottom part of the box, with loose parts. I've wanted a Sea Hawk for a while anyway, but never got round to picking one up. So I bought it as I figured I could build it in the last hour of the show when things were winding down anyway. As it's such an old kit anyway, the parts are few and far between and it didn't take very long at all to finish building. I glued it together and then gave it some sanding at home. I then decided to buy a Hobby Boss Sea Hawk so that I could get some decals. It didn't cost me much more than it would have to get the decals on their own anyway! So the Airfix kit will be a Luftwaffe one, and the Hobby Boss an Indian one! Below are pictures of the two kits...you can certainly see the age difference!
- 8 replies
-
- 4
-

-
- Airfix
- Hobby Boss
- (and 1 more)
-
 1/48th Chance Vought F4U-7 Corsair "French Navy" - ref.80392 Source: http://www.primeportal.net/models/thomas_voigt7/hobby_boss/ V.P.
 -
 #29/2016 Finally, after the Egypt MiG-21, my dad finished also the IAF Mirage. Started with the Eduard kit, but due to warped parts and bad fit my dad trashed it, bought the Hobby Boss kit (more or less a copy of the Eduard one) for 13 € at Hobby Easy, and built that almost oob. Some of the stencils are from Eduard, also the seat which he already had built up. The spine antenna is scratchbuilt, painted with Gunze H310/312/313/314. Initially this aircraft was coded 259 and wore no triangles but right after the war started it had a take-off accident on Oct. 7th 1973 und was severely damaged. It was repaired and re-entered service in 1974, was coded 159 and wore triangles. Got that info when it was already too late to change anything, maybe would have done a different aircraft instead then.
 -
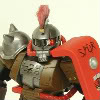
Hi All, Here's my Hobby Boss Dog House 2. I've added the Meng IDF Tankers figures and Eureka tow cables. I found this kit quite a challenge as I can't do PE at all and mounting the bar armour was really hit and miss as you have to cut the mounting slots out of the doghouse walls which was pretty tricky. I hear the Tiger Models kit is much better. The tracks are individual links but not too demanding as the side armour covers most of it. The mud effect on the skirts is my first attempt with oils which I was reasonably pleased with. Still struggle with painting figures as you can see. Still enjoyed the build though as it's such an imposing vehicle. If you're going to be where the bad men have IEDs, RPGs etc etc you want to be inside this wagon. Any comments,suggestions much appreciated Cheers David
- 9 replies
-
- 13
-
-
- Dog House
- Hobby Boss
- (and 1 more)
-
-
Well, been a while. The last plane I built was the delightful 1/48 Hobby Boss Me262, and this kit is proving to be no less delightful and enjoyable to build so far. This kit has had been much maligned for various reasons: Intakes are slightly off, the mad-riveter has struck, the fuel tanks aren't off centre, too much detail in odd places (two entire engines) etc. etc. Now, while this may be true, there is a HUGE amount going for this kit as I'm finding out. Firstly, the cockpit; you would only be able to beat this cockpit with a resin cockpit, and even then some of the resin pits are not as up to date in terms of MFD's and the RIO's sidecontroller. Secondly, the main gear bays; these fit together extremely well and don't clash with the intakes. The undercarriage installation calls for the gear legs to be inserted during the bay construction, but this isn't necessary. Thirdly, the details; this is the first kit I've seen with such a detailed Vulcan, most especially the detail in the cannon port, outstanding. The weapons load is superb and varied (bizarrely including AGM-88 HARM and AGM-84 Harpoon?!) and , yet unfortunately the kit only provides two ADU-703 and BRU-32 bombracks. Minor, but annoying. Other great details, off the top of my head, are the inclusion of the reinforced area around the RIO's step, the GPS dome for the spine, the internal side panels for the cockpit, LANTIRN pod, LAU-138 BOL Sidewinder rails, the engine fan faces and exhaust fans and flame holders, exhaust petal construction, arrestor hook detail... You might get the impression I like this! Anyway, in between finishing some of my stalled builds, I bought this off Charley420 and decided to get it started and hope it wasn't going to be a putty black hole. So far, so good. The kit: Decal options in the box: VF-101 VF-213 Reference material The Tomcat 'Bible' TwoBobs 'Felix in the Fight ' VF-31 OIF (I'm going to model 519618 '110') W&D Studio pitot and AOA for the Hobby Boss kit Eduard Canopy masks
-
For my entry, I will be building Hobby Boss's 1/48 F-14A as a line jet from VF-24 Renegades during their 'Last Rage'. I will be using a fair bit of AM for this one, the Steel Beach Late Life Upgrade being essential for the NACA gun panel. Other AM being Wolfpack Design resin fuel tanks, Hasegawa Mk.83 1,000lb iron bombs (kindly donated by Neilscrim), Wheeliant resin wheels, Fightertown decals, Master Brass pitot and AOA and I still need to find my Quickboost GRU-7 seats. Kit and AM; Reference Material; (The Air International is particularly handy as it has some pics of VF-24)
-
Hello all, I'm really a slow builder, and when I finally manage to finish something or reach the finishing stages, my sausge fingers do produce chaos ... So thiis kit bgan its life in the guise of a Djibuti desert color scheme and it reached decals stage, but then I spilled some isopropyl (sp?) alcohol on the camo, thus leading to paint removal and the blue air defense scheme. This is the 1/48 Hobby Boss kit, paints are Gunze acryls and AK metallics for the undersides. Enough banter, on to the piccies ...; Comments and crits most welcome. Stef (#6)
-
 Hello all, This is my first WIP thread but is my second 1/48 model to hit my workbench. I have been really looking forward to getting into this bad boy. I will be using the Eduard "Danger Zone" Hobby Boss F-14 reboxing. The kit is absolutely beautiful and even with some dry fitting everything just clicks together and even has a lack of release pin markers that plagued their F/a-18d. For this built I will be pulling out all the stops as well as all the ports that the kit comes with...and some! Still undecided as to weather I will fix the wings extended with all the flaps and slates showing their red underbellies or if I will keep it simple and leave the wings swept back. One point I think is important to mention as I know some people may point it out if I don't mention, although I will be trying to create the model as close to the real thing as possible there will be an element of "Poetic Licence" regarding some parts/features/processes. I have so far been unable to find more than one picture of this particular jet, NL 212 on the USS Carl Vinson, so I am going to "assume" a few things. This mainly relates to weathering and any scratch building. With that in mind I plan to "Imitate NOT Replicate" Right enough waffling, let the games begin!! I started with an unusual point, rather than the cockpit and seats I went straight to the P&W TF-30 engine. I plan to open up some of the larger access panels around the back to show off this bad boy as well as all the other panels that kit gives you. First I need to get some strips: Followed by some dry fitting, measuring and measuring again and then a bit of cutting. Once the cutting and fitting was sorted I dove straight into the detailing. Phase one: Phase two to...well I lost count of the phases from this point but here is the result so far And then I had a final dry fit with all the extra details added: I plan to open up the largest panel on the underside of the engine to show it off a light similar to the image in the link below. http://www.aviation-militaire.com/Galerie/NAS_Oceana_98/015_07P.jpg From my research I have only ever found that when this panel is opened/removed the opposing panel also has to hang down. Can anybody clarify this for me? I would probably prefer to not have to open up the second panel. Mainly just to remove the chance of making any mistakes. if I can get away with one panel it would be fantastic! If anybody has looked at this before or has some references they can check that I don't have available to be can you please let me know? It would be a great help! Anyway, thanks for dropping by, all comments are welcome and encouraged!! Enjoy!
- 75 replies
-
- 10
-
-
- F-14a
- Hobby boss
- (and 6 more)
-
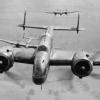 Hello all, I'll be entering this GB with HB's 1/72 Ju-88 C-6. It's one of their easy kits, but it looks pretty well proportioned if lacking in detail. To counteract this I've bought Eduard's zoom set for the Hasegawa C-6 that will at least allow me to add some interest to the very visible cockpit area (seriously, it's the clearest green house I've ever seen). The scheme I'm doing is displayed below: I'll post some contents/sprue shots when I get a chance/can be bothered. Hopefully it should be a quick build with the low parts count but scratch building the entire cockpit could slow everything up as the only usable items in the box are the cockpit floor (which needs a big chunk taken out of it) and the seats.
- 64 replies
-
- 5
-
-
- Hobby Boss
- Ju-88
- (and 1 more)
-
Junkers Ju-88 C-6 F1+XM Luftwaffe 4./KG 76, Taganrog, Ukraine, January 1943 Hello all! This is my Ju-88 C-6 built for the STGB, built OOB except for a few details from the Eduard Etch set for the Hase kit. The build went relatively smoothly, apart from my struggles with AK's paints, which I am rapidly falling out of love with. You can probably see that there a few items that are not where they should be (the gondola predominantly) and I'm not sure whether that's HB's fault or mine. But, it looks a bit like an '88 and it gave me a chance to practice some techniques I'd never done before and test out some new products so I'll chalk it up as a win. Cheers, Paul Work in Progress thread HERE
- 8 replies
-
- 16
-
-
- hobby boss
- 1/72
- (and 1 more)
-
1/48th Grumman A-6E Intruder by HobbyBoss in 2013 - catalogue ref. 81709 Source: http://scalemodels.ru/modules/news/img_5748_1358082281_fe7282025aafa40f1fabea15ab64034f79f0190e.jpg.html V.P.
-
My new project is the Northrop F-5E Freedom Fighter and I'll be using the Hobby Boss kit. This is the first time I'll build a Hobby Boss kit I'll represent an aircraft from the Brazilian Air Force (FAB) of the 1st/14th Fighter Squadron, Pampa Squadron, based in Canoas Air Base located in Canoas, Rio Grande do Sul. I'll try to make the FAB 4865 as it receive a commemorative painting scheme celebrating the 53rd Anniversary of the Squadron creation in 2000. Profile by Marcelo Ribeiro F-5E FAB 4865 in Canoas, RS Brazil circa 2000 The different paint schemes for the 1/14 Gav. To be continued...
- 45 replies
-
- 3
-
-
- 1/72
- Hobby Boss
- (and 3 more)
-
 Good afternoon, the Rafale has been finished a few days ago, and today I took the pictures. It's one of the Rafales which did the first live shooting of a Scalp cruise missile in Libya, March 23 2011. The kit is from Hobby Boss, it's ok as a base, but some things need to be changed, as they are not 100% accurate. It's still not, as I left some minor things out like the shell shute for the gun. The cockpit has been upgraded with the Eduard set, and the decals are from the excellent Syhart sheet. Colour was mostly revell light grey, which I think looks nice. Nose gear with some brake wiring. In the intakes, I added some sheet to avoid eye contact with the gear bay. Nice detailing of the Eduard cockpit. Displays, mirrors, grips And lots of seat belts! The HUD may be a bit too steep. Burner can with nice rivet decals, and the added chaff launcher Live ordnance. 4 MICA, 2 Scalps and 2 Tanks. Not bad at all. I think the MICA will fire straight into the tank... are they dropped before launch? they are slightly bent outside, but on the kit it's a bit excessive. All in all, a nice kit which was fun to build. To have a realistic model, I highly suggest the Syhart decals, they are very good to work with, and you get plenty of other decals you could use on other models (like decals for 6 GBU-12, for instance) Alex
- 8 replies
-
- 21
-
-
- Hobby Boss
- Rafale
- (and 2 more)
-
#20/2016 Here´s my dad´s newest little armour model, suiting for today´s 4th July. Hobby Boss kit with USMC/Wading conversion from Black Dog. Painted with Gunze and Tamiya acrylics and Faded Olive Drab from Model Master. The eagle-eyes among you may notice that the numbers are slightly of different size. The decals were taken from the sparesbox and didn´t belong together, saw too late the slight difference, but the Marines always had to improvise Somewhere on an island in the Pacific....
-
Hello, it's been a while since I've been able to make a new product announcement, but today's that day I've made a set of full depth resin exhausts and nozzles for the A-6 Intruder family in 1:48, designed in particular for the Hobby Boss kits. I haven't tested them on any other kit, but they may fit or be made to fit the Kinetic or Revell kits as well. Even though buried deep inside, I just couldn't NOT provide a detailed J-52 business end as well, including a small photo etch part for the probes that stick out into the exhaust gas. Pictures: Assembled and painted (I could add more weathering), and then test fitted to a Hobby Boss A-6A which has had the kit parts modified as per the instructions that come with the set: Note that this is an Intruder exhaust only - the nozzles on the EA-6B Prowler are a little different (they have more powerful engines). I'm also currently working on a Mk. GRU5 seat for A-6A's and early A-6E's. Cheers Jeffrey
-
Ref.72039 Source: http://www.primeportal.net/models/thomas_voigt10/ark/index.php?Page=1 V.P.
-
Ah, la France! Le Camembert, le Bordeaux, le Moulin Rouge, la Guillotine, la bombe atomique... et le seriously armed Rafale, ready to kick some bad guys buttocks! So, I decided to build a Rafale, as employed over Libya 2011. I wanted to build one of the Rafales which delivered the Scalps (the French Storm Shadow). For that, I will use the well-known Hobby Boss kit, which is not bad, but has some points to be corrected. I will also use a small PE-set from Eduard for the cockpit, and the excellent decal sheet from Syhart. For Reference, I will stick to another typical french item, the comic books (le BD, bande dessiné). There are some "Rafale Leader" books from Durand/Zumbiel, which have some excellent reference after the story itself. 160 pages, mostly great colour pictures of the Rafale and the airbase. In my case, it's St. Dizier, where the scalp dropping Rafales actually departed. So, a high level of frustration is guaranteed when I can cross-check the hobby boss kit with the lot of reference material! The Rafale will be Nr. 315, 113-HK from EC1/91 "Gascogne", equipped with 4 MICA, two Scalps and two of the big 2000ltr-tanks. This load out was common in the beginning, later they switched to one scalp only configuration. Marine employed the Rafale all the time with one Scalp only. Nice report can be found here, but unfortunately french only: http://aviateurs.e-monsite.com/pages/1946-et-annees-suivantes/les-belougas-d-harmattan.html Let's start with the kit itself, mostly with le cockpit: I have already scraped the side walls, as some PE-parts will be glued thereafter. Seat looks nice, belts will be added later on. The outlet of the aircon, I suppose. Here, it pays to make the sheets a bit thinner by sanding or scraping with a scalpel blade. The big badda-boums, the two scalps. They are really big, and consist of 10 parts each. And the tanks. This is where the problem starts, all modelers like recessed panel lines. But here on the tank, these are welding seams, and are not recessed, but raised. I will put some stretched sprue in the recesses, to simulate this effect. Thanks for attention! Alex
- 22 replies
-
- 4
-
-
- Rafale
- Hobby Boss
- (and 2 more)
-

Typhoon Class SSBN - Hobby Boss 1/350 scale
Flankerman posted a topic in Work in Progress - Maritime
Just when I thought I had enough submarine kits (see :- http://www.britmodeller.com/forums/index.php?/topic/234970734-new-1350-scale-submarines-uss-g-washington-hms-m1-etc/)to be getting on with, up pops the postman with this new kit from Hobby Boss. I ordered it from Hobby Easy on 15 November and it was delivered today (22nd) - 7 days door-to-door - excellent service Despite its size, it is quite a simple kit - the hull is in upper and lower halves with a separate 'sail'. The most numerous parts are the missiles - 24 tubes each in two halves, with 24 X 2-part missiles - plus all the caps and hatches. Alternate etched-brass propellers are provided and the small decal sheet gives markings for the depth numbers and escape hatches - but not the prominent white waterline markings around the whole hull. It's a huge model - 50cm long and 6.5cm wide! This sprue is repeated 4 times - to provide the 24 missiles and tubes etc.... Final sprue with sail (with alternate top) plus the propellers and diving planes (the front ones work!!).... Alternate etched-brass propellers..... I'm not sure about the acoustic tile detail - is it overdone ??? Some photos show the hull completely smooth - other pictures show the tiles - maybe a trick of the light ??? I chose this HB kit over the Micro-Mir version because I wanted to have the missiles on display - I'm not sure what the MM version is like ?? Ken -
Ref.72037 Source: http://www.primeportal.net/models/thomas_voigt10/ark/index.php?Page=1 V.P.
-
 Hello everyone! I'd like to share with you the predecessor to my last submission here, the Italeri 1/72 Sea Harrier FRS 1. It was completed around 4 months ago. The Hawker Sea Hawk played a pivotal role in the 1971 war between India and Pakistan. Deployed aboard the INS Vikrant (formerly the HMS Hercules), they flew successful sorties destroying or disabling vital installations in what is today Bangladesh, with no loss of aircraft. In honor of the role played by the Indian Navy and to a large extent, the Sea Hawk, December 4th is celebrated as Navy Day here in India. The Sea Hawk is part of my Indian Navy build theme, starting from the Vampire T55, the Kamov-28, the Sea Hawk and finally the Sea Harrier which replaced the Sea Hawk in the Indian Navy. These aircraft flew out of, or were based at Dabolim Goa, very close to where I spent my childhood. She, along with many others like her are now housed at the Naval Aviation Museum in Goa. The Sea Hawk bearing registration 076 piloted by Lieutenant RH Tahiliani was the first Sea Hawk of the Indian navy to land on the INS Vikrant. So it made for a unique choice of subject matter for this iconic aircraft. The kit itself was a joy to build. Along with the Eduard photoetch set to add in some extra detail, some custom riveting (which I took oodles of creative licence to place), and some hydraulic lines in the wheel bays (A big thank you to Vulcanicity here on britmodeller), the end result is a very sharp and detailed model for it's size. Boo-boos include the color- mixed it up from primary colors, and it ended up being too blue, and not grinding down the MLG bay doors before installing the PE panels which resulted in the doors touching the external tanks, and thus the wheels bend excessively inwards. The masking of the canopy also messed up unexpectedly. The Leaping Tiger was placed further aft on the original 076, and later painted forward on other aircraft. Lesson learnt. Anyways, on to the pictures! Two generations of fleet defense posing together: Thanks for watching!! Cheers, Alex.
- 23 replies
-
- 43
-
-
- Sea Hawk
- Hobby Boss
- (and 2 more)
-
A small selection of Hobby Boss and Takom brand kits for your consideration: Includes two highly detailed 1/35 post-WWII German and Soviet SPAAG Models from Takom and two 1/35 military models from Hobby Boss. Check out the full range of Hobby Boss and Takom kits online or grab an item from our great Sale! For full details, please see our newsletter.
-
Kamov KA-27 Helix 1:48 Hobby Boss First flying in the early 1970s, the Helix is a maritime helicopter with two contra-rotating rotors, which removes the need for a tail rotor, a feature that be quite lethal on a busy deck. It also helps to keep the size of the aircraft down, especially when the main rotors are folded. Its compact design and contra-rotating rotors make it a powerful lifting platform that is capable of carrying five tonnes, as well as being easy to fly with precision in difficult situations. As well as being in service with the Russian Navy, it has been an export success with many former Soviet allies, and some have made their way into the civil market. In military service they are capable anti-submarine helicopters, and carry a torpedo or a sonobuoy pack over 500 nautical miles at up to 168mph. it is also available as an assault transport under the KA-29 designation, with a powerful 30mm cannon and machine gun added along with hard-points for additional munitions. The Kit This is a brand new tooling from Hobby Boss, and should please anyone that has a thing about Russian helos, or just likes something a little bit left of field. It arrives in the usual box with a painting of a Helix dangling as dipping sonar underneath. Inside the box is split into two sections by a card divider that is glued to the lower carton. A couple of sprues are also wrapped in foam paper to keep them safe and secure, and the rest of the sprues are either bagged individually, or in pairs to keep the chances of chaffing to a minimum. There are nine sprues in mid grey styrene, one very delicate sprue in clear, a small Photo-Etch (PE) brass sheet containing some grilles, and a short metal strut. A small sheet of decals, instruction booklet and separate glossy painting guide in full colour. Detail is very nice, with restrained surface detail on the outer skin, very deeply engraved instrument panel, equipment racks and rotor detail. They have included a metal drive-shaft for the rotors as well as a gearbox so that when you turn one rotor, the other rotates in the opposite direction, just like the real thing. A busy interior is of course a must for a helicopter with a big side-opening door, and a big goldfish bowl on the front of the fuselage, so it's a good job it has one! It's the interior that is built up first on a large round-ended floor panel onto which you apply triangular rear stowage racks, a boxed in area with more racks on the opposite side that creates a narrow central walkway, and finally a cockpit that extends aft somewhat to accommodate the systems operator behind the two pilots. All the instrument panels are deeply engraved and have decals supplied to detail them, but you will need plenty of decal softener to get them to settle into the hills and valleys of the panels. The crew seats have been slide-moulded to obtain detail on the sides and an undercut on the front of the seats, with a seam running down the centres of the back that is easy to deal with. There are separate cushions fitted to each seat before they install on their mounts, with one in the rear, one behind the main cockpit and two up front for the pilots together with their instrument panels, drop-in centre console and separate collective and cyclic sticks. The rotor heads are next, with one being made up for the top rotor that has its connecting rods underneath, and the lower rotor having the rods on the top. The two are joined together on a geared drum that permits the two rotors to contra-rotate if you manage to keep the glue and paint out of the works. Sure, it's gimmicky and being made from styrene it won't last long if you use it a lot or try to motorise it, but a nice fun feature nonetheless. The mechanism attaches to the top of the cabin roof, onto which is installed the overhead console and decal for the cockpit. This then sits on a ledge within the fuselage halves, where it is joined by the lower portion of the cabin before the fuselage is closed up. There's no detail on the ceiling, but at least there is one, which can act as your blank canvas if you feel motivated to add extra detail. A faceted metal rod is supplied as the drive-shaft, which goes fully through the lower rotor and lodges in a socket in the lower gear and upper rotor head. This both gives the assembly some strength, as well as allowing the lower rotor to spin on its larger styrene "nut" moulded into the top of the gearbox. The rotors themselves are installed as the last act of the build, which makes sense from a practical point of view, and each one is made up from one part with sag moulded into it, starting from about the right point on the rotor where the aerofoil shaped part of the blade begins, and a small balance weight just before. The twin intakes over the cabin are a complex shape, which is why the top portion with a shallow valley between the two intakes is a separate part. The intake mesh and lips are added to the front once these are installed. The nose of a Helix is covered in glazing, which is replicated in lovely thin clear parts comprising the main nose glazing, plus blown side windows that have frosted areas that become the door skins. Painting the interior of these parts would add a bit more realism to them by achieving the correct colour for the interior as well as covering up the glossy inside of the parts. More window inserts are added to the fuselage before closing up, and to the large side door before it is added. A huge array of exterior parts are required for a bit of detail, which includes the two large oval exhausts, various domes and sensor blisters, antennae, grab-rails and PE vents on the fuselage sides. Its tiny sponsons are added toward the rear of the fuselage, and the substantial main gear legs are built up from four parts each plus a single wheel. The nose gear comprises a pair of "castor" wheels on a short yoke, and all wheels are built from two halves split circumferentially. Rescue gear and flotation devices are added to the sides, and the stubby H-tail is built up with separate rudders and leading edge slats, plus an actuating arm on the short horizontal planes. These mate with the fuselage using the usual slot and tab arrangement, and have bracing rods underneath each one. Markings There are two options available to the modeller from the box, and both are in a light bluish grey, as is to be expected in this age of grey military aircraft. There's plenty of scope for weathering with these aircraft, and if you wanted to go off the decal sheet, there are plenty of other colour options available. From the box you can build one of the following: Russian Navy, Ka-27PL, 42 Yellow RF-34177 – Yellow 42 on engine nacelles, Russian star on the tails. Ukraine Navy, Ka-27PL, 20 Yellow cn. 5235003517202 – Yellow 20 on engine nacelles, Ukrainian roundel on the tails. Decals are printed anonymously on an odd blue paper that has a sort of "wholemeal" patina, and the density of the yellow is a concern on some of the smaller decals because they don't appear to have a white under-printing, or the yellow extends past the sides. Some of the writing is a little indistinct, but as it's in Cyrillic, it's not a major concern. The decals overall aren't very inspiring, either in choice of subject, or execution. Conclusion This is a nice kit of a rather unusual and compact helicopter, and while it is perhaps a little on the high side for a kit of this size, there is plenty to commend it, and it won't take up much room in your cabinet when built. I have heard concerns expressed that the details on the fuselage are incorrect, but having done a little research they appear to be about right on the pictures I have studied, although perhaps fractions of a millimetre off in places? With a lump off the RRP, and with a more interesting decal sheet, you can have a lot of fun with this kit, and the super-detailers can add to the interior that is already present. Also, don't forget the fun you'll have twiddling the rotor blades! Review sample courtesy of
-
Ref.72040 Source: http://www.primeportal.net/models/thomas_voigt10/ark/index.php?Page=1 V.P.