Search the Community
Showing results for tags 'helicopter'.
-
Using this post to upload from HobbyPhotoHost for the first time, so let me know if there is any problems. This is my S-61A Sea King in Danish markings. The model is Cyber Hobby’s 1/72 S-61 with Whirlybirds conversion set and decals. I also scratch build the interior, but not much can be seen on the finished model. Painting using acrylics. Enjoy Drakendk
- 3 replies
-
- 25
-

-
- helicopter
- rdaf
- (and 1 more)
-
Its been sometime since i posted here . I seen this Hind E helicopter , Looks like a great OTB. Please enjoy Rick
-
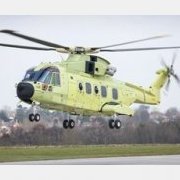
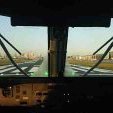
 So it begins, after paying stupid money for a 31 year old Hasegawa 1/48 sea king model and trying to locate rare parts I have now decided. to start over completely using the new AIRFIX 1/48 kit. I will post irregular updates and I hope to keep the model as close to the actual cab of my beloved squadron, but I must warn you, the last time I made a scale model was when I was 14 so it wont be anywhere near to perfection but I will certainly aim for it and have the luxury of you guys keeping me right! Below is the new Airfix kit but as with the Hasegawa a new window needs to be cut for the observer/sensor rack
- 64 replies
-
- 13
-
-
- Airfix Seaking
- Sea King HU5
- (and 1 more)
-
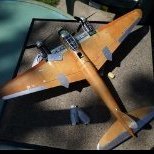
Well, this is definitely not one of the most elegant aircraft of the world. But it was a big step in helicopter development, First flown in 1939, six prototypes of the Fl 265 were built, but the development continued with the Fl 282. Flettner wanted to test the concept of two counter rotating intermeshing rotors. The 265 was powered by a 160 hp radial engine fitted with a fan for cooling. No, the propeller is not missing! Early special hobby kits are sometimes tricky, in this case the vacuum formed clear parts did not fit, the rear part was way too small and I had to scratch build this part. Cockpit and engine are nicely detailed resin parts. The delicate landing gear provides good landing characteristics, but was a pain to adjust it. Hope you like this interesting piece of aviation history. cheers, Norbert
-
a.thumb.jpg.58d92d116b0315dc55d352fd191d65e4.jpg)
Bell 47J-2, Chilean Navy, LF models 1:72
NorbertBu posted a topic in Ready for Inspection - Aircraft
After a long break I have finished this model. The project suffered from poor fit and parts which are way too big for the space provided. Only after cutting away some of the construction in the engine compartment, the fuselage could be connected. Another problem area are the grids providing cooling air. There is a PE part supposed to be glued inside the fuselage, which is very thick. and the grids in this part are way too large for this scale. So I cut small pieces out of a decoration stuff and glued them into the fuselage with white glue. This looks better than the manufacturer's idea, but still not perfect. The parts on the rotor head and the fuel vents are scratch built. But finally this project is finished. Would I build another one? Lemme think, NO! size comparison: Here the thickness of the fuselage parts is visible. -
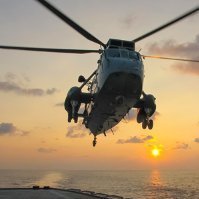
This is Shark 20 as she would likely have been during the Sydney-Hobart yacht race rescues in December 1998. Built under the Sea King Group Build but completed too late to include in the gallery. This is the most complex buld to date during my middle-aged modelling renaissance and I think at times I bit off more than I could reasonably chew. I failed to finish off some of the details but have done enough for me to call her done and move onto a (hopefully) simpler build. Painted in Gunze H307 (FS 36320) with some light panel line detailing and exhaust staining around the rear of the fuselage. The build thread can be found here: http://www.britmodeller.com/forums/index.php?/topic/234975709-westland-sea-king-mk50-ran/ Thanks for looking, Andrew
- 29 replies
-
- 57
-
-

-
- Sea King
- Helicopter
- (and 2 more)
-
My favourite modelling subject is civil aviation. How does this model fit into this? Well, I have found a picture taken in December 1970 for an ad by Sikorsky (United Aircraft) . Here it is: Scroll down a little bit. Being a former German Army CH-53 Pilot, I was very interested in the technical similarities and how ICM have reproduced them. The kit is very well researched! But the instructions are not...at some places you are left alone, where exactly a part is supposed to be or how to paint it. I used aftermarket parts for masks, instrument panels and seat belts. I have designed the decals and had them printed. Well, I hope you like this big machine in a not so common livery! Norbert
-
Hi, so this is my version of the 1/35 Kitty Hawk MH-60R in the HSM-35 "Magicians" colors. Sorry about the photos they're pretty crappy....must get a new phone....iThingy....camera....whatever the hell they are nowadays had a play at doing some of the lines/connector whajamcallums on the rotorhead......meh.....it's okay for a first smash. got a few more of these so will get it right next time A few of the interior bits and bobs before it was zipped up... This is the overhead cockpit panel...whatever its called.... this is some sort of in-flight entertainment system???....bomb droppy thing....god knows...I sort of jazzed it up a bit as the side was just a blank wall of plastic which was a bit boring ....anyway.....was a ballache to do as its so damn tiny....but fun.... This is the interor....the spidery thing on the left....that was ridiculous....on the sprue it was almost a solid chuck of plastic that had to be surgically removed....that weren't fun..... Cockpit....bog standard really.... same again....sans chairs.....thing about me is I'm totally crap with decals and the kit comes with this decal set of the instrument panel....sod that....tried me best and didn't use them Overall view of the inside bits and stuff..... Anyway that's enough for now...thanks for looking!! Next one is the US Coast Guard "Jayhawk" - the Astoria one. Got all the conversion stuff/decals from Werners Wings so looking forward to doing that. Cheers all Alan
- 23 replies
-
- 61
-
-
-
- MH-60R
- Kitty Hawk
- (and 1 more)
-
Hi gents, it's my pleasure to share with you my latest work, Gallery models' UH-34 D Sea Horse in 1/48:
- 15 replies
-
- 48
-
-
-
- 1/48
- Marine aviation
- (and 1 more)
-
 Mi-8MT Seatbelt & Zoom! Update Sets (FE1341 & FE1340 for Zvezda) 1:48 Eduard The Hip has received a little attention from the model companies recently, and that’s no bad thing as she was poorly served in 1:48 until now. Eduard's new range of sets are here to improve on the kit detail in the usual modular manner. Get what you want for the areas you want to be more of a focal point. As usual with Eduard's Photo-Etch (PE) and Mask sets, they arrive in a flat resealable package, with a white backing card protecting the contents and the instructions that are sandwiched between. Interior Zoom! (FE1340) A single nickel-plated and pre-painted fret is included in this smaller version of the usual Eduard package. This set contains a subset of the larger sets, namely the pre-painted parts that are used to improve on the main aspects of the cockpit, involving a complete set of new layered instrument panels, sidewall details, and side consoles with added levers for the cockpit, and a visor skin above the pilots’ heads. The round-topped cabin door is removed, as are the moulded-in raised instrument panel details that are being replaced, adding a double set of traffic-light indicators for the passengers that may be leaving either vertically or via the rear ramp. Finally, there is a layered panel that is sometimes fitted where the cabin fire extinguisher is normally sited near the side door. Seatbelts STEEL (FE1341) These belts are Photo-Etch (PE) steel, and because of their strength they can be etched from thinner material, which improves realism and flexibility in one sitting. Coupled with the new painting method that adds perceived extra depth to the buckles and other furniture by shading, they are more realistic looking and will drape better than regular brass PE. You get two full sets of four-point crew belts for the pilots in the forward cabin in this set, complete with quilting details and comfort pads underneath the lap belts that keep the buckles from causing the pilots any discomfort. Review sample courtesy of
 -
Hi folks, I am planning to scratchbuild a Sikorsky S-61N helicopter but am lacking some details. I have plenty of Plan and Profile diagrams but do not have any cross-section views, which would be needed for me to get the contours and dimensions right. Can anyone here help with such information, measurements and frame/cross-section plans please? cheers Mike
-
Hi all, hope your all well. Here is another finished model with some extras. The basis is a Italeri 1/48 Bell OH-13 Sioux helicopter with some extras. I scratch built the wings with tissue laid over a wire frame, used a couple of old RAF pilots for Batman & Robin, model the engine slightly and added some more parts, and moded the undercarriage section.
- 12 replies
-
- 44
-
-
-

-
- Italeri 1:48
- helicopter
- (and 1 more)
-
This is the older Revell kit, the PAH.2, which came out in the very early 90's, not to be confused with the new mold Revell kit, which has very nice Tiger Meet decals in it and has a lot more surface and cockpit detail. However I decided as I got this for free, I might as well build it for what it is. Fit is generally pretty good, as mentioned detail is lacking somewhat, you do get decals for the instrument panel and seat belts but the decals in my kit were wrecked. Thus I sourced some from another helo kit so they are not 100% accurate. It makes into a decent shelf sitter, although I'll probably take it to a model show or two as a table filler. If you do want to build a very early Tiger then this is your kit. It's not a bad model, just basic. Thanks for looking.
- 3 replies
-
- 14
-
-
- revell
- helicopter
- (and 1 more)
-
Hi all, Latest off the bench is Italeri's H-19B Chickasaw, converted to a HAR.9 using the Airwaves resin nose peice and the excellent newly released Xtradecal Westland Whirlwind collection. The kit is missing a few aerials and type specific components, but looks convincing enough when built up. A very nice kit which builds up very quickly and has some reasonably good detail. Painted using Revell Aqua Colour and Hataka Lacquers. The fluorescent orange is particularly difficult to colour match as many photos show variations or fading of the paintwork, so I tried to match my previously built Wessex and Whirlwind as closely as possible. Weathering has been kept to an absolute minimum with just a custom black/brown oil wash applied around the RAF Blue Grey areas to simulate operational grime at sea. Many thanks for looking!
-
dear fellow modellers, I would like to show you this very small helicopter. It is one of the first designs by Kamov and made its first flight in 1949. The engine only had 55 hp. The kit is by AMG and consists mostly of photo etched parts, which makes building it a challenge, at least for me. The instructions were not very helpful in some areas and I had to rely on fotos to construct the complicated mechanical parts. One of the fotos available in the internet shows a Ka-10 landing on a truck, a ZIS 150. That would make a nice scene, I thought. As it was not possible to integrate a pilot figure into the seat and the control elements, I decided to show the aircraft in a kind of fictional scene after landing on the truck. The closest thing to a ZIS-150 I could find was a ZIS-164 by Armada hobby. That required some work to adopt the front grille. As all of the loading area was terribly warped, another kit by Trumpeter of a Chinese truck was needed to replace these parts. The figures are by CMK. Why one of the officers is holding a bottle...well, we don't know. Maybe he is saying: "Excellent landing, Comrade pilot, have a glass of vodka!" which is full of prejudices!! Hope you like the little scene! cheers, Norbert
- 7 replies
-
- 30
-
-
- helicopter
- 1:72
- (and 1 more)
-
Not sure if this really merits an RFI thread but it’s been on the shelf of doom so long I think I’ll do one anyway. Revell 1/144 Apache US Army completely oob, a nice little kit.
- 4 replies
-
- 9
-
-
- Helicopter
- OOB
- (and 1 more)
-
Bristol Sycamore Mk.4/HR.51 RAAF, RAN, RAF & Civilian Service (RRK48004) 1:48 Red Roo Models Even while the guns of WWII were still firing, Bristol were developing the rotorcraft that became better known as the helicopter. Their project wasn’t the only one in existence, as the Nazis were also developing their own helicopters at around the same time, sending a small number of their early prototypes into service before the Allies, although to no avail. The Bristol project became the Sycamore, and it was the first British helicopter to reach production, and also the first to be registered as safe for flight by the British authorities just before the beginning of the ‘50s. It went into service with the RAF in time to take part in the Malayan, Cyprus and Aden emergencies as battlefield taxi, medical evacuation, and as cargo transport. Although less than two hundred of the type were built overall, a substantial number were built for the post-war reconstituted German military, and small numbers were used by the Australians and Belgians. They also saw civilian service in reasonable numbers, and stayed in service with the RAF for a long period, with the last one leaving service in the early 70s, while the Australians struck theirs off charge in the mid-60s. The Kit This is a re-boxing of AMP’s 2018 tooling of this early chopper, but with additional parts to represent the aircraft and types that are mentioned on the box top, and in their usual fashion, they are heavily focused on antipodean airframes, which is only fair given their location and expertise. The kit arrives in a thick card box with a picture of some of the decal options on the top, and inside the captive lid is the AMP plastic, which extends to four sprues in grey styrene, plus two smaller sprues in clear plastic. In addition, there are two frets of Photo-Etch (PE), two sections of clear acetate with printed shapes, two small blank pieces of blue decal paper, two decal sheets, and a thick colour laser printed instruction booklet that has colour profiles and reference photos in the rear, plus a separate sheet that documents additional positioning of stencils and the painting of the rotor blades. The styrene parts are well-moulded and have good detail, but as these are medium-run moulds there are the occasional sink marks that are a feature of thicker parts, where the styrene shrinks as it cools, which is more evident in the bulkier areas. There are only a few however, and if they are tackled before construction begins, they shouldn’t pose any real issues. The detail more than makes up for it, and the crew cabin is moulded in clear styrene to ease fitting and masking of the windows, which is always a good idea that is often found in helo models, as they tend to have excellent visibility thanks to huge expanses of perspex. Construction begins with the cockpit, which will be highly visible on the finished model, and this work starts with the two crew seats, which are well-detailed, having separate rails, cushions, backs and armour, plus PE stays that link the two cushions, and lap belts for the crew. The instrument panel is a kidney-shaped unit with instrument backs on the backside, and a decal placed over a coat of white paint, then a PE surface to depict the details and instrument bezels. It will be sensible to take care in aligning the layers, which can be done by using Klear as a glue and to make the dials shiny after painting. It is supported by a long tubular arm that later suspends it in front of the crew without impeding their view. A set of seatbelts are also made up for the three canvas passenger seats that later fix to the rear bulkhead along with circular headrests and more PE supports, leaving the bench seat parts on the sprues. The seats are glued to the cockpit floor after adding the pilot controls in tandem along with the centre console and rudder pedals, the latter made from PE and fitted to the front of the cockpit floor alongside a fire extinguisher. The rear bulkhead clips into the back of the cockpit floor with the three canvas seats as previously noted. The semi-complete assembly is slotted into the opaque plastic underside of the fuselage, which is in turn joined to the aft fuselage halves, taking care to cut the slot in the starboard side if you are modelling a military version. The cowling over the power plant is first detailed by adding a number of PE louvers into the engine intake at the front, and an axle that projects from the underside of the rotor head into the interior. It is then glued in place in anticipation of the clear fuselage and windscreen parts. The clear parts are prepared with small handles, then it would be an idea to make some masks for the inside of the windows so that the interior can be painted a suitable shade and not left shiny when painting it externally. Before these assemblies are fixed to the model, the rotor-head is created, which is a process that will result in an excellent focal point for your model. You are incited to take care removing the styrene parts from the sprues as they are delicate, and that seems a sensible precaution. They will also benefit from scraping of the seams to give them a more realistic appearance before you start putting things together. The main head part is the basis for the forthcoming work, which includes plastic and PE parts to give the assembly a highly realistic look. A scrap diagram shows the completed assembly, and you might miss the second diagram that is for extended blades – I know I did for a moment there. The key step is installing the triangular blade holders that all point in the same direction for stowed blades, and in-line with the rotor-head when extended for flight. The cockpit clear sides and roof are added to the model next (don’t forget to remove any masks!) along with the main gear, which are each two-part wheels with two more parts for the struts, the starboard unit having a box fairing near the top. A small highly detailed winch assembly is attached to the starboard side of the engine compartment, and a long strut stretches diagonally down the side of the fuselage, partially in the slot cut in the fuselage side earlier for the military version. The rotor suppports are added to the tail boom to hold the stowed blades later, and the nose of the model is glued into the front after adding a coaming to the inside, where you might want to fill two tiny sink marks at the ends, and a PE windscreen wiper on the outside. Also on the starboard side is an engine exhaust, which is covered by a bulged fairing to the front, presumably to avoid burning the legs of the crew or passengers. On the port side are a number of tubular step frames, a filler cap and a rear-view mirror, the head of which is PE, so the back side should be painted with the shiniest metallic you can lay your hands on. The steps are replicated on the starboard side too, with more small parts and the front landing gear leg on the underside. The tail boom also has a long, slender and angled bumper fitted, a small stabilising surface, and of course the three-blade tail-rotor and crown. The final task is to install the rotors stowed or in position for flight, attaching to the appropriately configured rotor-head. Markings The booklet contains a general stencil placement guide, and there is another loose page with additional guidance and details to paint the main rotor blades and the tail-rotor in great detail. There are a generous six decal options on the sheet, with a broad range to choose from. From the box you can build one of the following: A91-2, 1 Air Trials Unit, Jan 1955 XN448, 852, 723 Sqn. Fleet Air Arm, RAN, Jun 1960 XG544, 118 Sqn., RAF Aldergrove, Northern Ireland, 1962 XG548, Joint Helicopter Unit, HMS Ocean, Suez Crisis, 1956 VH-INO, Australian National Airways Pty Ltd, May 1956 VH-INO, Australian National Airways Pty Ltd, Flying Billboard for Thorn Atlas (Thorn Australia) The Thorn Atlas decal option has a large pair of colourful backgrounds to the logo, which aren’t included as decals, but are supplied as pre-printed stencils on the acetate sheets. You are instructed to cut out the templates and spray the colour onto the provided decal film, which you can then overspray with clear gloss and apply to your model after cutting them out close to the painted areas. You could of course use the templates to make a tape mask and spray them directly onto the model, so now you have two choices of how to do it. Decals are printed under the Red Roo banner, which is a guarantee of good registration, sharpness and colour density, with a satin carrier film cut close to the printed areas. Conclusion Early helicopters are usually a weird, ungainly looking bunch, but apart from the Sycamore’s unusual nose-up ground stance, it is a surprisingly modern-looking aircraft. The base kit is good, and the Red Roo additions make it better. Add a bunch of well-researched, attractive decal options, and we have a winner. Highly recommended. Review sample courtesy of
-
This is my first post in this site. I present you my latest work with my Kiowa warrior in Greek version.This is the Academy kit with the old MRP mold. With this kit i bought the special Pro-cal aftermarket resign kit which converts the kit in the Greek recent version that my country added to the armed forces. The color i used is the AK Helo drab. In this work i decited to create all the possible details like wires in the pylons-missles and back fuselage until the back rotor, quite a hard work to do but the result looks very nice. Finally i added all the details for a stopped helicopter according to the real photos i studied.In the end i decited to build a simple diorama as you see with many scratch builds like satellite, wires, hf antenna, Barrels for spare parts, trush barrel, power suply generator etc. The helipad is created by plaster and lots of airbrushing. I believe that i have a good final result after all.. (Excuse my English..)
-

M&E Models/Matchbox 1/72 Bell TH-57A SeaRanger
hsr posted a topic in Ready for Inspection - Aircraft
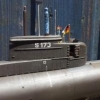
This is a 1/72 Bell TH-57A SeaRanger US Navy basic/advanced helicopter trainer using the Matchbox OH-58 kit and the M&E Models conversion. The M&E conversion was injection molded plastic, not resin, and dated back to 1989. It is for the early TH-57A and was designed for the Matchbox kit. It consisted of 2 fuselage haves molded in very thick translucent plastic, a tail boom, white metal rotor parts, and decals. The interior, fins, skids, and tail rotor come from the Matchbox kit. The Matchbox interior only needed slight trimming of the bulkhead tops, and while the TH-57 instrument panel was just a centrally located pedestal the kit part was the full width of the from of the cockpit so needed more trimming. Missing were the collective stick and rudder pedals which I added, but given the translucency of windows are hard to see. The rear rudder fin needed to be shortened. The main rotor was left as an exercise for the builder and I made it out of 2 laminated .015 strips of styrene mated to the white metal rotor head. Here are some construction pictures: Note the white strip of styrene around the top of the "dog house" that forms a little lip that was missing from the fuselage halves. This is what you get from M&E Here it is assembled with the Matchbox parts in in green and brown. Note that the rear of the main skids needed to be shortened a little to give it the right TH-57 stance. Later to be added were 2 exhausts on the top of the dog house. I made them from brass tubing which I found hard to work with and cut and I am less then satisfied with the results. While there seem to be many pictures of the TH-57B & C, pictures of the A are harder to find, but I did find this one: and used it as a model for painting and decaling. The M&E decals where for a US TH-57A (which deviated slightly from the above picture), and an Israeli and UK Bell 206. I did a test of one of the UK decals and it fell a part in the water. So once again MicroScale Decal Film came to the rescue and mostly solved that problem. So after all that, here it is: As an aside in my research I cam across this web site: http://www.jetwashaviationphotos.com/us-navy-air-training-command-.html Which has a lot of good information about US Navy pilot training including this chart: which I found very useful. It is a little dated since the TC-12's have been retired and replaced by T-44C's and the TH-57 is in the process of being replaced by the Leonardo TH-73A Thrasher. Next up in the Italeri F-100F Wild Weasel using the Blackbird wings Enjoy. -
For my second entry I am building this Hobby Boss Eurocopter Tiger as an Australian Army armed reconnaissance helicopter. Ironically it has recently been announced that the Tigers will be replaced by AH-64E Apaches. The Tigers had a troubled history, lengthy maintenance requirements resulted in high operating costs and low availability. In addition there were problems with communication and data links. A look at the parts: The instructions are of the exploded diagram style: I also have the Ronin Decals sheet which allows any of the Australian Tigers to be modelled the decals come with a very useful set of detail photos: some parts of the defensive suite will need to be scratched and, somewhat dauntingly, so will the very long towel rail aerial on the port fuselage. A quick start today with some of the major components cleaned up and dry fitted: fit is quite good and it goes together well, the cockpit tub is a very tight fit care will need to be taken to get the nose to close up properly to allow the canopy to fit correctly. Thanks for looking. AW
- 29 replies
-
- 7
-
-
- Helicopter
- Hobby Boss
- (and 1 more)
-
Good day! Here is my latest work, Kittyhawk's UH-1D Huey in 1/48 scale. The model itself is not as good as Tamiya or Edurad, but it is by far the best one in 1/48th scale. I had some minor problems during the assembly, but nothing that couldn't be fixed. The major drawback are the instructions, so keep that in mind if you want to build one. Referneces and photos are crucial with this build. I have to thank mr. Floyd Werner for all the provided photos and information. Without them, I would be lost. Enough talking, enjoy the pics. Model: Kitty Hawk 1/48 UH-1D Huey Extras: Eduard 49861 - interior Eduard Fe862 - seatbelts Eduard EX564 - masks Eduard 49022 - Ammo boxes Paints used: MRP Weathering: Ammo Mig products. Some historical photos. Note the interior green door and aeleron. Same helicopter at the beginning of the tour. Side doors were still installed. But they have been removed later on during the tour.
- 13 replies
-
- 56
-
-
- helicopter
- 1/48
- (and 1 more)
-
 Finally finished this which has been on and off the shelf for around a year. Cheers, Sam
 -
I recently did my last WIP post on these, so its time for a final post for these. Both Gazelles are the Airfix offering, one from the 80s and the other from the 90s/00s. The first one i started (back in March) got to the end of the painting stage and it all went a bit wrong when i found out i had completely messed up the canopy. It took me a fair few months to know what i will do with it. I decided to do it in the scheme of XX453 used by Qinetiq in a fictional diorama with it in storage, getting brown paper getting applied to the glass. (The wonky antenna has since been fixed) The later kit had decals for a pair of HT.2s, but had the GOA on the top section of the canopy. Due to this of course i had to look at AH.1s and found a very nice desert scheme. This one is XZ347 used by the AAC. This one also has a base but it is very quick, and one day i will make one it deserves.
-
Dear all, Please find below some images of my recently finished SAMI review kit of the Vought-Sikorsky VS-300. The VS-300 was the first practical US-designed helicopter and pioneered the now familiar lay-out of a main rotor and small tail rotor. The kit is a reissue by Brengun of the Extratech multi-media kit. The review article will appear in one of the upcoming issues of SAMI. Peter
- 11 replies
-
- 24
-
-
Welcome to the Helicopter, Autogyro and STOVL GB. Duration: Saturday 27 June to Sunday 18 Oct 2020 Host: @JOCKNEY Co-Host: @Col. So all the usual rules apply but the most important one is to have fun and enjoy your own build and encourage everyone else with theirs, so the rules cover the usual points: 1) The subject of your chosen model has to be either a helicopter, an autogyro or a STOVL Aircraft. 2) The model kit and any aftermarket components can be of any scale or build material, additional GB points for Vacform and Scratch building. 3) All models must be less than 25% complete at the start of the build. If in doubt, please ask the GB hosts, we are very flexible as we want to see as many completed builds as possible. 4) All builds must have a WIP thread showing progress, models cannot go into the gallery unless there is a build thread for them. If you are building two or more similar models or there is a strong link between the subjects, then they may be combined in the same thread, or separately if you prefer. 5) No buying/wanted or selling in the GB please. Please use the buying and selling section in Britmodeller for this 6) There may be a poll to vote for your favourite build in the Gallery at the end of the GB. You do not have to put your competed build in the gallery or take part in the poll if you don't want to. 7) Please be polite and constructive with your comments to member’s build. I would encourage everyone to support others builds, lots a humour, and advice is the order of the day. 😎 Please do not leave comments in the Gallery thread but rather put them in the relevant subject thread. With so many different subjects to choose from this should be a really special GB. Good luck everyone Cheers Pat & Col


.thumb.jpg.272d279b0681830e369bacbd49b18715.jpg)


Wedge-TailedEaglePortraitRaptorDomains.thumb.jpg.41a306d3445a68f0f2df773e01776ea6.jpg)