Search the Community
Showing results for tags 'hasegawa'.
-

Eduard Hawker Typhoon 1b (Late) Updates 1:48
Mike posted a topic in Aftermarket (updates/conversions)
Hawker Typhoon 1b Updates (for Italeri/Hasegawa) 1:48 Eduard Italeri have re-released Hasegawa's well tooled bubble-top Typhoon under their own brand as a D-Day striped late model, and Eduard have sensibly re-released their Photo-Etch sets for it to take advantage of renewed demand for upgrades. All sets arrive in Eduard's flat pack with card backing, and the Zoom! set is presented in a short pack of a similar type. Typhoon 1b Bubbletop Set (49684) This set covers both the interior and exterior of the aircraft, and is presented on two frets of PE, one in bare brass measuring 10.5cm x 7cm, the other plated and pre-painted, measuring 7cm x 4.7cm. It starts with the cockpit, first requiring the removal of a small section of coaming from the front of the cockpit opening, before installing various small parts to the sidewalls, as well as replacing the rudder pedals, and adding throttle quadrants to the tubular inner framework. The main instrument panel is replaced by a lamination of layers of pre-painted PE to give a more realistic finish than most of us could manage, and this rests between the two side frames. The pilot's seat is replaced totally by a multi-part PE seat with a pre-painted quilted pad in the back, and a full set of crew belts in pre-painted PE. The head armour is also replaced with more detailed parts that offer a scale representation of the real thing. A curved bracket is placed over the coaming area to support the gun-sight, and behind the pilot's head the rear decking is detailed with a single part that is folded and curved to match the contour of the fuselage it sits upon. It also portrays the sliding mechanism of the canopy that runs down the centre line behind the pilot. Moving to the outside of the aircraft, the big chin-scoop is a prime candidate for updating, which requires a little surgery to the radiator core to remove the projecting cylinders from the main bath. Once removed they are skinned with PE mesh, and the hole filed to match the PE parts. A scrap diagram shows how the next parts fit together, which comprise a cylinder rolled from one piece of PE, attached to a choice of two circular front grilles, and sliding through the smaller aperture in the rear face. A little fiddly, but the improvement to the finished article should be well worthwhile, and this is then finished off with the rear cooling door being replaced by a folded PE part. The wheel bays are then decked out with additional panels on the bare sidewalls, and a simulation of the lattice-work front wall that is blank on the kit. A PE brake hose is added to each gear leg, parts are laminated to the gear bay doors, and the probe under the port wing is given a base-plate, while the rockets are given more realistic shackles, ignition wires and exhaust detail parts. Zoom! Set (FE684) If you don't fancy working with both the sheets above, but want to titivate your cockpit (fnerk!), you would do well to pick out this Zoom! set instead, which includes just the pre-painted fret as detailed above. Landing Flaps (48824) Measuring 9.2cm x 8.2cm and etched in bare brass, this set allows the modeller to drop the flaps on their model to add a little visual interest to the underside. I always shied away from them as they look difficult to the casual eye, but once the lower wing is adapted to remove the flap area, and the upper wing edge thinned down to accommodate the set, it is relatively straight forward, and quickly completed. With the wings glued together, the inner skin is added to the thinned upper surface, and the flaps are folded to shape, which involves folding over the wedge-shaped ribs into the grooves in the flap, gluing them down, and adding a piece of 1.2mm plastic rod along the curved rear edge of the ribs. Repeat four times, and that's it done. The instructions helpfully show the correct 7o angle from the wing lower, which is best achieved by marking out and cutting out a template if you don't trust your "by eye" measurements. Review sample courtesy of -
This is my first work in progress thread having spent quite a while lurking and admiring all the great builds on here. I hope I can produce something that will be worthy of a forum thread! Since I got back into modelling a few years ago I've been collecting bits and pieces to build my ultimate Lancaster diorama. I settled on the Hasegawa B.I/B.III as a base as the new Airfix kits hadn't been released at that time. I've since built one of the new Airfix Dambaster kits and would have switched were it not for all the aftermarket stuff I've acquired - great kits! So my plan is to build a B.I belonging to 9 squadron as it prepares for a mission. Although the information is a bit hazy I think I have a family connection to the Lancaster ground crew of 9 squadron. I currently have markings for WS-F 'Fanlight Fanny', although I may switch those to WS-J prior to it's 38th mission when it was piloted by Denis Froud from Leyton, my home town. Here is what I've collected so far: Quickboost barrels, CMK resin wheels and Falcon canopies (for the Airfix kit, but hoping they might work!) Eduard Big Ed kit and Quickboost air intakes Kit World decals and Aires Merlin, I also have a CMK engine set. I plan to show at least one of the engines being maintained as every picture I can find shows the engine covers off as the bombs are being loaded! Guess they needed a lot of TLC. Finally a whole host of ground accessories, some of which will find their way into the diorama. For the base I've ordered the Noy's miniatures bomber base, which is printed, but will at the very least act as a layout for building upon.
-
Hey guys, this is the third Jet I'm building for my friends 35 years of service retirement gift. The kit is the very old Hasegawa 1/72 F-106A. The moulds are showing their age as there is a ton of flash on the parts and some of the pieces don't fit well. The kit also has raised panel line details. Hasegawa was kind enough to produce this kit with my units aircraft included on the box cover and decals inside. That's pretty awesome in my opinion. I bought two of these because I wanted one for me as well. I rescribed the model which wasn't too hard to do. I'm not that good at rescribing yet so my lines are pretty heavy handed and ultimately not very realistic. Meh, it looks ok to me. I'm pretty far along without many pictures as I'm not sure people really want to see a great amount of build photos unless there is some real talent building the kit with scratch building and stuff like that. I'm not a scratchbuilder.
-
Hi! This is Hasegawas B-25H finished in Tamiya colors. I used Eduard photoetch for interior details, and Quickboost cowlings. A bit green OD, but I pretend this is the ANA 613 color Any comments appreciated Best regards Rune Haugen Norway
- 12 replies
-
- 21
-

-
This is the Hasegawa 1/72 P-2H (P2V-7) Neptune that was built for the informal Neptune Build. I had one of the old boxings and the decals were worthless. It did go together fairly well, but not as easy as you would think from a Hasegawa kit. For all the wonderful machinations in making this kit the WIP thread is here: http://www.britmodeller.com/forums/index.php?/topic/234963193-p2v-7-neptune-blue-blue-and-blue;-finished/. For a 1/72 kit, it is quite large. Although the Neptune served in Vietnam, where I was and the time period I was there, we did not meet so I have no experience up close and personal with one. For the most part I enjoyed the build. I have the Revell reboxing of this kit and will do that one soon. Here are the finished results. And here it is in its new home. As always, all comments welcome.
-
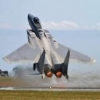
Kit - Hasegawa 1:48 Paint - All Xtracolour enamels. Decals - HaHen Extras - True Details resin seats, Eduard etch Zoom set. TF-104G Starfighter Marineflieger 2 Eggebeck AB, 1986 For some reason (almost certainly 'operator error') the photos are just awful for this one. I'll try and take better ones later in the week. Started this back in January and finished in the middle of last week, ready for the 'Armistice' show here next weekend. I'm guessing that the weather here will be a little less 'inclement' than you'll be experiencing in Telford at the same time. I highly recommend trying HaHen decals if you've never used them before. He specializes in post-war German stuff and they are very, very good - be aware they are on a single sheet of carrier film, so you'll need to cut each and every item. The True Details GQ7 seats are amongst the best resin seats I've ever used, and again highly recommended. As ever thanks for taking the time to look and/or comment. Happy to take all questions, criticism and comments. AFN Ian
- 19 replies
-
- 18
-
-
- Marineflieger
- Hasegawa
- (and 1 more)
-
A couple of years ago I picked up a 1/48 IdolMaster F-2A by Hasegawa to do for my niece. The WIP is here http://www.britmodeller.com/forums/index.php?/topic/234943817-how-to-build-an-f-2a-and-lose-your-mancard/and the RFI is here http://www.britmodeller.com/forums/index.php?/topic/234944706-how-to-build-an-f2-a-and-lose-your-mancard-is-finished/. It was quite enjoyable although very detailed regarding the decal scheme. I was following a link on Britmodeller the other day that took me to HLJ website. Since I was there, might as well cruise it (addicted people will take any excuse to use!) Lo and behold, HLJ had all of the IdolMaster kits on sale. I was weak, I was not strong; I was very bad. I got this kit, the Hasegawa 1/48 F-22 Raptor in the IdolMaster scheme. I also somehow ordered all of these: So, my purchases of Micro Sol and Set will be going up exponentially due to these kits. The main appeal for me is the decal schemes; they are very decal intense. Here are the instructions. As you can see in the instructions, there are quite a few decals that have to be applied and in a certain order (that is never described in the instructions mind you) as some overlap others. The decal sheets are quite large, about 14 inches long. The parameters of the build are to get it done reasonably well, but the main focus is the end scheme of the plane. Obviously, I am not trying to get as accurate as I can F-22 Raptor. This is an anime portrayal of an actual aircraft, not the aircraft itself. With that said, upon opening the box, I am greeted with some lovely shades of plastic. I have standard Hasegawa grey sprues, a very dark black/grey sprue, and multiple sprues with a fetching shade of hot pink. (I can’t wait to go to the LHS to try and match this color. They are used to me getting the drab WWII camo colors. Guess I will tell them I am doing a flaming PR spitfire!) Since this is Hasegawa’s regular F-22 kit, the build starts with the cockpit. After freeing the parts I have a wonderful hue of plastic colors to work with. And all the parts are assembled to dry and await a very dull black base color. As the main cockpit dries, I begin work on the instrument panel and the six decals it gets. After a few doses of setting solution, the decals snuggle into place. Next up a base application of NATO black over the entire cockpit. When the base coat dries, a drybrushing of metallic silver helps to bring out detail and give a little life back to the cockpit. I have not decided if the canopy will be open or closed. If it is closed, not a whole lot will be visible in the cockpit. With such a dark base color, even with the canopy open, not a lot will be visible. Next up the main weapons bay. There are 3 bays, the main, the port and the starboard. I have already decided I will not have the side bays open. I am still debating about the main bay, so I will build that up. The main bay is put together All that is left is the six weapon racks that have to be made up. One down, five to go. And all of the weapon racks installed. The nose wheel bay is next to be built up. Here is where I am at a loss. If you look at the detail molded into the weapon bay pictures above and the main wheel bay to come, there is some fairly nice detail to the parts. For the nose bay, nothing except the one part that is attached at the end of the bay. Now maybe the actual aircraft has nothing in the bay, but I kinda doubt it. I just am at a loss as to why Hasegawa would put such effort into making the detail in the weapon bays and main wheel bay, but nothing for the nose wheel. The two side bays are removed from the sprues (great detail). And the main weapon bay, side bays and nose wheel bay are inserted into the bottom fuselage section. Finally, a rubber gasket is held in place by this round plastic cap allowing the nose wheel to be removed. A very nice touch when it will get down to painting and decaling. (In fact, after looking ahead in the instructions, all of the wheels are designed to be removable. That will be very helpful. Next up is the main wheel bay. There are four different sub-assemblies that are inserted into the fuselage. I have built those up. These are off to get a coat of white before I install them. On a side note, being the ham fisted builder I am, I frequently send small parts sailing far away from where I want them to go. I may not be too thrilled about the hot pink plastic, but it is great when having to search for lost parts!! I haven’t lost a single little small part even though I have dropped several very tiny parts. Apparently, the carpet monster does not like pink. And this is where I stop today. As always comment welcome.
- 71 replies
-
- 4
-
-
- Idolm@ster
- F-22
- (and 3 more)
-
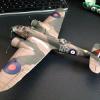
 Hi I present to you one of my best modelling bargains! I picked this set up very cheaply from a trader at a show because the canopy for the bubbletop was missing. I used one from a scrap Thunderbolt in my parts box. The kits fall together really well, but are let down by a very basic cockpit, comprising an "armchair" and an instrument panel decal. The kits were built straight from the box, except for the simple addition of masking tape seat straps. The bubbletop was painted with a Halfords Nissan Silver aerosol and the razorback was airbrushed with LifeColor Neutral Gray and various shades of Olive Drab. I distressed the OD with MicroMesh, which was promptly "repaired" with a coat of Klear! All the decals looked very thick and quite discoloured, but applied easily and settled well into the surface detail with Klear. Once the decals were dry, I applied a Winsor & Newton Satin Varnish to the bubbletop and W&N Matt Varnish to the razorback. My preference is not to over-weather my models, so I applied a Raw Umber wash which I streaked in the direction of the airflow with a cotton bud. The most enjoyment I have ever had with £3!! Thanks for looking.
 -
SBS Model Macchi 202 & 205 Cockpit Set 1:48
Mike posted a topic in Aftermarket (updates/conversions)
Macchi 202 & 205 Cockpit Set (for Hasegawa) 1:48 SBS Model The MC.202 & 205 were of the same design lineage, and consequentially had very similar cockpit, with the main differences being the power plant and armaments. SBS have crafted these two very similar cockpits in a mixed media kit that contains resin, Photo-Etch (PE) and clear acetate film. The sets are different enough to warrant separate boxings, so make sure you pick up the right one. They both arrive in SBS's nice little card box, with a picture of the set on the front. Inside is a bag of resin parts, a separate card-backed bag for the PE and acetate, plus a single sheet of instructions, which are well drawn, clear, and have painting call-outs that are so often missing from aftermarket sets. C.202 Folgore The main differences are in the instrument panel, with the rest of construction common between them. The kit cockpit is designed with inserts for the sidewalls, and the resin replacements for these are much more detailed, and are improved further by the addition of some PE levers and trim-wheel. The cockpit floor is very finely engraved with floor panelling, and has a delicate webwork of supports for the seat, all moulded as a single part, with flash to be cut away with a sharp blade. The curved rudder rests are added from PE parts, utilising the kit rudder pegs, and a new resin control column. The seat is also resin with moulded in belts, while the headrest and armour are PE, with additional PE belt-tops that join to the resin stubs at the top of the seat back. A rear-view mirror is fitted to the top of the windscreen hoop to replace the thicker kit part. C.205 Folgore The instrument panel on both sets is a multi-layered assembly, which is happily shown on the instructions in both an exploded-diagram, and in a completed state, so you can check your work. Using three layers of film and three PE panels that attach to the resin back-plate, you also add a kit part, PE and film rendition of the gun-sight. Where the two sets differ is in the central lower panel, which is larger on the 202, and also has an extended lower panel to the right of the pilot's knees. The additional levers that are added to the panel are identical, with just one extra on the central panel of the 202. Painting As mentioned above, there is a colour diagram at the end of the instructions, using generic names or FS numbers for the correct colours, and if you paint the backs of the film panels white before construction, you will be able to see the faces of the pre-printed dial through the PE panel. Conclusion SBS have impressed us greatly since we became aware of their products, and these sets are well up to muster, correcting what I consider to be a weakness of a lot of Hasegawa kits when measured against modern standards. The resin is well cast, casting blocks sensibly placed, and the PE of a very high quality. Add the clear, concise instructions into the mix, and you have a top line product that is difficult not to like. It's also good to know that your hard-earned cash will be going to a thoroughly nice, cheerful gent. Very highly recommended. C.202 Folgore & C.205 Veltro (scroll down to see the individual sets) Review sample courtesy of -
Kit - Hasegawa 1:48 JT152. Paint - All enamels, Humbrol & Xtracolour. Decals - Almark roundels & kit. Extras - Falcon vac-form canopy. Quickboost drop-tanks, gun barrels. Ultracast seat, exhausts. Eduard etch 'Zoom' set. Hawker Hurricane IIc. 34 Squadron SEAC India/Burma border Mid 1944. This (and a Hasegawa Spit IX) were the first aircraft kits that I started after arriving here in NZ two years ago... Quite a sizeable time in the 'Pending' pile , but I'm fairly pleased with it, and it's only the second Hurricane I've ever completed in over forty years of modelling !! As ever, thanks for taking the time to look and/or comment. All questions, criticism and comments are welcome. Ian
- 23 replies
-
- 24
-
-
I am bound and determined to get through my shelf of doom kits and clear off some builds. This is the third Ready for Inspection I posted today. This is the Hasegawa 1/32 Kawasaki Ki-61-1 Otsu (Tony) Shinten Seikutai. The build thread is here http://www.britmodeller.com/forums/index.php?/topic/234963835-ki-61-hien;-done/. The kit was a delight to put together. There was just enough detail to make it look good, but nothing overboard that would never be seen. The only issue I had was self-induced when somehow, I lost one of the main landing gear struts. How I did this I don’t know, but SAC metal undercarriage came to the rescue. It looks exactly the same as the kit strut and fits in exactly the same manner. I did this kit to practice/learn to airbrush. (A black and terrible art that is fighting me every step of the way. Once I take a baby step forward, and I am then thrown down to the ground and pushed back a yard by the demons that control air brushing and scoff at my learning this evil, mystical voodoo.) Although for this kit, the paint went down well, even the silver under belly. I just barely weathered this plane to give it a not factory fresh, but not that far from it. I gave it some scraps and scratches, and a coat of dirt, but not the extreme weathering seen on some Japanese planes. That I will reserve for the ZM Raiden that is still being built. Here is the finished product. And here it is in its new resting place. As always, all comments welcome.
-
And she's finished! As usually click on the photo for more!
- 23 replies
-
- 20
-
-
This is another kit that is being sacrificed so I can learn to airbrush. I started it as I am waiting for my latest airbrush disaster (Neptune Build) to finish drying so I can attempt to fix/repair the damage I have done through means I am not sure of. So, another fatted calf off to my painting slaughter house. It is the 1/32 Hasegawa Kawasaki Ki-61-1 Otsu (Tony) Shinten Seikutai. Whew, try and say that quickly. I chose this kit as it should be an easy build and it will be an experiment with Japanese camo schemes before I attack my ZM Raiden that is patiently waiting to be painted. If I can get the scheme I am doing down right, I will tackle the Raiden next. If you check some of my more recent WIPs you will find I consider airbrushing a dark art that is always trying to defeat me (and it succeeds most of the time) This will be an OOB as the main point is to get to the airbrush camo stage. So here goes. . . I gave the cockpit parts a base coat of interior paint. While that dried, I painted the various interior detail parts while still on the sprue. When the base coat had dried, I glued the main instrument panel to the front bulkhead and applied the decal for the instruments. This photo reflects the decal is resisting conforming to the panel surface and I am coaxing into compliance. Resistance is futile. Next up, I install all the little pieces where they should go in the main cockpit parts to get ready to do the detail painting and weathering. I have also coaxed all the decals for instruments to conform to their respective surfaces. (Not a great talent I have, just Micro Set and Sol make me look like I know what I am doing.) I am going to let this dry overnight before I get down to detailing and weathering. As always, all comments welcome.
-

Lockheed P-38J 'California Cutie'
HansReggelsen posted a topic in D-Day 70th Anniversary Group Build
Time sure flies, when you're having fun. So here today - 5 days before 'take-off' I present my topic for this Group Build. Hasegawa's 1/48 P-38J w/Eduard etc and Kagero decals: I'll be starting this on friday the 6'th of june and I be having 'The Longest Day' on the telly as further inspiration! I'm really looking forward to this! Cheers - and may your glue never dry out! Hans J -
This is the hasegawa kit. Liveries Unlimited Decals. Model represents Emirates' second 777-200, A6-EME, delivered in 1996 and still in the fleet. 1 by Billy Wilt بيلي الذبول, on Flickr 2 by Billy Wilt بيلي الذبول, on Flickr 3 by Billy Wilt بيلي الذبول, on Flickr 4 by Billy Wilt بيلي الذبول, on Flickr 5 by Billy Wilt بيلي الذبول, on Flickr 6 by Billy Wilt بيلي الذبول, on Flickr 7 by Billy Wilt بيلي الذبول, on Flickr 8 by Billy Wilt بيلي الذبول, on Flickr 9 by Billy Wilt بيلي الذبول, on Flickr 10 by Billy Wilt بيلي الذبول, on Flickr 11 by Billy Wilt بيلي الذبول, on Flickr
- 19 replies
-
- 12
-
-
Hi guys are the weapon sets well molded etc? I'm building a couple 1/72 models including a Airfix Buccaneer and it especially needs a better ordnance load. Was thinking of some resin replacements, but there's quite a bit in those H boxes for not too dissimilar cost... cheers
-
 Kawasaki Ki-61 Type I-TEI, #5262, Chofu, April 1945, Pilot: 244th Senai commander Capt. Teruhiko Kobayashi (reserve a/c) Kit: Hasegawa (in the meantime clearly superseded by Fine Molds and RS Models) Photo-etched parts: Eduard Wheels with rubber tires: Equipage Decals: Life Like Decals “244th Sentai Pt.2” Built in 1997 and finished initially as that dubious "Shamrock Tony" much discussed around 2000. Partially repainted and completely re-decalled in 2004. Although the level of painting and weathering leaves something to be desired being obviously below that of my more recent models presented here and the exact colours might remain somewhat controversial, lot of corrections and extra detail (wheel wells,ventral radiator, drop tanks - just to mention a few...) were done and so I dare to present it to your attention...
- 10 replies
-
- 11
-
-
Hi all, I have a question for the F-104 experts out there. What are the differences between the cockpits of the TF-104 and the F-104DJ? The reason I ask is because I'm thinking of using Aires' TF-104 1/48 cockpit in my Hasegawa F-104DJ. Any insight would be very much appreciated. Many thanks in advance!
-
 Hasegawa 1/48th recycling... - ref. HSP324 Source: http://www.amerang.co.uk/model-kits?product_id=48642#.VCwtOT9xmUm V.P.
 -
This is one of my earlier builds finished as early as 1999. The level of painting and weathering leaves something to be desired being obviously below that of my more recent models presented here and the colours might be somewhat controversial in the light of new information, which became available since then. Nevertheless, as it seems not to be really a lot of NL-KNIL B-339 builds around and I was pretty busy doing all that extra detail, I still dare to present it to your attention: Brewster Model 339C B-3110, 2-VLG-V, ML-KNIL, Singapore, January 1942, flown by Kapt. J.P. Van Helsdingen Kit: 1/72 Hasegawa F2A-2 Buffalo "U.S. Navy" Afermarket sets : Eduard #72-233 photo-etched detail set Hobby Plus navigation lights, wire Decals: Aeromaster # 72- 146 "Buffalo Collection Part II" Modifications to convert F2A-2 to a Dutch B-339C: the tail fuselage cone with arresting hook was replaced with the longer and more pointed one (without a hook ) featured on land-based a/c; a fixed tailwheel mounting with a larger wheel was installed instead of the retractable one with a small wheel; cuffs were removed from the Curtiss Electric propeller blades (although the kit does provide the uncuffed blades as well, but these are Hamilton Standard referred to be used with a B-239 and therefore don’t fit to the Dutch version, being first of all just too short); the area behind the cockpit under the canopy was simplified as the navy equipment (liferaft, RDF loop etc.) used on F2A-2 wasn’t installed on B-339 the straight pitot tube on the starboard wing was replaced by an ‘L’ shaped pitot tube. Other corrections/additions/replacements: wing panel lines were not very accurate and were so filled in with superglue and then rescribed according to the available photos; only one landing light (on the port wing undersurface) is required on this version of Buffalo, so the second one provided in the kit was just mounted in place, the seam was filled and then everything was sanded and polished to be later just painted off; wing, rudder and elevator trailing edges were thinned the wheel wells were corrected and extra detailed as they should look like on the real a/c; the fuselage interior seen through the wheel wells was almost totally empty in the kit, so a lot of details were added there; air intakes at the top and bottom of the engine cowling were represented as just holes und had therefore to be deepened by cementing plastic pieces behind that holes followed by drilling them and scribing the correct tunnels. navigation&formation lights were replaced with transparent ones. the machine gun barrels were made of hypodermic needles.
- 10 replies
-
- 18
-
-

-
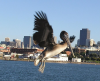
VF-11 F2H-2 over Wonsan (courtesy of Wikikmedia.) So I'm going to have two sets of builds going. This one will be a bit more fun compared to the more serious RB-26 effort. I've built almost all of the US Navy's Post-WWII fighter types in 1/72; the Panther, Banshee, Demon and Fury are the only ones I have left to do. This GB is a great excuse to build the two earliest ones. Its also a period (Even outside of the Korean war) I'm really interested in. Naval aviation was undergoing a massive shifts during this period. Technology is the most obvious: the transition to jets offered much promise as well as challenges. However there was also a major debate about what was the role of the Navy, particularly in light of nuclear weapons development. Its an interesting time, and maybe I'll post some more about it, and the fighters later. So... the kits. F2H Banshee from Sword. I've been eagerly awaiting this kit. I purchased mine from Rob at West Coast Hobbys, in anticipation of this group build. He's been awesome retailer for me over the years, and its worth the effort to buy from there. The kit itself looks fantastic: Hasegawa F9F-2 Panther So I've had this kit for awhile and been meaning to built it, but never got around to it. Now, of course this kit is going to need some help to get it looking good. The eduard set is pretty exciting, but I also got some other help The Obscureco seat is a pretty nice addition. I've used their stuff on a number of my kits, and have never been disappointed. The most recent one was an Academy F2H-4 Banshee... which really made the model shine. This set comes with two seats and a great instruction set. Pretty awesome. Finally, I needed a new set of decals, as I had cannibalized the kit's original set for another kit. So, I also ordered a set of Blackbird decals from West Coast Hobbys: I think I'll chose the VF-111 scheme, as I recently finished a F11 tiger in the squadron's markings. So that's that for now. This one will be a bit of a faster build, hopefully I can complete it in less than a month. Thanks for looking!
-
Dewoitine D.520C1 n° 277, GC III/6 5ème escadrille l'armée de l'Air, Rayack (Syria), June 1941, flown by Sous-lieutenant Pierre Le Gloan Kit: 1/72 Hasegawa Dewoitine D.520 "French Air Force" Afermarket parts : Eduard #72-254 photo-etched detail set (selected parts only) Falcon vac formed canopy (from the set #26 “France WWII”) Corrections & additions made on the kit: The nose air intakes were originally the wrong shape being too narrow at their forward end. This was corrected with plastic inserts and re-shaping. The louvers were added to the intakes as it can be seen on the photos. The under-belly cooler was too narrow and also not curved enough in outline. It was re-shaped by making two cuts in its rear part, repositioning the rear ends of the cooler sides outward and filling the gaps with Mr.Surfacer. The cooler interior (area covered by the cooler) was completely re-worked by cutting out the flat plastic fragment of the lower wing part and making an appropriate niche instead, as it was on the real thing. Therefore, the etched cooler grills by Eduard (designed to fit the kit parts) became just useless and the replacement parts were finally scratch built. The wing area where the cooler is attached was also modified according to the reference photos. The main wheel wells (too shallow and represented totally wrong on the kit) were completely re-worked, in particular, the niches for the landing gear legs. For the wheel well “ceilings” the Eduard parts were used, with some additions though. The kit parts for the landing gear covers were thinned down and modified for correct appearance. This way they still look much better than the flat etched pieces. The incorrect curved representation of the area under the rear view windows behind the cockpit (à la P-40) was removed and replaced by the flat panels at it was the case with the real thing. Some panel lines were added and some were corrected according to the reference photos. The rear view windows (unfortunately, not present with the Falcon set and too thick as kit parts) were therma-formed using the kit-parts as templates. The main wheels were flattened using the surface of the electric cooker. The etched parts for the gun sight were still too big and this one was eventually scratch built as well. I decided to add the ring gun sight as well, since it can be clearly seen on one of the photos showing this a/c. The kit decals were modified according to the reference photos.
- 18 replies
-
- 18
-
-
Here a very old model of an italian starfighter: out of the Hasegawa boy with spare (at least partly correct , Paolo, please ignore the details ) decals hope you still like it!
-
It seems I just can't get away from those invasion stripes. The latest addition to my collection is this Hasegawa Hellcat built as supplied in the box, wearing the markings of 800 Sqn, flying from HMS EMPEROR 70 years ago today (15 Aug 1944), during the second D-Day - the Allied invasion of Southern France, Operation Dragoon. The forces landed in the Nice/Hyeres area during Dragoon were almost entirely US and French, however the immediate air cover came from Allied Task Force 88, the air component of which was almost entirely provided by the RN's Escort Carrier force. Dragoon was immensely successful, building on the experience of Normandy to conduct a textbook (partly) opposed amphibious landing. Within a month the Axis defences had collapsed and the southern French ports were in Allied hands, receiving much needed supplies directly from the US (making up for the problems capturing the port of Cherbourg in the North). There isn't much you can say about the Hasegawa kit; OK so it has lightly raised panel lines and the wheels have some awkward ejector pin indentations, but in all other respects this was one of the kits that earned Hasegawa their superb reputation for precision and buildability. As with pretty well every WW2 Fleet Air Arm aircraft, the markings are open to some discussion; in theory the invasion stripes should have gone by August, but it has been suggested 800 kept them to avoid the Hellcats (not used before in the Mediterranean) being mistaken for Fw-190s. The red cowling was a Mediterranean Theatre recognition marking (think red spinners on Spitfires, Hurricanes and Mustangs), but not seen on all aircraft. Hasegawa have also chosen to model this aircraft as she appears in a well known photo thought to have been taken in the Aegean a month or so later, with part of the stbd side invasion stripes painted over by what looks like a repair job. In this photo she appears well weathered, but most of the pictures of Dragoon show the aircraft in remarkably pristine condition - in light of the partial stbd invasion stripes I chose to reflect the well weathered look. I also painted behind the Royal Navy titles and serial numbers; as per the photo. FredT
-

IdolM@ster F-22 Raptor, Feeling Pinkish?
georgeusa posted a topic in Ready for Inspection - Aircraft
Nothing screams raw, pure, outlandish masculinity like a bright, pink, aircraft covered in multi-colored flowers with Japanese Anime cartoon figures on it. (I promise after this post, I am putting on my boots, riding my horse, punching a few cows, eating very raw steak and telling SWMBO that I really don’t care what she thinks about my purchase of 3 1/24 Airfix Typhoons!! And then, I will take a blanket and find refuge outside with the dogs where I will be sleeping for a few nights.) This fine kit is Hasegawa’s 1/48 F-22 all doled out in the IdolM@ster markings. IdolM@ster started out as a video game and then expanded into books, magazines, TV shows and a movie. The F-22 IdolM@ster centers on Haruka Amami. And, that, folks is about all the knowledge I have regarding its background. If you need more, that’s what the internet is about. While feeding my slight obsession for Tiger Meet Aircraft, I came across one of these kits (there are several aircraft in the IdolM@ster series) and got hooked. This is my second with 5 more to go. The kits are somewhat decal intensive to say the least. It is the standard Hasegawa F-22 Raptor kit, albeit molded in bright pink and dark grey sprues. The trick to these kits is a very careful study of how to put on the 200 plus decals and then using a shockingly huge amount of decal setting solution to make the decals behave. With patience, the decals will settle into the kit decal as if they were painted on. To me it is an enjoyable build, different looking, and just an escape. The build thread is here. http://www.britmodeller.com/forums/index.php?/topic/234964072-the-idolmster-f-22-raptor/ I am going to finish a few more conventional builds before I tackle the next kit in this series. The last picture is the kit in its new home next to the other IdolM@ster kit and some of its Tiger Meet cousins. As always, all comments welcome. Must make mental note; really, really need to fix that wheel!!- 12 replies
-
- 9
-
-
- F-22
- IdolMaster
- (and 4 more)