Search the Community
Showing results for tags 'hasegawa'.
-
This is the classic 1/72 Hasegawa J2M3 Raiden kit supplemented with DEAD Design Models canopy masks. Mr. Color, Tamiya, and Alclad paints. Weathering with Tamiya and AK panel liners, Abteilung and Mig oils, and a touch of Tamiya pigments. The decals gave me trouble, wrinkling under my Solvaset regimen, and so I was forced to weather them: too much, IMHO. Here is one jacked up Jack. Thanks for looking!
- 5 replies
-
- 24
-

-
- 1/72
- J2M3 Raiden
- (and 1 more)
-
 Hi aviation modellers, as I haven't been able to start a project in a while I thought I would share a build from a couple of years ago. This model is built from the Hasegawa 2002 boxing of the Ki-44-II, or Army Type 2 Fighter, and represents an aircraft of the 3rd Chutai, 47th Hiko Sentai based on Narimasu airfield northwest of Tokyo in 1944-45, the same unit that @Toryu depicted in his superlative 1/48 scale build, found here: This unit was put into action against the B-29s that wreaked havoc against Tokyo and other Japanese cities on firebombing raids late in the war. Do correct me if I'm wrong, but I believe that aircraft assigned to Home Defense can be identified based on the white painted wing and fuselage background for the Hinomaru (meatball) national markings. Interestingly, according to pacificwrecks.com, the airfield was converted post-war into the "Grant Heights Family Housing Annex" for American military personnel and their dependents, with the airstrip serving as the main street. The build presented very few problems and I would recommend the kit to beginners and vets alike. Happy days, Nick.
- 6 replies
-
- 34
-
-
- Ki-44
- Nakajima Ki 44
- (and 1 more)
-
 It's been a while since I last posted something so I'm now about to make up for that. This has been my main "summer 2023 build" & unfortunately I just couldn't get into taking progress pics. It was mainly a matter of getting the chance to build as and when. Small bits here & there amongst whittling other kits. So here it is; General Dynamics F-111F Aardvark 70-2390 Miss Liberty II Lakenheath 01-1991 1/72 Hobby2000 Hasegawa kit. Armory wheels Master brass pitot Reskit exhausts Reskit AN/ALQ-131 Reskit 3D printed ladders Eduard cockpit set Eduard Brassin GBU-24 X2 Hasegawa GBU-15 X2 Hataka Vietnam War redline acrylics. All the decals were from the kit & were very good quality only the colour scheme in the kit isn't quite accurate to the actual airframe with the general three colour pattern. Hobby2000 have you put colours where they shouldn't go, then I even fluffed up on the forward starboard placing of the green which should have completely gone underneath the four squadron badges. There are photos of 2390 with munitions on while taxying out of a HAS, so I had to research what I was supposed to hang from the pylons. Should have asked here I know! I hope I've got it right. GBU-24's outboard from Eduard, I slapped the supplied yellow rings around them, but have been informed they should have two? The GBU-15's were from one of the Hasegawa weapons sets. I also sourced a decent AN/ALQ-131 from Reskit fixed to its rear station. Other than that, the kit goes together really nicely. I did have to scribe the details in for the wing gloves in the fuselage sides oh & for some reason I managed to fog the bottom of the windscreen, but it doesn't look too bad. I used my usuall Ammo Mig panel line washes. I started using a ground equipment set for my Tiger Meet Starfighter, so the rest of the box was used on this build & painted in the later NATO dark green, with a lonely pilot waiting for the rest of the ground crew to finish their breakfast! Thanks for looking. Martin
- 27 replies
-
- 77
-
-

-
A year ago I made a start on this kit in the F-15 STGB but then ground to a halt. Time to get it going again - here is a link to my first attempt. One of the reasons I never finished it is because it was a release based on the very first few built with markings for one prototype and one development aircraft, It does come with a shedload of Rockeye bombs, but I fancy building it with a different payload, so may need to get some more decs. I also need to do a bit more research to see what if any changes I might need to make for a later service aircraft. More soon - hopefully. Pete
-
HI everyone!🙂 this is my HASEGAWA 1/48 Aichi B7A2 "grace" It's not famous,but I realy like the shape of this airplane.. the kit is almost 25years old,however,I think it's a good kit the IJN green has always been a challenge fo me.. try to build this beauty as good as I could.. hope you guys like it!
-
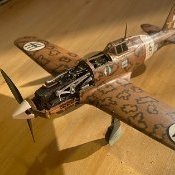 Hello, this model was very hard for me to finish, it exceeded my skills. It was in the making for long-long years and it was put aside many times. This is the old Hasegawa Macchi C.202 1/48 with the FM Detail sets (which is not available anymore). I used Mike Grant Decals smoke rings, because I was not able to make nice smoke rings with my airbrush at the time. The main thing is, the model should look good in my opinion. Then I used Mr. Hobby semi-gloss varnish to protect the decals, which are quite sensitive. I had to use many times super glue gel to glue resin or metal parts. For the wash the bottom side I used PLW Dark Sea Blue (I had it already because of my SU-27), for the top I used PLW Dark Brown. I know it's not perfect, there are some things which aren't, it was very hard for me to build, but I think it looks good and I have gained lots of experience with this one. The experience gained here, will come in handy when I will do my Zoukei-Mura Ho 229 1/48. Here is the Google album
- 17 replies
-
- 31
-
-
I'm a great fan of " Robotech" since I was a boy ( back in the eighties , I was born in 1979). I discovered later that Robotech was an adaptation of different Japanese Anime one of which was "Macross super dimension fortress". the Regult is the most common single pilot battle pod used by the Zentradi on that Anime. I had fun building this one. is much bigger than I expected. I added some dents , and bullet holes here and one little panel on the legs. But is mostly out of the box.
-
This kit, bought at a model show for £6 Instruction header. Options - I'm going for that Eagle on the tail. Parts. Unused metal seats leftover from an F-14, and various smart bombs. Walkaround
-
 #25/2023 Next IJN subject finished by my dad. Hasegawa kit oob, only added brake lines with lead wire and antenna wires with EZ Line. The seatbelts are molded onto the seat. Painted with AK Xtreme Metal White Aluminium and Gunze H59 IJN Green with a touch of blue. Build thread here https://www.britmodeller.com/forums/index.php?/topic/235130819-too-few148-kawanishi-n1k2-j-shiden-kai-george-ijn/ The Shiden Kai was a potent opponent for the allied fighters but not even 500 have been built. Aircraft of Lt. Takashi Oshibuchi, 343 Naval Flying Group, 701 Sqn, Matsuyama Airbase in March 1945. DSC_0001 by grimreaper110, auf Flickr DSC_0002 by grimreaper110, auf Flickr DSC_0002 by grimreaper110, auf Flickr DSC_0005 by grimreaper110, auf Flickr DSC_0006 by grimreaper110, auf Flickr DSC_0007 by grimreaper110, auf Flickr DSC_0008 by grimreaper110, auf Flickr DSC_0011 by grimreaper110, auf Flickr DSC_0004 by grimreaper110, auf Flickr DSC_0013 by grimreaper110, auf Flickr DSC_0014 by grimreaper110, auf Flickr DSC_0015 by grimreaper110, auf Flickr DSC_0016 by grimreaper110, auf Flickr DSC_0003 by grimreaper110, auf Flickr DSC_0018 by grimreaper110, auf Flickr DSC_0019 by grimreaper110, auf Flickr DSC_0020 by grimreaper110, auf Flickr DSC_0021 by grimreaper110, auf Flickr DSC_0022 by grimreaper110, auf Flickr DSC_0023 by grimreaper110, auf Flickr DSC_0024 by grimreaper110, auf Flickr DSC_0025 by grimreaper110, auf Flickr DSC_0027 by grimreaper110, auf Flickr DSC_0005 by grimreaper110, auf Flickr DSC_0003 by grimreaper110, auf Flickr and together with the N1K1-Ja DSC_0028 by grimreaper110, auf Flickr DSC_0029 by grimreaper110, auf Flickr DSC_0030 by grimreaper110, auf Flickr DSC_0001 by grimreaper110, auf Flickr
 -
This B5N2 Kate is part of a 3 model kit that Hasegawa released a few years ago. The other two planes are an A6M2 Zero and an D3A1 Val. The 3 planes all took part in the initial attack on Pearl Harbor, and were launched off Imperial Japanese Carriers. To stay with the theme; I decided to build a 1:48 replica of the IJN carrier Hiryu. I chose to build a 1/4th section of the carrier as it should be ample room (24”x36”) to get some photographs of all 3 planes together once they're all finished. This was the first time I utilized photoshops function to replace the background in favor of some real images and really enjoy how the photos turned out. I also just started using a 105mm macro lens. Overall, I am satisfied with the kit and am excited to start the next two planes.
- 19 replies
-
- 33
-
-
-
The late version of the George was an equal opponent for Hellcat and Corsair but not even 500 have been built. Soon to be started DSC_0008 by grimreaper110, auf Flickr
-
This was the result of leftovers from another P-3 conversion project (to a P-7A) Mostly P-3 parts OOB, the tail planes are from a B-17C as I could not find the original stabs.
-
Not cleared either F-4 from the bench, but making progress and waiting for paint to dry so I thought I'd get this together, as top photo: Hasegawa F-104S Master pitot Wolkpak decals Hasegawa weapon set for AIM-9L All still in bags. And second photo some reference material. I fancy the QRA with 2 sidewinders from 2004, although the only photo I can find of MM6763 (my preferred option from decal sheet as I like that "M" swoosh) as a ASA-M shows clean and no stores, see link: https://www.airliners.net/photo/Italy-Air-Force/Lockheed-Aeritalia-F-104S-Starfighter/1290763 That link does confirm that the decal sheet is correct with the 4o Stormo famous emblem a black horse on white rather then outline on black. I shouldn't start but I probably will. Chris
- 30 replies
-
- 15
-
-
Hello All, I have had a couple of requests to repost pictures of my model Soya which I thought were lost to Photobucket but I've dug very deep and found the originals wjhich were taken in daylight and added more realism. A tiny but wonderfully detailed little ship especially if the Hasegawa etch set is used to enhance it. The base was home made and covered in Polyfilla water is Vallejo still water and everything painted with Revell Aqua. Hope this little dio inspires others to have a go and it certainly makes a change from grey ships! Please let me know your thoughts on this one some of you might have even seen it at a model show but these days ill health keeps me at home. Hope this is of some help to those that requested a repost. It sure was a lot of fun creating it! MODeller
-
After a lot of deliberation, this choice has been made. I'll be building this kit As this option The kit isn't totally accurate for this particular aircraft - but we'll just have to put up with that.
- 33 replies
-
- 11
-
-
#19/2023 Next Zero by my dad. Hasegawa kit oob, added Eduard seatbelts and EZ Line for the antenna wire. Painted with Gunze H59 IJN Green and Tamiya XF-12 JN Grey. The yellow wing leading edges are painted. Build thread here https://www.britmodeller.com/forums/index.php?/topic/235128898-last-of-the-breed148-mitsubishi-a6m8-type-54-ijn/ Last produced Zero type. Two A6M5c were converted and fitted with the stronger Kinsei engine to replace the no longer produced Sakae engine in April 1945. The M8 never made it to serial production. At least one of the two prototypes fell into US hands. DSC_0001 by grimreaper110, auf Flickr DSC_0002 by grimreaper110, auf Flickr DSC_0003 by grimreaper110, auf Flickr DSC_0004 by grimreaper110, auf Flickr DSC_0005 by grimreaper110, auf Flickr DSC_0006 by grimreaper110, auf Flickr DSC_0007 by grimreaper110, auf Flickr DSC_0008 by grimreaper110, auf Flickr DSC_0009 by grimreaper110, auf Flickr DSC_0010 by grimreaper110, auf Flickr DSC_0011 by grimreaper110, auf Flickr DSC_0012 by grimreaper110, auf Flickr DSC_0013 by grimreaper110, auf Flickr DSC_0014 by grimreaper110, auf Flickr DSC_0015 by grimreaper110, auf Flickr DSC_0002 by grimreaper110, auf Flickr DSC_0017 by grimreaper110, auf Flickr DSC_0018 by grimreaper110, auf Flickr DSC_0019 by grimreaper110, auf Flickr DSC_0020 by grimreaper110, auf Flickr DSC_0021 by grimreaper110, auf Flickr DSC_0022 by grimreaper110, auf Flickr DSC_0023 by grimreaper110, auf Flickr DSC_0003 by grimreaper110, auf Flickr The First and the Last DSC_0024 by grimreaper110, auf Flickr DSC_0025 by grimreaper110, auf Flickr DSC_0027 by grimreaper110, auf Flickr DSC_0001 by grimreaper110, auf Flickr
-
Hi everyone, this was the Queen of the Queens... of my personal collection of Queens of shelf, having bought and started it in 2003 😱 Between the starting and finish date there are not only 20 years, but 7 (yes, seven) movings. Now I'm in my current house since November 2021 and I'm slowly trying to build a nice workspace and resuming modeling. Kit is almost straight OOB. I've only improved the seats and cockpit with some scratch built details, and tried to reproduce the wing folding mechanism. Painting has been done with Gunze Aqueous and this was the first time that I tried to use oils for weathering and I'm quite impressed as I see a lot of potential! That's all, let's now post some pics...
-
 If I did not already have more than enough P-3s built, it is time to add another. This is a dual build with my son, he works on AP-3Cs so he wanted to build a model of his aircraft. So I am tagging along, building one as well and helping him out with tips (he unusually builds and paints Warhammer) as he has not built an aircraft kit in about 15 years. I started with the cockpit, having built a few P-3s I had not done any real detail work on any of the cockpits, so with help from my SME I reconfigured the rear cockpit walls to more what they look like. I also added some crew for the spares box cannibalising them to get non-helmeted heads on them. Seat belts from an Eduard cockpit set that had been used on a previous model. This is what an unmodified cockpit looks like from my last AP-3C model. Next was the wings, CMDS fairings were fitted to the rear of the inboard engine nacelles, the wing tip sensor packs fitted and obligatory filling of weapon pylons mounting points. I also added support structure for the stand. Finally a the cockpit installed and test fit of major components
- 27 replies
-
- 15
-
-
 Eduard next limited edition kit will a 1/32nd Curtiss P-40N Warhawk - ref. 11104 Source: https://www.eduard.com/store/out/media/distributors/leaflet/leaflet2017-07.pdf V.P.
 -
#18/2023 My dad´s US naval theme continues, this time with something more modern. Hasegawa´s A-7 kit, first released in 1987, this is the P14 kit from back then. Aires A-7 late seat, TwoBobs decals used which were very thin and tended to wrap and tear. Painted with Gunze H311 FS36622, Gunze H310 FS30219, and Tamiya XF-69 Nato Black. Build thread here https://www.britmodeller.com/forums/index.php?/topic/235126917-flying-gecko148-ling-temco-vought-a-7e-corsair-ii-va-22-fighting-redcocks-usn/ Around 1987/88, the CO and XO aircraft of VA-22 were painted in special camouflage. Whereas the CO bird was painted in a greyish camo, the XO one became brownish. At least the CO plane in its new clothes took part in Operation Praying Mantis in April 1988, a clash with the Iranian Navy, don´t know about the XO plane. Later in 1988 "302" wore single grey again. DSC_0001 by grimreaper110, auf Flickr DSC_0002 by grimreaper110, auf Flickr DSC_0003 by grimreaper110, auf Flickr DSC_0004 by grimreaper110, auf Flickr DSC_0005 by grimreaper110, auf Flickr DSC_0006 by grimreaper110, auf Flickr DSC_0002 by grimreaper110, auf Flickr DSC_0001 by grimreaper110, auf Flickr DSC_0007 by grimreaper110, auf Flickr DSC_0008 by grimreaper110, auf Flickr DSC_0009 by grimreaper110, auf Flickr DSC_0010 by grimreaper110, auf Flickr DSC_0001 by grimreaper110, auf Flickr DSC_0018 by grimreaper110, auf Flickr DSC_0003 by grimreaper110, auf Flickr DSC_0011 by grimreaper110, auf Flickr DSC_0012 by grimreaper110, auf Flickr DSC_0013 by grimreaper110, auf Flickr DSC_0014 by grimreaper110, auf Flickr DSC_0015 by grimreaper110, auf Flickr DSC_0016 by grimreaper110, auf Flickr DSC_0017 by grimreaper110, auf Flickr DSC_0019 by grimreaper110, auf Flickr DSC_0027 by grimreaper110, auf Flickr
-
 Hello, I've not been posting here for more than a year which does not mean I had nothing to show. Looking back to my shelves I figured I have almost a collection of aeroplani dell'AMI which I never got posted here. So starting to fix this omission with the iconic aircraft of the jet aviation golden age - the F-104G Starfighter or il Spillone as it was nicknamed in Italy - the country which was able to keep the beast flying into the XXI century!!! F-104 is the airplane I always liked for it's extreme rocket-like shape that shows its power and speed. Super-strong engine with small wings, cabin, radar, tail attached. No surprise I wanted to do the most clean version of it without wingtip fuel tanks and without anything on the fuselage bottom. Clean sheer power! That is how I got to choose the first version used by AMI - F-104G and modelled it in the cleanest configuration possible. Just added two Sidewinders to show even more power. The prototype I chose was flying with 10° Gruppo, 9° Stormo at Grazzanise airbase in Campania. The location of the airbase is perfect for making superhot photoes of F-104 flying over the Amalfi coast above blue sea and rocks... Here is the photo that I used to inspire my project: http://www.916-starfighter.de/Large/Stars/wA9-05.htm The kit is the very well known Hasegawa set. I had the boxing for Luftwaffe and AMI F-104G/S. The kit decals for AMI aircraft are intended to build up an S version so I got couple Sky Decals sheets with Italian roundels and with multiple F-104 AMI badges to reproduce 9-05 s/n 6522 with il Cavallino Rampante on the tail. Unfortunately the Sky Decals set contained il Cavallino for grey schemes only so it did not have a white background which I sprayed myself trying to match the shape of the insignia as much as possible. I also used quite a bit of aftermarket staff. That included CMK interior set, Aires exhaust, Armory wheels, Master pitot tube. Of all these items I would say exhaust makes the largest difference as Hasegawa's is fairly simplistic. Also Master brass antennae is a must have for me anytime. So much better than kit parts for small price and very easily installed. CMK interior was quite poorly fitting to be honest. Of course it looks much better but not much of it is seen after you close canopy. As mentioned above - decals are coming from Sky Decals sets. Sidewinders are from Hasegawa weapons set. Paints are Hobby Color for camouflage and Vallejo aluminum metallic for underside diluted with a little bit of neutral gray to reduce shiny effect. Blueish tint for radome is self-mixed. I'm still not sure what the right colour should be there. At least I'm satisfied with how this part looks like. And some collage with close up shots: Thanks for watching! Dennis
 -
Well, because my dad builds mostly pairs lately, I thought a second Zero besides the A6M3 in surrender scheme would be nice. Decided for the last built Zero type, as far as it is known, only two prototypes were built. DSC_0002 by grimreaper110, auf Flickr DSC_0003 by grimreaper110, auf Flickr
-
After all the yellow wing subjects, it´s time for some more modern USN stuff. Gonna do a Hasegawa A-7 with TwoBobs decals, representing the XO aircraft of VA-22 in the second half of the 80ies, which received a special livery like the CO. DSC_0001 by grimreaper110, auf Flickr lower scheme DSC_0002 by grimreaper110, auf Flickr
-
Kit - Hasegawa Paint - All acrylics Decals - Sky Decals 48-052 Extras - Eduard generic RAF seat harness. Vac form (rear) canopy. Hawker Hurricane IIB. 335 (Greek) Squadron, RAF. North Africa. Mid 1942. This has been in my stash for around fifteen years, so with the immanent arrival of the Arma kit, I decided to dig it out and have a go. What a great experience, said here before just how much I love the 1990's era Hasegawa 1:48 WWII kits, and this did not disappoint. Home brewed camo tones using Tamiya acrylics and possibly some alchemy. I used W & N oils to fade and change the tones, consciously making the fabric areas more faded which you can especially appreciate on the fuselage. - artistic license ?, well yes but not 'extreme'. The decals are by Sky Decal and are about the same age as the kit. Utterly perfect, QC back then was astonishing. No extras other then the seat harness and a vac-form rear canopy. I cut separated and used the 'windshield' section kit and did the opposite for the rear. So there t'is, please feel free to ask any questions, register any outrage or make any comment at all. Cheers from NZ. Ian.
-
 So this is yet another conversion of a Sikorsky SH-3H kit to depict the SH-3D "Old 66" recovery helicopter for Apollo 11. It's the first time I've posted to "Work In Progress". I suspect I'm going to be grateful for input from people with more experience of this aircraft. My starting point is Hasegawa's 1/48 kit: I've also got the necessary short sponsons from Belcher Bits, the Starfighter/Old 66 decal sheet, a set of Montex paint masks, and the Hasegawa 1/48 SH-3D instruction sheet, downloaded from Scalemates. On opening my kit box bought from eBay, I discover I've also got two sets of Quickboost seats (if anyone wants one, drop me a PM and I'll post it to you), and an Eduard photoetch cockpit set. I started by doing a bit of scratch building to produce the camera mount and Yagi antennae. I've been helped with the appearance of the camera mount by watching Todd Douglas Miller's excellent Apollo 11 documentary. The camera mount for Apollo 11 seems to have been a bit more complicated than is often depicted: The lower right image is from NASA / S-69-21723; the others are screen-grabs from Apollo 11. There is certainly something mounted outboard of the two video cameras, wrapped with yellow tape. I've interpreted it as being an SLR stills camera with a motor drive. Here's my best effort to sorta-kinda reproduce the appearances above: In the Apollo 11 images above, there also seems to be a weapons mount point just forward of the camera mount, bearing some sort of attachment I can't quite make out and which I can't find in my reference material. I'm going to need to scratch build this, too. It seems the same sort of fixing was probably present on the aft mount points on the port side too: What was happening on the forward mount points behind the sponsons is a mystery to me. I'll put together another stills camera to mount on the starboard side, but I've no evidence of what this actually looked like, beyond a tantalizing glimpse in about three frames of Apollo 11, as the helicopter drops out of sight on the elevator. The Yagi antennae were a bit more straightforward. Here they are with their attached cables: I used the "free" resin seats and photoetch detailing in putting together the cockpit. It's an SH-3H instrument layout, but it looks better than I could manage trying to detail by hand: The SH-3D instructions were very useful in finding out which lumps and bumps needed to be removed from the fuselage, since that kit used the same moulding as the SH-3H: I also shortened the horizontal stabilizer and filled the locating holes for its supporting strut: The kit comes with what seems to be a depiction of the dipping sonar retracted into its well, so I carved that out and blanked off the upper end of the empty well with styrene card: Finally, I used the Montex interior masks to paint up the inside of the canopy, and added the green panels with Tamiya clear green (which I found something of a nightmare to apply). Hopefully, some actual assembly photographs coming up soon.
- 54 replies
-
- 17
-