Search the Community
Showing results for tags 'hasegawa'.
-
 After 2022 (link) newsletters, the Hasegawa news for January 2023. Source: http://www.hasegawa-model.co.jp/month/202301/ V.P.
 -
From the Tintin book 'The Red Sea Sharks'. It's the Hasegawa 1/72 Mossie kit with (heavily modified) Blue Rider decals. Depicting it in flying mode meant closing the undercarriage doors, which required a lot of filling/sanding. The only other deviation from the kit instructions was the re-configured nose gun arrangement, and I added Skut the pilot. My figure painting ability is – appropriately – comical, but he looks OK under glass.
- 43 replies
-
- 91
-

-

-
I’m getting back into this group build with a Hasegawa Ki-45 Toryu (Dragon Slayer), Allied reporting name Nick. I had this kit lined up for the Asia GB later in the year so will have to find something else that when the time comes. Started by putting the cockpit together and prepping some of the smaller components for painting. I added a little detail to the side walls for interest: The ejector pins wont be visible once the cockpit is in place. I forgot to rake a photo of the sprues before I started, here they are: Nice crisp moulding. Thanks for looking. AW
- 37 replies
-
- 17
-
-
Hasegawa F-104S ASA-M. Wolfpak decals AMI 9th Stormo 2004 Hasegawa AIM-9, weapon set V Master pitot Humbrol and some Xtracolor enamels brush panted Humbrol wash W&N matt varnish Finished in KUTA 2023 as link. Shown with: This month's other completion, Phantom FG.1, 1986 Another, Norwegian, F-104, mid-70s Closest in date, near contemporary, JASDF F-4EJ, 2007 Thanks for looking. Chris
-
 Happy New Year; could be a bit of a mistake, but while waiting for weathering to dry on Phantom I started decals on the F-104S which was the reason the FG.1 ended up on the SOD. These Wolkpak Decals go on very well, even the 2 part roundel, and nice density, never used them before. There are a lot of stencils for the tanks and upper side roundels and the only instruction is one side view. Chris
 -
This F11F was entered in the Artwork Group Build with the sharkmouth decoration. This model was more or less built OOB, with a full rescribe and some extra detail added. Cheers, Luka
- 13 replies
-
- 61
-
-
-
- Hasegawa
- F11F-1 Tiger
- (and 1 more)
-
 Hi all, Here's my latest 3D printed kit update, this time for the Kinetic 1/48 Sea Harrier FRS1 and FA2 (they may also fit the Harrier Gr1/3 and T-Harriers). The update consists of two parts, including the prominent fan and then a representation of the compressor. As can be seen, there is an enormous improvement with these parts, when compared with the original kit part! Kinetic intake fan, selling for £6 plus £2.50 postage. See also, upgrade for the Hasegawa kit (will also fit kits that use the Hasegawa plastic - Revell & Hobby 2000). 3D printed upgrade featuring a two-piece fan. Hasegawa intake fan, now selling for £8 plus £2.50 postage. Cheers! Ben
 -

Ki-84-I Hayate - Home Defence - 1/48 Hasegawa
BOBO posted a topic in Ready for Inspection - Aircraft
I started the model in 2016, when I was still living in Strausberg. The model survived the move to Berlin without any damage and was then waiting to be completed. My current wife always encouraged me to continue building the kit. Now I've done it, I'm still missing a decent Jeep or something similar, I just haven't found a usable one yet. It should then still be on the lawn. The rollout. This kit from Hasegawa is one of the best from Hasegawa, everything fits together very well, sometimes you have to work very carefully because many of the small parts are very delicate and delicate. The decals are just as fine and sensitive, a lot of patience is necessary. I completely improved the engine. The engine was made from a metal part, wire insulation, plastic sheets. Many positions have opened. GI's were curious.- 5 replies
-
- 24
-
-
- Ki-84
- Home defence
- (and 1 more)
-
 So this is where all the cool kids are? Right, time to claim some space for me then with this little one I've had it in the stash for quite some time, but now it's about time to build it! It looks nice on the sprues at least. The decals have aged quite a bit though: I guess I should let them soak in some sunlight for a while. Currently the box is quite empty from AM goodies, but somewhere in the stash there are some masks, resin cannons and some etch. I'll compliment with some exhausts and wheels shortly! Strangely enough, there is not a lot of desert camo A/C in my stash, even though it is a favourite theme? Well, I do have a certain Eduard box though, but who needs another Spitfire when you have Hawkers? But first, let's finish that Supermarine Attacker over at the FAA gb!
 -
This build took roughly a year to complete and features 3 Imperial Japanese Navy aircraft involved in the assault on Pearl Harbor. I discovered this kit from Hasegawa around the fall of 2022 and had a pretty rough time tracking it down. It is a limited kit and had a very small run. Fortunately though, my wife was able to score one off Ebay and surprised me with it. I was initially drawn to the kit having all three planes in one. Especially the B5N2 Kate with the torpedo. At the time of discovering this kit, I had also been wanting to build an A6M2. The D3A1 was icing on the cake as I have a bit of nostalgia from using that plane in the video game Battlefield 1942 as a teenager. Additionally, I purchased Eduard detail sets and mask for all three planes. Since I just finished the A6M2 Zero this post will also feature glamour shots of it alone. The A6M2 was the final plane I needed to complete to call this build done. A6M2 Zero: Interior: Engine: Carrier deck photos - These forced perspective photographs were taken on a 1:48 replica of the IJN carrier Hiryu (24”x36”) that I made. Background images were photoshopped in. Completed build for D3A1: https://www.britmodeller.com/forums/index.php?/topic/235134064-d3a1-val-pearl-harbor-attack/#comment-4849239 Completed build for B5N2: https://www.britmodeller.com/forums/index.php?/topic/235132510-148-hasegawa-b5n2-kate/#comment-4816388 WIP build thread for A6M2: https://www.britmodeller.com/forums/index.php?/topic/235134216-a6m2-zero-attack-on-pearl-harbor/#comment-4869009 WIP build threads for the D3A1 and B5N2 are on another modeling forum. I can provide link if requested. Additionally, I have a build thread for the carrier flight deck. Overall, I am satisfied with this offering from Hasegawa and am happy to have it on my display shelf. My one major gripe would be the decals provided. Majority of them are rather thick and brittle. I used all the decals for the B5N2 Kate, but decided to move away from them on the D3A1 and A6M2 when possible. Specifically I painted on the Hinomarus, and any type of stripe.
- 22 replies
-
- 64
-
-
-
This is the great Viking from Hasegawa. Good oldie from the seventies. I rescriped all panellines and added some detail from scratch. It will be an aircraft stationed on the USS Ranger. Cheers, Bas
-
Hi guys! Long time no see. I think my last post here was in late 2022/early 2023. Here's my most recent completion, Hasegawa's A-4E PT21 as the FAA Douglas A-4C C-322. Colours used were Revell Aqua 371 Satin Light Grey, 66 Olive Grey, 15 Matt Yellow and 76 Light Grey. Decals came from an Aerocalcas sheet. These decals are thin and prone to sticking (you can see the IV Air Brigade decal on the right side crooked because of that).
-
This was a very nice build and I enjoyed it a lot. For this kit it was Ootb with some small details added and I engraved the panellines. Painted with AK 3 gen acrylics and weathered with oils. Cheers, Bas
-
This is the 1/72-scale Hasegawa TBF 1-C Avenger. Built OOB with some canopy masks: initially tried Eduard but these (shockingly) fit poorly and couldn't be used. I found that DEAD Design Models masks worked like a charm. Mr. Color and Alclad base paints, weathering with Abteilung and Mig oils, AK and Tamiya enamel washes, and sparing use of AK weathering pencils and Tamiya pigments. Thanks for looking!
-
This is the 3rd plane included in the Hasegawa 1/48 "Pearl Harbor Attack" limited release. The other two planes in the kit were a B6N2 Kate and a D3A1 Val which I have already completed. B5N2 Kate: D3A1 Val: The Box and kits within: The A6M2 included in the kit is offered in the markings of EII-102 (Mobile Task Force over sky direct support unit from carrier Zuikaku) or AI-110 (Pearl Harbor 2nd Attack unit from carrier Akagi). I will be going with AI-110. Along with the Hasegawa kit, I also purchased Eduard detail set, Eduard seat belts, and Eduard mask. Rivet work complete: Cockpit cleaned up for paint and PE parts: Cockpit painted in Tamiya XF-71 Cockpit Green IJN: Next up will be addition of the cockpit PE parts followed by weathering.
-
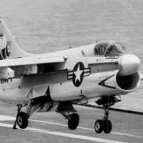
Hey folks, not finished anything for a l-o-n-g time hence not been around. Bought this in 1991 in a wee model shop my mate owned in Southport and it's been on the shelf ever since. Dragged it to the bench before Christmas to keep me out of trouble over the holidays - which it pretty-much has. Other than the ALQ pod and the mid-1980's Microscale decals, what you see here is exactly what came in the box. Definitely not my best work, but wonderful nostalgia trip (even painted it with Humbrol enamels). All comments, criticism and questions welcomed - Happy New year everyone. Ian.
- 11 replies
-
- 54
-
-
 Greetings everyone! I present to your attention a “Hasegawa” kit F-15C in 1/72 scale. For my building I chose an aircraft with the board number 79-036 as of 1984, when this aircraft was based at Bitsburg Air Base in Germany. The kit was built in 2016. During the build process, I used the following aftermarket: 1. Photo-etched “Eduard” № 72398 2. Photo-etched “Airwawes” № 7209 3. Exhaust nozzles “Aires” № 7170 4. Ejection seat “Quickboost” ACES II № QB72022 5. Cockpit light “BobTaurus” № RT72041 6. “TwoBobs” decal № 72-099 7. AIM-9M/L Sidewinder “Brassin” № 672 037 8. Angle attack sensors “Master Model” № AM-72-008 9. The “Academy” F-15C kit was used as a donor for some details. Below I want to show some of the building steps in more detail. Air intake channels “Hasegawa” does not provide air intake channels, so I integrated it from the “Akademy” kit. Wing Fins Cockpit Front wheel bay Pylons and armament Main landing gear and wheel bays The main landing gear were almost self-made from metal needles, different kinds of plastic, some PE parts, tin and wire. Nose landing gear As the main landing gear, the nose landing gear were almost self-made. Other elements As you can see, all elements of the model have been subjected to great improvements. Building took about two years. I hope the viewing was interesting. Best wishes Dmytro aka DimaADA
- 43 replies
-
- 86
-
-
-
My entry is Hasegawa’s 1/32 Boeing F4B. Scalemates has this first kitted in 1971. The box has certainly seen better days. Parts are on two sprues, interestingly they are on different colour plastic. The wings are a silvery plastic, the second sprue is grey. Whether it was released like this or I have sprues from two different boxings I don’t know. Not many parts but a lot of ejector pin marks that will need cleaning up. Hoping for a quick build. The decals are showing their age, so I will be using a sheet from Yellow Wings Decals.
-
Another 2023 build I'm catching up on posting is this Revell boxing of the old Hasegawa Mirage F.1C. Despite its age, I think this kit holds up well in terms of shape and fit. I augmented mine with a Pavla cockpit (which is a huge improvement on the very basic kit cockpit), ResKit wheels, Master pitot tube, a CMK jet exhaust and Quickboost air scoops. The air scoops and the exhaust are for the Special Hobby kit, and just a few simple mods were required to the Revell fuselage to get the latter to fit nicely but is a nice addition I think. The Hasegawa/Revell kit has raised details so I rescribed some of the most noticeable panel lines. Colours are Ammo MiG Mirage Blue over Vallejo white aluminium. Again, apologies for the quality of the camera phone photos
- 12 replies
-
- 45
-
-
Hi guys, I hope you are all well and safe. This project is the old Hasagawa version of the Canadian Hornet, but it lacks a lot of detail and specific Canadian details, like the id light in the nose. I have made the intakes and cockpit from scratch and some part out of the Verlinden update set for the Hornet. The flaps and slats are positioned as the plane is on the ground. This and the scratched intakes take a lot of time to build. Still a long way to go, but the hardest parts are finished. Up to the wheelbays and landinggear. cheers Bas
-
I have in my stash some Hasegawa 1/48th Hurricanes one of which is the 40mm canon armed Mk.IId. I am going to build this kit with the hope that Arma will eventually produce this version of the Hurricane from their magnificent new 1/48th kit. This Hurricane kit is modular in design, with a separate nose section for the Mk.I and Mk.II different engines and wing inserts for the different armament that these aircraft carried. Compared to the Arma kit the fabric covering is rather overdone (too saggy) and the riveted wings are very smooth, I'll try and improve the fabric effect by a good coat of primer but apart from applying 3D printed rivets to the wings they will have to remain smooth. Here is the kit, Hasegawa kits from that period came with all the sprues in a single bag, only the clear sprue and decals were kept separate, so bag opened and sprues spread out. I am not using the kit decals but it will be finished in the 6 Sqn markings of HV594, aircraft letter P. Same camouflage colours as the box art, including the red spinner. I have bought some upgrades over the years. Some Aires separate tail surfaces, Brengun wheels, Eduard zoom set for the cockpit and a CMK resin cockpit seat as the kit one is too short. Let the fun begin, any advice or questions are most welcome.
-
Greetings to all. The Hasegawa model is of venerable age, with perhaps its typical pros and cons: very poor detailing, but excellent execution of the panel lines, perfect joining, razor-thin edges. Some technological aspects of the assembly are of course also outdated (hello from the 90s), but all this did not disappoint at all, the model is pleasant and, in my opinion, is definitely the best for the 520. I didn’t photograph all the improvements in the process, and there weren’t that many of them, so I collected what was left in the photo into collages. The cockpit in the model is completely empty. I had a small etching board from Eduard, it is the same age as the model, so it also has a lot of shortcomings, but it helps out quite well in combination with available materials. Another relatively significant omission on the model is the landing gear niches (I see that these are also “family features” of Hasegawa models). Firstly, they have an irregular shape in cross-section (in the part where the stand is placed they are rectangular in cross-section), and secondly, the filling of the niches themselves is fictitious. Here, too, it was corrected partly by etching, partly by polystyrene. The rest of the modifications are already in the category of small things: tubes, hoses, technological holes, thinning of the edges, navigation lights made of colored plastic, etc. The tail unit has been “revitalized” a little - in photographs of the D.520 the rudders are often in this position. In addition to the mentioned etching, I used exhaust pipes from Quickboost, a vacuum canopy, a landing light from Elf, wheels from Kora (very low quality, I do not recommend). Riveted. Perhaps it was unnecessary, but I decided so. Painted with Tamiya acrylic and Hobby color. I mixed all the colors myself. Color accuracy is an extremely complex and hardly provable issue. Decals from Print scale. The unit of the pilot Rene Pomier-Layrargues, famous for the fact that he managed to shoot down Werner Melders, although the French pilot died in that battle, but Melders survived and continued his “career”. I painted the tricolor on the keel. Unfortunately, this time too there were some shortcomings, but overall I was pleased with the result, which is what I wish for all modellers. *Sorry for automatic translation
- 11 replies
-
- 35
-
-
Greetings to all. The Hasegawa model is of venerable age, poor in detail but at the same time with excellent panel lines, precision joining, thin edges. Therefore, in a sense, it is great for those who want to work with their hands and apply dexterity. At the same time, the prototype itself is very rich in details. Therefore, during the construction, a lot of aftermarket goods and even more parts made from scratch were used, most of which I think can be seen in the photo. The prototype is Captain Franco Lucchini's unit, a well-known aircraft among modellers, primarily because of its unusual paint scheme, which caught my attention. The plane was reconstructed at least twice, both times changing its appearance, and ultimately received half a wing and a hood from other aircraft. *Sorry for the automatic translation
- 26 replies
-
- 60
-
-
-
This D3A1 VAL is part of a 3 model kit that Hasegawa released a few years ago. The other two planes are an A6M2 Zero and an B5N2 Kate. All 3 planes presented in this kit took part in the initial attack on Pearl Harbor, and were launched off Imperial Japanese Carriers. I have already completed the B5N2 Kate which is featured in some of the forced perspective photos which were taken on a 1:48 replica of the IJN carrier Hiryu (24”x36”). Next up is the A6M2 Zero! Carrier deck photos: White background photos:
-
This kits been sitting in my stash for a few years. This seems like a good time to add a 1/72 IID hurricane and when I think of aircraft and Desert Camouflage the first thing I think of is a tank buster Hurricane. Not sure which aircraft I will make yet; however it will be a 6 squadron one, that’s for sure!
- 35 replies
-
- 18
-
-
- 6 Sqdn
- Hurricane IID
- (and 1 more)

Wedge-TailedEaglePortraitRaptorDomains.thumb.jpg.41a306d3445a68f0f2df773e01776ea6.jpg)