
Search the Community
Showing results for tags 'hasegawa'.
-
 Besides the P-40, my dad starts another lend-lease project. 101523-10849-pristine by grimreaper110, auf Flickr DSC_0001 by grimreaper110, auf Flickr gonna be "white lightning" DSC_0002 by grimreaper110, auf Flickr
 -
 Build WIP:
 -
Hi Steve Long or any other ex RAN Skyhawk maintainers - I'm embarking on a long term restoration of an old 1/32 Hasegawa A4 Skyhawk of mine that ended up on the SOD - just wondering if I can get some guidance on the cockpit colours - I've seen some colour photos and it looks basically a mix of light greys & black instruments - ejection seat and parachute packs colours too - specifically looking for RAN A4G colours for the cockpit which I assume might be standard USN? - I am in the process of fitting an Avionics resin cockpit set. CJP
-
#28/2019 And another one finshed. Hasegawa kit with Authentic Decals, AK Real Color AMT-7 and AMT-11, EZ Line for antenna wires and brake lines, Eduard seatbelts Build thread here https://www.britmodeller.com/forums/index.php?/topic/235061405-lend-lease148-curtiss-p-40k-warhawk-soviet-airforcevvs/ The model shows an aircraft of the 760th fighter regiment, 261st composite division in Karelia winter 1943-44. DSC_0002 by grimreaper110, auf Flickr DSC_0003 by grimreaper110, auf Flickr DSC_0004 by grimreaper110, auf Flickr DSC_0005 by grimreaper110, auf Flickr DSC_0006 by grimreaper110, auf Flickr DSC_0007 by grimreaper110, auf Flickr DSC_0008 by grimreaper110, auf Flickr DSC_0009 by grimreaper110, auf Flickr DSC_0010 by grimreaper110, auf Flickr DSC_0011 by grimreaper110, auf Flickr DSC_0012 by grimreaper110, auf Flickr DSC_0013 by grimreaper110, auf Flickr DSC_0014 by grimreaper110, auf Flickr DSC_0015 by grimreaper110, auf Flickr DSC_0016 by grimreaper110, auf Flickr DSC_0017 by grimreaper110, auf Flickr DSC_0018 by grimreaper110, auf Flickr DSC_0019 by grimreaper110, auf Flickr DSC_0020 by grimreaper110, auf Flickr
-
This is a Hasegawa 1:72 EA-18G Growler of VAQ-135 Black Ravens NAS Whidbey Island 2011 Kit is made OOB apart from the decals which are from Authentic Decals
-
Hasegawa 1:72 Northrop F-20 Tigershark Humbrol enamels HU126, 127, 145, 147 Alclad on the Jet exhaust Flory wash Clear coat is Humbrol Satin cote Stores:- Sidewinders & drop tanks from the kit and AGM 65 Mavericks & Mk83 bomb from Hasegawa weapons sets. Enjoy & thanks for looking CT
- 10 replies
-
- 29
-

-
Have just finished this as I wanted to take something to Telford.... also, shamelessly (considering the time I've been on BM), my first RFI on the forum too. Now, I just need more time to finish my other projects..... Finished He-111 1/72 Hasegawa by Totallyrad.co.uk, on Flickr Finished He-111 1/72 Hasegawa by Totallyrad.co.uk, on Flickr Finished He-111 1/72 Hasegawa by Totallyrad.co.uk, on Flickr Thanks for looking, any comments good or bad welcome
- 49 replies
-
- 60
-
-
Here´s the newest upcoming project by my dad. Being right on the way with the Soviet 109, he decided to stay on the Eastern Front. DSC_0009 by grimreaper110, auf Flickr DSC_0010 by grimreaper110, auf Flickr gonna do the tiger DSC_0012 by grimreaper110, auf Flickr
-
Hi, With the Seafang stuck on a missing part (my fault) and the A-26B Invader stuck on a missing part (less my fault - as I got it off eBay) - I'm starting another build. The box I happened to pull out of the stash comes from the 'cheaper' side of it - kits I got for lower prices that I plan to use as part of my training and getting more skilled process. It's a 1/48 Typhoon - another WWII favorite with a very distinct look. As a Hasegawa - I expect good fit and ease of build - I just hope the decals are still good to go. Ran
-
P-40N | 1/72 | Hasegawa United States, 49th Fighter Group, 7th Fighter Squadron -- Lt. J.B. Paris, Pilot -- New Guinea, 1944 I finished this on November 27th, 2019. This is the P-40N flown by Lt. Joel B. Paris. I love P-40s, and this is the first 'N' model I've done. The 'N' was the last P-40 model made and is easily recognized by its distinctive "squared off" canopy behind the cockpit for better visibility. The 'N' model was also the most produced P-40 Model. Joel B. Paris III volunteered for duty in 1942 and flew 167 combat missions in P-40s and P-38 in the Pacific. He had 9 confirmed victories and was decorated many times including the Silver Star, Distinguished Flying Cross and Purple Heart. He retired from the Air Force a Major General in 1970. The kit was typical good quality Hasegawa, with no fit problems and nice external detail (although the cockpit is a little sparse). The kit provides the wrong wheels (the P-40N had a lighter landing gear than previous models, including a smaller diameter spoked wheel) and I had to buy some nice quality SBS resin replacements (oh... darn! ). The kit also had an unfortunate seam right in the middle of the flaps on the underside of the aircraft, which were easily filled. The canopy didn't fit as well as I'd like and I am living with a gap at the bottom rather than try to trim it to fit because that could go very wrong. WIP is here. Special thanks to @Jackson Duvalier for introducing me to SBS resin wheels and alerting me that I missed filling in the flaps before it was too late! Also special thanks to @Corsairfoxfouruncle for providing me with info on interior colors. Paints: Mr. Surfacer 1500 black primer > Hataka RAF Dark Earth and RAF Dark Green topside > Mr. Color C306 (FS36270) Underside > Mr. Color White for the tail > Mr. Color White and Tamiya Royal Blue for the spinner. Decals: Kit decals Weathering/Wear: Tamiya weathering pastels (black) > white oil paint dot filtering for sun fading > oil staining and dirt streaks with Black and Burnt Umber watercolor Paints > Chips with Testors Chrome enamel applied with a spotter brush > Vallejo European Dust Dry pigment for dust on the wheels Thanks for looking! Questions, Comments and constructive criticism welcome!
- 12 replies
-
- 34
-
-
Since work has stalled on my Flying Tigers P-40B waiting for decals, I thought I'd start another kit. I'm still in the mood to do a P-40, so I dug this one out of the stash: I bought it because of the Burma Banshee decals it had for an alternate theme, but I decided that I really liked the markings on the box art. It all turned out great, because my quest for a Burma Banshee, led me to finish my P-40M, which frankly looks way better than the markings in this kit. Not much in the way of parts: and some pretty nice looking decals: Unfortunately, being an older Hasegawa kit, there isn't much in the way of cockpit detail, and no detail on the sides of the cockpit. So, I had to make do with what I had. I painted the sides and just scuffed them up with Tamiya weathering pastels. The cockpit came out a little better though with some Eduard PE seat belts added Now, I'm just waiting for the radiator intake parts that I glued into a fuselage half to dry so I can button up the fuselage....
-
 Come back frim home with 19 photos of my most recently completed model, Hasegawaga's 1:72 Dora.
- 4 replies
-
- 9
-
-
- Focke Wulf
- Hasegawa
- (and 1 more)
-
 Hi comrades! Here is my model of Kate from Soryu aircraft carrier, member of first wave of Pearl Harbor attack. According to some sources - the killer of Arizona battleship. The kit is fantastic! I added only Eduard's brass (critical for bomb fins and seatbelts). equipment panels I preferred to paint, IMHO looks more realistic than etched. My additions: wiring on main undercarriage, bomb, engine. Airframe riveted. Most of the markings painted with Montex and self made masks. Thanks for looking. And good view of cockpit: Build is here: https://www.britmodeller.com/forums/index.php?/topic/235060939-b5n2-kate-soryu-december-1941-148-hasegawa-ready/&tab=comments#comment-3504018 Thanks for looking
- 15 replies
-
- 26
-
-
Hi comrades! My next build is Hasegawa's fantastic Kate. I will depict the famous Arizona killer - aircraft from Soryu, piloted by Haruo Sato. In all the reference books this machine painted differently, in most of them in two color camo. I compared the number of sources and after reading the long discussion on j-aircraft.com, decided to paint the model in single color unregular camouflage - like presented in the book by Bert Kinzy (Pearl Harbour). I also decided to rivet the model - so the build will take more time... Aftermarket consists of Eduard brass, Montex masks and spare decals. So far, stabilizers riveted, cockpit done. Next - rivets on wing Thanks for looking!
-
Hello! Here's the second of my "jump jets" posted today, the 1/72 Hasegawa F-35B. This one was built out of the box and the only major modification was to add some more detail to the pilots seat and downwards pointing nozzle. The kit went together very easily and most of the build time was spent on the paint job. This consisted of an Alclad Aluminium basecoat underneath my own Haveglass grey, mixed together from xf54, x32 and xf85 - this gives an interesting sheen which changes tone depending on the lighting and the angle you look at it. I then spent an age masking the ram panels before spraying another mix of grey. I tested out the ram panel decals in the box on the inside of the tail fins but they are just to contrast-y for my liking to be used all over. I'm really glad to get this one over the finish line and pretty pleased with the final result, even if there are a few things I need to work out for future builds - tinting the canopy was a disaster and I gave up in the end and like the Harrier I got some decal silvering probably because the gloss coat over the paint needed to be smoother..... WIP here: Enjoy! Different light, different effect:
- 15 replies
-
- 38
-
-
Latest effort - a car door Typhoon. I like the Typhoon, big ugly brute that it is, and for some reason the car door version really grabs me - don't know why - just like the idea of the car door complete with window wind down. I'm sure the pilots didn't like it much. Still - box Contents And a few extras I've decided to add to it. Starting with the cockpit I started by painting the cockpit internals black primer, and then sprayed individual areas with interior green, so as to leave some darker areas around details and try and lend some depth. After that I picked out details using dry brushing techniques, as well as making use of prismacolor pencils, which make highlighting knobs and switches quite straightforward. Gradually moving towards a more complete cockpit. The instrument panel is made up of a resin casting, and three separate etch metal bezels, which are laid on top of three instrument transparencies for dials. I must say I'm pretty happy with how this has turned out so far. I still have to finish seat belts and add those, bit dry fitting shows that this assembly will fit very nicely into the fuselage.
- 47 replies
-
- 12
-
-
 G'day all. I've just put the final touches on the Royal Thailand Air Force F-16B from the 1/48 Hasegawa kit. I had a lot of fun building it and learnt a few things at the same time. Details are the Hasegawa F-16B Plus Fighting Falcon, Quick boost seats with Eduard ejection ring pulls, W&D Studio pitot and AoA probes, Mk82 slicks from the Hasegawa weapons set, AIM-9L from an AFV Club F-5E, Siam scale decals (meh... Not the greatest), Verlinden ground power and comms panel and homemade intake and exhaust plugs. The rear exhaust bung is made from Tamiya epoxy putty. And paints are the ubiquitous Mr Color. The front canopy section even has the smoke tint! Now to make the Polish Tiger meet version... Hope you like it. Cheers, Mick
- 14 replies
-
- 38
-
-
Hi guys, here is another car project and I really do have my work cut out with this one, it’s been in my stash for about 5 years, dug it out last week and took a peek at it, good points are that it has a very nice accurate looking body and all the fenders and details on the outside of the car look good, however inside was very poor, no engine bay, and worst of all very inaccurate seats and dash. Not surprising really as the 66 T-Bird had very elaborate seat and dash detailing, so what to do? Well, looking at YouTube videos I found that the convertible versions looked much better, so I decided to bite the bullet and cut the roof off! Now this committed me to scratch building and modifying the kit interior details, the main objective was to give a fairly good representation of a top down 66 T-Bird that was ready to cruise or had just been fully restored to show winning condition. Here are some photos of a restored 66 T-Bird that I am trying to copy in model form. I decided the body would be painted in blue metallic with white leather and blue interior, with lashings of chrome details. So I hope to update you with progress soon, now where’s that hacksaw?
-
I finished the Corsair today, and there wad enough light in my room, so I was able to take some photos of the finished model. The canopy didn't fit at all, it's too narrow in the end and just hangs above the canopy railing. I also lost one of the gun mounts, and had to fashion a new one from one of the pieces.
- 7 replies
-
- 16
-
-
- Argentina
- Argentine Navy
- (and 1 more)
-
Hello guys, here's a glimpse of what will be my next model, an F4U-5 from the Argentinian Navy in 1:48, the kit will be Hasegawa's F4U-5N with parts for a night fighter, but also for the daylight fighter. I'll use Phoenix decals as the only aftermarket. I bought two sheets in case one fails me, but both sheets look ok. All the options are for daylight aircraft, which carried a Light Gull Grey upper colours and white undersides, together with white landing gears and wheel hubs. Click the follow button if you'd like to see how this build goes!
-
 I present the Hasegawa Embraer 170 in the well-known “Krakow and Malopolska invite” livery carried by SP-LDC between 2009 and 2012. The tail features Leonardo da Vinci’s painting “Lady with an Ermine” which is one of Poland’s national treasures. Although the kit has been around for many years this is the first time I’ve built it. It was seriously overpriced on UK release but several years ago I managed to get a couple at a sensible price via HobbyLink Japan and they’ve been in my stash ever since. It seems that currently the kit is only available in Japan and various Japanese sellers have it listed on eBay at prices ranging from £26.52 to an utterly ridiculous £108.01. The kit fits well and the scribed detail is generally good. However some areas are basic, notably the undercarriage. There is a PE set available from Extra Tech but I’ve never really liked PE and my eyesight is no longer up to assembling nine microscopic parts to make one undercarriage door for a small aircraft like the Embraer 170 so I contented myself with thinning the kit doors and adding a little detail. I did use the PE to improve the undercarriage bays and also to add pitots. Apologies for a bit of a rant but it’s beyond me why most PE makers can produce scale sized hinges for undercarriage doors but then give you pitots resembling part of the radar array from a WW2 Luftwaffe nightfighter. The Extra Tech set was no different and much fiddling and cursing was needed to get things looking reasonably presentable. Paint is Halfords Appliance White and Racking Grey with Tamiya and Revell metallics. I was going to use a set of Nazca decals which I’d bought at the same time as the kit but I discovered that some of the lettering was over-scale to the point that you couldn’t make an accurate model with it. Fortunately BOA have covered the same scheme so the tail decal is Nazca and everything else is BOA. Detail decals are from the kit sheet and windows are by Authentic Airliners. Thanks for looking and as always constructive criticism is welcome. Dave G
- 32 replies
-
- 49
-
-

-
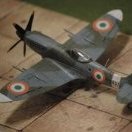 I have not seen many spitfires with nose art and have been fascinated by MT841 for a while for its excellent nose art and that too on a RIAF Spitfire! Using the book Spitfires in the Sun and the site bharat-rakshak.com as starting reference points, I found some excellent decals for MT841 from Exito Decals and started of on building the kit. According to the reference material cited earlier MT841 Spitfire was with No.2 Sqn RIAF from 20 Jan 46, and was written off on 29th Jan 1947, when P/O Pat Callaghan belly landed the aircraft at Kohat airfield. The aircraft engine had caught fire after an oil leak in circuit. The Hasegawa kit is a quick build with well fitting parts. It has a basic cockpit, good exterior detail and engraved panel lines. Some have discussed that the kit's outline is a tad off from the real airplane as with Hasegawa's 1/48 scale but frankly I could not tell for this or for that matter - the 1/48 I built earlier. I really enjoyed building this kit. The only mods made were seat belts made from masking tape. Paints are all Tamiya. I started with spraying Tamiya Titanium Silver as a primer. Next step was some salt weathering added to the left wing root before pre-shading with Tamiya nato Black. I then sprayed the standard RAF camo scheme in Medium Sea Grey, Dark Green and Dark Earth. The prop cone was a little challenging to paint and required creativity. Once dry, I scrapped off the salt and added some light chipping around heavy traffic areas (cockpit, cowl...etc) using a metallic silver color pencil. Decals were added and sealed with Tamiya clear gloss and then I applied a black panel line wash using Tamiya's line of washes. I sealed it all with Tamiya flat clear. I do hope you enjoy the pictures. Some were taken indoors - some outdoors but my photography skills leave a lot to be desired so apologies for that. Comments/ questions/suggestions are always very welcome as they help me get better! To start, a picture of the actual aircraft: The Decal sheet came with poster art which is excellent! And a few outdoor pictures in natural light Thank you for looking!
 -
 Hi guys, So this will be my next build hasegawa's 1/48 JU87-R2 which I believe is a extended range version of the B2 the only difference being two external fuel tanks. If that's not true then please correct me because I'm thinking of just doing a B2. The reason being because the 1994 decals don't look great and there's more options for B2 schemes. If anyone has some desert or winter schemes that are a bit different that they could share images of I would be most grateful so am open to suggestions. The kit looks ok I know there are some issues with the flap mass balancers or arms (one of the two) so am ready for that, and I will be showing it with the Aires resin engine and cockpit set which looks nice, there will no doubt be a bit of scratch and may even open it up a bit more but we'll see. It won't be a quick one I dare say. Thanks for looking. Phil
 -
Supercharger Intake for Bf109G-10/K in 1/32 scale from Hasegawa. Supercharger intake intended for Hasegawa’s Bf109K/G-10 and for our future G-6AS conversion and G-10 correction set for Revell sets.
-
#24/2019 My father´s latest and last? contribution to his captured Bf109 theme this year. Had a Hasegawa Bf109 F/G fuselage lying around from an abandoned project. Then he had the idea to play Frakenstein and fusion it with a wing and undercarriage from Fujimi. (Had still two Fujimi kits in our stash that he won´t build) After some work the wing fit perfectly. Seatbelts from Eduard, Russian star decals from the sparesbox, translucent JG3 decal from an old Aeromaster sheet, brake lines with lead wire and EZ Line, the latter was used for the antenna wire too. MRP RLM74/75/76 for the base camo, AK Real Color AMT-7 Blue and MRP AMT-4 Green for the overpainted areas. Build thread here https://www.britmodeller.com/forums/index.php?/topic/235060494-under-new-management148-messerschmitt-bf109g-2-soviet-airforce/ The model shows an aircraft of JG3 that was captured in the Stalingrad area by the Soviets. Sources differ, some say JG3 I. Gruppe, some II. Gruppe, either end of 1942 or early 1943. DSC_0001 by grimreaper110, auf Flickr DSC_0002 by grimreaper110, auf Flickr DSC_0003 by grimreaper110, auf Flickr DSC_0004 by grimreaper110, auf Flickr DSC_0005 by grimreaper110, auf Flickr DSC_0006 by grimreaper110, auf Flickr DSC_0007 by grimreaper110, auf Flickr DSC_0008 by grimreaper110, auf Flickr DSC_0009 by grimreaper110, auf Flickr DSC_0010 by grimreaper110, auf Flickr DSC_0011 by grimreaper110, auf Flickr DSC_0012 by grimreaper110, auf Flickr DSC_0013 by grimreaper110, auf Flickr DSC_0014 by grimreaper110, auf Flickr DSC_0015 by grimreaper110, auf Flickr DSC_0016 by grimreaper110, auf Flickr DSC_0002 by grimreaper110, auf Flickr DSC_0003 by grimreaper110, auf Flickr DSC_0006 by grimreaper110, auf Flickr DSC_0007 by grimreaper110, auf Flickr


