Search the Community
Showing results for tags 'hasegawa'.
-
Hallo again Now I will start the F-15 in 1/48. This will be a little longer modelling sequence, since I have many detail sets and accurate weapons for it. Beside that of all, I have so much literature about this a/c and know it very well from my own. I have seen it at the first flights, many combat sorties and on ground in the hangar for maintenance. Also in the museum. Since there are so many wonderful photos available, please use our walk around at the forum. Here you have hundreds of photos I will constantly refer to. It also exists a collection of flying photos from IAF aircrafts. It is a marvel book. Like Leonardo da Vinci, this photographer’s work may enjoy you. The link will be there. THE MOST WONDERFUL PICTURES OF AIRCRAFT The surface treatment of this model will be the outstanding challenge. Oh no, not because of C307 and C308 Mr. Hobby Colours, no not at all. Because how it looks in reality! I found a built report on the internet, which is would be my guideline. My Guideline Using Aires cockpit and nozzles. The airframe by itself is a nice challenge. For the modeler: I split it. Front fuselage with cockpit and rear main fuselage without rudders. Tailerons and ruder will assembled at the very end. Wing is separately during a long time. My aircraft will be the F-15 A Baz 689. Happy modelling
-
As I've finished "Missouri Armada" with a bit of time to spare before the Lancaster STGB I thought of killing the time with the egg plane I bought on a whim a few years ago Should be a nice quick build and a bit of fun at the end If I don't do it now it will probably sit there untouched for more years Ian
-
Joining you with this kit, from a choice of many. Bought at a show a Coventry Air Museum in 2002, for £3. All parts are removed from sprues, - I hope they're all present. I've built this kit previously, in 1988.
-
This is the last of my Hasegawa Hurricanes from my stash It is finished as P3585, one of the third production batch and issued to 213 Squadron. On August 11th 1940 whilst being flown by Sgt E.G. Snowden, she was involved in combat with the Luftwaffe and after claiming a Bf 110, P3585 was hit and landed on Lulworth Tank Ranges. She was later repaired and issued to 303 Squadron. Snowden survived the war only to crash a civilian Anson after hitting the Chain Home towers at Ventnor 1947. The kit is straight from the box with the exception of the Propellor which came from my spares and some seat belt. I kept weathering to a minimum as the machine was only recently delivered so just some wear and tear by the ammunition panels and the wing root and some exhaust stains. The decals were a mix of kit and Xtradecals, I think the M is too wide but I can live with it. Thank you for looking.
-
 Back in 2016/17 my father built a fully loaded Israeli hotrod too as adversary for the Iraqi Su-7. Like with the Fitter, also took some new pics to pay tribute to my dad´s model. Hasegawa kit (VA-55 A-4E/F), decal sheets for Ayits are no longer available or at least hard to get, therefore had to use different sources, the stencils are from the kit, the roundels from the Hobbycraft A-4E/H kit, the numbers from an Isradecal number sheet and the squadron badges from Isradecal Mystere sheet. Gunze H310/312/313/314 for the camo, Quickboost seat, Snakeeyes, MER and LAU-3 rocket pods from Hasegawa weapon sets. Build thread here https://www.britmodeller.com/forums/index.php?/topic/235009478-yom-kippur-opponents-2nd-edition148-su-7bmk-vs-a-4e/page/2/ The model shows an aircraft of IAF Squadron No.116 "Flying Wing" during the Yom Kippur War in 1973. DSC_0001 by grimreaper110, auf Flickr DSC_0002 by grimreaper110, auf Flickr DSC_0003 by grimreaper110, auf Flickr DSC_0004 by grimreaper110, auf Flickr DSC_0005 by grimreaper110, auf Flickr DSC_0006 by grimreaper110, auf Flickr DSC_0007 by grimreaper110, auf Flickr DSC_0008 by grimreaper110, auf Flickr DSC_0009 by grimreaper110, auf Flickr DSC_0010 by grimreaper110, auf Flickr DSC_0011 by grimreaper110, auf Flickr DSC_0012 by grimreaper110, auf Flickr DSC_0013 by grimreaper110, auf Flickr DSC_0014 by grimreaper110, auf Flickr DSC_0015 by grimreaper110, auf Flickr DSC_0016 by grimreaper110, auf Flickr DSC_0017 by grimreaper110, auf Flickr DSC_0018 by grimreaper110, auf Flickr DSC_0021 by grimreaper110, auf Flickr DSC_0023 by grimreaper110, auf Flickr DSC_0024 by grimreaper110, auf Flickr DSC_0001 by grimreaper110, auf Flickr DSC_0002 by grimreaper110, auf Flickr DSC_0003 by grimreaper110, auf Flickr DSC_0004 by grimreaper110, auf Flickr
 -
 And now for something completely different, in a scale I'm not particularly used to. But, when it's the only option available for the subject you want, you make do. It’s the Hasegawa 1/200 P-8A Poseidon (yes, I still need to paint the tip of the nose black). It's a fairly straightforward build, though all those little antennae nearly drove me batty.
- 11 replies
-
- 33
-

-
Another latin girl from 2016 now presented in my new style. Hasegawa F4U-5N kit, Aztec decals, True Details cockpit, Gunze and Tamiya acrylics, EZ Line for brake lines and antenna wire, the "T" antenna on the belly was taken from the ancient Hasegawa F4U-4 kit. The model shows one of the dayfighter Corsairs that were involved in the Argentinean Navy revolution attempt in 1963 when they defended their base against the army. The last Argentinean Corsairs were retired in 1965. DSC_0001 by grimreaper110, auf Flickr DSC_0002 by grimreaper110, auf Flickr DSC_0003 by grimreaper110, auf Flickr DSC_0004 by grimreaper110, auf Flickr DSC_0005 by grimreaper110, auf Flickr DSC_0006 by grimreaper110, auf Flickr DSC_0007 by grimreaper110, auf Flickr DSC_0008 by grimreaper110, auf Flickr DSC_0009 by grimreaper110, auf Flickr DSC_0010 by grimreaper110, auf Flickr DSC_0011 by grimreaper110, auf Flickr DSC_0012 by grimreaper110, auf Flickr DSC_0013 by grimreaper110, auf Flickr DSC_0014 by grimreaper110, auf Flickr DSC_0015 by grimreaper110, auf Flickr DSC_0016 by grimreaper110, auf Flickr DSC_0001 by grimreaper110, auf Flickr DSC_0003 by grimreaper110, auf Flickr
-
Not sure where to put this really, but 'Aircraft' seemed the best fit. This is a build of Hasegawa's venerable 1:8 scale white metal kit. I've heavily modified it during the build with a lot of scratch built components. In fact only the main white metal castings made it into the final model, plus a few sundry components like spark plugs. It was a very enjoyable build, but significant effort is required to get something acceptable. The white metal castings aren't as sharp as their plastic equivalents in the injection moulded version. Replacing all the moulded bolts with tin plated aftermarket versions is a considerable cost in its own right. Still, worth the effort in the end. I hope you enjoyed the pics.
- 12 replies
-
- 23
-
-

-
So, here are the last two refreshed latinas from 2016. FAS Corsair: Tamiya kit with Aztec decals, Tamiya and Gunze paints, EZ Line for brake lines, plastic rod for antenna. According to fellow Hyperscaler/Britmodeller Marco, the wheel wells and landing gear were also painted in camo. Got that info too late so my dad kept them the way they were. The model shows one of the five El Salvadorian Corsairs that took part in the 100 Hours War or Soccer War between El Salvador and Honduras from 14th to 18th July 1969, the last time Corsairs went into battle. FAH Corsair: Hasegawa kit with Aztec decals, seatbelts added, scratchbuild parts for the armament switches on top of the instrument board, brake lines and antenna wire with EZ Line. The kit includes a 1000lb bomb but the biggest ones the FAH had were 500lb bombs. This one, together with the smaller clamps were taken from a Hasegawa P-51 kit. The "T" antenna on the rear belly was taken from Hasegawa´s ancient F4U-4 kit. Painted with Gunze H54 Navy Blue. The flags were painted too, only the stars are decals. The model shows the a/c of Major Fernando Soto Henriquez who became an ace in the war by shooting down two FAS Corsairs and one FAS Mustang on July 19th 1969. Most probably the plane didn´t have the noseart anymore when the war started, but it looks good and I´ve never seen FAH609 done with it so we decided to apply it. DSC_0021 by grimreaper110, auf Flickr DSC_0001 by grimreaper110, auf Flickr DSC_0002 by grimreaper110, auf Flickr DSC_0003 by grimreaper110, auf Flickr DSC_0004 by grimreaper110, auf Flickr DSC_0005 by grimreaper110, auf Flickr DSC_0006 by grimreaper110, auf Flickr DSC_0007 by grimreaper110, auf Flickr DSC_0008 by grimreaper110, auf Flickr DSC_0009 by grimreaper110, auf Flickr DSC_0010 by grimreaper110, auf Flickr DSC_0011 by grimreaper110, auf Flickr DSC_0012 by grimreaper110, auf Flickr DSC_0013 by grimreaper110, auf Flickr DSC_0014 by grimreaper110, auf Flickr DSC_0015 by grimreaper110, auf Flickr DSC_0016 by grimreaper110, auf Flickr DSC_0017 by grimreaper110, auf Flickr DSC_0018 by grimreaper110, auf Flickr DSC_0019 by grimreaper110, auf Flickr DSC_0001 by grimreaper110, auf Flickr DSC_0002 by grimreaper110, auf Flickr DSC_0003 by grimreaper110, auf Flickr DSC_0004 by grimreaper110, auf Flickr DSC_0005 by grimreaper110, auf Flickr DSC_0006 by grimreaper110, auf Flickr DSC_0007 by grimreaper110, auf Flickr DSC_0008 by grimreaper110, auf Flickr DSC_0009 by grimreaper110, auf Flickr DSC_0010 by grimreaper110, auf Flickr DSC_0011 by grimreaper110, auf Flickr DSC_0012 by grimreaper110, auf Flickr DSC_0013 by grimreaper110, auf Flickr DSC_0014 by grimreaper110, auf Flickr DSC_0015 by grimreaper110, auf Flickr DSC_0016 by grimreaper110, auf Flickr DSC_0017 by grimreaper110, auf Flickr DSC_0018 by grimreaper110, auf Flickr DSC_0020 by grimreaper110, auf Flickr
- 18 replies
-
- 35
-
-
-
Taking a little break from the F1 cars and building something from my dream garage. This is the Hasegawa 1:24 Lamborghini Miura SV. It's the original red molded kit that I primed and changed to metallic green. I really liked this kit - proportions look great and the wheels are beautifully detailed. Foil transfer emblems also do a great job of enhancing the exterior of the kit. The only issues with the kit were some light sink marks around the headlights that I was able to level with some Tamiya Liquid Primer. Built box stock. The colour is Mr. Color Metallic Green #77 which was then clearcoated with GX100 Super Clear. It has a bit of a pearl in it which changes the colour depending on the light source - it can get very turquoise in some light and very green in natural light. I was trying to match one of the first factory restorations that Lamborghini's Polo Storico did. I think the metallic pigment is a good size for this scale, but my primer base could have been sanded smoother - the roughness of the primer showed up a bit more than I thought it would in the metallic. I stripped the chrome off the wheels and knockoffs, painted the wheels aluminum and used Alclad polished aluminum for the knockoffs. I love the wheel design and Hasegawa did a fantastic job replicating them. Window trim was all done in Bare Metal Foil with a Molotow Liquid Chrome pen for some of the chrome details like washer nozzles and door handles. There's half an engine in the kit, but it's all but invisible once you put the body on - you can just barely see the white air filters through the louvers and the glass at the back of the interior. Here's the interior before it went behind the glass. Interior was painted with Vallejo Air Golden Brown and Sand Beige. I used embossing powder for the carpet which was then painted but I feel it looks a bit too 'sandy' as opposed to fluffy. It looks okay through the glass. Some nice touches from the Hasegawa kit here including the foil transfer for the shift gate. I've been doing the grey background studio style shots for my builds so far but thought I would try some photographic backdrops to see how the model would look on 'location'. I found a few hi-res photo backgrounds online and then went to the 5 storey parkade next to my office and took photos of the pavement and sidewalk from above. I printed them out, mounted them on some foamcore and set them up as ground and background. I'm enjoying the photography as much as the build - I think my favourite part is seeing the reflection of the environment in the gloss of the body. Downtown location: At the parkade: Some back street in France maybe: And a shot of my elaborate outdoor studio: 😉 Thanks for looking, comments, questions and critiques always welcome. Martin.
- 40 replies
-
- 33
-
-
Already shown this in 2016 but from time to time I take new pics of older kits (formerly photographed with white light tent) with new background, lights and camera, hope you don´t mind😉 The FAG used Mustangs for anti-guerilla fighting in the 60ies and early 70ies before the a/c were succeeded by the A-37 Dragonfly. Hasegawa kit, Aztec decals, Mk.82 bombs from a Hasegawa weapon set, Gunze and Tamiya acrylics used. DSC_0001 by grimreaper110, auf Flickr DSC_0002 by grimreaper110, auf Flickr DSC_0003 by grimreaper110, auf Flickr DSC_0004 by grimreaper110, auf Flickr DSC_0005 by grimreaper110, auf Flickr DSC_0006 by grimreaper110, auf Flickr DSC_0007 by grimreaper110, auf Flickr DSC_0008 by grimreaper110, auf Flickr DSC_0009 by grimreaper110, auf Flickr DSC_0010 by grimreaper110, auf Flickr DSC_0011 by grimreaper110, auf Flickr DSC_0012 by grimreaper110, auf Flickr DSC_0013 by grimreaper110, auf Flickr DSC_0014 by grimreaper110, auf Flickr DSC_0015 by grimreaper110, auf Flickr DSC_0016 by grimreaper110, auf Flickr DSC_0017 by grimreaper110, auf Flickr DSC_0018 by grimreaper110, auf Flickr DSC_0019 by grimreaper110, auf Flickr
-
 Hi there. Just finished another swedish jet a few days ago. It´s a conversion from Hasegawas J35F to a S35E using a lot of Maestro Models nice stuff. I used etched parts for the cockpit, a new nose and extra fuel tanks, a KB pod, the RWR pods under the wings and the complete tailcone. From Pavla came a new vacu formed canopy, from Pilot Replicas the pilot and from Hasegawa the ground crew member. The ladder is also an etches part from Maestro. Daniel
- 24 replies
-
- 59
-
-
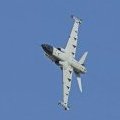
Time to dust off a model that was built as far as the primer stage about five years ago: Hasegawa F-16A, to be finished as S/N 92-0409 from NAS Fallon circa 2002-2008: and a shot of the blue / grey aggressor scheme - decals will come from the Eduard "Top Falcons" boxing. I also have the Eduard "NATO Falcons" boxing so intend to build two of the NATO versions using those two kits - as one is at a similar stage to this model, it may too appear in KUTA in due course. I'm going to use Mr Paint for the first time and have a set of jsworkmodel masks for the camo. Here is a link to a rather patchy version of the scheme. Mike
-
Finished today. The model depicts Hans Ulrich Rudel's Ju 87G 494193.
- 1 reply
-
- 11
-
-
- Stuka
- Junkers Ju 87
- (and 1 more)
-
Hi everybody, in case you haven't been following the recent Floatplanes and Flying boats GB, I present to you my entry to this very enjoyable GB: Hasegawa's N1K1 Kyofu (Rex) in 1/72. It is a very nice kit and I made only a few modifications: the engine exhausts were replaced by brass tube the plastic pitot tube was replaced my Albion Alloy tubes (it doesn't necessarily look better this way, but it is not as likely to break!) I experimented with the stressed skin-effect. It turned out be a bit heavy on the rear fuselage, but given the fact that is was my first try, I am quite satisfied.
-
 I started this model as a part of the recent P-40 group build but in rushing to finish it to meet the deadline I managed to snap one of the undercarriage legs and ruin the wheels. The retraction jack from the broken leg pinged off and in disgust I threw the model in the bin. A couple of weeks later I managed to find the retraction jack and remove the other leg - along with the remnant of the broken one. With a paid of new undercarriage legs from SAC (at great expenses) I fished the model out of the bin and started to re-finish it. So, around 6-weeks after the group build finished we now have a Hasegawa P-40E in the markings of 'Texas Longhorn' of 1st Lt John D Landers from the 49th Fighter Group, 9th Fighter Squadron from New Guinea in 1942. The original build log is here: I'm actually pretty pleased with the way this has been rescued - although I still need to glue the canopy on. Still some work needed on the photography I think. I've got a new light-box studio to work with but need some practice.
 -
 Hi all. Number six for the year and the final one for 2019. The 1/48 Hasegawa J2M3 Raiden. I started this one almost two years ago however a disaster at the painting stage shelved it for almost 18 months. I picked it up about three weeks ago and finished it this evening. (10pm AEST, 31/12/19). I chopped open the canopy, added ResinArt wheels and exhausts, painted the roundels and used Aeromaster decals for stencils and ancillary markings. I really enjoyed the dinged up green on this one. There's so much scope for weathering with Japanese WW2 era subjects and this is a great subject to apply it to. Happy New Year and safe 2020 to all. Mick
 -
Here's my just-completed 1/48 OA-4M - last one for 2019! I needed a mojo restorer and this fitted the bill very nicely - it's taken just over a week. Apologies to anyone who might have been following my all too brief WIP, I got carried away and stopped taking photos as I went! This is the Hasegawa 1/48 TA-4J converted to an OA-4M using a resin conversion set from Phase Hangar. The conversion set was very nice indeed, it included everything needed for the conversion (on the outside anyway), including a nice pair of seamless intakes, and everything was a pretty good fit. One thing to watch out for if you do the conversion - the instructions call for you to add the brake parachute - don't, it wasn't fitted to the OA-4M. Decals are from Furball Aero Design and worked very well. Perhaps not quite as much contrast between some of the decals and the dark ghost grey though. Just one thing missing which I'll always notice, and was missed in my haste as I got carried away. Can anyone spot it? On to the photos: thanks for looking and happy new year Julian
- 17 replies
-
- 26
-
-
- Hasegawa
- Phase Hangar
- (and 1 more)
-
Hello friends, Here is the Hasegawa G4M2E “Betty” bomber with Ohka Kamikaze. I had completed this kit earlier in the year but now I finally got around to posting the pictures. My observations of this kit are as follows........... 1. Used “Hair Spray” technique to weather the subject. A. Mission Models IJN Deep green on the upper surface B. Tamiya Flat Black for the undersurface C. Alclad paint for the base silver / metal D. Used a moistened cloth rag to “peel” the paint. The Mission Model green came off easily but the Tamiya flat black took more of an effort. 2. Built straight from the box. 3. Used Eduard canopy masks for the clear parts 4. Model Master IJN Grady for the Ohka. 5. Used Uschi bobbin thread for antenna wire. 6. Used contrasting colors to replicate replacement propeller ( starboard / right side ), slightly darker green for a replacement panel on starboard wing, masked off a panel on the lower starboard wing, and lighter green on the fabric control surfaces. 7. Other weathering by using pastels, washes, and paint. 8. Tamiya tape for cockpit seat belts. References indicated that Japanese maintenance crews were required as a source of pride to keep all national markings and squadron insignia in a clean or pristine state. I tried to reflect this with this kit. I found the kit straightforward and simple. Masking the many sections of the clear parts was very time consuming but the results are worthwhile. I would recommend this kit to all. Thank you in advance for all of your comments. Respectfully submitted, Mike
- 2 replies
-
- 14
-
-
- Hasegawa
- 1/72 scale
- (and 1 more)
-
Hi all Here is my RAN A4G Skyhawk finally finished 4 months after my last post -it is a shelf of doom rebuild. WIP link here - https://www.britmodeller.com/forums/index.php?/topic/235027738-ran-a4g-skyhawk/ The main list of parts used and some of the detailing as follows - Avionix A4E resin cockpit Aires resin Wheel bays and white metal landing gear set AMS resin wheels Eduard slat and vortex generators etch SAC Buddy Pod Master refuelling probe and cannon barrels Flight Path USN Carrier Deck set provided the ladder and wheels chocks Maketar paint mask for RAN roundels - - fin checks masked by hand - very fiddly AOA A4 airframe stencil decal sheet Scratch intake and exhaust blanks push moulded wing navigation lights & hazard beacons scratch built forward engine bay door port scratch built detailing added to landing gear & wing pylons various Quickboost bits and pieces like scoops a generous donation of spare Hasegawa A4 sprues from a fellow modeller Finally allocated a spot in the display case thanks for looking CJP
-
#30/2019 Most probably the last new one by my dad for 2019. Started with an ICM kit but switched to a Hasegawa kit with decals from AML, superfabric seatbelts from Eduard, painted with Gunze H306 FS36270 for the underside and Tamiya XF-82 RAF Ocean Gray 2 and XF-81 RAF Dark Green 2. Used darker shades of these colours to simulate freshly overpainted RAF roundels on the wings. Build thread here https://www.britmodeller.com/forums/index.php?/topic/235061874-lend-lease148-supermarine-spitfire-lfixe-soviet-airforcepvo/page/2/ The model shows an aircraft of 26 GIAP PVO, Leningrad 1944-45. DSC_0001 by grimreaper110, auf Flickr DSC_0002 by grimreaper110, auf Flickr DSC_0003 by grimreaper110, auf Flickr DSC_0004 by grimreaper110, auf Flickr DSC_0005 by grimreaper110, auf Flickr DSC_0006 by grimreaper110, auf Flickr DSC_0007 by grimreaper110, auf Flickr DSC_0008 by grimreaper110, auf Flickr DSC_0009 by grimreaper110, auf Flickr DSC_0010 by grimreaper110, auf Flickr DSC_0011 by grimreaper110, auf Flickr DSC_0013 by grimreaper110, auf Flickr DSC_0014 by grimreaper110, auf Flickr DSC_0015 by grimreaper110, auf Flickr DSC_0016 by grimreaper110, auf Flickr DSC_0017 by grimreaper110, auf Flickr DSC_0018 by grimreaper110, auf Flickr
-
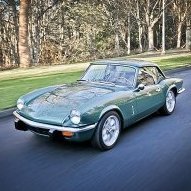
Hi all, well considering how basic this kit was when I first looked it over, I think it has turned out looking pretty spiffy. The kit really was going to have to be super detailed to make it look convincing; I used a basecoat colour that I had mixed for a motorcycle tank I was respraying for a client. It was Suzuki Maui blue; it seemed to match the full size car's colour perfectly. Not one of Hasegawa's finest, there was some nasty fit issues, around the front fender, the lower valance did not want to fit, as well as the rear wheel covers. I had to replace the front windscreen and quarter side windows with some clear acrylic sheet as the kit one was starting to split and was too poor quality to really use anyway. Overall I am pleased I took the decision to convert the car into a convertible and save the kit from returning to the stash and probably never being built.
- 17 replies
-
- 17
-
-
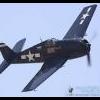
 This is the Pearl Harbor version of Hasegawa's Kate, but since they don't include the right torpedo fins, I went looking for another colour scheme. I stumbled upon pictures of this surrendered Kate in green cross markings and well, why not? I left out the rear gun but apart from that it's OOB. It's a very nice fitting model. I did paint the camouflage under the white, which is applied patchy intentionally. It also looked as though they had really roughly painted the spinner and prop with a brush, so I tried to recreate that look as well. I'm not sure the aircraft ever flew, but it did look scruffy around the engine cowlings with the rest of the aircraft fairly clean. Green crosses were painted on and the '2' on the tail was from the spares box.
- 12 replies
-
- 25
-
-
Hi, I would like to enter into my second GB with Hasegawa's classic floatplane fighter. I have long been fascinated by this plane: floatplane fighters are one of the most bizarre categories of military aircraft and almost a mission impossible to design. Floats are hard to reconcile with low weights and good aerodynamics. Nevertheless, Kawanishi had done a good job with the N1K1 (based on the equally fascinating E15K fast reconnaissance aircraft). A design so sound that it was later turned into a land-based fighter, the N1K1-J. This must be one of the very few cases when a floatplane or flying boat was converted into a conventional plane and not the other way round. The only other case, I can think of, was the Piaggio P.166 which was based on the amphibian P.136. Do you know others?
-
Besides the P-40, my dad starts another lend-lease project. 101523-10849-pristine by grimreaper110, auf Flickr DSC_0001 by grimreaper110, auf Flickr gonna be "white lightning" DSC_0002 by grimreaper110, auf Flickr