Search the Community
Showing results for tags 'german'.
-
Just finished this small diorama and am very pleased with the result. Tried some new techniques and scratch built everything except the figures for the first time. Depicts a group of weary and disconsolate German infantry trudging past the ruins of yet another burnt out Russian farm in winter of 1942. The NCO takes a peek into the 'privy' but decides not to bother using it! Figures are mostly Masterbox, with 2 Dragon figures added. Heads have been swapped on most of them for Hornet items (One is from Bodi I think). Some of the original heads included collars etc so needed to make new ones for using the Hornet heads. new collars & 'Private Pike's' scarf (the last guy in line) are from green stuff putty. First time I had used this so pretty happy with the results. House was built from kebab sticks, foam and lolly (craft) sticks. Privy and fence are from plasticard. Pine tree is from wire ad moss, and other tree is just a twig from the garden. Snow is made from a mixture of lightweight filler, acrylic modelling paste and baby powder for the roof dusting. Hope you like and all comments welcome
-
 I'm curious if someone would know what kind of lozenge fabric was used on Josef Müller's Fokker D.VII (Alb) 646/18 of Jagdstaffel 23. In color profiles, I see it illustrated with 5-color lozenge fabric, but from a photo I have of it (specifically on p. 251 of Royal Bavarian Jagdstaffel 23, Aeronaut Books), I'm unable to tell if it is 4 or 5 color lozenge. All other photos are too blurry to make out the lozenge fabric. From my understanding, some early batches of Albatros built D.VII's used 5-color lozenge, but in general, most used 4-color lozenge. Perhaps someone with a better eye for lozenge fabric type, or more knowledge of the subject, could tell me. Thanks again in advance for you help!
 -
Warsaw, 17th of August 1944. The Warsaw uprisings are in full swing. In order to help suppress the revolt, the German army sends one of the 60mm mortars "Karl Gerät" named Ziu by rail. After a long journey, it has finally arrived and prepares to drive to the front. Transporting such a large weapon is a big logistic operation! Is is a small wonder therefore that, while Ziu is already en route, the train that brought it here is still being unloaded. All this under the ever watchfull eye of a camera from a Propaganda Kompagnie, ever ready to show the actions of the German Army in the cinemas. Finishing this dio took me 2,5 years, with many delays and detours in order to finish other projects. But finally it is finished. A good observer will notice all kinds of small scenes telling their own little stories, together painting the big picture. There are 11 vehicles, more than 20 figures and numerous accessoiries on the dio. Enjoy watching!
-
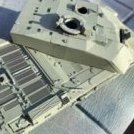
I've been painting this tank for around a month, and I'm at the end of finishing it. As this is my third tank painting, I think it's turned out pretty well. I used Revell Aqua Colours for my main painting because I hand-brush everything. Then I used the Revell Weathering Powder to add in the grim and sort of dirt to the tank and recently followed up with oil paints for a discoloration effect for the tank. It could be better if I used less brown for the discolouration, but I think everything else is fine. I just need to finish off the rest of the oil paints to give a discoloured look.
-
- 6
-

-
- German
- Panther Ausf.D
- (and 1 more)
-
First post here, so I might mess it up a bit, Recently bought another Tamiya Panther Ausf. A, The construction went well and with some parts from a Jagdpanther I will never finish I feel the build is just a bit better than if I used the parts from just the Panther A kit any criticism would be appreciated, and if anyone has any suggestions for the build that would be helpful
-
Hi all - I have decided to start another 1/48 DVa. Having built several before, this time, I have gone with the Revell boxing, which is a re-box of the Eduard kit. Revell have moulded this kit in a very light grey and slightly brittle plastic. Reflecting upon the fact that a tightly cowled Albie hides all of its secrets, I decided to bite the bullet and tackle something that i've wanted to do for a while; an un-cowled DVa. The first thing to do, unsurprisingly, was cut off the kit cowls, and thin down the fuselage sidewalls. I sanded off all of the interior detail, and thinned down the interior of the nose section with a dremel: Now, the real challenge... how do deal with those curves, and build all of the distinctive formers? Having sanded the fuselage, it was now not simply a round symmetrical section that I could use. I also really didn't want to make up each frame painstakingly by hand. I decided that I would use my Silhouette Portrait cutter to cut the formers from thin plastic. That would also allow me to design the lightening holes and have them cut out cleanly. To do this, the first thing I did was roughly get the shape of each frame using thin plastic. Some of the shapes were going to be a bit 'odd', due to the way that the plastic had been sanded, creating shapes / contours that weren't quite oval (mainly at the point of the firewall, as you can see I needed a slightly odd shape here): This then allowed me to scan the shapes into the Silhouette drawing program, and trace out each shape. The appropriate details were then added: I then used the Shilhouette Portrait cutter to cut the shapes from 0.010" plastic. I had to use this plastic thickness as anything thicker would have been too hard to cut. This plastic was too thin in and of itself for each frame, so in order to provide some rigidity I cut two pieces for each frame and glued them together: I then had the frames I needed to create the main structural elements: Next was re-adding the structural detail in the fuselage halves: And here it all is, VERY roughly placed within the fuselage. It may need a couple of adjustments here and there, but I think it will all work. And proof the fuselage halves still come together... I now have the basis to commence the rest of the interior. Phew...! Happy to take comments, tips and feedback. Cheers again! BC
- 16 replies
-
- 22
-
-

-
 Hello everyone – this is my latest completion, the 1/48 Eduard Fokker Dr.1. The kit is painted in the markings of Ltn Hans Koerner, Jasta 19, May 1918. I added some detail to the cockpit, replaced the kit guns with items from Gaspatch, added the telescopic gunsight that Korner fitted to his machine, and shortened the undercarriage struts to correct the ‘sit’ of the model. The rest was out of box. The Fokker streaked camouflage was from Aviattic, and the personal markings from Pheon. This is a lovely little kit which presents minimal problems in construction (save those that were self induced), and was a joy to build. For the build log, see here – https://forum.ww1aircraftmodels.com/index.php?topic=13042.0 Thanks for looking, and feedback always welcomed! Cheers, BC
- 12 replies
-
- 39
-
-
-
Hello, This question may seem odd, but when looking through Pz 4 models and I’ve noticed that there seems to be no Ausf. “i” variant, only Ausf. H followed directly by Ausf. J. I wonder if there was something special about the supposed “Pz 4 Ausf. i” or whether they’ve simply skipped the “i” version because “i” could be interpreted like a roman number 1 or something like that? This may be a silly question, I just couldn’t find results for Pz. 4 Ausf. i on the internet. Thank you.
-
Hallo Because of my projects, I need your help: The color scheme. After looking at pictures in some good books and consulting Ullmann’s book, I had to resume that the use of RLM 61, 62 and 63 are the proper colors. Not at all to use RLM 02. The Spanish aircrafts of the civil war are also in RLM 63. So do I think. The Japanese Emil, as flown from Stöhr, are also in 61 and 62. The mottled camo scheme as it was used during A, B, C and D series are they in 63 as basic and 61 and 62 mottled? Need your opinion and your knowledge! Happy modelling
-
Hallo Scale 48 only now! This is now a series of Messerschmitt 109. I will start with the A version as prototype. Now after a half year with modelling tanks, I wanted to switch back to my roots. Many years ago, I built my last CA kit. So I started after breakfast and after cleaning my workbench. As I said, I started in the morning. I cut all resin parts with my US cutter. Anyone, who does not know about this tool: https://www.amazon.com/Honda-Cutters-ZO-41-ultrasonic-cutter/dp/B00KCAKZ7G This tool is the best invention after resin parts in modelling appeared. No breaking of crispy parts anymore. On th other hand, when I need a saw, I take my Japanese saw. https://www.1999.co.jp/eng/10101375 So, with this comfortable tools, working is easy and clean. Afterward I took out all plastic parts and cleaned them, I went on the first assembly process. The wings with wheel bay. Of course, some thinning and additional grinding is necessary. As with CA kit is usual. I got them easily together and glued them. Then I checked the slats, and with some fitting work for increasing the holes for the levers, it was done. Gap filling at the outer ends of the wing with CA glue. Getting the molded lights off, since they will be replaced by glass. The cockpit is straight forward. The resin parts fit, without wall thinning! So far it was done. Time was left and I took out all etched parts and film. My spraying will be with Montex masks. Just part of it. So far for today. Next week more! Happy modelling
-
Hallo This is my Rescue-Hetzer from Thundermodels. The build is not so easy as it may look. The instruction and the design and quality of parts are a challange. The name Hetzer for this tank is an after war invention as it looks. Since in German it has a meaning, which is absurd in the German terminology at this time. As many other such names even in aviation, are after war inventions which never was spoken so in this time. In military or civilian circles. So, have a look: Happy modelling
-
Hallo This kit is the interior RFM in 1/35. Aftermarket are the track chains from Friul. The built was quite straight forward. I know already this tank quite well, not well enough to make mistakes. The assembly process is quite different to the MiniArt kit. This I will build next. I built the H Version already from MiniArt. Some parts are missing in the kit, like the two towing cables. I have only two grommets of proper size for one cable. Some other details are to question, but I have no clue who is right. MiniArt or RFM. The camo was a struggle. The green was to dark first, now think it is too bright. On the other hand it was spring time in Germany, when this tank was used. Well see by yourself. Happy modelli´ng
- 11 replies
-
- 13
-
-
-
Hallo I look for some ideas for weathering. I will not use aftermarket utilities like MIG or AK. I use Mr.Color from Gunze the C brand. I want to use color and pil paints only for the finish. Can you give me some advice. Until today I built new, right from maintenance, tanks. Just mild weathering. Looking forward. Happy modelling
-
Hallo In order to counteract one of the often occurring somewhat bland impressions in British camouflage, I decided to shade the green and brown color a bit. I usually just spray it green and brown. It looks so unnaturally clean, quite the opposite of the photos. In principle, you can shade dark beforehand. That's right, but only in the dark direction. The bleaching is by no means there. When the masks are gone. Bleaching is no longer possible. So, I decided to do this process with the masks in one go per color. In both directions, dark shade and bleaching! Now the model has just been sprayed, without further aging and weathering. What is your opinion? Happy modelling
-
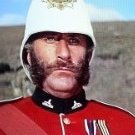
What Revell Acrylics paints match German WWII Uniform colors.
-
I've always wanted to do a German tank, for far more reasons than I can remember. Zvedza bought out the Panzer IV Ausf. a couple of years ago and one has been in my stash for a while now. I wanted to do the tank with p!enty of detail to get stuck into, so I hunted around for some interior parts. Eduard provided some decent PE while CMK chipped in with Engine bay, Driver and Radio Op's seating and Turret bustle. This kit does have it's own turret bustle, so I'll build both to decide which one is best. I'm still waiting on a turned gun barrel, I've been told it could take up to four weeks, so we'll have to wait and see.
-
Hallo Does anybody know the interior color of Panzer 38(t) ? I build right now one from 1940 or 41. General question: Did they have their tschech original paint left or for the new production adopted the german standard. This is what I would need to know. One Hetzer rescue tank from 1945 is also waiting. Here I asume German standard. Right or Wrong? Thank you in forward. Happy modelling
-
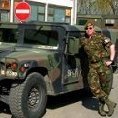
Checkpoint (35562) 1:35 MiniArt via Creative Models Ltd Checkpoints. They’re useful to stop people going where they’re not supposed to, and also handy to stop everyone to catch-out naughty people trying to sneak through them with nefarious deeds in mind. It’s also a good place to dump squaddies that have misbehaved and are deserving of a boring, soul-crushing job for a few hours. The Kit This diorama set arrives in a small top-opening box, and inside are twelve sprues in grey styrene, a small clear sprue and a sheet of decals. This will allow the modeller to create a booth, barrier, signposts and an area of hessian bags to hide in case of enemy action, all of which goes to make a checkpoint. Also included is a set of glossy instructions to help you build and paint your model. Construction begins with a chair. Your guard has to be comfortable, right? This is an old-style wooden kitchen chair with a curved and slotted back and non-too-comfortable seat. Your guard also gets a choice of telephones. An old-skool 70s bakelite type with a blank dial pad and wind-up handle to make a call, or a field telephone in an ammo-can style enclosure. A choice of oil lamps are also included, which both have clear parts to complete them, then the guard hut itself is made up from four sides, the front one having a large cut-out door, and the two sides with portholes that have slide open/closed hatches to stop the wind whistling through your ears. The walls and base are all planked, and before you drop the walls into place, the chair and your choice of lamp/phone are put in place. The roof is peaked, and looks to be made from lead flashing or roofing felt with ribs perpendicular to the front. The barrier is a long pole that needs an alternative pivot point removing, after which it is pinned between the two halves of its support so that it can pivot once the two-part counter-weight is installed on the short end. A sign is provided for the centre of the pole for people waiting in cars to read while the guard saunters across, and there is a single part for the support of the long end, but it’s not mentioned in the instruction steps. The eight sprues of sand bags can be used to create a C-shaped barrier by following the instructions, or you can figure out how to make any other shapes you might figure out by trial and error. Finally, there is a small desk with three-drawer pedestal and knee space, which you can place somewhere nearby if you fancy it. Mentioned on the back page are instructions for the signs, which are a subset of one of the many signpost sets that MiniArt have released of late. Each sign has a decal with the same alpha-numeric code as its part, and there are two posts included to attach them to, or you can make your own with a lolly stick, coffee stirrer or toothpick. The instructions advise you to paint the sign white before applying the decal to give it better definition. The text on the decals is German, and the suggested colour scheme for the booth is red/black/white, which further enforces the Germanic nature of the set, even though it isn’t mentioned explicitly. Conclusion A nicely detailed German checkpoint for you to wait to have your papers seen and your bumps felt for weapons or other contraband. Highly recommended. Review sample courtesy of
-
This has been quite a good kit so far. Nice and simple, tracks came moulded all as one which saved so much blood, sweat and tears as this is only a 1/72 scale model. All the parts have gone together so far with little to no sanding required. Paints look fairly good. Now it’s just time to paint it!
-
Hi y'all hope all ok I need the advice of modelers far better than myself to help with the camo on my below panther and Jagdpanther. Question is do you think the camo on Jagdpanther is too light or too much. Have seen pictures of the late war diagonal pattern but the red brown bands seem to look much darker than mine. Dark yellow ran out as well. No weathering done yet Thanks for looking
- 20 replies
-
- 1
-
-
- Panther
- Jagdpanther
- (and 1 more)
-
What were the paint colors used for the German Africa corps? I did have them listed in the old Testors manual, which I cannot find now. There were four used that I remember. Two were issued when they deployed in 1941; in late 1942, early 1943, two other colors were issued as replacements. Can anyone tell me the RAL numbers and the paints names, please? TIA Joe
-
I got the Masterbox kit used by another modeller, in excellent condition except for its box, which was damaged. Contains three fragile grey plastic frames, one transparent, decals and rubber wheels for the vehicle and one plastic tan frame for five figures and one dog. The instructions are not clear and need a lot of study so as not to make a mistake. Generally the kit is over engineered and makes the life of the modeler difficult, but the result is satisfactory. I decided to build a KriPo vehicle for the period 1936-1939.
- 8 replies
-
- 8
-
-
- Master Box
- 1/35
- (and 1 more)
-
Hello, I am not sure about the best way of weathering steel tow cables. The kit provided brass cables which I did not like, so I’ve replaced them. The replacement was made from several strands of steel rope braided together. I think the rope is zinc coated, but I am not really sure about that. You can find a picture taken at daylight just by the window attached below (work in progress). When looking at real tanks, the cable seems to be too bright to me as it is (no weathering). What would you do about it? I would like to avoid coating the entire wire with a paint. I thought about submerging the cable in sulphuric acid for a while which could darken it a little in theory or maybe applying some dark oil wash over it. Has somebody dealt with this before? What would you suggest as the optimal weathering method? Thank you. The picture
-
Two figures from Model Cellar.
-
So folks with the M113 rapidly coming to an end I thought I'd let you all in on the next project. Undecided on the scheme but it might be the NATO 3 colour jobbie ? The beautifully done Master MG-42, this will be a modern MG-3 though. Expensive but worth it And a couple of crew figures It will be a few days before I cut plastic on this one. Regards Dan
- 394 replies
-
- 11
-


.thumb.jpg.c85c3c45aebd697e50c77949353eacb0.jpg)