Search the Community
Showing results for tags 'french'.
-
watch this space.
-
This is the new Tamiya AMX-13 French Light Tank. The model was built straight out of the box, the only additions were the aerials. Painted with Tamiya paints, weathered with a Flory wash and a Tamiya weathering set. Thanks for looking. Here is the link for the WIP
- 25 replies
-
- 18
-

-
Completed build of ICM's Panhard armoured car, as used by France during WWII. (build review can be seen here - Armorama build )
-

1/18 French SBD-5 Dauntless Indochina 1947
richdlc posted a topic in Ready for Inspection - Aircraft
total construction time just under two years. From Merit SBD-3/4 kit with extensive modifications. New windshield, scratchbuilt flaps and actuating mechanism, scratchbuilt interior, twin 0.30 cals, engine, engine accessory compartment, bomb racks and fuselage interior. Skinned with pewter sheet.- 36 replies
-
- 43
-
-
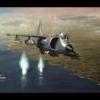
 So to go with my Asas de Portugal Alpha Jet I'm doing a Patrouille de France one too! The kit is the standard Revell one - I've got a lot of these floating around and they make a decent Alpha. The decals come from Caracal which I believe gives enough for 2 complete aircraft. But I have 3 Alpha Jets and some other decals in a Heller anniversary box I got when I was a kid in France on holiday, so I may well do 3 in the end! Most of you are probably fully aware of the Patrouille de France. They're one of the best display teams (and my joint favourite) in the world. They've flown the Alpha Jet for since 1981 now and their paint scheme hasn't changed much bar their tails which have changed over time to reflect anniversaries of the Armee de l'Air or of France. As per my other builds, I didn't take any photos of the before and after...so it's mainly pictures during painting and decals that I'll have to offer. When I do my next Alpha Jet I'll actually take construction pictures (though it normally only takes me half an hour)! So far I've painted the wings and some of the fuselage...not much else! More to come soon! Wings and some centre complete. Alongside it's colleagues.
- 1 reply
-
- 2
-
-
- patrouille
- de
- (and 10 more)
-
Renault UE 2 Universal Carrier with Transport Trolley 1:35 Mirage Hobby The diminutive Renault Universal Carrier was in service with the French army long before the war, but authorities were unhappy with its performance and spent a long period looking for its replacement. Renault had the ear of the government, and was able to shoe-horn a revision to the design into the existing production line that resulted in the UE 2 that was superior enough to its predecessor to be accepted into service. With high production levels from numerous factories the number in service soon increased above 2,000, and after capitulation the Germans saw them as a useful tool to add to their arsenal. Many were overhauled and re-engineered to perform different tasks, even to the extent that one variant mounted a number of rocket-propelled missiles. It saw extensive service with both the French and German forces during WWII but few survived to find their way into museums. The Kit This is a new tooling from Mirage Hobby, although they already have a UE and a few other tankettes in their range at time of writing. It is an injection moulded model that arrives in a small top opening box, with five sprues in grey styrene, although one has only a few parts on it. A set of "rubber-band" tracks, decal sheet, instruction booklet in black & white, with a glossy colour painting guide to round out the package. The kit is of traditional injection moulding, and as such there is no use of fancy techniques, but the detail is still good for the size of the subject, with a set of link-and-length tracks for the tractor, and a pair of rubberised plastic tracks in black for the trailer that it tows around. Construction starts with the bogeys for the tank, which has three pairs of wheels between two large panels with an idler wheel to the rear. These completed assemblies are then added to the hull, which is built up from four panels, with no interior details. The exterior is detailed up once built with additional panels, fenders and the rear assembly to which the large towing hook is added. Exhaust with shroud, pioneer tools and stowage boxes are glued to the hull, while two return rollers fit into turrets on the sides, with the drive sprockets attached to the front sides. There is little mention of the tracks in the instructions, but there is a diagram at the top showing the tracks from the side, showing lengths and numbers around the run. This corresponds with the number of links per run on the sprues, although there is no English writing in the vicinity to confirm the rumour. The armoured cowlings around the drivers' heads can be posed open or closed, although as there are no crew, which is a slight shame. The rear stowage box that fits over the engine deck is made up from individual panels with moulded in strengthening bars on the outer sides. There are some substantial ejector pin marks on the inner faces, but as they are raised, they should be the work of moments to remove. There are a few more ejector pin marks around the model, but most are hidden once complete, or can be removed with a little care. Taking a round burr to the insides of the crew blisters will soon remove the ones found in that area, with little effort. The trailer is also build up from panels, with a small A-frame at the front, and two-wheel wheel bogeys pivoting around a single axle that is suspended from the frame by leaf springs. It is finished off by a pair of fenders, and of course the rubber tracks. Markings Any colour you like as long as it's green, but you get decals for three vehicles as follows: M31 520 from unidentified French unit late Autumn 1939 M15 063 1st Polish Grenadier Division, June 1940 M62 738 Unidentified French unit June 1940 The decals are well-printed in-house, with good registration, clarity and sharpness. Each white number plate decal has a black background to improve the look, although there are a few more number plate backs than strictly needed. Conclusion A lovely little model that will build up quickly into an interesting and lesser modelled French armoured car from the early war. Don't worry about the flexible tracks, as they are able to be glued as normal, and individual track links would have been a total nightmare due to the size! Highly recommended. Review sample courtesy
-
This is the new AMX-13 French Light Tank from Tamiya released earlier this year. The model is in 1/35th scale moulded in tan coloured plastic with full-length flexible vinyl tracks. Detail includes, one etched part, tools, jerry can and a commander torso figure with markings for 2 French Army Units. The box art. A sheet naming parts of the tank. Sprue A (X2), hull & turret. Sprue B, the hull top & torso figure. Sprue C, details including, hatches and canvas turret cover. Decals, full-length flexible vinyl tracks & the etched part. Apart from using wire to simulate the sag in the top run of the tracks, I intend to build the kit straight out of the box. I've not tried the wire technique before, but I think the tracks will benefit with a sag along the top run whilst still using the tracks provided in the kit. Thanks for looking, Joe.
-
Mirage IIIC and IIIE French Air Force 1960s / 70s Three Mirages from quite a few years ago. I think these were built in the 1980s but have just come out for a photo session. The IIIC is basically Matchbox and the two IIIEs are from the old Frog kit.
- 11 replies
-
- 27
-
-
 Hello, Been a little while since my last WIP, but this lovely little kit has got me motivated again. It's the Accurate Miniatures Vindicator reboxed by Azur, who supply revised wings for the French version, resin and etch detail and new decals for three 1939/40 Aeronavale options. two are all over light blue-grey, the third having additional blotches of green/brown cammo. Think I may be doing the one on the box. Having read a little about the real plane, it seems it was yet another design that was good for 1936, but way behind the competition by the time it was used in conflict, as both the land-based French attack bomber squadrons, and later US usage in the Pacific proved, at the cost of many crews' lives. It was underpowered, under-armoured, and had poor flight characteristics when fully loaded. The kit is beautifully moulded, full of detail in the large cockpit, and the Azur additions seem to match the original parts well, with a quick tape together showing no issues at the wing/fuselage join at all. The engine is a good place to start, and shows crisp detail, and an ambitious approach to moulding the wiring loom and rods by Accurate Miniatures: However, after a bit of paint and a test fit in the cowling, it feels like the detail is too heavy (although about as good as you might get in plastic) and obscured the engine unrealistically. What to do? Leave it, or scratch build an alternative? Given the fineness of the detail elsewhere, I decided to have a go at scratching it. So, off comes the moulded detail, and the spares box provided a new ring to attach the plastic rod and wire replacement detail to. Just as I was about to start with the wire, and out gardening in the fine weather, I realised the plastic netting I was using to keep cats out of the raised veg beds/luxury cat loo (depends if human or feline...) would be an ideal alternative for the wiring: Hopefully this will work, as its got a nice randomness to the lines and is flexible stuff. given it was about £4 for 20m of the stuff, I've got enough to wire a few thousand engines! More soon, Take care, Matt
 -
 Bonjour, CECI est ma petite Surcouf (1937/1942), je l'ai Construit il ya 4 ans
 -
Hello everybody, This will be my first group build on BM, I only hope I don't show myself up and produce a decent looking model at the end! I have a few french modern jets in the stash at the moment, I was tempted to go with the Mirage F.1C in the 'Normandie Niemen' boxing, but I am going to go with the Mirage 2000D OOB, Not a bad looking kit, I believe it is a reboxing of the Italeri kit, I haven't purchased any aftermarket as I'm confident I can produce a nice looking aircraft OOB. Fingers crossed all goes well, Rich
-
 This looks to be yet another cracking little kit from Revell, I'm looking forward to this one.
 -
Hello everyone! I think I dare to participate in this group build with this. I plan and hope that can build it out of the box.
-
Hi all, I am building Eduard's 1/48 Mirage IIIC in the French Fancy Group Build and have a query re the underside blue colour. Does anyone have any pics of actual djibouti camo'd a/c that show the underside? I have pained the thing in the Gunze colour recommended (over a light base of Xtracrlix azure blue) and it looks very vivid! It may be correct but would welcome opinion. See pics below. Any direction would be recommended (posted this here for more visibility). Thanks
-
Despite its widespread diffusion the Gnome Rhone 14 doesn't get much love from the manufacturers. Is there a kit with a decent representation of this engine?
-

What wing had MJ671 - French AF Spitfire Mk.IX in Indochina
Basilisk posted a topic in Aircraft WWII
Would anyone have a clue what wing configuration these Spitfires had (particularly MJ671 closer to the camera)? Is it a c or e wing and is it full span or clipped? difficult to see on this picture. Are bombs only carried on e wings? The French flew the Spitfire Mk.IX with c and e wings full span and clipped. My guess is a clipped e wing. Any suggestions are much appreciated. Thanks, Peter -
Hi, Someone knows if I can find (and where) the French Navy aircraft fonts ? I need to print some decals of Super Etrendard Modernise for a event, so if exists a font file, or even a draw with the letters, will accelerate the process. Letters Numbers Thanks,
-
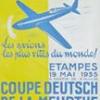
Here is a little oddity I picked up at my local hobby shop and couldn’t resist. It is a Payen Pa.22/2. According to the kit instructions, it is a 1935 design by Nicolas Roland Payen that was to be powered by a ramjet being developed by H. F. Malot. The ramjet didn’t work so the plane was completed with a 180 h.p. Regnier 6B-01 inverted, inline, 6 cylinder, air-cooled engine. It was to compete in the 1939 Coupe Deutsch de la Meurthe race in 1939. It was being wind tested when France fell to Germany. The Germans, probably liking the odd design, continued testing it and it was flown in 1942 after being repainted in German livery. It then was placed in a factory which, in 1944, was visited by some high flying Allied bombers and was destroyed along with the factory it was in. This is the RS Models 1/72 injection molding of this plane. It went together fairly easily and fairly quickly due to the limited parts count. Being a limited run kit, fitting twice prior to committing to glue was the standard of the day. It had a single vacuform canopy that was not a good fit at all. I do not know if it was the kit’s fault or mine as I detest vacuform canopies due to my inability to ever cut them out properly. So, it was probably my fault for the poor fit. It is an odd little bird and it broke up the time between my struggles with the F-104 and the Rafale and kept my sanity. Here is a picture of the actual aircraft. And here is my version If you have some experience with limited run kits and like odd planes, I would recommend this. It was a very enjoyable build. Comments always welcome.
- 10 replies
-
- 4
-
-
- Payden Pa.22/2
- RS Models
- (and 3 more)
-
My Tamiya Leclerc as seen serving with UNIFIL in Southern Lebanon, 2006. Kit was built OOB with the omission of the extra fuel tanks as per references of UNIFIL Leclercs, and the Decals are from Echelon's set; UNIFIL Leclercs, which is an excellent, well researched decal set.
-
Sepecat Jaguar A 1:48 Kitty Hawk The Jaguar has a convoluted development history, which began with Britain and France wanting different things, with some commonality of goals, if that makes any sense. Eventually these converged sufficiently to make more sense, and with the cancellation of one of the possible solutions, the Jaguar was born along with a separate joint venture between Breuget and BAC (as it was then) to form SEPECAT, which stands for Société Européenne de Production de l'Avion d'École de Combat et d'Appui Tactique, which translates to European Company for Production of Combat Trainer & Tactical Support Aircraft - a descriptive title if ever there was one, but a long way from catchy. The British and French partners ordered about 160 airframes each, with the French opting for a portion of their lot to be the yet-to-be finalised Jaguar-M options. These were of course cancelled due to cost increases and political wrangling in favour of the Super Etendard. Each Nation also ordered 35-40 two-seat trainers to assist in the conversion of pilots to this new jet. With the jet trainer element now completely removed from the aircraft's tasking with the introduction of the Hawk and Alphajet, the Jaguar was translated to a pure Ground Attack and Tactical Strike aircraft, a job that it did well, as it was a mechanically robust aircraft, with its unusual over-wing pylons freeing up more wing hard-points for munitions. Powered by two Adour engines, the initial airframes were considered to be underpowered, and crews joked that they only took off due to the curvature of the earth. Successive improvements to the engines increased power and load hauling ability though, and its ability to produce high power for take-off and short dashes made for some interesting low-level flight videos on YouTube over the years. The French Jaguar A was delivered to the Armée de l'Air in 1973, taking part in a number of conflicts in North Africa where French interests were threatened, and then went on to serve in the Gulf War through to the Kosovo and Bosnian conflicts, before being retired in 2005, some two years earlier than the British Jaguar's final curtain call. The Kit For years we have had only the Airfix/Heller tooling in 1:48 that dates back to just before the dinosaurs became extinct, and has many flaws associated with its age and heritage. We have known about this new tooling from young company, Kitty Hawk for only a few months now, but we are reliably informed by Mr Song that this is the first of a number of editions of the kit that will include British and 2-seat versions. That will make a lot of Jaguar fans very happy, and consign a lot of Airfix kits to the loft, I'm sure. The kit arrives in a diminutive white box, with a painting of a desert camouflaged Jag wearing French roundels on the top. Opening the lid, and you are greeted by a lot of plastic, filling the box to the top. There are seven sprues of pale grey styrene, plus two separate fuselage halves (minus nose), and a clear sprue. There is also a sheet of Photo-Etch (PE) brass, a colourful decal sheet, and a similarly small instruction booklet to finish off. First impressions are good – there is a lot of detail packed into these sprues, with restrained engraved panel lines, rivet detail and quite a few weapons parts included with the kit. The build begins with the cockpit, which is based upon an open-backed tub, which is then closed by a nicely detailed rear bulkhead, and detailed with PE side-console and PE instrument panel laminated to a styrene base that fits in a slot between the moulded in rudder pedals, but does not have a tab to hold it fast. The ejector seat is built up from a central cushion and headbox section, sandwiched between two side-panels that cover the rear, with a separate pull-handle between the pilot's knees. A set of PE harnesses are supplied to further detail this, and while it is surprisingly good enough to suffice for the majority of builders, additional detail can always be had by replacing it with a resin aftermarket part. There are some other seat parts for other versions of the kit that aren't mentioned in the instructions, so make sure you pick the correct ones from the sprues. The cockpit is finished off with a control-column, and a pair of internal side-wall parts that although not much of them will be seen, have some good detail moulded in. Like many fast jets, the nose gear bay is then attached to the underside of the cockpit, and here the detail is similarly good. The roof and end panels are moulded as one part, with separate sides that permit detail to be moulded on all facets, with plenty of rivet, cabling and structural detail moulded in. The instructions would have you install the nose-gear leg at this point, but I will be investigating the possibility of adding it later, to save it from damage during handling. The gear leg is strong, and has a pair of large mounting surfaces that mate with the roof of the bay and slide into slots cut in the sidewalls, it has separate yoke detail to the front, and a 2-part wheel that has the hub moulded integrally. The cockpit/nose gear bay assembly is then sandwiched between the nose sides, after adding some clear parts to the area portray sensors etc., and adding the nose equipment bay that may be posed open or closed. A single piece is included to portray the bay detail, which looks very nice, and should fulfil its purpose well with some careful painting. The two panels are added a little later in the open position, but if you are planning on leaving them closed, it might be as well to add them before you have closed up the nose, so that you can get them lined up with the rest of the skin. Once the nose is closed up, the coaming is added to the flat area in front of the instrument panel, which has a large oblong cut-out for the HUD that is installed with a clear part representing the reflective glass. The various sensors and the nose-mounted pitot probe can be left of until later, as can the open panels on the nose if you are leaving them open. The gun troughs are then added, and a pair of barrel stubs are installed within the trough to give added detail. The prominent exhaust holes underneath the cannon bulges are separate parts on the rear fuselage, which gives the mould the flexibility to depict one or both cannons installed for the 2-seat or single-seat versions. It also gives additional detail to a complex area, and careful fettling of the parts before gluing should result in minimal clean-up. The clear parts are thin and commendably clear, but would of course benefit from a dip in Klear/Future or Alclad Aqua Gloss. A set of PE rear-view mirrors are included for the canopy lip as well as a number of small styrene parts that attach to the inside of the windscreen. Their location isn't terribly exact on the drawing, so check your references before you install them. Attention then turns to the rear of the fuselage, and unconventionally begins with the construction of the main landing gear. The Jag's landing gear was quite innovative in its day, and because of its rough field handling requirement, the legs are sturdy and shod with balloon tyres. The struts are made up from six parts, which gives an idea of the complex shape. The twin tyres are made from separate halves with moulded in hub detail and circumferential tread pattern engraved in, with one attached to each side of the swing-arm. The completed legs are then installed to the front wall of the air-brake bay where the mounting points for the legs are moulded into their surface. The main bays are built up from individual wall parts, and fix forward of the air-brake bays. Detail in these areas is also good, although little will be seen because of the fact that the doors were usually closed after landing, unless they were needed left open for maintenance. Forward of the main bays are the cannon maintenance bays, which have a depiction of the 30mm DEFA cannons made up from two separate parts. The bay doors can be left open or closed at your whim. The intakes for the two engines are split diagonally into L-shaped sections that fix together along a diagonal mating surface to retain the curve of the sides of the parts. Of course a little sanding of the seam will be required, but this should be minimal, and as it is on the outer edges, shouldn't be too taxing. The trunking only extends as far as the intake sections, and leads into the fuselage, where the engine fronts will be visible within the gloom (if you can even see that far), so a coat of black to the inside of the fuselage just before closing up would be wise to hide any structure and prevent light-leaks. The intakes have a little rough surface on their internal faces, which you might want to take care of before gluing the halves together, and you could also paint the lip and trunk before gluing to make a tricky task a little easier. The blow-in doors are depicted in their relaxed state on this model, as they were only ever open when the engine was turning over and creating a drop in pressure that allowed them to hinge in to provide more air to burn with the fuel. If you plan on modelling your Jaguar in flight, you will need to remove the doors and pose them deflected inwards as per the box top painting. The fuselage halves are full of holes for open bays, so are by their nature flexible when handled straight from the box. They will doubtless firm up when the various bays are installed, which indicates that it might be an idea to tape the halves together while waiting for the bays to set up, so that no warp is induced by parts curing slightly out of line. The largest opening in the fuselage is to the very rear, where the twin Adour turbofans are installed. A large flat slab with a firewall bisecting it and the forward bulkhead are installed first, with the engines themselves added afterwards, having been made up from five styrene parts each, with a PE burner ring installed within the exhaust area, and a set of exhaust petals made up from a strip of PE that is curved around into a cylinder, and the individual petals folded in the correct order before being slid into the outer exhaust ring. A central outer skin panel is installed along the line of the firewall on the underside of the fuselage, and the modeller can then decide whether to install the main engine panels or leave them off, displaying one or both of the engines. The same can be done with the airbrakes, which have fine holes cut through them, just like the real things. If posing them open, a pair of jacks are included (one for each) to put them at the correct angle to the airframe. The tail-cone and a PE arrestor wire are added, as are the choice of two centre-line pylons, although whether they are better left off until after painting is a decision for each modeller to make. The wings are provided as individual halves, with the outer wing panel moulded entirely to the upper wing, due to the narrowness of the wing at that point. The flaps and slats are all separate parts, and a PE spoiler is supplied for the top of the wing, as well as the wing-fence, which is also made from PE. A tiny wedge of clear styrene is installed in each wing-tip for the recognition lights. The rudder is made up of three parts, the main part of the fin, the rudder panel, and the top of the tail, again due to the changes in the tail between marks. A pair of PE antenna parts are installed perpendicular to the tail at around the half-way point. The elevators are single parts, as they are rather thin, and affix to the fuselage with a large peg around which they can be rotated. The ventral strakes attach to long slots on the underside of the engine bulges, and a gaggle of small sensor parts install on the underside and rear spine. The crew heat exchanger that sits on the spine behind the cockpit fits into a slot, and has two PE blade aerials attached to its back. It is only at this point that the instructions suggest joining the front to the rear of the fuselage, after all of the weapons pylons have been installed. Happily, the pylons are made up of separate halves, and have attachment details added once they are joined. This is a neat little feature, and something that should be commended to all manufacturers of modern jets. The remainder of the build concerns itself with the construction of the weapons load that this pugnacious aircraft could carry into battle. A table on page 18 shows what each of the stations was capable of carrying, but check your references for actual war-loads and training loads that were typically carried. The sprues contain the following weapons: BGL 1000 250KG Bomb x 4 on 2 dispensers AS.37 Martel BGL 400 x 2 AS.30 missile BLG66 cluster bombs x 2 PHIMAT countermeasures pod Matra 155 x 2 OBL 755 AIM-9L Sidewinder x 2 ATLIS targeting pod R550 Magic.2 x 2 Barracuda ECM pod That's quite a pile of weapons, which takes up the majority of two sprues. Only one fuel tank is included with this edition, and that isn't mentioned in the instructions, although it's likely to be a centreline tank judging by the fact that there is just the one of them. It can be found on sprue H, next to the wing parts. The decals permit you to model one of two schemes, as follows: No. 124, EC01/007. Provence Saint-Dizier, 1994 - dark earth/light brown camouflage over light blue undersides. No.62 "Boar's Head" markings - dark green/dark sea grey over silver. Decals are sharply printed and appear to be in good register with a slightly matt/gloss mottling to the carrier film, which varies over the surface. The two large perforated decals are for the BLG-66 cluster bombs, depicting the bomblet dispenser holes. A full painting and marking guide for the weapons is included on the inside front cover of the instructions, taking advantage of the glossy colour print of the outer sleeve. Conclusion A new tooling of the Jaguar in 1:48 has been requested and prayed for for many years by modellers, and finally we have one, courtesy of Kitty Hawk. Soon we should have a full set of options for British, French and trainer aircraft, which is only to be applauded. From my personal (and very selfish) British standpoint, it's a shame the French edition was first out of the gate if only by a very short time, but in the grand scheme of things, we can wait a few more weeks for a new RAF Jaguar in 1:48, can't we? It is a thoroughly modern tooling, with a lot of detail included in the box, especially in the important cockpit, gear bay and surface areas. You have options to open up many panels, there are plenty of weapons included for you to choose from, and you even get a fret of PE parts to add to the kit, although there are no styrene equivalents for those that are PE phobic. From a personal point of view I couldn't be happier. I have a planned build of three, or possibly four Jags in 1:48 before I depart this world, so will be replacing my Airfix kits as I go along. Perhaps those Retirement Scheme decals might get used afterall! Very highly recommended. This is now a Work in Progress, and can be seen here. Review sample courtesy of and available soon from major hobby shops
- 50 replies
-
- 3
-
-
- French
- Armée de lAir
- (and 1 more)
-
Just finished this today, first completed build of the year. Italeri 1/72 F4U-7 in French Navy markings from the Suez Crisis. Pretty much built OOB, added brass tube gun barrels as the kit ones were a bit soft, tape belts, nitinol radio wires and made the navigation lights out of clear sprue, a first for me and they came out alright. Painted the stripes and the tricolour on the tail even though they are supplied as decals. The kit decals aren't great and if I made another I would replace them. They are a bit translucent and take forever to loosen from the backing paper. The fit of the rockets is a little clubby, not sure if the fins are too long or the stubs need spacing out more. Other than that the kit goes together very nicely and I'm tempted to get another one and do it as a very tatty French bird from Algeria or maybe an Argentine Navy one. Cheers Segan
-
Hi all, This is my first post to the figures section and my figures are rather small in scale relative to others here. These are 4mm OO figures adapted to be members of the French resistance. Ben.
-
Found this on Hyperscale. All in French, But, A very impressive build article on using an ancient Leo 45 WW2 bomber model to make an underwater diorama. There are also similar diorama's from other builders. If you have a crap kit & a picture frame, This could be the thing to do. http://www.master194.com/forum/viewtopic.php?f=4&t=74692 Enjoy Pete
-
AuF1 Self-Propelled Howitzer 1:35 Meng Models Developed from the successful AMX-30 Main Battle Tank, the AuF1 is a 155mm howitzer that as well as being rather heavy (over 41 tonnes), is also fast and manoeuvrable, as well as having an automatic loading system giving it a high sustained fire rate of 6 rounds per minute, and burst mode of 8 RPM on a good day. Because the vehicle has sufficient room inside for the whole 4-man crew to travel inside the cab, it has quite a high profile, but because it has a range of almost 24km it has little need for stealth, and is in fact only lightly armoured to a thickness of 20mm to withstand small arms fire. The AuF1 is used by the French army, all of which are now upgraded to the AuF2 spec, as well as the Saudis who have over 50 units on strength. Iraq had 85 that saw action during the Iran/Iraq war, but following the first Gulf War, some remained intact, possibly because they were unable to take part in operations due to a lack of spares caused by the years of arms embargoes in the run up to the conflict. There were rows of abandoned machines at a former Republican Guard base that made for quite an impressive sight. The Kit Following Meng's launch of the AMX-30 recently, it made sense from a tooling point of view to create the parts to complete this imposing, although lesser-known howitzer, and fans of French armour will rejoice that there is now a kit of this beast in styrene with a modern tooling. I'd not heard of the vehicle before its announcement, but it has quite an impressive look, and should look good on the shelf next to the American M109 and the British AS90. The kit arrives in Meng's by now familiar matt finish top opening box, so your Meng kits will stack nicely together, which is a bit of a bonus when you have a large number in the stash. Opening the box reveals eleven mid-green sprues, plus five in brown styrene, a clear sprue, separate lower hull, two sheets of Photo-Etch (PE) brass, a small sprue of poly-caps, a decal sheet, and the instruction booklet. All but the roadwheel and track sprues are individually bagged to prevent chaffing. Construction of the lower hull is identical to the AMX-30, as you'd expect, with paired drive wheels attached to the suspension arms by friction fit of the poly-caps, and full-length torsion bars mimicking the real suspension. The upper hull is ostensively the same too, with the same hatches on the glacis plate at the front, side pioneer tool panels, and the rear bulkhead/radiator/exhaust assemblies. The main difference, such as it is concerns the long bar that rests on the rear of the engine deck on the Auf-1, but on the rear bulkhead on the AMX-30. The light clusters, spare fuel cans and external telephone are all present, as are the PE grilles that cover the hot exhausts. The front mounted tool box assemblies differ in the equipment that is fastened to them, and an additional panel is attached at the front of the glacis plate to make this section symmetrical, and a more robust set of headlamp covers are included. The tow ropes are consigned to the port side panels with the pioneer tools. The tracks are of course identical, with the ingenious part C10 providing us with a template for building up the individual click-together track links, 80 parts per run. Now the kit starts to deviate from the earlier AMX-30 kit, as the turret is a far different beast from the streamlined AMX-30's. The first thing to note is that there is a rendition of the full gun, with breech detail, plus a complete interior to the turret that can be seen through the large opening doors on the sides. Work begins with the breech, which is made up from 10 styrene parts, and two poly-caps to make the barrel posable. The recoil mechanism is next, with four recuperators installed along with the base of the barrel, mating with the breech assembly on either side of the mantlet, with some large lifting lugs added to the sides of the bolt-studded mantlet. The base of the turret is a single part onto which the crew seats are installed, all of which fold up or down into the deck to give extra room with the turret at busy times. A PE grille is placed into a styrene frame to act as the breech fence, onto which the commander's seat and some controls are added, before it is placed vertically on the edge of the turret ring, with another to the right containing more controls and instrument panels. Sighting equipment is installed in the front right of the turret floor, and a large shell containment system is inserted into the rear of the turret. It comprises a closed front and a detailed rear, showing the back of the shells and the powder charges, with the top row further detailed having the full shells and bags moulded in, giving the impression of a full magazine. The roof interior is covered with equipment boxes and a depiction of the inside of the commander's cupola vision-blocks, which are supplied in green styrene, with the blocks painted a clear blue. The sidewalls have more equipment installed on them, including a rack with a single FAMAS bullpup rifle, right next to the side-door location on the right-side. The mantlet is installed at the front of the turret, and is joined by the sides, then the frame of the rear wall, and finally the roof. The roof has a couple of lugs removed (possibly for an AUF-2?) and some boxes, smok dischargers and various lifting lugs are added around the turret before the large side doors are constructed from an inner skin joined to the outer, with a clear vision port and internal handle to improve the detail. These can be posed open or closed on the moulded-in hinges, and the top hatches are left loose to be posed open or closed at will. Grab-handles, an antenna base, along with two sets of barrel cleaning rods (oone on each side of the turret) are added, and a short-jacketed 50cal weapon with mount and ammo-box is added to the left-hand hatch. The rear magazine doors can be posed open or closed, just needing the hinges removed if you opt to close them, and installation of a pair of stays on each one if you leave them open. The final parts are the main length of the gun, which is supplied as separate halves, with a small detail section added to the aft of the muzzle brake. Once complete and the seams hidden, this just slots into the hole between the recuperators, and could even be left loose for ease of transport, as it is a little on the long side! There are a number of loose shells supplied on one of the sprues, as follows: 4 x Extended range base-bleed shell 3 x HE shell 3 x White phosphorous Incendiary 10 x cartridge cases These can be used in diorama settings, or as part of a loading vignette. The second PE fret is of a heavier gauge to the main sheet, and contains four masks for the roadwheels, to allow painting of the hubs after the rubber tyres have been painted. There is a recess on one face to allow easier centring of the wheels within the mask, and as they are brass, they can be cleaned between shots in a pot of thinner, to avoid build-up marring your finish. The other part on the fret is long part with oblong cut-outs that is a mask for painting the rubber track-pads, which although they are not square like the mask, by the time you have added dust and rust to weather them, little over-spray would be visible. Markings The scheme on the box is the only one supplied on the decal sheet, in the tri-colour NATO scheme, although the small decal sheet has two other number plates, plus three "IFOR" and two "Mont Igman 1995" insignias, and a couple of stencils, intimating at least one other choice was considered, but never made it to the decal sheet. The AUF-1 has been seen in white UN colours, as well as desert colours, and it wouldn't need much in the way of decals for whatever option you fancied. Some of the abandoned vehicles from Iraq with their slogans and markings spray-painted on their hulls would also make for a little different subjects. The decals are well printed, with good register, colour density and crisp demarcations. The colour profiles cover every side of the vehicle, so there will be no guess work on where the various colour splodges start and finish, which make a nice change from recent experiences with other manufacturers. Conclusion An imposing and well tooled kit that brings French armour a little well-deserved prominence. The inclusion of a full interior, Photo-Etch parts, masks and working track-links makes for a well-rounded package that should please most purchasers. The fact that the whole underside of the vehicle from the fenders down is just black rather than camouflaged eases painting, and that huge barrel is just great! Highly recommended. Review sample courtesy of
-
TS-004 1:35 AUF1 155mm Self-propelled Howitzer Meng have announced the release soon of this rather brutal looking French Self-Propelled Gun (SPG), to give it its full title, GCT 155mm AUF1. It is based on the AMX 30 chassis and sports a 133mm gun with a 39 calibre round and can fire a whopping 8 rounds a minute due to its auto-load mechanism. Used by the French, Saudis and in small numbers the Iraqis during the Iran Iraq war, it cuts an impressive profile on the battlefield. Looks like it'll be an impressive kit when it arrives. No dates have been given as yet, but I'm hoping soon Mike.