Search the Community
Showing results for tags 'flanker'.
-
 Here goes the (almost complete) WIP for my GWH twin-sticker Flanker. I used Galaxy Model masks for the pixel camouflage, Galaxy masks again for masking quite a lot of stuff, Foxbot decals and MRP paints. Here we go. The cockpits are painted MRP Sukhoi cockpit blue-grey, and I used the kit decals with quite the dose of Tamiya extra-strong decal softener. The gear bays are painted MRP Chassis Grey and the various bits are painted using Gunze. The nose gear bay has been cleaned quite a bit since I took this pic. The gear bays are glued to the belly of the beast: And both cockpits are glued to its back. I kept the sprue on the wings as long as I could to avoid breaking the static dischargers (and as I only broke one, I'm pretty proud of myself). The belly and the back go together without any fuss. And the intake assemblies go seamlessly. The radome needs a bit more attention. And then it's masking time. Or should I say era? Fins are assembled and glued, stabilators are just snapped in place. This is a big one. Canopy is masked. Main gear door are glued in place using a tiny drop of CA glue. I took the nose gear door I didn't intend to use, cut everything that protruded from it, and snapped it in place. The belly pale blue was sprayed and the gear doors removed. The base blue for the back followed. It's an entertaining shade... And now, masking. Again. The grey and the dark blue are sprayed in thin coats to avoid buildups around the masks. Unmasking a tailplane: Good! Now unmasking the rest of the plane. One thing, though. If you don't spray everywhere you need to spray, you're up an entertaining creek without a paddle. Guess what? I lost my paddle. And once everything has settled down: It is now time for some more masking. Masks away! Now for the interesting metal effects at the rear. I know it's been a long time, so why don't I put some more masks? Then a coat of Mr Surfacer 1500 Black followed by a coat of Zero Paint generic TS14 : Then MRP Titanium and Dark Aluminum. There are dark blueish stripes on these parts, I made them using a blue Sakura pencil. And after a thin coat of heavily thinned black, the masks are removed. Let's go for the nozzles. First, a primer coat of Mr Surfacer 1500 Black, then some MRP FS36081. Then the petals are masked (yeah, I know). Inside is painted white. Outside gets some Gunze Super Stainless and a thin coat of MRP Burnt Iron. Then goes a black oil wash, and I played with my red and blue Sakura pens, and a couple dozens of Q-tips. Everything is dulled using a photoetch stencil through which I sprayed MRP Exhaust soot. The stencil and the exhaust soot treatment is applied to the fuselage. Decals! And here is what the kit looks like now. Right now, I'm painting and decalling the missiles. Guess what? I got some more masking to do... S.
- 15 replies
-
- 17
-

-

-
- Great Wall Hobby
- Flanker
- (and 1 more)
-
WIP is there: The pics: The Galaxy masks for the canopy, panels, missiles and engine area are extremely helpful. If you intend to build a GWH or Minibase Flanker, get some. The Galaxy masks for the digital camouflage are extremely cleverly designed, and almost idiot proof (I know, I used them). From what I saw, their design is better than the Foxbot ones. While we're talking Foxbot stuff, their decals are excellent. I used them rather than Galaxy and GWH ones when I could. MRP paints are as usual, ie excellent. The kit is one of the best designed kits I've ever seen. Can't wait for the next GWH Flankers (the Flanker B is on its way). Cheers, S.
- 12 replies
-
- 31
-
-
I haven't posted anything in this section for a while but I've decided that this is about to change. Brand new GWH kit of the Su-27UB in 1:48 and from my initial inspection, I am quite certain you can make it into outstanding looking model without use of any aftermarket products. Progress is slow as I have a bunch of exams at work in the near future and parenting and other hobbies take a toll, but still, I am gaining momentum with this build nevertheless. First completed piece is front gear well - I am doing an early version of the UB so I've chosen the open bay with all the piping and structure visible but GWH provides a closed well for later versions as well.
-
Hi everyone This is my 1/48 SU-30SM by Kitty Hawk. This was a very nice kit to build with great detail. The fit was good, only having large gaps on the air intakes and air brake. I had read reviews about the other su-27 and su-30 kits missing axles for the wheels but mine came with them so I'm guessing they have fixed it. The instructions did have a few mistakes, the paint guide didn't show the camouflage on the underside and showed the registration number from one of the other aircraft. The decals were decent but some of them took a few applications of micro sol to make them conform. Some of the yellow decals were very thin and clear so when applied to the model, they went a lot darker and hard to see, this was the same with some of the red ones. There were also some yellow decals that looked more of an orangey colour, I don't think they are meant to be that colour on the real aircraft but I could be wrong. The weathering made the orangey decals less obvious and orange which was good. For weathering, I decided to try something different to what I normally do. I applied a black oil wash on a gloss varnish, then coated it in matte varnish. I used small dots of white oil paint on the panels which I blended with a wet brush to try to make faded areas. I am happy with how this turned out. It was then coated in a matte varnish again. Thank for looking
- 10 replies
-
- 32
-
-
-
 1/48th Sukhoi Su-27 "Flanker-B" by HobbyBoss in 2013 - catalogue ref. 81711 Source: http://scalemodels.ru/modules/news/img_5748_1358082281_fe7282025aafa40f1fabea15ab64034f79f0190e.jpg.html V.P.
 -
Hello everyone! This is P-42 (former T-10-15 Su-27 demonstrator modified to set time to climb records) in 1/144 scale. Base kit is Trumpeter, with some chopping done to align with the original airframe. Anything that was not essential to the very basic purpose of flight - including paint finish - was removed. Tips of vertical stabilizers, ventral fins, IR dome, tail sting - are all gone, so are most of antennas. In 1986-7 the P-42, equipped with uprated engines which along with other modifications gave thrust to weight ratio of ~2.0, set series of time-to-climb records, beating those set in 1975 by likewise lightened and stripped out F-15 Streak Eagle. This model served as a prototype for Shelf Oddity brass Time and place: Thanks for watching! Leszek
-
Hello fellow modellers, I want to acquire the 1/32 Trumpeter Su-27B single seater for a build I want to do. However, I am aware of most of the errors (intakes etc.) on the kit that were corrected on later two seat versions released by Trumpeter. Can anybody here tell me if Trumpeter actually released the single seater with the corrected parts at any stage. It makes sense that, given the fact that they made new molds, these parts could have been included in later boxings of the single seater. If so, how would I know if it has (kit number maybe?). Thank you in advance Regards Victor
-
Next HobbyBoss 1/48th Flanker is expected in late November 2016. and it's a Sukhoi Su-30MKK "Flanker-G" - ref.81174 Source:http://www.hobbyboss.com/index.php?g=home&m=article&a=show&id=75&l=en Box art Kostas what have you done? Definitely not your best art work. V.P.
-
Good afternoon, Below my efforts on the wolfpack SU-27 Flanker, of the Russian Knights. While I mostly enjoy propeller planes, I could not resist the fantastic lines of this plane. Thanks for looking and comments more than welcome. CF
-
Hi All, This post will have several first's in it for me. This is the first time I have completed a Zvezda kit and the first time I've used Vallejo model air paint. I thought this would make it an ideal model to be the first I share on a forum. The kit went together nicely with no major modification or extra parts used. I am however a little less happy with the Vallejo paint. I wanted to try them since they now offer a range of colours that match various flanker schemes nicely. I found however that they were harder to airbrush and get the thinning right. Often, they would feel slightly rubbery after drying. I thinned them very slightly with tap water which may have been the problem but if anyone else has experienced this or has any other tips on using Vallejo model air they would be greatly appreciated. What do you think of the finished model and do you have any tips on how it could be improved? (please excuse any subpar photography) Thanks br60066
- 13 replies
-
- 17
-
-
 As I am a model enthusiast, I cannot live without thinking a new project even at see side in vacation house for summer break. The only material here I have is my laptop. But it is sufficient to make drawings of any future project. I have already done the drawings of one of my near future project namely Su-27LL which can be found here. The another one will be "Record Aircraft" P-42. At the beginning I have underestimated how this aircraft could be difficult to finish. In terms of kit modifications this is really easy task. But finishing is really a big challenge (most probably a nightmare). Here below the 3 view drawings I did based on available pictures. The panels after paint removal has different shades of aluminum as well as green primary coating. I thought I can use one of Revell/Zvezda Su-27SM for this conversion but due to significant effect of rivets most probably I will go with Trumpeter early Su-27 kit. Any recommendations or comments about drawings and kit selection are welcome. Serkan
 -
As I am currently on summer vacation till beginning of August I have no chance to progress on my currently ongoing builds. But hence I have my notebook with me I can still make some brainstorming for my future projects. 🙂 I have some deformed airframe parts from T-10M conversions due to wrong heat treatment process of self casted resin parts in oven. I have decided to use them for Su-27LL conversion which looks also very distinguished with her blue/gray paint scheme. I have made 3 view drawings based on available pictures in internet. But I could not found any reference pictures of real aircraft which show top and bottom surfaces. The only material I have is the instruction sheet from Begemot Decals. But still I have some doubts especially for upper surface. Here are my drawings with available data I have: I would like to build the aircraft displayed in 2013 MAKS. Any feedback/comments about the above drawings will be highly appreciated. Serkan
-
After the Su-34 "Fullback" (http://www.britmodeller.com/forums/index.php?/topic/234996669-kitty-hawk-su-34-148-render-march/), Kitty Hawk is to release a 1/48th Sukhoi Su-35 "Flanker-E" kit - ref. KH80142 Source: http://www.kittyhawkmodel.com/copy-of-kh80141 Looks like a weapons box with a Sukhoi a/c as bonus V.P.
-
Hello! I am kind in the middle of my "documentation quest" about the Flanker family, and coming across some questions. First, that'd be my first proper aircraft model, I'm looking to do a few of the flanker Family. Was thinking about doing first either the 2014 Zvezda Su-27SM, or the Revell rebox of the Hasegawa Su-27SM. Those seem to be some good quality models and it sounds like a good "warm up" before the project Do you think it would be a good idea? Or should I start with something smaller and more simple? (I'm kind of an aviation nerd so any good model of a jet fighter interests me, or any aircraft for the matter haha, completely open to recommendations). Secondly, while waiting for the release of the Zvezda Su-30SM, my project could be an Su-30MK, that particular one: However, I can't seem to find much about it... I found a diecast model at 1:72 but only a few pics online and no profiles or anything, not even sure what the exact color scheme is, it seem to have been a temporary livery at a Paris Airshow and MAKS 2009. From my understanding, I could take a trumpeter Su-30MKK or the old Su-30KN from Zvezda (which seem to be a berkut rebox). From those two aforementioned, which one would be the better kit? Know any other possibilities? Or have I missed that someone made that exact kit already? Or maybe I'll get tempted by one of those very colorful twin seat flankers liveries from air forces like Venezuela, or get inspired by some of those fantastic creations in that forum and end up with a totally different aircraft project. PS: I'm a brush painter, so maybe from your experience, complex camos and those metal shiny part for example exhaust and engine on the flanker may be an issue? Thank you very much in advance, Cheers!
-
 Su-27S/SK/UB Flankers (72-050 & 48-022) 1:48 & 1:72 Hi-Decal Line There are quite a few Su-27 Flankers models out there, however the decal options in the kits tend to be pretty standard. If you want something a little different the Hi-Decal have a sheet out in 1/72 & 1/48. The options on the sheet are; Su-27S Flanker B "1953" 1st Fighter Sqn, Ethiopian Air Force with kill marking 2010 Su-27S Flanker B "608" 6th Fighter Squadron Eritrean Air Force 2005 Su-27S Flanker B "C110" 13th Fighter Squadron Angolan Air Force 2006 Su-27 SK Flanker B "TS-2701" 11th Fighter Squadron, Indonesian Air Force 2003; Su-27UB Flanker C "I 100" 13th Fighter Squadron Angolan Air Force 200 The sheets provide all the national markings as well as stencils for each option. Registration, sharpness and colour density are all good, with a thin gloss carrier film cut close to the printed areas. Recommended for your next Flanker build if you like a little something different to the kit options. Review sample courtesy of
 -
 Hi All, Looks like I've got about a month off work and doctor's orders to take it easy, so it's time I started this behemoth of a kit! It seems like a good subject for a WIP thread as I'll be doing a bit each day for the next month or so - this is a BIG kit and I'll be throwing the kitchen sink at it. I've got a proper digital camera instead of my phone for pictures, so hopefully I will be able to keep a record that is visually explanatory as well as detailed in words. Trumpeter's by now familiar 1/32 Su-27 Flanker-B kit. I bought it seven years ago on my first visit to China - it cost me about £40 at the time when it was double that in the shops at home. Since then I've gradually accumulated practically every aftermarket item worth having, with still some more on the way! The main purpose of the aftermarket stuff is to deal with some of the well-documented shortcomings of this kit. I'll outline those in this post and tackle them as I go. As far as the kit goes, it was among Trumpeter's first forays into the 1/32 jet world in the early 2000s, which brought us several very popular subjects that had never been released in this scale before. No-one really expected to see large aircraft like the F-105, A-10 and Su-27 in 1/32, but Trumpeter surprised us all with their efforts. Unfortunately for all these early kits, though very nicely produced, they were blighted with some fundamental shape problems, and the Flanker was arguably the worst offender. From studying drawings, I think the shape of the Trumpeter kit is based on drawings of the earlier development airframes (T-10-10/11), rather than the production model T-10-S. That said, there isn't a kit in any scale out there that captures the correct shape of the Flanker's fore section (except, I'm told, the new Zvezda 1/72 version), and this kit is very finely detailed in good quality plastic, nicely produced with minimal flash, and fits together well. And it is seriously HUGE! The three Aires sets for the kit - cockpit, wheelwells and exhaust/nozzles: Superb quality - I haven't used many of these Aires add-ons, but they are amazingly detailed: These items are luxuries to upgrade the kit detail - out of the box the kit versions are very much acceptable! Now for the corrective items - all from Zactomodels. These are the intakes and new nose. The kit intakes are too narrow and curved along the bottom profile. The kit nose is much too short and conical and these replacements are spot on. The other problem shape is the canopy - the kit windshield is too sloped and the overall shape is too short and bulbous looking. I did get Zactomodels' canopy set as part of the combo, but since I'll be posing the canopy open, it's less apparent that the shape of the canopy is wrong. I've test fitted the canopy and Aires instrument panel coaming and there is likely to be an interference fit with the HUD as well, so I've decided only to use the canopy accessories from the Zacto set and keep the vac canopy for another day. I can't overstate how very, very good these items are. The quality is the best I've ever seen in resin. The surface is almost creamy, perfect fidelity and very finely detailed. They also fit the kit exactly. This stuff is by no means cheap, but it is good value for what you get. It's also sufficiently accurate to throw suspicion on later releases of the Trumpeter kit which mysteriously "fixed" the intake and nose problems within a year or so of Chris' (Zactomodels) release. Make of that what you will! I also have the obligatory Eduard etch sets for the ejector seat and airframe exterior - some of the exterior is for the FOD guards, but as they are based on the kit intakes, which are quite dimensionally different to the Zacto ones, I won't be using them :'( Decals - I have Linden Hill's stencil set and Guardians of the North decal sets - I've also got some leftover Begemot MiG-29 decals, so who knows what I will end up with?? I'm leaning towards one of these two at the moment - 03 Red or 41 Blue. On the other hand, it would be nice to do a bang-up-to-date 2014 version seeing as these may be becoming very relevant in the coming months! If that were not enough, I also have MasterCasters' replacement wheel set, and the seated pilot figure. The wheels are pretty much exact copies of the kit wheels but without the need to use the rubber. Personally, I have no problems with rubber wheels, and have several completed kits going back eight years with rubber wheels that have suffered no ill-effects. So I may not use the MasterCasters wheels unless I have trouble reshaping the rubber ones. The last aftermarket items (still on their way) are some wingtip Sorbitsya ECM pods courtesy of Wolfpack Designs. I could have also got these from Zactomodels, but I could buy the Wolfpack ones here in the UK. This solves the problem of the kit's mis-shapen wingtip missile rails which are conspicuously wrong and very visible. I intend to build this as a modern-day Su-27 interceptor with R-73, R-77AE and R-27(E)T missiles, so two less R-73s won't make a huge difference. The missiles will come from the Trumpeter 1/32 Russian Weapons Set which I bought years ago and luckily have all the required missiles included. They are not spot on but perfectly acceptable, as I used several for my MiG-29UB built two years ago: Well, that's that little introductory thesis over - the casting blocks are cut off, the resin is drying off after a marathon washing and scrubbing session, the parts are cut to shape - we begin at dawn tomorrow, Comrades! 8) Hope you enjoy following the build, I'll try to be as detailed and explanatory as I can, tell me if it gets too boring or tedious with minutiae!
 -
After many paint disasters and still trying to learn how to stick bits of plastic together and paint them using these new fangled acrylics. When I looked into the box initially my first impression was 💩💩but the kit went together quite nicely and then I noticed that one of the canards was missing. So I had a look through my decal collection and had an idea or possibly a spasm so here it is.
-
After the Sukhoi Su-30MKK "Flanker-G" (link) HobbyBoss is to release in late July 2018 a 1/48th Shenyang J-16 "Flanker-G" kit - ref. 81748 Source: http://www.hobbyboss.com/index.php?g=home&m=article&a=show&id=115&l=en V.P.
-
Sukhoi SU-27 Flanker (Hasegawa, 1/72)
Filbert_Wang posted a topic in Ready for Inspection - Aircraft
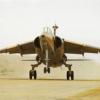
Hi folks, This is a kit I made from Hasegawa. Have enjoyed painting miniatures for some years but this is my first stab at a plastic kit since I was nipper and bodging together Airfix Spitfires and Panzers. I love seeing the Flanker in air displays after first seeing it in the early 90s so after some research on which kit to buy got this one from Hasegawa, and have to say thoroughly enjoyed it. Had quite a few learning moments - hopefully these will get fewer as time goes on! - Variable air pressures: Turns out trying to spray with 60psi isn't for the best, as a snapped off tail fin can attest to! - Don't leave the model in a dusty environment for a month, then do an inadequate job of cleaning it before doing the next coat. - Undercarriage/weapons etc: leave these off until the rest of the build & paint is completed so they don't get in the way (I did learn from my mistakes after re-gluing part of the undercarriage for the 5th time. Any criticism or tips very welcome! After a quick google search on the aircraft number, this is apparently the aircraft that appeared at Farnborough in 1991. -
Sukhoi Su-33 Navy Flanker (03911) 1:72 Revell The SU-33 is a carrier based development of the SU-27 that has suffered from the dearth of finances following the break-up of the Soviet Union at the end of the last millennium. Soon after it was taken into service by the Soviet Navy, funding was reduced to the military as a whole, and as a result only 24 airframes were ever built. Overseas sales were attempted, but none came to fruition for various reasons, and further sales to the Russian Navy weren't an option, as in 2009 they decided on the navalised Mig-29K going forward. Beginning with the basic SU-27 airframe, the internal structure and landing gear were beefed up to cope with the additional stresses of hard carrier landings, the wings were enlarged to provide additional lift, and both the wings and stabs were fitted with folding mechanisms for storage below decks. The first aircraft embarked on the Admiral Kuznetsov in 1995 after substantial testing, but the cancellation of other carriers led to the projected buy of 72 airframes being cut back to the aforementioned 24. They are being drawn down in favour of the Mig-29K, and will be refurbished to replace their outdated avionics for future use elsewhere. The Kit For this kit Revell have brought us the excellent Zvesda plastic in their own box. Construction begins with the cockpit. The ejector seat is built up, if adding the pilot figure than the seat pad and belts part can be left off. If you dont want to add a pilot figure in the cockpit then a standing figure is also included to pose next to the model. The seat and control column are added to the tub and this is inserted into the top fuselage half along with the control panel (instruments provided as a decal). Construction then moves to the lower fuselage. The front gear bay is assembled and added in, along with the main gear bays. Once these are in the fuselage half's can be joined together. Next up the engines are made up and installed. The rear cone and burner ring are added at the back the the middle ring is added, followed by the afterburner section. Te inner sections of the tail planes are then added to the fuselage. Next up the large intake tunnels are built up, an engine fan front is provided for the rear, additionally FOD blanks are supplied as well. Fuselage and centre line pylons are added at this stage followed by the two ventral strakes. The two vertical tails are then added. The outer tailplanes can be added in the down position, or folded. If the main wings are to be folded then the fold mechanism is added at this stage. Back at the front the canard wings are added along with the nose cone. The cannon muzzle is fitted along with the HUD, front screen and IR sensor. Construction then moves to the landing gear. At the front the two wheels are added to the leg along with the landing lights and a couple of struts. The front gear door has its hinged and retraction strut added. The mains have a hub and single part tyre added to the leg, retraction struts are added and the doors get their hinges and struts added. The outer wing panels are made up, there are conventional upper/lower parts with a separate flap section (different ones for lowered and raised) and the wingtip missile rail to add. Two weapons pylons are added to each wing, there is a choice of pylons but no mention of which ones to use, so check your references. The wing panels can now be added either in the folded or unfolded positions. Finishing up weapons can be added where needed, The main canopy is added, along with the nose cone and its pitot. The large upper airbrake can be added in the closed or open position. A boarding ladder is provided if the modeller wants to use it. Decals The decals for this kit are printed in Italy by Cartogrf so that assures you will have no problems with them. From the sheet one of two aircraft can be built; Red 78, 279th KIAP (1st Sqn) Admiral Kuznetsov 2017 Red 86, 279th KIAP (2nd Sqn) Admiral Kuznetsov 2017 The kit provides a comprehensive set of stencils and very good instruction for there placement. Conclusion Revell give us the great Zvesda plastic with new decals. Our very own Flankerman said this was in his opinion the Best moulded Su-33 in this scale and that's good enough for me. Very highly recommended. Revell model kits are available from all good toy and model retailers. For further information visit or
-
 Hi, Here is my latest build. I decided to renovate my "old" Flanker built in 2007 In progress here: http://forum.largescaleplanes.com/index.php?showtopic=44533&st=0&p=464100 Nose: Zactomodels Pitot: Master Models Exhausts: Aires PE for bangseat: Eduard Decals: Linden Hill Windshield: Scratch Air Intakes: Scratch It is still far from perfect. But I find it better than the previous one. Thanks for watching! Comments are welcome ;^) Rom
 -
Evening All! I attended RIAT last year and saw the incredible display from the Ukrainian Flankers. As soon as I saw the scheme I knew I had to do it. Luckily, Foxbat do decals and paint masks for the Ukrainian digital scheme. The Academy kit was used as the base and I added the Neomega cockpit, canopy from Yufei (haneto), Quickboost nose and traffic cones, Aires exhausts, DAN models FOD covers and the NorthStar Models towbar. I decided to do it as it was at RIAT 2017 with the famous blue cones. Overall, the Academy kit wasn't too bad, however with the amount of AM I had added, blending everything in took many attempts. The nose cone was too large for the kit and the canopy took lost of blending (I'm sure it was down to my poor cutting of the canopy and not the mould!) I aded the blind flying hood to the canopy from stretched sprue and tissue paper. The scheme was painted with the AKAN Ukrainian digital camo set, however I found most of the paints to be way too dark and had to be lightened extensively. In the end, the scheme was actually quite easy to paint after having a couple of arguments with the masks. The NorthStar models towbar was great and fell together. I think it's a nice addition to the scene. Here's a few photos. Hope you all like. DSC_0695 by Phillip Loughlin, on Flickr DSC_0668-Edit by Phillip Loughlin, on Flickr DSC_0667 by Phillip Loughlin, on Flickr DSC_0674 by Phillip Loughlin, on Flickr DSC_0676 by Phillip Loughlin, on Flickr DSC_0678 by Phillip Loughlin, on Flickr DSC_0683 by Phillip Loughlin, on Flickr DSC_0690 by Phillip Loughlin, on Flickr DSC_0671 by Phillip Loughlin, on Flickr
- 10 replies
-
- 17
-
-
Hi all, just finishing up my first three models (all 1/72) and would like to move into a 1/48 for the next one. i love the Flanker series and am thinking about doing one of them next. Question is, what are the best fitting, best looking kits in this series, that I will not have to purchase too many aftermarket bits (excessive PE, and lots of inaccurate bits like radome (easy to buy aftermarket I know) etc. So priorities are good fit, good detail. Thanks!
-
1/48 - Sukhoi Su-27UB "Flanker-C" by HobbyBoss - released
Homebee posted a topic in The Rumourmonger
HobbyBoss next 1/48th "Flanker" is a Sukhoi Su-27UB "Flanker-C" - ref.81713 Release expected in late September 2017 Source: http://www.hobbyboss.com/index.php?g=home&m=article&a=show&id=95&l=en Box art V.P. -
Modelsvit is to release a 1/72nd Sukhoi T-10-10 Ram-K "Flanker-A" kit - ref. 72049 Source: https://tieba.baidu.com/p/5347441745 V.P.

-01_compress20.thumb.jpg.876237f478e7de3cb420ca2f41976d87.jpg)