Search the Community
Showing results for tags 'dragon'.
-
 Here is my recently completed HMS Sheffield using the 1/700 Dragon/ Cyber-hobby kit. Built mainly OOB with a couple of corrections and was an experience to use 1/700 PE that was included in the kit. Paints were from Colourcoats, kit decals and was depicted in her final scheme before her demise during the Falklands Conflict. Build log here: Stuart
 -
Hey Everyone. I'm new here to the forums on BM, but I've been referencing others great works here for years now. Britmodeller has always been one of my go to's for ideas. Great works here. I've been modeling on and off since I was about 6 and primarily focus on WW2 AFV, but have also dabbled in Naval vessels and submarines. Like many, I am a sucker for most German WW2 AFV. The colors. The engineering. In any case, I thought it was about time to start sharing some works of mine. I have loads, but this one I just recently finished on the bench and had some fun with it. The Panther G is such a beautifully sculpted vehicle. It's hard to imagine it as anything other than the most iconic side shot of a tank. It's a late war Panther G Command. Not historically accurate to say the least, but I liked the lighter shade 2 tone camo on this one and had some fun with the weathering and a few added goodies. The command figure is my first attempt at adding a figure to my work and like others, not very skilled at it just yet. But, adding a figure definitely adds to the final result of the tank for sure and I hope to get better at it as I continue to build. Periscopes are missing because I can't find them for some reason, but getting a new set to put in. No worries. Metal tracks. A few added parts. I usually always paint with Tamiya paints. Finish with some enamel washes, powders, and oils. I kept the weathering minimal as I like the tonal colors so much, I didn't want to cover it up. I think the German wool blankets were the hardest part for me. Ironic how hard it is to paint a straight line. Other than that, pretty much out of the box. Nothing over the top. Hope you like it. Cheers.
- 11 replies
-
- 20
-

-
- panther g
- panther late
- (and 1 more)
-
I've started to go through my old RFI's which both Photobucket and Village Photos have managed to mess up, one way or another. Instead of having to click on each one twice to see them (and risk going into VP which has no security certificate), I'm uploading them again. Apologies to those who've already seen them, and thanks for your understanding. Basically, what this is, is Tamiya's M1 Sherman upper hull and turret, Dragon's M4 Hybrid lower hull and running gear, T49 tracks from Panda Plastics, and Sabingamartin decals. The WIP is still there, but minus the photos. ___________________________________________________________________________________________________________________________________________________ I finished this a couple of weeks ago, but I didn't want to put it into RFI until I'd put it on a base and added a couple of crew members. Well, now that's done. I used the two figures that came with the Tamiya kit but I wasn't happy with the faces. Most of the figures supplied with kits are a little lacking when it comes to definition with regards to the facial features. For me, nothing beats the resin variety. So I changed the heads for ones from Hornet. Unfortunately, the only ones that I had were British, but I thought that there were many Europeans who emigrated to Israel after WW2, so they'd have to do. I made the base using a small picture frame bought from Wilkinsons, balsa wood for the sides and polyurethane foam sheet. I wanted to keep it fairly simple, so I mixed up some household filler, PVA glue and some yellow ochre acrylic paint with water, and spread the mix over the top of the foam. Before it went off, I gently pushed the tracks down into the mix. Once it had hardened, I added some clumps of grass. It would have been better if they had been a bit more parched, but once again, I used what I had. If you want to see the build log, it's here; Any questions, comments or criticisms, please feel free. Thanks for looking. John.
- 53 replies
-
- 37
-
-
After a very long break, I’m finally getting back to completing the Dragon 1/72 Jagdtiger. This was originally started as part of a group build back in 2019 but life got in the way. There’s a lot of photos documenting the build in the completed group builds section - I guess I’m going to be about four years late for the GB but perhaps another one will come along before I finish this little beast?! I restarted working on this a couple of weeks ago - I had problems with the Dragon tracks being too short, which looked unrealistic and they were so tight that they snapped the drive sprockets off. I made new axles from brass rod and spliced in some of the spare tracks from the kit. One side is complete apart from track painting. I also added the decals, gave it a coat of Matt varnish and started the weathering process. I’m going to go easy on this - from what I have read, most JTs saw very little action. Photos from 2019 - Dragon 1/72 kit plus PE from ET Model. And now in 2023, showing recent progress. The kit suffered a bit of minor damage in storage, so some repairs and touching up of previous work is required. The replacement front axle from brass rod. The grey area is the spliced in styrene spare track links. Some of these have been painted and hung on the hooks that I added. More updates to follow - thanks for looking, Andrew
- 11 replies
-
- 9
-
-
- Jagdtiger
- 1/72 scale
- (and 1 more)
-
My entry will be the Dragon 7/1. It arrived the other day and looks to be a very nice kit. It comes with proper rubber wheels rather than the DS ones. I may change them still because the weighted ones add that little extra. I also got the Nuts and Bolts book from Historex but recommendations of other additions to the library will be appreciated. Due to a house move I currently don't have the internet set up so this will be a place holder. Once set up I will get some photos sorted out. Technology, Schmecnology. 😀 By next week I will have started this properly with decent updates. Hopefully.
-
Bf110E-2 Tropical 1:48 Dragon / Cyber Hobby - Master Series The Messerschmitt Bf110 was designed to fulfil a German Air Ministry requirement for a long-range, twin-engined fighter aircraft, or zerstörer which was issued back in 1934. Following the prototypes first flight in 1936, it beat off competing designs from Arado, Focke-Wulf and Henschel and was in service by the time war broke out three years later. Fitted with the same engines as the Bf 109E, the Bf 110 was a powerful aircraft and was very well armed in comparison to its counterparts. Despite early successes in Poland, the inadequacy of the Bf 110 as an out-and-out fighter was exposed by the RAF during the Battle of Britain. Heavy losses resulted, mainly as a result of the aircrafts lack of manoeuvrability. This aspect of the design was not improved to any degree in later versions, and for this reason the Bf 110 found itself increasingly utilised in other roles such as fighter bomber. The aircraft performed this role well in the North African campaign. The E models were mainly fighter bombers, the had a strengthened able to carry a bomb load of up to 1200 Kgs and featured extra bomb racks outboard of the main engines. The E-2 was fitted with DB601P engines and featured the same fuselage extension as the D-3 The Kit This kit is a variation on the earlier versions that Dragon has released since 2008, but this time its in their Cyberhobby range. The kit arrives in a sturdy box, upon opening you are struck by the sheer amount of plastic which seems to be packed in there. There are 15 sprues of light grey plastic, a clear sprue, and a small phot-etched fret. It's clear from the sprues that they have been designed in such a way to extract the maximum number of 110 variants from a common core of sprues, however there are not that many parts in this box which will not be used. The instruction sheet is large than normal giving the modeller bigger diagrams which are clearer to read. There seems to be a lot of detail in this kit with some intricate build steps. Most of the detail for the cockpit areas will be seen under the large canopy, however detail in the nose gunbay and other areas is a bit strange as there are no removable panels supplied in the kit? Like most aircraft the build begins with the cockpit assembly. Construction of the pilots seat is first and this is made up of the seat and two supports, with the left hand support featuring the seat adjustment handle moulded in place. The etched seat belts are then fitted and adjusted to shape. The main instrument panel is fitted with the gun-sight and small selector box and attached to the main cockpit floor, along with the rudder pedals, joystick, throttle quadrant to the left and side console the right. To the rear of the floor there is a large spent cartridge bin for the rear machine gun. The rear bulkhead is fitted with the spare ammunition drums for the rear machine gun, whilst the central framework is fitted with the radio panels and spare 20mm ammunition drums. There is a panel that fits in a trough just behind the pilots seat, this is the mounting panel for the 20mm cannon, two of which are fitted on the underside, whilst the ammunition drums, air bottles, radio operators seat and associated frame are fitted to the topside. These subassemblies are then fitted to their respective positions on the cockpit floor, followed by the side walls. The upper cockpit frame is then assembled from the main shoulder height frame, upper frame over the radio section, auxiliary instruments over the radios and the rear machine gun at its mounting plate. The completed framework is then fitted to the cockpit assembly and the whole cockpit glued into one half of the fuselage which can then be closed up. The nose gun mounting is assembled and the two machine guns fitted along with their ammunition belt runs before being slid into the single piece nose cone. This seems to be a bit of a waste as none of this detail will be seen unless the access panels in the nose section are carefully removed. The numerous sections of the cockpit greenhouse are then attached (or the modeller can use the one part canopy). With the fuselage closed up, the single piece centre wing spars complete with extra cannon bay detail is attached and covered with the fuselage centre panel, thus again covering all the detail previously fitted. Whilst the fuselage is upside down the PE DF aerial and styrene HF aerials are glued into position. The build moves onto the two DB 601 engines. These begin with the assembly of the main block which comes in two halves onto which the cylinder head and two cam covers are attached. Onto this main block the ignition harness, engine bearers, turbocharger assembly, oil tank and pipework are fitted. The undercarriage is the assembled, with the main units made up of the oleo, scissor link, retraction jack and support framework. The main tires are in two halves to which the separate inner and outer hubs, also in two parts are fitted. The upper cowling is fitted with the oil cooler intake, the exhaust stacks and their fairings are assembled and the main undercarriage bays are assembled from the firewall and roof sections, and completed with a selection of pipework and fittings. The exhaust stacks are then attached to the engine assemblies which are then fitted to the firewalls and the main undercarriage fitted to their bays. Before the radiator housing can be fitted to the lower cowling a large section must be cut out. The separate upper cowlings can be fitted, or left off to show off the engines. The instructions move onto the wings and the assembly of the underwing radiators which are made up of five parts then attached to the lower wing panels. The main wheel bays are detailed with internal frames after which the wheel bay doors are attached. The engine/undercarriage sub-assemblies are fitted to the lower wings followed by the upper wing sections, wing tips, leading edge intake scoops and landing lights. The flaps can be positioned in either the raised of lowered positions. The propellers are assembled by fitting the three separate blades to the hub, which is then attached to the backplate and finished off with the spinner. The modeller has a choice of whether to fit the two drop tanks or two pairs of bombs and their respective racks. The completed wings are then slid onto wing spars on the fuselage and glued into place. The final section is the assembly of the tailplane with the two halves of the vertical fins joined together then attached to the horizontal tailplane which comes as a single piece upper and two lower sections. In the centre of the lower section the tailwheel bay is attached then fitted with the tailwheel, made up of two wheel halves and single piece oleo, then the bay is completed with the addition of the bay doors. The completed tailplane is then attached to the rear of the fuselage thus completing the build. Canopy The clear parts are thin and free from distortion. A complex mulitpart canopy is supplied which can be modelled open; or the modeller can chose a one part canopy which will make things easier but be closed. Phot Etch A small photo etch fret is supplied which contains the seat belts, and radiator parts, along with two loop aerials. Decals Decals are supplied for three aircraft. All feature the RLM79 over RLM78 scheme. They are printed by Cartograf so should pose no problems. 8./ZG 26 - North Africa 1942 7./ZG 26 - Italy 1941 7./ZG 26 - Libya 1942 Conclusion This is an impressive kit from Dragon. The parts build is fairly high with some great detail. Like other boxings of this kit in other scales it is puzzling as some of the detail will not be seen. The modeller though could if they wished with some care expose this. Overall the kit is recommended. Review sample courtesy of UK distributors for
-
 Hello folks Before the GB starts I would like to introduce you to my model. A lot of small parts in a full package made a lot of work, but the real nightmare are the 3 PE sets. As always there is also a small vignette, this time it goes to Omaha Beach, a few days after D-Day. Looking forward to many nice models, see you! MD There are 3 variants with many details
- 50 replies
-
- 22
-
-
 Against my better judgement, I decided to get a fourth Dragon kit. Another Ta 154. This one will be built as the projected, but never built, A-2 single seater day fighter version. Since the Ta 154A-2 never materialised, I have an open canvas regarding the camouflage. Speaking of camouflage, I still don't know how I'll paint this kit. Undersides will be in RLM 76, but for the upper sections, I have no idea. Since it'll be a single seat heavy fighter, I could go with a late war RLM 75/82 or 81/82 scheme with the late JG 300 RVD band on the back. The other option would be to use RLM 74/75 with the early JG 300 red band. Tough decisions will need to be made. Markings will be as simple as it gets, with the generic crosses and two chevrons to make it a Hauptmann aircraft. I'm also aware of the warping issue of the wings. My copy looks ok (I said the same when I bought the first one). Here's the link that has all the planned variants of the Moskito: http://www.historyofwar.org/articles/weapons_focke-wulf_Ta_154_Moskito.html Start of the project ia scheduled after January 21st of 2023.
- 16 replies
-
- 10
-
-
- dragon
- TA 154 Revell 1/48th
- (and 1 more)
-
 My kit for this GB is the Dragon kit of the 8 wheel armoured car armed with a 7.5cm short L/24 gun. This weapon had been fitted to the older Sd.Kfz. 233 armoured car and also to some Sd.Kfz. 251 half-track vehicles. Around 90 of these 8 wheeled armoured cars were built between June to December 1944 and issued to reconnaissance Panzer Units and Panzergrenadier Divisions. There is one preserved vehicle left in world, WH-1751008. This is at the Bovington tank museum, but not much use as a reference item, it's not complete and has been re-painted in a spurious grey colour. Dragon brought out all 4 variations of this vehicle during 2007 and Cyber-Hobby released a late war conversion of this /3 vehicle in 2008. More expensive but much better detailed than the old Italeri kits. Here is the kit, it's been untouched in my stash for 15 years, time to get it built! Not long to the start of the GB.
 -
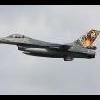
I thought I might try a new challenge and go down from the big scale of 1/72 to 1/144. So I dug out this Dragon Tornado from the attic. They do a weird cockpit with Mr Blobby crew, so the whole cockpit and ejector seats had to be scratch built. I have to say 1/144 is a very unforgiving scale! Too tall nose wheel or skew whif pylons are all too easy errors to make. The canopy was not all that good so had to use filler to fair it into the spine. Anyhow tell me what you think? You might recognise the 56(F) Squadron markings It's an old scratch built RAF hanger in the background and an Oxford Diecast landrover Andrew
-
 Dragon/Cyber-Hobby is to release in November 2013 a 1/32nd Messerschmitt Bf.110E-2 Trop kit - ref.CHC 3209 Source: http://www.dragon-models.com/d-m-item.asp?pid=CHC3209 V.P.
 -
Started with the Dragon 1/72 Bushmaster. The instruction sheet: And the sprues, decals, etc. Packed in a lot of plastic bags. Started with the interior. The thing that you notice is that Dragon did not put in a steering wheel. So I added a PE steering wheel and attached it to a piece of rod. Once completed not much of the interior will be visible. However one will notice there is no steering wheel. The seats seem undersized compared to the real thing and the rest of the interior is pretty basic. First details to the top added: Added the rear door: Oh wait! I'll be building 3 of these Bushmasters. One for my nephew who is commanding a a few of these and one for his driver. Prepared the windows: Up next painting the interior in RAL9001 and rest of the details.
-
I'll post a condensed version of my group build entry for anyone interested. I am working on Dragon's version of the kit and so far, so good. I have come across their legendary instructions already so it is a kit that you will need good reference material to help you along. It comes with a good engine, which will get a bit of detailing. I'll leave the bonnet open to show it off (unless I make a pig's ear of it.) So far I have most of the chassis done, a bit more to do and then paint. There are a lot of component parts that will be taken off so I can get paint into every nook and cranny. Cheers all and for any that have missed it and maybe want to join in here is the group build. It lasts until February so no rushing about.
-
I don't see many Bf 110s built. In any scale, from 72nd to 32nd. In 1:32, the only available kits are the old Revell Bf 110C-4/b and the family from Dragon that goes from C to D. The Dragon kit is not easy, being very fiddly in multiple places, such as the propeller construction and engine assembly. The clear parts also come separate as 8 individual sections. The engines is where I encountered the biggest issues. If you aren't going to open the cowlings, then you can just assemble the basic engine with the arms and glue them to the landing gear bulkheads. Once that's done, make sure to glue the outer exhausts looking upward, while the inner ones point downwards. The covers for the engines were also wrongly marked in the instructions. I didn't realise this until it was time to glue everything together. But I beat the kit in the end. I used the kit decals. The crosses were undersized. I think they'd fit better in a 1:48 kit. The sharkmouth conformed to the panel lines after using some Mr. Mark Softer. The question is, would I build this kit again in spite of the self induced issues and poor instructions? Absolutely. In the Revell boxing of course.
-
A Desert M4A1 from the battle of El Alamein.
Retired Bob posted a topic in M3/M4 Medium Tank STGB II
I'm dog sitting at my son's house for a couple of weeks so although I do not have access to my paints or books I am planning on a quick build of this Dragon M4A1 as used in the battle of El Alamein. Between dog walks I can clean up and glue the running gear together and get as far as possible before I need to add some paint. Here is the kit that has been in the stash for at least a decade it's a pity Dragon never included any figures but there is a lot of PE for the dust shields and mounting brackets for the decoy covers they used in the desert: The kit includes DS tracks of the smooth rubber pad type T51 so I will replace those with my last pack of AFV Club individual track links. So here goes for a quick mostly oob build. Just hope the dogs don't eat any bits. -
Hi all, this is going to be my entry for this fine group build, a late M4A2 of 1st marine tank battalion on Peleliu. I’m going to be using the dragon kit for this build, mostly OOB but with a few additions: metal barrel, resin .30 cal for the commanders hatch and resicast wading stacks, plus some stowage and spare track links. Much as I dislike them I’m going to be using the DS tracks as my modelling time is limited so no indi links. And the main two reference books I’m going to be using. Now, I said mostly out of the box, but there are a few changes I need to make to make an accurate version of this. I’m going to be basing my Sherman loosely on this picture. Notice the tracks in opposite directions. The first 50 large hatch M4A2’s were built without the hull ventilator cover, as well as the early large hatch versions having the longer splash guards in front of the hull hatches, padded lifting rings on the rear hull and dry stowage with the sponson appliqué armour. These very early large hatch M4A2’s, or at least a lot of them, ended up in the marine tank battalions, as in the picture above on peleliu. so there’s a few changes I need to make to the hull before I start building, highlighted in the picture below. Can’t wait to get cracking on this.
- 50 replies
-
- 12
-
-
I have had this cyber-hobby kit in the stash for a few years so I have dusted it off and I will throw it into this GB. The plastic has just been re-issued as a 2 in 1 kit by Dragon, I have always fancied building this scheme with the charging Knight on the turret, so it's as it comes with just a new Armour Scale barrel. Here's the obligatory box full of bits picture: Wish me luck, it's covered in Dragon zimmerit!
-
Hello and good evening everyone. I'm back.......well, starting to get back into being at the bench after having to withdraw from the GB Panzer IV due to some medical and personal issues to fix; my apologies to everyone who finished and congrats on a great build from all. Even though I didn't drop by any contributions as regards comments etc....I followed avidly on all your builds. Thoroughly enjoyed everyone's progress. My medication prevented me from being able to positively contribute both at the bench and on here as a forum with some chat etc. ...but I'm back and will slowly get up to speed. I have a few projects on the go that I flit between like a butterfly, medications limit concentration at times............ Here's one that I'm slowly,,,,,very slowly plodding through. I'm working from a walk around set of images from the Ferdinand that's resides at Bovington at present (the one from Maryland). Had some issues with it as regards the Dragon kit itself and the moulding in places as regards fit. The rear sponson construction that I think was added at the time to form the Ferdinand from the prototype Tiger chassis.....took a long time to sand and pair down to make fit and line up the chassis........ There's a lot of weld lines omitted from the kit itself that I'm working through adding, a very intricate PE set from Aber that I'm going for; even through the kit itself is a Smart Kit with PE included. Nice metal barrel and host of metal parts etc to get into over time. SO HERE'S WHERE SHE STANDS AT PRESENT.....WELD LINES TO ORDER OF THE DAY. FRONT GLACIS WITH ADDITIONAL BOLT HEADS SUPPLIED BY MASTERCLUB. One note to add is the front drive wheels. There's no position marker of any sorts provided by Dragon to set them in place. I recommend taking a peek at some actual photos of that area of the chassis to get the position as close as possible. I set them wrong and had to remove and re-set...... WELD LINES ADDED ON BOTH SIDES FOR THE MUD SCRAPERS AND IN REVIEWING THE BOVINGTON FERDINAND, THE ADDITION OF SOME VERY HEAVY WELDS TO HOLD WHAT I BELIEVE IS SOME SORT OF ARMOURED EXHAST COVER....I IMPROVED THE TEXTURE OF THE COVER ALSO WITH SOME ADDITION OF LIQUID CEMENT AND FINALY....EVEN THOUGH NOT REALLY SEEN ARE THE GRILS FOR THE EXHAUST (OR AIR IN TAKE) WELL....can't say when the next update will be....but it's nice to be back on the forum to some extent, slowly is better than nothing....🤗.......catch you all soon...regards....Simon.
- 108 replies
-
- 14
-
-
Morning all....decided to kick off another project in this lockdown world at present.....the Panther D from the Kursk Offensive July '43. Picked this up off Ebay for £32. Came with RB's turned barrel, some part PE set and a set of Panther II skirts. Might get to use them one day day as they look similar to the Panther G type. This Panther by Dragon is a very clean and simple kit. Nice clean crisp moulding.....but needs some help with some basic PE.....so three sets on the way. Three PE set's.......PEA071 for the tool box specific to some Panthers at Kursk. ET Model Panther D set and I still have to locate the side skirts with specific brackets..... And finaly the tracks.....early set for this type of Panther... Hopefully, once the PE skirts arrive I can post some progress..... see you all later and stay safe... Regards Simon
-
Hobby 2000 is to rebox the Dragon (link) 1/48th Focke-Wulf Ta-152H kit. - ref. 48017 - Focke-Wulf Ta-152H-0 https://www.hannants.co.uk/product/H2K48017 - ref. 48017 - Focke-Wulf Ta-152H-1 https://www.hannants.co.uk/product/H2K48018 V.P.
- 3 replies
-
- 2
-
-
- Ta-152
- Hobby 2000
- (and 1 more)
-
One of the 'small' dragons recently released by GW
-
Dear fellow Britmodellers, here's my 1/72 Dragon T-34/85. Painted with Mr.Hobby acrylics, photographed by Wolfgang Rabel. I added OKB Grigorov resin tracks and wheels and Golikov Project resin turret. Towing cable from Eureka. Decals from Kagero. Weathered with artist oils and real mud, mixed with white glue and pigments. Thanks for your interest. Roman
-
 Evening all Now I'm back at the bench, and working through the backlog........I've decided to complicate it all by kicking off another build. I recently picked this up from a fellow member (cheers Rob ). Been looking for one for some time, always had an aim to do one of these smaller open halftracks. I also decided to make it as painful as possible ( I never learn ), and picked up the Griffon Model upgrade set specific for this Dragon off KingKit for just above half price compared to what they are asking off Ebay. Anyway, most probably will kick this off in the New Year. Need to study the instructions.....plenty there to read in both the kit and the PE....... Considering a diorama for this (my first). Keep meaning to get one under my belt at some point. Well off to update a couple of ongoing builds. Cheers all.
 -
Here are the results of a project I have been doing on and off since the beginning of the year, Dragon's old but good Ferdinand and Tamiya's great Elefant kit, with extra bits like Atak Zimmerit and metal tracks on the Ferdi. My photoing is getting better but some good weather would be nice so I can get some natural daylight involved. As always thanks for looking and thanks for following the WIP and some great tips and history lessons and general chit-chat.👍👏
-
After the delights of last month's very yellow aircraft (a CL-415), I have done something a little less stressful this month. This is the excellent Dragon M1296 Stryker Dragoon in 1/72 scale. I've already done an Academy build of the normal M1126 Stryker, so this provides an interesting comparison. The Dragon kit is an easy build, well thought out and nicely detailed. ....and with the Academy kit: FredT