Search the Community
Showing results for tags 'chipmunk'.
-
 Airfix is to release in Summer 2021 a 1/48th de Havilland Canada DHC-1 Chipmunk T.10 kit - ref. A04105 Source: https://www.airfix.com/uk-en/shop/new-for-2021/de-havilland-chipmunk-t-10.html V.P.
- 329 replies
-
- 25
-

-

-
 Evening all. I My build will be one of the RAF's most prolific and successful piston engined photo reconnaisance aircraft. "Its a DH group build. Surely its a Mosquito!" I hear you cry? Well, erm... no. As you may know in post WWII, Berlin, like the whole of Germany, was divided into 4 zones by the occupying powers, namely the British, Americans, French and Soviet Union. Agreement was reached giving all 4 the right to fly over the whole of Berlin Control Zone. The Zone covered a radius of 20 miles which included not only the Soviet Zone but also a decent chunk of what became East Germany. Now, the Gatow based RAF Officers being underpaid chaps, they wanted to keep on collecting their flight pay so they needed to keep up their flying hours. After the Berlin Airlift combat aircraft were not permitted hence the need for training aircraft at RAF Gatow in the British Zone. Fortunately, the British Commanders'-in-Chief Liaison Mission to the Soviet Forces in Germany (BRIXMIS) were 31 officers and men who had permission to travel in the Soviet Zone of both Berlin and Germany. Hence they became aerial photographers. It didn't take long before the opportunity was taken to conduct covert reconnaisance over the Soviet Zone and beyond into East Germany. Since the Soviets thought the agreement covered flights over only West Berlin, they stamped the Chippy's Flight Registration Cards "Safety of Flight Not Guaranteed." Not very comforting eh? From 1956, the Chipmunk took over this duty and conducted almost daily flights right through the fall of the Berlin Wall in 1989 to German reunification in October 1990. There are some excellent online articles if you want to know more. Here's a couple for starters: https://www.16va.be/vols_brixmis_part1_eng2.html https://www.keymilitary.com/article/across-wall Chipmunk WZ862 was stationed at RAF Gatow from 1974 to 1987. So after all that, here's what I've got. This will be an out of the box build because I'll be up against it to finish in time without complicating the situation. Let the fun begin. Phil.
- 14 replies
-
- 11
-
-
 When I was nine, we moved into a newly built bungalow in Mapperley, Nottingham. One of the advantages I found was that looking out the back you could see the circuit for the RR test airfield at Hucknall. Also down the side of the house, part of the airspace used by 2FTS at Syerston was visible. Finally, at weekends, the Chipmunks from the now closed RAF Newton used to float around. It seems right to me to commemorate that bit of my life between nine and eighteen when the sound of the Gypsy Major punctuated the quiet of a Sunday morning. I am using the KP kit, which is not faultless, but still looks a better bet than Airfix's venerable offering. I have the British Trainers decal set from S&M and some dayglo panels from a ModelArt sheet. The obligatory sprue shots. I am not going overboard on cockpit detail, just the floor mounted compasses and seat belts, the Chipmunk was fairly simple
 -
 Anyone who has been following me on Britmodeller will know that in 2020, I became a bit Chipmunk mad. I CAD modelled and 3D printed the DHC Chipmunk. To reward my hard work, in 2021, Airfix announced that they were releasing a new 1/48 Chipmunk! Almost a year ago, I built Airfix's beautiful 1/48 Chipmunk, in the (slightly erroneous) markings of privately owned Chipmunk, based just down the road from me, co-incidentally, I know both the owners! I've always had a soft spot for the Chippie, having my first encounter with the type on work experience at RAF Coningsby - as part of my work experience, myself and my (ex-RAF) late grandfather got a personal tour of the BBMF hangar, during which I got to sit in a Chipmunk, when they were in their gloss black colours. My love for the Chipmunk really took-off (no pun intended) in 2016; as part of my PPL training, myself and a flying instructor flew to Sleap airfield in Shropshire. We were to pick up a freshly re-painted Piper Warrior and return it to the flying club, upon arriving at the aircraft painters, I noticed a smart looking ex-RAF Chipmunk in the hangar and I was kindly shown around. Fast forward to last year, and I had quite an opportunity... A share became available in a Chipmunk, based at the airfield I fly from. Following a viewing of the aircraft, I had some serious thinking to do - not long after, I'd made up my mind... One flight later and I had a serious case of "Chipmunk Grin" Whilst waiting for better weather, so I can begin my tailwheel endorsement and Chipmunk familiarisation - I decided to build the Airfix kit again, in the markings of my new acquisition. I added Eduards PE, wheels, belts, and instrument upgrades. The only other additions were a compass and g-meter above the forward instrument panel and replacement of cockpit control sticks and canopy bracing srut, using brass rod, providing a much better scale size. The lower cowl was modified to represent the later single pipe exhaust, with the exhaust being replaced with brass tube. Airbrushed using Tamiya white and Hataka Light Aircraft Grey / Signal Red - followed by a gloss coat of GX100. The national insignia is from the kit, however I had to double up the roundels (using spares from my previous Chipmunk build), as they were slightly translucent. The individual aircraft markings came from a generic Xtradecal sheet. Weathering was a bit of dilemma, the aircraft itself is about as clean as a Chipmunk can get (obligatory DH Gipsy Major oil streak), but the kit looks too much like a toy with a panel line wash, which was done with MIG PLW. I also added oil streaking and a bit of mud splatter using MIG oils. I'm very happy with this lovely little kit, the only real challenges being the droopy wing and challenging canopy fit. Here is a view with which many an ex Air Cadet will be familiar, before climbing up the wing and into the cockpit - and soon I will be too.... I really hope I have done justice to this soon-to-be 72 year-old lady in model form, and I hope to have many happy flying experiences with the 1:1 scale version Thanks for looking! Ben
 -
hello I've got the Airfix new chipmunk rising slowly to the top of my build pile and would like to do it in the scheme of No. 8 Air Experience Flight of (I think) RAF Stafford in the early nineties. can anyone point me in the good direction of suitable references (online or a decent book) particularly with codes or crest that I'd need to apply? I have already done a bit of digging and see that there is one photo of the same flight but from the 1960s. I'm also aware of the Hannants decal sheet. grateful for any assistance anyone can provide and good evening to you!
-
Sorry for not posting for a loooong time! Had to post this beastie up though! My first flight in a Chipmunk was in WB627 at 5AEF in Cambridge, a must do build! Eduard Space panels and belts, MRP paints.
- 33 replies
-
- 84
-
-
-
 Hi everyone Well I finally got her finished, my 1/48 Airfix Chipmunk. It really is a lovely little kit, well detailed, well thought out and well moulded for me it was a real mojo restorer after quite a long modelling drought. I built her OOB and only added some seat belts from Eduard, I finished her in the No 2 FTS colours as I think its the quintessential scheme for a Chipmunk. I'd like to thank everyone for their support and I think its about time I finished this old girl.. Cheers everyone Iain 👍
- 25 replies
-
- 61
-
-
-
Hi everyone Long time no see. The past few months have been a real modelling black hole where I haven't been bothered to go to my workshop let alone do any modelling. Builds that I've started are as they were with no progress being made on any of them, I think that over my recent modelling history I've lost my way and for some reason felt the need to over complicate my builds with too much resin and etch. Now don't get me wrong I enjoy working with both mediums but they can sap the enjoyment that comes with just sticking bits of plastic together and squirting paint everywhere. I have a little time on my hands over the next couple of weeks (I start a new job on the 24th) I thought it was about time to get back to basics and build a model OOB and just enjoy it, so to that end and as the title suggests, I'm going to build the fairly new Airfix 1/48 Chippy. I started by just gluing the motor together, just because it looks rather nice and I enjoy just gluing things together... ..I'm not sure if I'm going to build the model with the engine exposed but it really is a lovely little thing..well done Airfix! I have splattered some paint around and painted up the cockpit area, I used several different shades of dark grey, black and light grey to try and get some tonal variations because otherwise its pretty boring in there.. I will add some seatbelts in due course and tonight I'll get the instrument panels finished using the kit decals. Thanks for looking and see you all soon Iain
- 44 replies
-
- 20
-
-
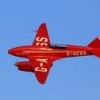
Glad to have this one finished! This has been a bit of a long drawn-out build, I used a couple new techniques, had some fun with a bit of aftermarket, made a few mistakes – but overall, I’m very pleased 😊 As soon as Airfix announced their 1/48 Chipmunk, I knew I needed a few. The first I chose to model is in a rather unique scheme, it’s an ex-RAF Chipmunk that was painted in Portuguese markings, the colours are, I believe, incorrect, as I have never seen a Portuguese Chipmunk in light blue. I also have a slight connection to this aircraft; I’m hoping I can explain in the next few months. Onto the kit; the kit went together pretty easily, once I sorted out the droopy wings. I replaced a few of the Airfix interior parts (stick, flap controls, canopy strut) with some finer brass tubing, the cowls were vacformed to as the kit parts were way too thick. I initially used the Kits World 3D printed decals for the instrument panel and straps, however they were pretty poor, stiff decals that were over-size and very grainy – instead, I used Eduards photo etch instrument panel and seatbelts, this also included a canopy sliding rail from PE. The kit was a mixture of brush, can and airbrush. I sprayed the entire model with white primer before giving it a couple light coats of white humbrol spray, the yellow was then painted using Tamiya TS-47 chrome yellow (can sprayed). Following this, I brush painted the blue (Vallejo Model Color - Sky Blue) and the red (Hataka – Cherry Red). Everything was gloss varnished using Winsor and Newton Galeria acrylic gloss, out of my airbrush – the anti-glare panels received the same, in matt. I bought myself a Molotow Liquid Chrome pen and used this to paint the landing light, oleos and tail light, it really is mirror like! Using Mig Panel Line Wash Deep Grey and Mig oils, I weathered the model to pictures (it’s surprisingly heavily weathered for a civilian Chipmunk), I was fortunate enough to do a walkaround and take loads of photos of this aircraft at a fly-in last year. I made a few mistakes, mainly being I forgot to remove all the dust from the upper surfaces (after I’d left the model for a few weeks) before I gloss varnished – I only noticed this once I’d let the gloss dry – oops! Anyway, I’m very pleased with the result, it certainly stands out on my shelf and I really enjoyed making this kit, Airfix have made a real cracker Here's a lovely air-to-air shot of the real aircraft. Thanks for looking, now I can crack on with the decals on my Sea Vixen! Cheers Ben
- 19 replies
-
- 36
-
-
 Hi Everyone, This dull November time needs some colour on the table. And what could be better then a nice trainer airplane on bench? Couple trainers? Three trainers? I thought I'd go for four!!! Assortment of freshly released kits and some issued several years back. Three of four are české krabice and the last is Wolfpack from Korea. Two are going to be white-orange USN (USMC?) fast and beautiful jets, two are propeller driven yellow and orange little cuties. So some work to be done!!!! More to come! Dennis
 -
I like to build a series of kits based on some spurious theme plucked from the recesses of my dusty brain. In this case, I am starting a short series based on aircraft I saw at RAF Gatow when I was but a wee lad. First up: This will be one of the two Chipmunks stationed at RAF Gatow that were tasked with flying over Berlin and environs photographing interesting military assets. During my time there, the serial numbers were ZP850 and ZP971. The exact serial number I choose will depend on what I can butcher from the kit decals. They were all over Light Aircraft Grey, so an easy paint job is in my future. I have already snipped plastic off sprues and am preparing the cockpit for an all over black paint job. For reasons that mystify me, I have bought the Kits World 3D decals for this kit. I can't remember why, the IPs in the box look fine and a decent dry brush and tickle with a hairy stick should bring them up nicely. Maybe I got the decals for the seat belts. I am getting lazy in my old age! What's build #2 I hear you wonder. Hercules: crud and custard scheme with RAF Transport Command on the side. I'll start that one soon but I have an F-16D to finish for my Singapore Air Force series then an F-4J for my 74 squadron series. It's all very slow on my bench.
-
Here’s my 1/48 Airfix Chipmunk T.10 in University of Liverpool Air Squadron markings. These aircraft were based at RAF Woodvale. This was a fun and easy kit to build. I used the Kits-World 3-D printed instrument panels and seat belts, which were a measurable improvement over what’s supplied in the kit. I’m already planning my next one.
- 17 replies
-
- 48
-
-
 I haven’t made an aircraft kit since last Christmas and my local hobby shop has a pile of these in stock, so thought I would have a go. Sprue shots: Looks like just the right amount of complexity that I can handle at the moment - reasonably detailed but not too complicated. Transparencies still all wrapped up. A rather busy decal sheet - although I’m going to do the Army one, so not so many of the little stencils to be done for that one. Here is the one I am going to do - Middle Wallop was just a short distance from where we lived (for multiple postings) when Dad was in the Army. Started work on the cockpit straight away. This is going to be a straight out of the box job. All went together very nicely. Then paint, a couple of coats of Tamiya XF69 NATO Black were brushed on, followed by some dry brushing with a light grey acrylic. A wash with Army Painter Dark Tone wash, and the finished with a coat of Italeri clear flat. I used a few dots of Tamiya X22 gloss clear for the instrument dials. While the paint was drying I had a go at the canopy - which has me a little anxious. Airfix provide a little jig to align everything. It’s a bit fiddly, but I took it slowly, using very careful application of Tamiya Extra Thin Cement, and it looks like it’s worked ok. Couple of tiny gaps that some PVA will fix. That’s it for today, so far it’s a good start.
 -
Hi all I present to you my rendition of the Airfix 1:48 Chipmunk T.10 I chose to do the camouflaged markings of WP964 serving with the Army Air Corps at AAC Middle Wallop in June 1968 I used kits-world 3-D printed decals for the instrument panels and seatbelts (KW3D1481020) not overly impressed with these would of preferred photo-etch but hay-ho Tamyia XF-52 and XF-81 acrylic paints used for the camo also added the break lines from nylon thread i throughly enjoyed this build thanks for looking and happy modelling
-
 Rejoining with this familiar Airfix kit, costing me £3 at IPMS Avon show in 2015. Familiar to anyone in the ATC during the 1970s - I enjoyed several air experience flights in Chipmunks. I remember building an RAF training base with my train-set at that time, Chipmunk being one of the aircraft, along with a Bulldog, JP3, Hawk, and the MRCA. This Chipmunk being the only available resident in my stash. Parts and decals, With my plan to build as the Spitmunk, as far as my spare decals will allow. I found this colour plan to follow.
 -
AZ model is to release 1/72nd and later 1/48th DHC.1 Chipmunk kits Source: http://www.britmodeller.com/forums/index.php?/topic/234931186-azmodellegatoadmiral-wwii-aircraft-comments-questions-and-wishes/?p=1518104 V.P.
-
 3D renders found here: http://www.modelforum.cz/viewtopic.php?f=1&t=110753 they researching for differences of the RCAF and RAF versions
 -
Just getting back into building model planes after a break of a few years. I'm kind of learning as I go along and trying to make a decent job, but I'm a slow builder. I like civilian aircraft and trainer planes. Last year I started an Airfix 1:72 Chipmunk but I think I sickened myself of it trying to rub down the rivet details and never got very far. A few weeks ago I saw the Revell DHC-6 Twin Otter and bought it. The Twin Otter is going to be finished in a British Airways livery (like the ones that were flying between Glasgow, Barra and Benbecula. The Chipmunk is going to be finished in the overall black scheme that the Battle of Britain Memorial Flight had a few years back. I put a coat of NATO black inside the Chipmunk fuselage halves tonight and sanded down some more rivets on the underside of the wings. I managed to scratch the canopy when I was cutting it out of the sprue. Polished it up a bit with toothpaste but now there is a very fine haze, it's not crystal clear. I saw some videos about dipping clear parts in a floor polish to mask imperfections so I might give that a go nearer the time for fitting it. With the Twin Otter I've filled in a few sink marks in the fuselage halves as best I can over a few nights this week. Tonight I started putting in the windows, managed to tip over the small plastic bottle of adhesive, so decided to call it a night before I did anymore damage 🙂 The two models... Filling in some sink marks on the Twin Otter fuselage... The story so far...
-
Pics from Old Warden from Graham James
- 7 replies
-
- 1
-
-
- de Havilland
- Chipmunk
- (and 1 more)
-
Morning all, I picked up this little gem of a kit for just over £4 from my LMS, and what a great purchase it was! The quality of the tooling itself is rather terrible- raised panel lines, no cockpit detail apart from some basic seats, poor wing-fuselage join, thick one-piece canopy and minimal level of overall external detail. But its redeeming features are So, I began by first of all cutting and dropping the flaps, positioning the elevator and ailerons and cutting the canopy into two pieces. Secondly modification was the cockpit, now this is quite literally what you get with the kit: (control columns modified slightly) I couldn't let that remain unaltered and so I started to add some detail: (note the compass in each cockpit) One or two coats of paint and gloss varnish later and it was completed: Airfix 1:72 De Havilland Chipmunk T.10 Notes: -Painted with Vallejo "Model Air" -Kit decals with a few from the spares box -Weathered with Vallejo "Moden Wash"- dark grey -Varnished with Alclad aqua gloss Well, that's it- thanks for having a look! Kind regards, Sam
- 13 replies
-
- 21
-
-
I've been meaning to visit this museum for years and finally got around to it a couple of weeks ago. Small, but perfectly formed, the highlight is of course the three Mosquito aircraft, and for me the opportunity of sitting in a Sea Vixen, thus fulfilling a boyhood dream! More here if you're interested: http://www.hanger51.org/aircraft-museums/uk-museums-collections/de-havilland-aircraft-museum/ IMG_8611 copy by tony_inkster, on Flickr IMG_8615_copy by tony_inkster, on Flickr IMG_8614 copy by tony_inkster, on Flickr IMG_8610_copy by tony_inkster, on Flickr IMG_8597 copy by tony_inkster, on Flickr IMG_8588_copy by tony_inkster, on Flickr IMG_8577_copy by tony_inkster, on Flickr IMG_8571 copy by tony_inkster, on Flickr IMG_8619_copy by tony_inkster, on Flickr
-
Hello guys... The following pictures of my latest model ... I must say a special thank to Fritag, for inspiring me and for very valid tips ... ciao....
- 37 replies
-
- 22
-
-
I thought I'd share my latest build. I finished this one a month or so ago time to share it now... Well where to begin... As a young chap in the ATC I had my first air experience in this aircraft. After looking through my flight log I noted that in fact most of my air experience flights were in this aircraft. It had been my intention to model it at some time but did not know where to start. At this point I must give a nod to Fritag. His Chipmunk gave me the inspiration to get going on the model. So what did we do.... Ok, the rivets had to go!! Then came the scratch building of the cockpit, landing gear, intakes, exhaust and a bunch of other stuff that I can't remember now! One thing that I am pleased with is the canopy that I vac-formed myself. Having never done it before I'm happy to add that to my skill set. On with the photos.... Lighting wasn't to good, I may add more later... That's all for now, the CL-215 awaits.... All comments welcome...
-
Hi Everyone, I've just completed a project to build 5 Chipmunks, in each of the liveries offered by Airfix over the years. Airfix have released a few more than I built, but the ones I've chosen not to build are duplicate schemes with ones that I have. The intention with this project was not to add too much detail or refinement, but to build them as Airfix intended. I did add instrument panels and harnesses though, although they are difficult to see through the canopy. I managed to keep my hands off the rivets until the last one, when I just had to refine them. I hope you like it. Cheers Tony
- 16 replies
-
- 33
-
-
- DHC
- De Havilland
- (and 1 more)
-
Hi guys, This is my first 1/72 model - the Airfix DHC Chipmunk. It's far away from being perfect (canopy section mainly) but it was fun. The markings are fictional - I wanted to do an RCAF trainer version but didn't have the right decals. So I painted it yellow but used the kit decals. So, enough bla bla - here the pics. I hope you like it. It's definitely not gone be my last 1/72. Thank's a lot to William de Coster from Belgium for having sent my a replacement canopy since I messed up the first one even more... Cheers, Michael