Search the Community
Showing results for tags 'buccaneer'.
-
Blackburn Buccaneer S.2B 1:72 Airfix (A06022) The Blackburn Buccaneer was an all-weather naval strike aircraft designed and built by Blackburn Aircraft Limited (later Hawker Siddeley) to fulfil a Royal Navy requirement for an aircraft to counter the threat posed by the Soviet Navy's Sverdlov class of light cruisers. The requirement called for a two-seat aircraft capable of sustained low-level flight at up to 550 knots over a combat radius of up to 800 nautical miles. The resulting aircraft made use of a number of novel features in order to fulfil the mission requirements, including the use of fully blown wings to improve low-altitude performance, area rule fuselage and very robust design and construction in order to ensure survival of the airframe in its tough operating environment. The Buccaneer was able to carry a range of conventional munitions, as well as the 2000lb, 20 kiloton 'Red Beard' nuclear weapon. The Buccaneer got off to an inauspicious start due to the relatively low power output of its de Havilland Gyron Junior turbojets, a feature exacerbated by the extra power needed for the blown flying surfaces. The S.2, fitted with more powerful and more efficient Rolls Royce Spey turbofans, was far more successful. The Buccaneer served the Royal Navy with distinction until the replacement of the last of the large carriers with the smaller 'through deck cruisers'. The Buccaneer was also offered to the Royal Air Force, but was rejected in favour of the TSR.2 and then the F-111. With the cancellation of both of these programmes, the RAF reluctantly accepted the Buccaneer as an interim measure until the MRCA became available. As it turns out, the Buccaneer served the RAF very well for over two decades and even participated in Operation Desert Storm in 1991 where it ended up lasing for its replacement! and even dropping some bombs itself. Another RAF Veteran who left on a high note. The Kit Notwithstanding the excellent-but-expensive CMR resin kit, fans of the Blackburn Buccaneer had been poorly served by kit manufacturers until Airfix came along with their new tool. Inside the red top-opening box adorned with the usual high-quality artwork, are five frames of grey plastic and a single clear sprue. For this boxing there is a new sprue with the bulged bomb bay which also contains slipper fuel tanks, two Paveway II LGBs, an AIM-9 sidewinder, an AN/ALQ 101 ECM Pod, and an AN/ALQ 23E Pave Spike Pod. The mouldings are clean and crisp, with fine, recessed panel lines throughout and plenty of nice detail on smaller parts. The assembly instructions are divided into 85 stages, which gives a good indication of the level of detail that Airfix have crammed into their new model. Assembly begins with the cockpit, the tub of which reflects the correct offset arrangement for the observer's seating position. Speaking of seats, the three-part Martin Baker Mk.6s appear to be a pretty good representation of the real thing, although some photo etched harnesses would be desirable. Crew figures are included if you are so inclined. The tub, instrument panels and side consoles are nicely detailed, although decals, rather than moulded details, are used to represent the controls. The nose gear bay fits onto the underside of the cockpit tub. Once complete, the forward fuselage halves can be joined together, forming a small-sub assembly entirely separate to the rest of the aircraft. The distinctive profile of the nose, which has always looked off on the other injection moulded Buccaneers, looks spot on. The nosecone is not moulded as a separate part, however which means a seam to clean up. Once the forward part of the fuselage is complete, construction turns to the central part of the airframe. The lower part of the fuselage includes about 80% of the lower wing surface. In order for the pylons and fuels tanks to be attached, holes must be drilled at the appropriate points. The outer wing can also be cut away at this juncture if you wish to build the model with wings folded. The inner structure of this section comprises the main landing gear bay inner walls, front and rear bulkheads and tube structures for the engines. The front and rear faces of the engines are nicely represented and it should be possible to clean up the internal seams on the engine air intakes prior to final assembly. Once all of the internal detail has been fixed in place, the upper half of the fuselage can be cemented to the lower half. At this point in the build, you really have to decide whether to finish your model with folded or extended wings. If building the former, you can attach the wing fold mechanism and then miss out the next few steps. If finishing your model with wings extended, little spars are included to help you align the separately moulded upper wing surfaces and to give the model strength. Whichever route you take, the last major step involves assembling the rear fuselage and tail. The vertical part of the tail is integral to each half of the rear fuselage, while the horizontal tail is a single, solid part. There are separate parts for the RWR fairings, which is handy. Depending on the decal option chosen there are new airbrake parts on the new sprue with this kit. The foremost part of the engine air intakes, as well as the rearmost part of the engine exhausts, are moulded in such a way that the clean up of seams will be absolutely minimal. The bomb bay can be finished in open or closed position. If the former, there is plenty of nice detail to catch the eye. The prominent air brake at the rear of the fuselage can be finished in open or closed position as well, and is nicely detailed. The Buccaneer's robust landing gear is nicely represented and subtle flat spots are moulded into the tyres. There are different parts for the arrestor hook depending on whether you build the model with gear down or up. The canopy is nicely moulded and can be finished in the open position, although the instructions don't show this. Three options are provided on the original decal sheet: XV361 No.208 Sqn RAF, RAF Lossiemouth June 1990. XV361 As Preserved at the Ulster Aviation Society. XV885 "Sky Pirates" No.12 Sqn RAF, RAF Lossiemouth September 1993 XV361 carries the wrap around Dark Green / Dark Sea Grey scheme while XV885 the Medium Sea Grey / Camouflage Grey Scheme along with its Gulf War nose art. The decal instructions give the modeller a few variations on the schemes that both aircraft had at times due to replacement panels / radomes etc. Conclusion This kit has been eagerly awaited and the kit is worth the wait. The level of detail is very nice and it's clear that Airfix have put a great deal of thought into their model. There are plenty of options, such as folding wings, airbrake and bomb bay, and they are are all nicely realised. The option of a former Gulf War aircraft is a good one. This is an excellent model which finally plugs a huge hole in the world of injection moulded cold war British aircraft. Highly recommended. Review sample courtesy of
-
Hi all Just been surfing the Hannants site for rear fuselrge serials in white. I have in mind 12 Squadron Buccaneers circa Autumn 1970. If you have the Haynes manual, there is a pic on Pg81. Do any suitable decal sheets exist?
-
Calling this finally done. Been on going for all most a year. Despite the reputation of this kit I really enjoyed it, pushed me to use techniques and materials I havnt used before. I should have added more painting detail to the wing folds but, I really couldn't be bothered. Aftermarket consisted of: Neomega Resin Cockpit Aries wing fold Aries air brakes Pavla resin flaps
- 20 replies
-
- 46
-

-

-
 Buccaneer S.2C Cockpit & Port Engine sets (For Airfix kit) 1:72 CMK by Special Hobby The new tool Blackburn Buccaneer from Airfix was most welcome. Now CMK have a couple of sets to help improve the kit if you want. The It arrive in the usual yellow and clear bubble, with header card folded over and instructions within. They’re a range of drop-in replacements for kit parts, offering an almost instant upgrade to detail in areas that modellers usually like to concentrate focus. Cockpit set (7449) This is a complete new cockpit for the kit. As well as the main tub there are two Mk.6 ejection seats complete with PE handles, a new cockpit coaming with the gunsight, new sidewalls and instrument panels. Also included is the main rear bulkhead for the cockpit. All of the parts look crisp. This set should greatly increase the kit cockpit. Highly recommended.` Port Engine set (7450) This is a new set to install and have visible the port engine, As well as the engine there are the internal walls of the engine bay as well Recommended if you want to open this area up. Review sample courtesy of
 -
 All done. A very enjoyable kit but there are some delicate details that need careful handling. I used Xtradecal sheet X72307 for the aircraft serials and unit markings and stencils from the Airfix kit. The seat belts were pinched from an Eduard set for the old tool Buccaneer but the other details for the IP etc didn’t fit. Paints are from Mig Ammo - 205, 206 & 207 as included in their A.mig 7203 set; I found these to be very fragile and easily damaged even with a couple of dots of Pledge floor gloss. The only weathering was a panel wash. In the end I decided not use the Air Graphics CBLS panniers or the kit rocket pods and painted the bombs from the kit as inert/practice bombs, I made some more from the Airfix Phantom kit but had trouble with paint adhesion on them and couldn’t be bothered to re-do them, I also found them to be a slightly different shape.
- 28 replies
-
- 50
-
-
Brewster SB2A-4 Buccaneer "US Marines Dive Bomber" (SH72303) 1:72 Special Hobby In 1939 Brewster was selected by the US Navy to develop a larger scout/bomber aircraft based on their Brewster SBN aircraft. The new aircraft shared the design platform but had a much higher rated engine. The aircraft was a conventional single-engined, mid-winged monoplane layout with two fixed forward firing 50 cal guns in the fuselage, and two 30 cal guns in each of the wings. The aircraft was supposed to have a rear enclosed turret although this was replaced by a flexible twin 30 cal mount. 1000lbs of bombs were to be carried in an internal bomb bay. As well as orders for the USN the French, Dutch, Australians and UK Governments placed orders for the aircraft. The French order was taken over by the UK following the fall of France, however the UK asked Brewster for many modifications which lead to production being delayed. These delays they caused the Australian Government to cancel their orders. Problems at Brewster with the company being badly run led the US Navy to take over the company but deliveries were still quite slow. The type actually proved unacceptable for combat and most of the aircraft were destroyed before being flown operationally. Aircraft which did make it to units became trainers, hacks or target tugs. The aircraft which were ordered by Holland were taken over by the USMC, re-designated SB2A-4 and used to form the first night fighter squadron VMF(N)-531. The Buccaneer has been described as "overweight, underpowered, and lacking maneuverability,", "one of the worst aircraft of World War II", a failure,, and by the Truman Committee as having "turned in a miserable performance." The Kit The kit was a new tool from 2009 and has been released in a couple of boxings since. There are 3 sprues of plastic parts, a clear sprue, a sheet of PE and a bag of resin parts. Construction starts with the cockpit and rear enclosures. The cockpit is first up with the seat going in, at the front a bulkhead and the rudder pedals with the control column behind. Seatbelts are PE; all this followed by the rear bulkhead. The radio compartment and rear gunners enclosure is up next. There are resin parts for the radios and gun sights. The seat goes in again with PE seatbelts. Next up various small parts must be fitted to both fuselage halves. Once this is done, the instrument panel, cockpit, radio compartment, rear gunners enclosure; and the shelf between the front and back cockpits are all fitted into the fuselage along with the engine firewall at the front; the fuselage can then be closed up. Now we can concentrate on the wings. on both sides the wells must be boxed in, and at the rear the support rail for the dive brakes are added. The main landing gear for each side is also built up now. The wings are added along with the tailplanes, than the landing gears and its doors can go on, followed by the underside dive brakes, last on underneath is the tail wheel. Moving back up top on the wings the upper dive brakes are fitted. Moving to the front of the aircraft the engine is built up from a central core, and individual cylinders. In the rear cockpit the defensive guns are added in. If the modeller want the canopy to be posed open then it will have to be cut up, the rear sliding section seems to be of a greater dimension so it should fit over the centre section. Once the engine goes on this is followed by the cowl, the prop and the hub. Markings The decals are printed in house and look to have no issues with them. There are marking for 4 aircraft; VS-30 Operational Training Unit, NAS Vero Beach, Florida 1943 (Faded wing markings) VMF (N)-532 , Cherry Point, 1943 VS-34 Operational Training Unit, NAS Vero Beach, Florida 1944 Fictional Dutch East Indies Scheme Conclusion A nice tool of a historically interesting aircraft.. The kit is detailed inside and out. Recommended. Review sample courtesy of
-
 This Summer, Special hobby is to release a SB-2 new variant (link) the 1/72nd Brewster SB2A-4 Buccaneer - ref. SH72303 Source: http://www.specialhobby.net/2020/02/sh72303-sb2a-4-buccaneer-boxart.html Box art V.P.
- 10 replies
-
- 2
-
-
- Buccaneer
- Special Hobby
- (and 1 more)
-
Finally finished this one, think it's taken around 6 months working on and off between house moves and work. I know the stigma around this kit, but it's been one of my favourite builds. Kit of firsts for me, first full photo etch cockpit, using filler, using a gloss coat, vacform canopy and an enamel wash... need a lot more practice with the wash though. Airfix 1/48 Buccanner S2/S2C kit used Pavla ejection seats Airwaves photo etch cockpit Kit World decals Areoclub canopy Scratch build bomb bay Sprayed with Tamiya acrylics Humbrol enamel black wash Humbrol gloss varnish brushed on Kit came without any clear parts, so no nav lights or screen between the navigator and pilot. Work in progress below Picture time
-
I restarted modelling after a very long break a few years ago. I went through a stage of buying kits far quicker than I could build them. This is a kit that I bought a few years ago off EBay. I finally decided to give it a go having got some experience with some more modern examples. So I was more than a little annoyed when I discovered that a previous owner had tried to make a start with the cockpit, made a bit of a hash of it a lost a few parts in the process. Serves me right for not actually checking the contents on receipt and believing the description on EBay!! This is all that remains... So a quick search on Hannants and only 11 days later the following arrive on the other side of the world 👍 Still waiting for parts ordered from the US in May!! The plan was to produce a scheme from the first Gulf War, brings back memories of us following what was going on watching a mini portable TV whilst we should have been listening to some lecture at Uni. The picture on the front of the interior details nearly changed by mind having stood close to a taxi runs at Bruntingthorpe but I am sticking with the original plan. Any help and advice would be much appreciated along the way.
-
Better get my Buccaneer build going before I run out of time. I'm using the Airfix 1/48 kit with a Neomega cockpit, resin wheels, Heritage Aviation intakes and Eduard exterior PE set: I'll be building it as XW987 of the A&AEE as it looked when I photographed it at RIAT '94: Better get cracking. I've started by cleaning up the cockpit parts and priming them. I'll start painting them tomorrow. thanks for looking Julian
- 28 replies
-
- 11
-
-
- Airfix 1/48
- buccaneer
- (and 1 more)
-
Blackburn Buccaneer S.1 Intake, Exhaust & Air Brake Update Sets 1:72 AeroCraft Models There was little doubt that once the new Airfix Bucc was released that there would be plenty of options being produced for it. This is really a pair of backdate sets to make the earlier S.1 Intake Conversion Set There are new intakes for the S.1 These are hollow cast, with new fan blade faces. The intakes feature the section of wing which joins them. Comprehensive instructions are supplied online. Exhaust and Air Brake Set While you can modify the kit parts for this Ali has taken the hard work out of it by supplying these parts for the shorter exhausts, and the air brake with the heat shield removed (opened & Closed option provided). These can still be open or closed. As with all Aerocraft products the casting is first rate and the online instructions easy to follow. Highly recommended of you want a Buccaneer S.1 n your model line up. Review samples courtesy of
-
Rumour with very basic 3D renders... Doesn't look Tanmodel quality IMO. Except the subject and the 1/48th scale I confess being up until now not impressed by what I see. Source: https://www.facebook.com/groups/8586041972?view=permalink&id=10156026295996973 Song = Kitty Hawk V.P.
-
Hawker Siddeley Buccaneer S.2 800 Naval Air Squadron, HMS Eagle, 1971 New 1/72 Airfix kit In my opinion this is the best 1/72 kit Airfix have produced. I know that’s saying something profound, but as a Buccaneer fan since the 1960s this kit is just spot on. I’ve spent quite a lot of time trying to make the old Airfix and Matchbox kits look like Buccaneers, which was all good fun, but I can now go and just build a kit OOB and get a model that looks just right. I even used the kit decals – something I very rarely do. What more can I say – well done and thank you Airfix.
-
Does anyone have a list of serial numbers and codes of the Buccaneers operated by 809 Sqn on the last cruise of the Ark Royal in 1978? TIA!
-
So I will be building the Bucc' by Airfix once I finish my Victor. Was slightly disappointed to find that while the Bucc' does come with an open bomb bay position it does not give any ordnance to go with it. Would this be the correct bomb to buy/use on the model? I am also unsure about how I will attach the ordnance to said bomb bay. could anyone supply good pictures of the bomb bay loaded with 1000lb freefall bombs. Thanks in advance.
-
Blackburn Buccaneer S.2C 1:72 Airfix The Blackburn Buccaneer was an all-weather naval strike aircraft designed and built by Blackburn Aircraft Limited (later Hawker Siddeley) to fulfil a Royal Navy requirement for an aircraft to counter the threat posed by the Soviet Navy's Sverdlov class of light cruisers. The requirement called for a two-seat aircraft capable of sustained low-level flight at up to 550 knots over a combat radius of up to 800 nautical miles. The resulting aircraft made use of a number of novel features in order to fulfil the mission requirements, including the use of fully blown wings to improve low-altitude performance, area rule fuselage and very robust design and construction in order to ensure survival of the airframe in its tough operating environment. The Buccaneer was able to carry a range of conventional munitions, as well as the 2000lb, 20 kiloton 'Red Beard' nuclear weapon. The Buccaneer got off to an inauspicious start due to the relatively low power output of its de Havilland Gyron Junior turbojets, a feature exacerbated by the extra power needed for the blown flying surfaces. The S.2, fitted with more powerful and more efficient Rolls Royce Spey turbofans, was far more successful. The Buccaneer served the Royal Navy with distinction until the replacement of the last of the large carriers with the smaller 'through deck cruisers'. The Buccaneer was also offered to the Royal Air Force, but was rejected in favour of the TSR.2 and then the F-111. With the cancellation of both of these programmes, the RAF reluctantly accepted the Buccaneer as an interim measure until the MRCA became available. As it turns out, the Buccaneer served the RAF very well for over two decades and even participated in Operation Desert Storm in 1991. Notwithstanding the excellent-but-expensive CMR resin kit, fans of the Blackburn Buccaneer have been poorly served by kit manufacturers for far too long. The previous Airfix kit, along with the Matchbox and Frog kits, are long in the tooth and have issues in term of accuracy when it comes to the complex, area-ruled shape of Blackburn's finest. When Airfix announced their intention to redress the balance be releasing an all-new kit, it therefore seemed like a logical move for the Margate firm. Inside the red top-opening box adorned with the usual high-quality Adam Tooby artwork, are five frames of grey plastic and a single clear frame, holding 140 parts in total. The mouldings are clean and crisp, with fine, recessed panel lines throughout and plenty of nice detail on smaller parts. The assembly instructions are divided into 84 stages, which gives a good indication of the level of detail that Airfix have crammed into their new model. Assembly begins with the cockpit, the tub of which reflects the correct offset arrangement for the observer's seating position. Speaking of seats, the three-part Martin Baker Mk.6s appear to be a pretty good representation of the real thing, although some photo etched harnesses are a must. Crew figures are included if you are so inclined. The tub, instrument panels and side consoles are nicely detailed, although decals, rather than moulded details, are used to represent the controls. The nose gear bay fits onto the underside of the cockpit tub. Once complete, the forward fuselage halves can be joined together, forming a small-sub assembly entirely separate to the rest of the aircraft. The distinctive profile of the nose, which has always looked off on the other injection moulded Buccaneers, looks spot on. The nosecone is not moulded as a separate part, however which means another seam to clean up. Once the forward part of the fuselage is complete, construction turns to the central part of the airframe. The lower part of the fuselage includes about 80% of the lower wing surface. In order for the pylons and fuels tanks to be attached, holes must be drilled at the appropriate points. The outer wing can also be cut away at this juncture if you wish to build the model with wings folded (yes please!). The inner structure of this section comprises the main landing gear bay inner walls, front and rear bulkheads and tube structures for the engines. The front and rear faces of the engines are nicely represented and it should be possible to clean up the internal seams on the engine air intakes prior to final assembly. Once all of the internal detail has been fixed in place, the upper half of the fuselage can be cemented to the lower half. At this point in the build, you really have to decide whether to finish your model with folded or extended wings. If building the former, you can attach the wing fold mechanism and then miss out the next few steps. If finishing your model with wings extended, little spars are included to help you align the separately moulded upper wing surfaces and to give the model strength. Whichever route you take, the last major step involves assembling the rear fuselage and tail. The vertical part of the tail is integral to each half of the rear fuselage, while the horizontal tail is a single, solid part. There are seperate parts for the RWR fairings, which is handy. Apparently the rear RWR cone is the wrong shape for an S.2C, but this is an easy fix if such things trouble you. The foremost part of the engine air intakes, as well as the rearmost part of the engine exhausts, are moulded in such a way that the clean up of seams will be absolutely minimal. The bomb bay can be finished in open or closed position. If the former, there is plenty of nice detail to catch the eye. The prominent air brake at the rear of the fuselage can be finished in open or closed position as well, and is nicely detailed. The Buccaneer's robust landing gear is nicely represented and subtle flat spots are moudled into the tyres. There are different parts for the arrestor hook depending on whether you build the model with gear down or up. Aside from the wing slipper tanks, you get two Matra rocket pods and two 1000lb free-fall bombs to hang under the wings. The canopy is nicely moulded and can be finished in the open position, although the instructions don't show this. Two options are provided on the original decal sheet: XV154 of No. 809 Naval Air Squadron, HMS Ark Royal, January 1972; and XV336 of No. 800 Naval Air Squadron, HMS Eagle, June 1971. Both aircraft are finished in overall Extra Dark Sea Grey with Type D roundels. The decals themselves look thin and glossy and a full set of stencils are included. Conclusion I know I wasn't the only modeller to get excited when Airfix announced their new-tool Buccaneer. Thankfully, the finished product doesn't disappoint. The level of detail is very nice and it's clear that Airfix have put a great deal of thought into their model. There are plenty of options, such as folding wings, airbrake and bomb bay, and they are are all nicely realised. It would have been nice to have a low-viz roundel option, but in all fairness there isn't a huge amound of variety when it comes to S.2Cs. Overally this is an excellent model which finally plugs a huge hole in the world of injection moulded cold war British aircraft. Highly recommended. Review sample courtesy of
-
... not the new one, sorry This is the 1989 version of Airfix Buccaneer in 1/72 painted in the Gulf War scheme. Spiced up with few extra parts - such as resin nose & tail, etch details in the cockpit & air brake. Making the airbrakes open up was bit fiddly as they clearly weren't meant to be displayed open. But I think I got it figured out eventually. Painted with Vallejo paints using brushes. Dirtying up using Tamiya panel liners & pigments. Model was bit on the more challenging side to build, it felt like older kit than -89. Most of the plastic was pretty soft & clunky but I'm pretty happy with the results. Hope you like it - feel free to comment & post constructive criticism.
- 16 replies
-
- 39
-
-
-
15 Squadron Buccaneer S.2Bs at Red Flag, Nellis AFB, January 1983. I think they were there to support the Jaguars, designating targets. XX891 XX899 Thanks for looking, Sven
-
Another heritage group build!!! For me, the biggest problem with these GBs is deciding how to build the kit. Do you build it OOB in the same way as you would have done back in the day? Do you build it OOB with all your current skills (in my case that can sometimes end up looking like the previous choice! ) Or do you improve the kit and build it to the highest standards you can achieve using aftermarket bits and pieces that were never even thought of when the kit was originally issued? For this one, I'm going to choose the latter - sort of. I always loved FROG's full colour painting instructions The kit is apparently very accurate, shapewise. However, the fuselage is an empty shell. You can see strainght through from the intakes to the exhausts. The open undercarriage bays provide a lot of light to aid the view. So I shall be using some Neomega resin sets to deal with that issue. They are designed for the now-obsolete Airfix kit but I see no reason why they shouldn't fit the FROG one. I will be building the box top scheme, complete with four Martels. However, I'll be using most of the markings from an Xtradecal sheet intended for the forthcoming Airfix kit. The FROG decal sheet will provide serials. Looking forward to this one!
-

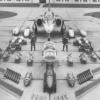
F. 238 Blackburn Buccaneer " The Flying Pirate!"
Corsairfoxfouruncle posted a topic in FROG Squad GB
Hello everyone... Well I'm in with my 1st ever Frog model. Im going with this the S.2A Buccaneer Frog #F.238. The kit comes with early RAF & SAAF markings. Which i plan on keeping for a backup. However i just don't feel good always going with kit markings. So I'm going ambitious with this as my option. Aircraft coded XW986 or XW988. Im going to have to source the decals for the plane as i don't have any. Biggest ones are roundels but should be able to figure something out ? Even if i have to mask them. Here are the complete sprue shots. Questions, comments, & suggestions always welcome. Dennis- 98 replies
-
- 13
-
-
Hello everyone... Well I'm happy to say this one is done. As I mentioned in my build log this is a tribute to Lieutenant D.H.J.Owen (R.N.). While i was looking for some answers during the build process i found my aircraft XV348 was a part of 237 OCU. It was lost in a crash on 31/10/1977. The plane had left Bødø Norway for the U.K. and struck power-lines shortly after takeoff. The back seater survived the pilot did not. This was my first ever build of a Frog kit, it was a pretty bare bones kit. I was able to scratch the wheel bays and build a cockpit. I have an Airfix Data-link pod given to me by one member for the Martel's. I am using an A/M pitot for the kit given to me another member. And finally i modified one of the Martel's to a T.V. guided variant. I hope the Buccaneer meets your expectations. I used this photo from Canberra kid as the basis of my model. This build is Dedicated to Lieutenant D.H.J. Owen (RN). R.I.P. ... Questions, comments, or thoughts ? If you're curious here is the build log link. Dennis
- 20 replies
-
- 39
-
-
Hello everybody I have the RAF Green & Grey for the uppers but whats a good equivalent for Light aircraft grey I have a few light grey's ? Light aircraft grey like you would see on a SEA Camouflaged USAF bird out of Vietnam ? Or something darker like RAF Med. sea grey from WW2 ? Or a Light ghost grey like that used by the USN ? I know i have asked this before a long time ago but have lost the notes ? I want to paint an RAF Buccaneer from Honington in 1970 ? This is for the Classic Frog models group build. I was initially going with a different scheme but changed my mind ? Dennis
-
Apologies if this is i the wrong section, please feel free to move it. My son and I have recently visited the RAF Museum in Hendon after its recent make over and was rather impressed. Seeing the Bucc in close up again after many years (worked with them at RAF Abingdon) was very impressive. Looking at it just made me think that something wasn't quite right. The airframe in question is XW547 still marked up as 'Guiness Girl' I'd taken a few pics and checked when I got home. The powers that be have painted a veil over the young ladies chest!?! I could be wrong but if a museum attepmts to change history to spare a few blushes then what's next??????? Rant over.........for now
-
The website has been updated to cover; 1) 60th Anniversary http://www.thebuccaneeraviationgroup.com/event-60th-anniversary-xx894-xw544-and-xx900-1.html 2) Cold War Jets August 2018 with a very personal story http://www.thebuccaneeraviationgroup.com/event-cwj-aug-2018--xx894-xw544-and-xx900.html 3) Events for 2019 http://www.thebuccaneeraviationgroup.com/event-25th-out-of-service-event.html Best,
-
Hi all, newbie member here after some help! A friend of mine recently gave me a selection of old kits, having sadly reached a point where he's had to give up modelling due to health issues. Having recently rediscovered a love of aircraft modelling after a 20-year hiatus I've promised to build them and give them a good home, so at least he can see them made... I've 'warmed up' on 1/48 TSR2, Lightning and Jaguar (he has excellent taste in aircraft) and just started the big one - a 1/48 Airfix Buccaneer S2 (08101 - the 1996 rebox). I say the 'big one' as this is his favourite aircraft and the one he was really looking forward to building prior to his health problems. The trouble is I've just realised all the clear parts are missing, despite the fact that all the sprues are still bagged and sealed. I've been trying to source a spare canopy to no avail - does anyone know where I may be able to get hold of one?? Thanks!