Search the Community
Showing results for tags 'buccaneer'.
-
 First, the photos... Here's my attempt at the 1/72 Airfix S.2B Buccaneer. For a kit which has had rave reviews, I had mixed feelings on mine, not helped by the fact that one of the wings was quite warped in the box, and I never managed to get it entirely straight. A couple of other fit issues around the big fuselage components left a bit of a messy finish, though I'm sure a more skilled modeller would have done a better job. That said... some components went together really nicely and were quite cleverly engineered, and the surface detail is pretty good too. It was built almost totally OOB, with the exception of some Eduard etch for the cockpit, and those Quickboost intake FOD covers. Paints were Hataka acrylic, mostly airbrushed but a bit of detail added by brush. I wanted to weather it enough to represent a late-life, well worn example, and this was mostly done with oils (a little clay wash shading too). To get that properly worn, faded look, the whole thing was sprayed with Windsor & Newton Galeria matt acrylic varnish. When they say “matt” they really mean it! The flattest finish I’ve ever used. I deviated from the Airfix guide on the weapons colours, and went for 'live' markings on the Paveway and the AIM-9L. All photographed on the dining room table, as usual... the 'night' ones were done with just two torches for illumination. The hangar backdrop photo is courtesy of Nick Challoner, and the first generic airfield backdrop was a large print made after purchasing the shot from Shutterstock. Overall I'm fairly happy with it for the small scale - I think it was NavyBird who said how unforgiving close-up photos of small scale models can be, and he's right...don't zoom in too closely! Thanks for looking.
- 18 replies
-
- 66
-

-

-
 My first attempt at one of the new-tool Airfix 1/48 Buccaneers, and I thought I’d start with the Royal Navy version. I have to say it’s an absolutely superb kit, Airfix’s engineering is brilliant and required only a few areas of filler. The fit is excellent with many parts just dropping into place. I didn’t need to use any aftermarket as the cockpit, decals, undercarriage, etc are all great out of the box. XV340 was delivered to the Fleet Air Arm in April 1967, and served on board HMS Eagle and Ark Royal as well as at Lossiemouth. It was transferred to the RAF in May 1973 but was grounded following the Buccaneer fleet inspection in 1980 and allocated the maintenance serial 8659M, seeing out its days on Pendine Ranges. The model shows XV340 in its heyday as a front line Royal Navy strike jet based at Lossiemouth in 1970. All comments, constructive or otherwise very welcome!
- 11 replies
-
- 61
-
-
-
A happy new year to you all! It’s been a while since my last build, with theatre commitments, holidays then Christmas, but I’m back with a bang, or should that be Bucc with a bang! Despite waiting ages for the RAF version for which I’m awaiting delivery, I felt compelled to buy and build the previous FAA version as a companion to the Sea Vixen. Seeing this kit reduced to £50 it seemed a good time to get one, I doubt it’ll ever be less than that. So without further ado, my first build of the year. The now very familiar box, freshly delivered this morning… And a LOT of plastic inside! I’m tempted to make it with wings folded, but reserve the right to change my mind. Lovely decal sheet! And this is the scheme that most caught my eye. The real thing, images below are all courtesy of the FAA Buccaneer website: I’ve already got a spray can of EDSG so should be ready to get going. All comments and advice and general Bucc banter more than welcome …
- 47 replies
-
- 12
-
-
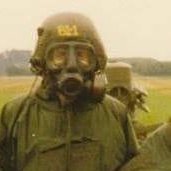
Hello, First try at aircraft since I was a kid (a long time ago!) I usually do ships, but came across some 1/144 resin British aircraft at Telford last year from https://www.144th.co.uk/ Picked up a Buccaneer and a Lightning. Lovely kits, great quality and very nicely detailed. Only extra bits I added were ejection seat handles, seat belts from odd bits of etch, a piece of acetate sheet to represent the 'hood' over the navigators position s the kit part is necessarily quite heavy, and some bits of etch and wire to replicate the wing folding mechanism. I need to work on my aircraft weathering!! This is the Buccaneer ready for inspection; Ejector seat handles from 0.2mm copper wire; Wing fold mechanism from spare etch and wire; Thanks for looking and any feedback gratefully received. Cheers Nick
- 10 replies
-
- 43
-
-
-
Hi All Finally finished my Airfix 1/48 Buccaneer. I was making great progress and then stalled while I finished some other builds. I built it as XN974, which was the first S.2 off the production line. It saw service with the Royal Navy Test Sqn and is now with the Yorkshire Air Museum. The kit was a joy to build and the only problems I encountered were with the wing pylons - they would not sit flush to the wing and the ladders - the locating pins are at the wrong angle. Thanks for looking Mick
- 54 replies
-
- 110
-
-
-
Were the early grey and white Buccaneers painted in a high gloss or silk finish?
-
 Hi all, I completed this one a few weeks ago, but I've only just gotten around to taking photos of it - it's so large it won't fit in my photo booth, so the photos have been taken outside (now that it's not rainy). Firstly, these new Airfix kits are INCREDIBLE and designer Paramjit has done an amazing job! This kit was built from the box with only a couple of small additions being resin ejection and metal pitot tube and refueling probe, I also scratch-built a windscreen wiper and the ejection seat handles so they are much closer to scale size. Airbrushed with Hataka Extra Dark Sea Grey acrylics (which turned out a bit lighter than expected), weather with oils, and MIG panel line wash. I've been very pleased with GX100 varnish which creates a beautifully smooth finish over which I toned down the gloss slightly with Winsor and Newton satin varnish. I rather enjoyed this build, it was surprisingly easy and a reasonably quick build too! I decided to go with a slight variation from the kit and built it with a two Martel loadout, inspired by the art below; Here's my attempt! I've just noticed, unfortunately the forward ejection handle has flopped down slightly... This now completes my "conventional" Fleet Air Arm jet collection, I'm now moving on to the STOVL trio to complete my 1/48 Fleet Air Arm jet collection Cheers, Ben
- 36 replies
-
- 89
-
-
-
I am currently building the new Airfix 1/48 Buccaneer S.2C/D as XN974 when it was based at Boscombe Down. I have got the Kits-World decal sheet for XN974 which shows that the aircraft has the wing ECM pods fitted but actual pictures of the aircraft at the Yorkshire Air Museum show it with no pods fitted. Would anyone know if the pods would ever have been fitted to that particular aircraft? I am more inclined to believe the photos rather than the decal sheet. The museum aircraft pictures do not show the drop tanks fitted but I imagine that would have been at some time in it's working life.
-
Here's my 1/72 Airfix Buccaneer built as S.2B XW987 of the A&AEE. I've built it as depicted in a few photos I found online of this aircraft in 1992, with a buddy refuelling pod on one wing and a slipper tank on the other. The decals are from 26 and the buddy pod, towel-rail antenna and wingtip cameras are 3D printed. The build thread is in the Prototypes, Racers, Research, Record Breakers and Special Schemes group build here together with my build of a Buccaneer development aircraft, XK527. and one shot of the two Buccs together: thanks for looking Julian
- 11 replies
-
- 102
-
-
-
- Airfix 1/72
- Buccaneer
- (and 1 more)
-
Here's my 1/72 Airfix Buccaneer built as XK527, one of the original NA.39 development aircraft that was progressively modified throughout its life, ending up in S.2D standard. I've built it as it was in the latter stages of its life as an S.2D used by Hawker Siddeley at RAF Holme-on-Spalding Moor for Sea Eagle trials. The decals are from Kits-World and the Sea Eagles are from Air-Graphics, and the nose probe and extra pitot (on the starboard wing) were 3D printed. The build thread is in the Prototypes, Racers, Research, Record Breakers and Special Schemes group build here together with my build of XW987, a raspberry ripple S.2B. thanks for looking Julian
-
 Many of you recall a year or so back i built and finished the Airfix 72nd scale Buccaneer. Those of you who followed the build progression probably remember that i had fit issues between the instrument panel dash, and the windscreen. At the time, i thought it was something of an oversight and while i was able to make it work, i thought Airfix was asleep at the switch. Fast Forward to late 2022. I have a second Buccaneer going into paint (funny story), and time came to install the windscreen. In a nutshell... i was flat out wrong. The second instrument dash installed exactly per the kit instructions, and fit fine. At this point, while allowing the suspense to build.... i used the NewWare Models NWAM0742 mask set this time, instead of Eduard. This is just me, but based on my experience using both Eduard and NewWare masks, given the choice i'll use NewWare. If you haven't had a chance to compare them to some Eduard masks, you should. This is the inside of the windscreen, masked and painted with the NewWare set. And now... the big finish. The Airfix Windscreen fits as perfectly as anyone could expect. So, this experience just re-enforces my feelings towards the kit, which are very very positive. Airfix knew exactly what they were doing; i did not. Thought it was important to pass on my findings and set the record straight. -d-
- 26 replies
-
- 24
-
-
- Mea Culpa Dept
- Airfix 72 scale Buccaneer
- (and 1 more)
-
Having recently finished a Tamiya Wildcat I started to search through my stash (or the NARNIA CUPBOARD as my wife calls it) to find my next project. I spotted the old issue Airfix Buccaneer I've had for some time. I've made no secret elsewhere on this forum of my disappointment at the cost of the soon to be released new version so thought I should put my money where my mouth is and actually build the one I have in stock. I must admit that some of the mouldings look a bit rough around the edges but they certainly give the appearance of what could become a model of one of my favourite aircraft. I hope to carry out most of the build form the box but decided to replace the original wheels with a resin set from ARMORY. Just getting underway now, so will add to this as things progress. Ian
- 27 replies
-
- 12
-
-
Happy Saturday shipmates This is my first attempt at doing a build process forum topic thread thingy, I'm usually just a lazy Instagram poster but i thought i might try to match the effort from you guys on here and actually somewhat document this build. Ive been wanting to do a Bucc for sometime and have had the Airfix 1/72 FAA kit sat in my stash for a year or so collecting dust and decided now was the time, given their upcoming 1/48 release. I purchased a fairly large amount of aftermarket sets as i've just done a couple airfix kits oob and felt they needed more.. In particular: CMK resin cockpit set Quickboost - FOD covers, Remove before flight tags/covers and Antennas Eduard Brassin Wheels Master Pitot tube and refuel probe HGWModels remove before flight tags The plan - Imagine a RN Buccaneer as an airshow static display.. Thats it Sounds boring i know, but as its my first of this aircraft i wanted to preserve the excellent lines of the Buccaneer aswell as add covers and open the canopy etc, however you'd rarely if ever find one on a carrier with the wings spread but the intake covers on and canopy open (correct me if im wrong) Im hoping to do the 1/48 kit as wings folded, bombs loaded, ready for the crew to walk, on a deck, but we will have to wait for that. So on with photos I made a few additions to the CMK set in the form of wires, piping, the computer holder in the frame of the rear seat blast screen and then the pointy parts of the bang seats which for some reason cmk missed. The blast screen middle frame part was stolen from the kit as the cmk piece was just a square block.. anyway IMG_1086 by tomradford15, on Flickr IMG_1093 by tomradford15, on Flickr IMG_1091 by tomradford15, on Flickr On to painting, as the detail is so small and shallow i didnt prime it but instead went with light, well thinned coats of tamiya XF-24 Dark Grey as the base layer, then on top of that, XF-82 ocean grey as the main colour of the cockpit. This was still quite dark so I went over that with XF-82 + few drops of XF-2 white, but trying to apply it from a top down angle to put emphasis on the upward facing, and so highlighted areas. IMG_1099 2 by tomradford15, on Flickr IMG_1107 by tomradford15, on Flickr IMG_1116 by tomradford15, on Flickr IMG_1120 by tomradford15, on Flickr You may be thinking but that still looks too dark, well you're right. Next im going to hand paint the raised details in the cockpit colour which will leave all the airbrushed paint as essentially shading. To be continued.. Tom
- 12 replies
-
- 11
-
-
 Hello! I proudly present my 1:72 Bucc! It took just over a month to do and I'm very happy with the finish on it (brushpainted). I had lots of fun making this, it's a relatively easy model and the single colour fuselage really helps with build speed, one of my fastest models (although the fact that I had to self isolate for 10 days helped a lot with getting me time to build) Thanks for looking! Next RFI either F-15E or another JP T.4
- 19 replies
-
- 63
-
-
Good evening. The bucc is actually almost done! Just thought I'd share how things went. It all started 20th December with the gear bays... Then... The next day, my father tested positive for coronavirus! No school for me! On one hand, I was happy because I finally got to spend my birthday at home for once. On the other hand, I wasn't able to celebrate Christmas with the rest of my family, had to visit them once self isolation was over. After I took a PCR test, I immediately went back to modelling. Speedbuild time! In one day, I went from this: To this: Quite a bit of progress. After that, it was just putting together the subassemblies and finishing the painting. I then took a break to celebrate the new year and a late Christmas with my family! (Happy Christmas and new year by the way everyone!) Last night, I finished painting and added the first pledge coat. Today I applied many decals. Here it is with the rest of my British jets: Only rocket pods, many stencils and weathering left to do! Unfortunately, exams and prelims are looming so I may not get it done soon, thought I'd post this though at least as I am excited by the progress I've made. I must say that for brushpainting, I am very happy with how smooth this is! Some have asked elsewhere what paint I use, for the grey in this I used revell aqua colour blue grey. Hope you enjoyed reading! See you all later.
-
Hi I have the 1/72 new tool Airfix Royal Navy Buccaneer kit that I'm planning in building a very early RAF version from. I'm aware that a number of the first aircraft on 12 sqn were ex FAA airframes, so can I use the slipper tanks supplied or will I need to steal the ones from the RAF version of the kit ? Thanks in advance Lee
-
 Buccaneer S.2B Upgrade Set & Masks (for Airfix) 1:72 Eduard The new Airfix kit is one of the crop of new tool kits which are excellent direct from the box, this has not stopped Eduard from offering some upgrades. Upgrade Set (73742) Here we get a sheet of brass for the airframe parts, and a small sheet of nickel-plated and pre-painted PE for the cockpit and ejection seats. Firstly from the nickel fret you get new head boxes for the seats, firing handles, and complete seat harnesses. In the cockpit you get new multipart instrument panels and all the side consoles. New rudder pedals are provided. For the airframe you get the interior of the large prominent rear air brake, burner can details for the engines, and heat shields for the exhausts. Internal skins for the landing gear well are provided, as well as new skins for the gear door. Masks (CX601) Supplied on a sheet of yellow kabuki tape, these pre-cut masks supply you with a full set of masks for the canopy both inside and out, with compound curved handled by using frame hugging masks, while the highly curved gaps are in-filled with either liquid mask or offcuts from the background tape. In addition, you get a set of hub/tyre masks for the wheels, allowing you to cut the demarcation perfectly with little effort. Review samples courtesy of
 -
G'day all. It's been a while since a completion. It just so happens I reduced the stash by one this afternoon. This is the lovely 1/72 Airfix S2C Buccaneer. It's a great kit to build with only two real gripes. I found that the inserts for the exhausts at the rear fuselage required some material removal as did a small amount at the nose to fuselage join. Other than that she's in the display cabinet safely. Kit decals used as XV336 while with 800 NAS on HMS Eagle in June 1971. I opted for the folded wings and deployed airbrake not so much as a space saver, but because I think its an airframe that doesn't look too bad like this. Keen to hear you thoughts. Cheers, Mick
- 20 replies
-
- 60
-
-
I've got one of the new Airfix Buccaneer S2B kits, and want to make a version from 237OCU as Honington is my nearest RAF base. I can find the decals for 237 on Xtradecal 72307 (Buccaneer S.2 XT287 237 OCU RAF Honington 1972), but can I use this kit? It doesn't matter if I can't because I will use it for another aircraft, and I'll get an S2C as the base for this instead. Can anyone point me in the right direction? Thanks
-
Having acquired the ancient 1960s moulding airfix buccaneer S1 which is really the NA39 prototype a kit I was told was terrible I decided to make it even harder for myself and convert it to XN923 an RAE buccaneer S1 that I help to maintain. So here is the 1960s kit adjusted with shortening of exhaust, addition of stab bullet weight, addition of camera pods on wing tips and radome, reshape radome, reshape exhaust. I have to say a huge thank you to @BritJet for the fantastic decals to make this mini XN923.
-
Blackburn Buccaneer S.2B 1:72 Airfix (A06022) The Blackburn Buccaneer was an all-weather naval strike aircraft designed and built by Blackburn Aircraft Limited (later Hawker Siddeley) to fulfil a Royal Navy requirement for an aircraft to counter the threat posed by the Soviet Navy's Sverdlov class of light cruisers. The requirement called for a two-seat aircraft capable of sustained low-level flight at up to 550 knots over a combat radius of up to 800 nautical miles. The resulting aircraft made use of a number of novel features in order to fulfil the mission requirements, including the use of fully blown wings to improve low-altitude performance, area rule fuselage and very robust design and construction in order to ensure survival of the airframe in its tough operating environment. The Buccaneer was able to carry a range of conventional munitions, as well as the 2000lb, 20 kiloton 'Red Beard' nuclear weapon. The Buccaneer got off to an inauspicious start due to the relatively low power output of its de Havilland Gyron Junior turbojets, a feature exacerbated by the extra power needed for the blown flying surfaces. The S.2, fitted with more powerful and more efficient Rolls Royce Spey turbofans, was far more successful. The Buccaneer served the Royal Navy with distinction until the replacement of the last of the large carriers with the smaller 'through deck cruisers'. The Buccaneer was also offered to the Royal Air Force, but was rejected in favour of the TSR.2 and then the F-111. With the cancellation of both of these programmes, the RAF reluctantly accepted the Buccaneer as an interim measure until the MRCA became available. As it turns out, the Buccaneer served the RAF very well for over two decades and even participated in Operation Desert Storm in 1991 where it ended up lasing for its replacement! and even dropping some bombs itself. Another RAF Veteran who left on a high note. The Kit Notwithstanding the excellent-but-expensive CMR resin kit, fans of the Blackburn Buccaneer had been poorly served by kit manufacturers until Airfix came along with their new tool. Inside the red top-opening box adorned with the usual high-quality artwork, are five frames of grey plastic and a single clear sprue. For this boxing there is a new sprue with the bulged bomb bay which also contains slipper fuel tanks, two Paveway II LGBs, an AIM-9 sidewinder, an AN/ALQ 101 ECM Pod, and an AN/ALQ 23E Pave Spike Pod. The mouldings are clean and crisp, with fine, recessed panel lines throughout and plenty of nice detail on smaller parts. The assembly instructions are divided into 85 stages, which gives a good indication of the level of detail that Airfix have crammed into their new model. Assembly begins with the cockpit, the tub of which reflects the correct offset arrangement for the observer's seating position. Speaking of seats, the three-part Martin Baker Mk.6s appear to be a pretty good representation of the real thing, although some photo etched harnesses would be desirable. Crew figures are included if you are so inclined. The tub, instrument panels and side consoles are nicely detailed, although decals, rather than moulded details, are used to represent the controls. The nose gear bay fits onto the underside of the cockpit tub. Once complete, the forward fuselage halves can be joined together, forming a small-sub assembly entirely separate to the rest of the aircraft. The distinctive profile of the nose, which has always looked off on the other injection moulded Buccaneers, looks spot on. The nosecone is not moulded as a separate part, however which means a seam to clean up. Once the forward part of the fuselage is complete, construction turns to the central part of the airframe. The lower part of the fuselage includes about 80% of the lower wing surface. In order for the pylons and fuels tanks to be attached, holes must be drilled at the appropriate points. The outer wing can also be cut away at this juncture if you wish to build the model with wings folded. The inner structure of this section comprises the main landing gear bay inner walls, front and rear bulkheads and tube structures for the engines. The front and rear faces of the engines are nicely represented and it should be possible to clean up the internal seams on the engine air intakes prior to final assembly. Once all of the internal detail has been fixed in place, the upper half of the fuselage can be cemented to the lower half. At this point in the build, you really have to decide whether to finish your model with folded or extended wings. If building the former, you can attach the wing fold mechanism and then miss out the next few steps. If finishing your model with wings extended, little spars are included to help you align the separately moulded upper wing surfaces and to give the model strength. Whichever route you take, the last major step involves assembling the rear fuselage and tail. The vertical part of the tail is integral to each half of the rear fuselage, while the horizontal tail is a single, solid part. There are separate parts for the RWR fairings, which is handy. Depending on the decal option chosen there are new airbrake parts on the new sprue with this kit. The foremost part of the engine air intakes, as well as the rearmost part of the engine exhausts, are moulded in such a way that the clean up of seams will be absolutely minimal. The bomb bay can be finished in open or closed position. If the former, there is plenty of nice detail to catch the eye. The prominent air brake at the rear of the fuselage can be finished in open or closed position as well, and is nicely detailed. The Buccaneer's robust landing gear is nicely represented and subtle flat spots are moulded into the tyres. There are different parts for the arrestor hook depending on whether you build the model with gear down or up. The canopy is nicely moulded and can be finished in the open position, although the instructions don't show this. Three options are provided on the original decal sheet: XV361 No.208 Sqn RAF, RAF Lossiemouth June 1990. XV361 As Preserved at the Ulster Aviation Society. XV885 "Sky Pirates" No.12 Sqn RAF, RAF Lossiemouth September 1993 XV361 carries the wrap around Dark Green / Dark Sea Grey scheme while XV885 the Medium Sea Grey / Camouflage Grey Scheme along with its Gulf War nose art. The decal instructions give the modeller a few variations on the schemes that both aircraft had at times due to replacement panels / radomes etc. Conclusion This kit has been eagerly awaited and the kit is worth the wait. The level of detail is very nice and it's clear that Airfix have put a great deal of thought into their model. There are plenty of options, such as folding wings, airbrake and bomb bay, and they are are all nicely realised. The option of a former Gulf War aircraft is a good one. This is an excellent model which finally plugs a huge hole in the world of injection moulded cold war British aircraft. Highly recommended. Review sample courtesy of
-
Hi all Just been surfing the Hannants site for rear fuselrge serials in white. I have in mind 12 Squadron Buccaneers circa Autumn 1970. If you have the Haynes manual, there is a pic on Pg81. Do any suitable decal sheets exist?
-
Calling this finally done. Been on going for all most a year. Despite the reputation of this kit I really enjoyed it, pushed me to use techniques and materials I havnt used before. I should have added more painting detail to the wing folds but, I really couldn't be bothered. Aftermarket consisted of: Neomega Resin Cockpit Aries wing fold Aries air brakes Pavla resin flaps
- 20 replies
-
- 46
-
-
-
Buccaneer S.2C Cockpit & Port Engine sets (For Airfix kit) 1:72 CMK by Special Hobby The new tool Blackburn Buccaneer from Airfix was most welcome. Now CMK have a couple of sets to help improve the kit if you want. The It arrive in the usual yellow and clear bubble, with header card folded over and instructions within. They’re a range of drop-in replacements for kit parts, offering an almost instant upgrade to detail in areas that modellers usually like to concentrate focus. Cockpit set (7449) This is a complete new cockpit for the kit. As well as the main tub there are two Mk.6 ejection seats complete with PE handles, a new cockpit coaming with the gunsight, new sidewalls and instrument panels. Also included is the main rear bulkhead for the cockpit. All of the parts look crisp. This set should greatly increase the kit cockpit. Highly recommended.` Port Engine set (7450) This is a new set to install and have visible the port engine, As well as the engine there are the internal walls of the engine bay as well Recommended if you want to open this area up. Review sample courtesy of
-
Brewster SB2A-4 Buccaneer "US Marines Dive Bomber" (SH72303) 1:72 Special Hobby In 1939 Brewster was selected by the US Navy to develop a larger scout/bomber aircraft based on their Brewster SBN aircraft. The new aircraft shared the design platform but had a much higher rated engine. The aircraft was a conventional single-engined, mid-winged monoplane layout with two fixed forward firing 50 cal guns in the fuselage, and two 30 cal guns in each of the wings. The aircraft was supposed to have a rear enclosed turret although this was replaced by a flexible twin 30 cal mount. 1000lbs of bombs were to be carried in an internal bomb bay. As well as orders for the USN the French, Dutch, Australians and UK Governments placed orders for the aircraft. The French order was taken over by the UK following the fall of France, however the UK asked Brewster for many modifications which lead to production being delayed. These delays they caused the Australian Government to cancel their orders. Problems at Brewster with the company being badly run led the US Navy to take over the company but deliveries were still quite slow. The type actually proved unacceptable for combat and most of the aircraft were destroyed before being flown operationally. Aircraft which did make it to units became trainers, hacks or target tugs. The aircraft which were ordered by Holland were taken over by the USMC, re-designated SB2A-4 and used to form the first night fighter squadron VMF(N)-531. The Buccaneer has been described as "overweight, underpowered, and lacking maneuverability,", "one of the worst aircraft of World War II", a failure,, and by the Truman Committee as having "turned in a miserable performance." The Kit The kit was a new tool from 2009 and has been released in a couple of boxings since. There are 3 sprues of plastic parts, a clear sprue, a sheet of PE and a bag of resin parts. Construction starts with the cockpit and rear enclosures. The cockpit is first up with the seat going in, at the front a bulkhead and the rudder pedals with the control column behind. Seatbelts are PE; all this followed by the rear bulkhead. The radio compartment and rear gunners enclosure is up next. There are resin parts for the radios and gun sights. The seat goes in again with PE seatbelts. Next up various small parts must be fitted to both fuselage halves. Once this is done, the instrument panel, cockpit, radio compartment, rear gunners enclosure; and the shelf between the front and back cockpits are all fitted into the fuselage along with the engine firewall at the front; the fuselage can then be closed up. Now we can concentrate on the wings. on both sides the wells must be boxed in, and at the rear the support rail for the dive brakes are added. The main landing gear for each side is also built up now. The wings are added along with the tailplanes, than the landing gears and its doors can go on, followed by the underside dive brakes, last on underneath is the tail wheel. Moving back up top on the wings the upper dive brakes are fitted. Moving to the front of the aircraft the engine is built up from a central core, and individual cylinders. In the rear cockpit the defensive guns are added in. If the modeller want the canopy to be posed open then it will have to be cut up, the rear sliding section seems to be of a greater dimension so it should fit over the centre section. Once the engine goes on this is followed by the cowl, the prop and the hub. Markings The decals are printed in house and look to have no issues with them. There are marking for 4 aircraft; VS-30 Operational Training Unit, NAS Vero Beach, Florida 1943 (Faded wing markings) VMF (N)-532 , Cherry Point, 1943 VS-34 Operational Training Unit, NAS Vero Beach, Florida 1944 Fictional Dutch East Indies Scheme Conclusion A nice tool of a historically interesting aircraft.. The kit is detailed inside and out. Recommended. Review sample courtesy of