Search the Community
Showing results for tags 'boeing'.
-
 F/A-18F Super Hornet Update Sets (for Meng LS-013) 1:48 Eduard Meng’s second Super Hornet of at least three is the two-seat -F, and it’s another great kit. Eduard's new range of sets are here to improve on the kit detail in the usual modular manner. Get what you want for the areas you want to be more of a focal point. As usual with Eduard's Photo-Etch (PE) and Mask sets, they arrive in a flat resealable package, with a white backing card protecting the contents and the instructions that are sandwiched between. Upgrade Set (491253) Two frets are included, one nickel-plated and pre-painted, the other bare brass. A complete set of new layered instrument panels with layered MFD panels, sidewalls and side consoles with added levers for both cockpits are in full colour, with a partial floor skin and rudder pedals for the front; sidewall skins; HUD with acetate film glazing; rear deck details; windscreen hoop insert and canopy interior details that include hooks and rear-view mirrors for the interior. Externally, there are hinge parts for many of the gear bay doors plus a complete laminated replacement of the largest nose bay door; a highly detailed crew access ladder with scale-thickness doors; hosing for the main and nose gear legs; a box for inside the nose gear bay; a full set of skins for the pylon contact-points, which should come in handy, as other than fuel and practice rounds modern jets often fly with empty pylons. Seatbelts STEEL (FE1254) These belts are Photo-Etch (PE) steel, and because of their strength they can be etched from thinner material, which improves realism and flexibility in one sitting. Coupled with the new painting method that adds perceived extra depth to the buckles and other furniture by shading, they are more realistic looking and will drape better than regular brass PE. As well as the two sets of crew belts, you also get a set of the pull-handles between the pilot's knees that gets him out of there in case of an emergency, the anti-flail leg straps, and a number of stencil placards for the sides of the headboxes and seats. Masks (EX840) Supplied on a sheet of yellow kabuki tape, these pre-cut masks supply you with a full set of masks for the canopy, with compound curved handled by using frame hugging masks, while the highly curved gaps are in-filled with either liquid mask or offcuts from the background tape. In addition, you get a set of hub/tyre masks for all the wheels, allowing you to cut the demarcation perfectly with little effort. Masks Tface (EX841) Supplied on two sheets of yellow kabuki tape, these pre-cut masks supply you with everything above, but also give you another set of canopy masks tailored to fit the interior of the glazing so that you can paint the interior and give your model that extra bit of realism. Review sample courtesy of
 -
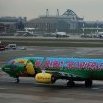
Jet2 757-200 & 737-800 1/144 I'm currently working on a diorama for Newcastle Airport but as I've progressed with that I've neglected to add my aircraft builds as part of my work in progress. These 2 examples will be of the same Jet2 livery and will be Newcastle regulars. Although Newcastle has a heavy Jet2 presence the classic 737-300s have gone and also the aging 757-200s. However ignoring the current disruption the 757 does make an appearance for New York trips and various other charter flights normally positioned from Leeds Bradford or Manchester. I don't have a specific registration for the 737 but the 757 will be G-LSAB which has been newcastle based and includes winglets. It also has the same metallic finish as the 737 fleet as some of the 757's have an older gray paintjob. The Revell kit has error such as a mighty set of super sized winglets so for the cheap price the Zvezda kit is a no brainer. It's obviously been covered before but the kit is beautifully detailed and snaps together really well. It also has alternative winglet options such as the non-winglet tips found commonly on the classics (and some NGs) and the alternative scimitar type found on the TUI NG's. one small problem is the cockpit glass doesn't blend well with the fuselage. To overcome this I used superglue over the surface which once dried allowed me to blend the 2 surfaces smoothly. Some unnecessary mini sections to add that come part of this kit, make sure you've got a good eye and a pair of tweezers. This piece I actually dropped and lost but luckily I had a spare! The 757 options are limited. I've went with the Minicraft C-32 kit and the braz conversion. Zvezda need to hurry up and bring out the 757 tool, I'd imagine it's going to be popular You can see from the minicraft build that it's not quite right. It's not abysmal but the tail is too square, the cockpit window area is angled incorrectly and there's almost a hump (a bit like the 777 rest area) just above and behind the cockpit. Some of the bodywork detail is nicely scribed and the parts actually fit together well. the nose is fine but the cockpit window is too far forward The tail is too wide, this is made obvious if you look at the width at the top conversions always get messy remove the link inside the fuselage, the braz piece won't sit right otherwise. You have to watch out because some parts of the circumference the plastic goes from thick to wafer thin. I found it was wise to leave some excess resin on the front bottom of the tail to fit in a hole in the fuselage, this way the tail is more secure when superglued to the base a good comparison the kit includes the giant wing tabs which can be a pain. If you lucky enough for them to fit then it's wise to keep them on otherwise they are not going to be very secure. As covered before this kit as a issue with the undercarriage where one set sits higher than the other, unfortunately this means inevitably you may have to hack the tabs off one wing and try and level it with the other wing, this will create a nasty gap but is necessary to have the thing sit on it's wheels. If your doing it in flight then you'll probably get away with the wing tabs and the position of the wings I got some winglets imported from the US (at an extortionate price). They are extremely fragile and have a tab that fits on the top half of the wing. Sadly the lower portion of the wing does not fit on well as a result and a lot of sanding and thinning of the wing is required. I actually bought the zvezda 737 after this and I live with regret as it would have been easier to modify the spare scimitar winglets for the 757, they are a very similar size and shape. they include a nice little trailing strobe light as mentioned before the repositioning of the wing creates a gap. too big for filler or milliput. I admit I nicked this idea from somebody else's fine minicraft build but it is basically just spare sprue (from this kit) plus lots of polystyrene cement allows for a nice plastic pace. don't inhale this stuff! drys as plastic and makes the wing less likely to snap off fairings added under the wing and starting to look like the mighty 757 Another major problem is the plyons, as you can see it has the engines pointing nearly 45 degrees up. This is important....don't sand them to the correct shape which is what I stupidly did. just hold the plyon at both ends a bend the plastic (gently) till it straightens out and sits level on the wing. I did this with plyon no2 and it's perfect, unfortunately no1 needs completely reshaped with milliput. oops. final thing to add is a couple of VHF antennas, they are barely noticeable on the real thing but I wanted a little detail added to the top of the fuselage As mentioned this is part of my airport diorama and both planes will sit on the apron in front of the building
-
 My scale model airliner build portfolio basically serves as a Cathay Pacific advertisement at this point, and this one is no exception lol. Subject - Cathay Pacific Boeing B777-300ER (B-KQY) The Boeing B777 was designed as a widebody long-haul aircraft designed as a replacement to aging B747s. Having been the first airliner fully designed with CAD, as well as Boeing’s first airliner to fully use fly-by-wire controls, it represented a quantum leap in airliner efficiency. Cathay Pacific Airways is the flag carrier of Hong Kong, offering passenger and cargo flights to international destinations around the world. It is considered one of the world’s largest and most prestigious airlines. The airline was heavily involved in the development of the B777, even becoming the recipient of the first prototype and the launch customer of the -300 variant. Cathay Pacific continues to use the type heavily in medium and long-haul routes, and is one of its largest operators. The aircraft depicted is B-KQY, one of CX's newer 777s that I was on twice, one from an FCO-HKG flight and on another in an HKG-MNL flight. The fact that I've built this same aircraft multiple times before made it easier to make the decals and copy the window layouts. B-KQY now seems to reside in storage along with other CX aircraft at Alice Springs, Australia for obvious pandemic-related reasons. Build I was originally planning to build this as an Emirates bird but a few days into the project made me decide that the CX livery was too good to pass up. I actually built Cathay 777s in the same livery before, one in 1/144 (B-KPK) and one in 1/200 (also B-KQY) but neither project really left me satisfied with the end result. Years after, and having accumulated what I hoped was enough modelling experience, I decided to tackle the 777 again one more time, partly as a gauge for how much I've improved. This was painted with mostly Armored Komodo lacquer paints and the paint mixtures were eyeballed with various so unfortunately I don't have a proper formula to give. Gloss was with GX112 polished with Tamiya and Novus polishing compounds and micromesh. Decals were a combination of 26Decals from the Emirates decal sheet I bought for the initial Emirates livery I wanted to do and Cathay Pacific decals designed and printed by myself with inkjet decal paper. Everything else is out of the box, short of the wi-fi dome I 3d printed. Kit - Zvezda 1/144 Boeing B777-300ER Going into it, I was expecting to be met with fit issues and seams given my experience with the similarly tooled Revell kit, so I was pleasantly surprised that the Zvezda kit went together easily and without too much fuss. If I had to talk about anything that could have been done better, the breakdown of the fuselage and wings makes it so that the belly is attached to the wing assembly. This makes it difficult to assemble and do polishing work on the wings, and also means that if you wanted to leave the wings off until after painting and decaling, you would have to sand, fill and repaint at the seam. I really liked Revell's engineering approach to their A350 and A380 wings wherein the wings can be left off until the end, and it would be nice if Zvezda did the same. It isn't really relevant in my case because 26decals included almost all the decals necessary for a 777, but Zvezda's inclusion of decals in this kit is very lackluster and misses out on a lot of big details. If you are buying an aftermarket set of decals for this kit, better to make sure that the set you buy includes 777 stencils or buy those separately. Decals This is the first time I've used 26decals, and although I had to pay a huge premium for the Emirates decals that I never used anyway, the other decals went down really well and the borders are practically invisible once applied. They're very thin though so extra care needs to be taken in applying them as it is easy to rip or fold them accidentally. - Overall, this build turned out to be a lot more enjoyable than I was expecting, and I'm happy to be able to do justice to this aircraft once and for all, with the end result being a Cathay 777 that I can feel satisfied with. Thanks for looking, feedback and comments are appreciated!
- 22 replies
-
- 38
-

-
 Hi all. After a while I will do a new wip thread. I started the Modelcollect B-52H a few weeks ago. That´s where it should go... 60-0058 B-52H 410th Bomb Wing, K.I.Sawyer AFB, RAF Marham 5-6-79 by Stuart Freer - Touchdown Aviation, auf Flickr Started with the most typical detail of the BUFF, the stressed skin on large areas of its fuselage. I used a milling cutter from my Dremel and scribbed it by hand. The kit looks quite nice but lacks details in many areas. On the rear for sample some panels and the ECM-antennas are missing. Some other parts need to be changed for the early H-modell. That´s it for the beginning, hope you like it so far. Daniel
- 53 replies
-
- 43
-
-
Hi all, I enjoyed so much the first GB that I joined the list for this one immediately after it was proposed! Again I have too many fitting kits to start, this time I made a decision to enter first an airliner, maybe this will be easier to finish and give me additional time for a second entry. So, my plan is to build the much cursed Minicraft B757 (not Zvezda, I still have to buy it) because I have it in my stash and this is a good excuse. Perhaps I will do some shape improvements, but we'll see. For sure the livery will be this: I made a return trip on it in 2006 for a holiday in Minorca. I have very good memories and the plane was quite comfortable compared to the run of the mill Airbuses and B737s. Cheers Fabio
- 31 replies
-
- 13
-
-
 To released by Easter Express a 1/144 Boeing B707-720 - ref. EE144163 Source: https://ee-models.ru/ee144163-avialajner-b707-120/ Box art V.P.
- 26 replies
-
- 2
-
-
- B-707
- Eastern Express
- (and 1 more)
-
I am currently planning/collecting models/parts for building 3 (make that 6 now. Update; 8 now) Revell 747s. The first is a 747-400 in Gulf Air livery, second a 747-600 conversion in BOAC colours and thirdly a 747-8i in an Air NZ completely black scheme (airlines have been updated). Here's my first question, should I fill the panel lines as they are quite obviously too deep? I have on the go... 1. 747-400 Gulf Air 2. 747-600 BOAC 3. 747-400Y British Airways Landor 4. 747-Xstretch Thai Airways 5. 747-8i Air New Zealand 6. 747-8i Alitalia And a hankering for more Update 7. KC-748 tanker. Possibly Iran Air 8. VC-25B Airforce One 747-8i
- 63 replies
-
- 1
-
-
- revell
- 1/44 scale
- (and 1 more)
-
Hallo After watching some videos on YouTube of the Flight Channel, I watched two types of aircraft manufacturers. Airbus & Boeing. For my interest were all videos, which showed flights without physical damage as fire or collision with another aircraft. Some clues out of it. To my perception there is a pattern of incidences which dominate: · Unclear reading of instruments, because of similar showing two different meanings · Unclear maintenance instruction, without giving proper reasoning for doing so · In electronic circuits: Putting some algorithm behind to detect not reliable inputs with a certain logic, which is absolute absurd! · Not limiting input amplitudes, so they can overstress the aircraft and result in a fatal crash. · Unspecified minimum distance of an aircraft before haven taken off to avoid wake turbulence. · In some other cases: To install a unit preventing the aircraft from motion until all instruments are up! · On the other hand it showed, that flying skills in stall situations are at low level. Private aerobatics could improve this deficit. If an aircraft type is about 20 years in the operative field, many of this flaws are corrected. Not all of course. Some automatisms are contradicting itself. Automatic voices vs. real air controller! Who is the source to follow! Or thinking about a check system, if all external probes are working properly! Not damaged, hole free of foreign objects or water or ice! Happy modelling
-
A long time ago on a modelling forum far, far away I started a project I am determined to finish and due to me having trouble posting pictures on said forum I decided to bring this project across to where all my other crazy ideas (they just might work!) are. so to begin the 747-600 if built would have been the longest 747 ever at 279 feet long with a wingspan of 250 feet. This means stretching the fuselage by 100mm with a 40/22/38mm split and the wings by 48mm each. As you can see I have elected to keep the stretch to a minimum by removing as little as possible from the SUD and upper section while still achieving the same stretch as the first time below hopefully I will start assembling the two sides of the fuselage and get some pics with my standard 747-400 for reference. A long time ago I decided to build a 747-700 as well but I must admit (defeat) that I have come to my senses as that is not going to happen (unfortunately). But i am now building a (poss. Thai Air) 747-8i and a Cargolux 747-8F to go with my old school Thai Air 747-400 and Gulf Air 747-600.
-
I've got hold of an old Revell Super Guppy kit, and accidentally started it. You know how it goes. I'm sanding all the seams down in advance of assembly of the main areas, and have come across the blobs of styrene that are the exhausts. I've managed to find a slightly hazy pic of them online, which shows that they're basically cylindrical, with a small fairing under the lower edge, and a separate "nib" under the wing. I've also noticed that on the example I was looking at, there were also some additional "streamlining" fairings either side of the nacelles, closely fitting to the wing surface, as shown in the pic below: This photo of Aeroscopia is courtesy of TripAdvisor I've got got plenty of tube around for the exhausts, but could do with some larger pics of the areas, and confirmation whether those side fairings were a standard fitting across the range. I'm looking at modelling the last flying Guppy in NASA service, after watching a documentary about it the other day on t'telly. Any additional detail pics would also be welcome, as I don't have much in the way of info, other than a few pics that I took years ago of a rather delopilated one at Brunty.
-
Hey, This is my first post and first model, please don´t be too hard to me. I will build a Beoing 777-300ER in the livery of Air India. My Camera is damaged , so picture will follow in future. Yesterday I mad my first airbrush layer, some mistakes included, but I think I will figure it out how to improve my airbrush skills. Decals: 26 Decals Kit: Boeing 777-300ER Zvezda Colours : Humbrol Gloss Ivory 41 Xtracolor Canadian Vodoo Grey x150 Red: I am still trying to find the best match
-
B-17G Flying Fortress Dinghy (4414 for HK Models) 1:48 CMK by Special Hobby HK Models’ new medium-sized 1:48 B-17G, not to be confused with their own gigantic 1:32 kit has been around for a while now, taking over the mantle from the old Monogram kit. The Flying Fortress often flew over large tracts of water, and like most WWII aircraft it had a dinghy pack oboard in case it went down far away from land. Being a tad larger than a fighter, and with 9+ crew, a larger dinghy was required, which was housed in the raised cockpit portion of the fuselage behind the mid-upper turret on the port side. CMK resin sets arrive in a clear clamshell pack with a yellow card insert behind that protects the parts within and keeps the instructions free from harm. There are three parts in the pack, all on their own casting blocks. Installation is simple, requiring the modeller to remove a small rectangular panel in the port side of the fuselage, which is picked out in pink on the instructions. The dinghy bay slots into the aperture from behind, then the packed-up dinghy is sides inside, making sure to paint the bay green and the dinghy yellow before you do. The bay door is wafer-thin, and attaches to the pour block along its hinge edge, with little clean-up needed there, or for that matter on either of the other two parts, which have their contact patches hidden away after construction. Highly recommended. Review sample courtesy of
-
Good evening everyone! I hope you're all keeping well? After almost 5 weeks of work (and more money than I should probably admit to) I've finally completed my rendition of an American Airlines Boeing 777-300ER in 1:144 scale: ------------------------------------------------------------------------------------------------------- I could write a lot about this build (and I have on the Work in Progress thread), but I shall try and keep it relatively short and sweet. Just over a year ago I took my first flight, in an attempt to get over my fear of both flying and heights. In the space of 2 weeks I'd been on 6 flights and it was on the 7th flight that I had the pleasure of flying on the Boeing 777. We were originally supposed to fly back with British Airways but delays caused by the weather meant we ended up catching an American Airlines flight the next day. The flight was incredible- there was very little turbulence, the views were unbeatable, the crew were friendly and the flight was empty (so plenty of opportunity to move around). The thing which captured my attention about the 777 was its size. It's comparatively gargantuan! Although we flew on a 777-223(ER), I didn't fancy modifying the Revell 1:144 -300ER kit dramatically- except for doing a bit of scratchbuilding and using Pas-Decals decals for the AA scheme. On that note, many of the lumps, bumps and antennae are placed as per the instruction sheet and are likely not 100% representative of where they are on the real thing. But despite this being my first airliner kit in a long while, and my first real attempt at using rattle cans, I really enjoyed this build. Look at the size of it! ----------------------------------------------------------------------------------------------- So there we are then. The base is only temporary, as I'd like to have something a bit more structurally sound than a cardboard box, but hey it works. As I said previously, this build has been an immense amount of fun to work on and although I'm pleased with how it's come out, I am even more satisfied with the skills that I've had the chance to develop along the way. I had planned for this to be my last project prior to starting back at university (again!) but naturally the situation has since changed and I should be able to get away with commuting. The next project might just be a certain venerable workhorse that had (until recently) served with distinction as part of the British Airways fleet... Thank you so much for following along, and dropping by to have a look. See you on the next one! All the best, Sam
- 20 replies
-
- 43
-
-

-
B-17 Engines & Turbochargers (MDR4854 & MDR4857 for Revell/Monogram) 1:48 Metallic Details The old Monogram tooled B-17 in 1:48 is an ageing kit that will benefit from extra attention in the detail department, with Metallic Details of Ukraine having created a very worthy offering in the engine department. Available as two separate sets to allow you to decide which aspects of the engines you’re most interested in if there are budget cxonstraints, you can buy an engine set and a separate set for the Turbochargers, which are very prominent on the bottoms of the nacelles. As they’re related, let’s have a look at them both. B-17 Engines (MDR4854) Arriving in a large(ish) card box with a label printed with a picture of the finished set on top, the interior is completely stuffed with resin and Photo-Etch (PE), all safely cocooned in individual resealable bags. If you read our review of the R1280 engine before this, you’ll recognise many of the parts, which are provided in multiples of four for each of the engines. There are eighteen large resin parts plus two bags of tiny parts that are too small and too numerous for me to count without removing my socks - ok, there's 103 of them with a few spares for good measure. There are also five small sheets of PE in a fine gauge to assist with ease of bending as well as realistic thickness. Construction begins with adding small arrow-shaped brass inserts that fit between the cylinders, then adding the intake piping to the centre, aligning each tube to the right of the head. Small parts and harnesses are fitted to the outer surface of the cylinder banks, then the push-rods and wiring harnesses in resin and PE respectively are glued in place to complete construction. With the cylinder blocks completed, the fronts of the kit engine nacelles are replaced with the new highly detailed units that have the exhaust collector ring moulded in, and for the inboard engines the extension that takes the exhaust gases back past the gear bays is also included with two of them supplied. The outer engines have their collector rings attached directly to the turbosuperchargers, so they attach directly to the outlet. With all the engines attached to the square lugs in the centre of the collector rings, the cowlings are fitted with the two curved sets of cooling flaps that operate when the engine temperature rises. There is a small ledge around the cut-out to give a good strong joint, while the PE flaps give a more in-scale appearance from the rear, allowing a peek into the superb detail of the engines. All of this sumptuous detail will require painting as it is assembled, and there aren’t any painting guides provided in the set, but there are ample resources online should you need them. It’s an incredibly well-detailed set of engines for the Monogram kit, and if you are serious about your detail, these are just perfect. B-17 Turbochargers (MDR4857) Strictly speaking they’re turbosuperchargers, and they’re quite simply moulded in the kit. This set provides four replacements of twelve parts in a small box, with four cut-out shells into which the mechanism fits, requiring a little kit surgery. The two inboard units have handed recesses that are marked L and R for your ease, while the outboard units are set centrally in the underside of the nacelles, so are identical and symmetrical. The units themselves are also provided with two marked L and R, plus another two identical units with long trunking for the outer engines. All of the central sections are individual parts that slot into the recessed centres for improved detail and easier casting. Again, the detail is exemplary and with a little care the set can be integrated into the model improving its immensely. Coupled with the engines themselves, they will be a knock-out! Conclusion These sets are exquisitely detailed and use the latest 3D printing techniques to create the masters and provide us with such crisp parts that were almost impossible 10-15 years ago. The kit will need a little fettling to accept the new parts, but anyone with some previous experience of using resin parts in their models and a soupçon of common sense shouldn’t struggle unduly. Extremely highly recommended. Review sample courtesy of
-
?'ve just bought the Academy C-97A in 1/72. I was wondering in is possible to convert it in a Civil B-377 thanks
-
Airfix Boeing 707 1/144 26 Decals - Air Mauritius I've got three of the ancient Airfix 707's in the stash, but what to do with them? They are the Conway engined -436 version not used by very many airlines. Browsing the 26 Decals website I came across this laser decal sheet which really appealed to me. It covers two ex- British Airways 707's, G-APFD and G-ARWD. I chose G-ARWD, originally delivered to British Eagle and sister ship to the ill fated G-ARWE. The kit originates from 1963 and has a number of areas for improvement. In no particular order: The nose is way too narrow, I shimmed it by about 5mm to fatten it, and fitted a Daco clear cockpit section. I've been using these on Airfix Airliners, and done several 737s and a 727 with them. The 707 can now be added to that list. The talfin is too short, I raised it by about 10mm The engines are horrible. I widened the intakes (which made a huge improvement) and sanded them to a better shape. All raised panel lines sanded off an rescribed I made one or two other improvements, but this has been lurking on my work bench for about a year, as I worked on it slowly, It always seemed to need filling or sanding, so was never the favourite when I got a bit of bench time! Anyway, I got there in the end it is now finished. I'm not in any hurry to start the other two just yet. With something else, its' rival the DC-8, also using 26 Decals. Thanks for looking. John
- 19 replies
-
- 46
-
-
-
Looks like there's a 1/72nd Boeing B-747-100 kit in design from ukrainian source - First 3D renders Sources: http://www.greenmats.club/forums/topic/5549-172-boeing-747-100 https://www.facebook.com/groups/greenmats/permalink/2251118168281046/ V.P.
-
 Hello all, Been some time since my last 727 model, but having passed my coach driving test I've been rather busy! But having been recently furloughed I've had some time to finish my Zvezda 737-800 I started some time ago, complete with 26 Decals Caribbean Airlines decals for 9Y-TAB. One of my favourite builds, and my first Zvezda build though a bit more fiddly than I thought, some over engineered bit's (the TINY bit needed to go on the wingtip for example could have been part of the mould, I ended up loosing that part so had to use a plasticard replacement) For the flying option I went for to use the stand, putting the main wheels in the body wasn't easy, nor was putting the front doors for the front wheel easy either, and the idea of having just two very tiny holes to hold the horizontal stabilizers isn't great, especially when a decal goes over it as well, so having to be careful with glue with not much of a fitting. So a fiddly kit but really does pay off in the end, happy with this and looking forward to my Minicraft build next, thanks for looking! James.
 -
Hi everyone, long time no see. Somehow I'm back into assembling kits, due to a lockdown, of course. So, this time it is the Zvezda's triple seven, arguably their best kit in the Emirates livery by the Pas-decals (Actually three sets of decals because kit decal is way too poor). Well, the build was relatively straight and easy. Some known flaws that I'm still not capable to fix (droop wings for instance). Quite a few mistakes of mine.. All in all I've learned a lot from this build and quite happy with the result. Cheers, Steve
- 13 replies
-
- 23
-
-
B-17 Wheels (648529 for HKM) 1:48 Eduard Brassin HK Models have broken away from their own de facto scale and used the data they collected for their 1:32 B-17 kit to create a new tooling in 1:48. That’s got my vote, as that’s my scale. Eduard have this nice set of resin wheels to replace the injection moulded parts on the kit, with masks into the bargain. As is now usual with Eduard's smaller resin sets, they arrive in the new shallow Brassin cardboard box, with the resin parts safely cocooned in bags, and the instructions folded around acting as padding. Inside the box are three resin wheels plus four additional hub parts and a set of pre-cut kabuki masks for them all (not pictured). Construction is simplicity itself and will take a few moments once you have removed them from their casting blocks with a razor saw or motor tool. The wheels have diamond tread and a very slight weighting to them where they attach to the casting block, and they are joined by the two hub parts in the centre, the inner one having a keyed socket for the axle to pass into. At the rear the small tail wheel is a drop-fit replacement, and masks are included for all hubs to give a perfect paint demarcation between hub and tyre. A scrap diagram shows how the wheel should look when installed and placed on the ground. Review sample courtesy of
-
Big Planes Kits (BPK) is to release in late 2020 a 1/144th Boeing B-757-200 kit - ref. 144xx 1/72nd kit should follow in the twenties. Source: http://bigplaneskits.com/757-200-1-144/ V.P.
- 11 replies
-
- 7
-
-
-
- Boeing
- Big Planes Kits
- (and 1 more)
-
Hi all! Is it possible to convert the Airfix 1/72 UH-46 Sea Knight into a Boeing V 107-II-2? What would the external differences be? And does anyone know if there are New York Airways decals for this aircraft? THA for any replies! DennisTheBear
-
After the B-737-200 (link), Big Plane Kits (BPK) is to release a 1/72nd Boeing B-737-100 kit - ref. 7201 Sources: http://bigplaneskits.com/shop/uncategorized/737-100-7201/ https://www.facebook.com/BigPlanesKits/photos/a.1510613519216386/2565169030427491/ http://bigplaneskits.com/737-100-1-72-color-schemes/ Box art V.P.
-
 This is my 1/72 Northrop Grumman E-8C Joint STARS build using the Heller E-3 Sentry kit and the Flightpath (David Parkins) E-8 conversion. May of 2018 I build the Heller kit as an E-3 and my opinion of the kit has not improved; very poor fit and finish almost as bad as Mach 2. But the decals were excellent. The Flightpath conversion contains a resin canoe,etched metal antennas and templates for the added doors and windows, and some white metal parts. No decals are included. The instruction are OK, but they make no mentions about marking so I used this picture from Wikipedia as my guide I had used the Flightpath TF-33 engines on the E-3, but based on this picture the housing shape is different and more closely resemble the kit parts so I decided to use them. You will notice from the picture that all 4 engines have a hood on top of them that goes from the front of the pylon to the front of the engine. I got half way through the build when I discovered that the Heller kit had that hood on only 3 of the engines but not the left outboard one . I am told that is correct for the KC-135 and maybe some E-3s, but not the E-8, at least not this one. I was a bit of a loose how to fix this and went on Ebay to see if I could get another kit for cheap to use one of the engines when miraculously I found someone in the UK selling just the engine sprue from the kit. So I bought that immediately. Unfortunately it had to be shipped from the UK to the US so while I was waiting I built the Monogram F-16XL kit. Once the new sprue came work proceeded fairly quickly. Wolfpak made a decal sheet (72-077) that included E-8 markings but unfortunately I did not have the foresight to buy it when it was available and it is now out of production. Fortunately the markings for the E-3 and E-8 are mostly the same so I was able to use the kit ones and only had to cobble together the tail markings from bit and pieces from other sheets. I rushed the final completion so I could get it finished in time to bring it to my local club's meeting tonight. That worked out and it won the monthly contest 🏆. So here are the pictures. And here it is in its new home. It is pretty big and takes up a whole shelf to itself Next up is the Hasegawa F-G Wild Weasel. Enjoy.
- 17 replies
-
- 43
-
-
-
Hi, Hasegawa calls out Mr. Color 315 as the aircraft gray for A320 and 737-700. However I've noticed on few forum posts people recommend using 338 for Boeing. So I've got both colors and the colors look quite similar except 315 is a bit warm. What are your thoughts on which color should be used for gray? Due to work schedule I wouldn't be able to get to the airport in a day time for a week 😢 so can't compare to the real thing. Do both manufacturers use the same color or one could be a better much for Airbus and another for Boeing? Is it the same color that is used on USAF RC-135 Rivet Joint? Thanks!