Search the Community
Showing results for tags 'battlestar galactica'.
Found 20 results
-
 Colonial Viper Mk.II & Mk.VII Updates (for Moebius/Revell) 1:32 GreenStrawberry It’s quite a while since the revitalised and re-imagined Battlestar Galactica (BSG) hit our screens, running from 2004 to 2009 through five series and a spin-off covering some of the exploits of the Pegasus, as well as a short-lived prequel series about the events leading up to the Cylons’ devastating attack on the colonies. Galactica’s flee from the Cylon onslaught was covered by the mighty Viper fighters and their brave pilots, initially the Mk.II was drawn out of retirement through necessity, but later joined by a small quantity of Mk.VIIs that had been separated from the communications network that had been their downfall during the fall of the 12 Colonies. With the network gone, the Cylons couldn’t easily infiltrate and disable them, so they could be used again. These new sets from GreenStrawberry are designed with the Moebius kits in mind, their own reboxings as well as their reboxing by Revell some years later. They’re nice kits, but will benefit from upgrades either from the existing GreenStrawberry sets, or some of these new ones that add a little diorama possibility into the mix, by adding standing crew and some hangar details that could embellish a hangar scenario. You can pick and choose from those available to suit your needs, and all but the Photo-Etch (PE) gear bay set arrive in small boxes, with the resin and PE components in heat-sealed bags, the PE in Ziploc bags, and folded instructions adding extra protection to the parts. Colonial Pilot (132009-1/32) This set turns up in a small box, with ten parts in grey resin, and another two in clear resin. The figure is moulded with legs, torso, arms and head as separate parts, and offers choices for the pilot’s head and helmet. You can use the bare head and have the empty helmet in his hands, or you can substitute the helmeted head, although you’ll need to be careful when painting the face through the visor aperture. There are two clear resin visors included, and you should be able to polish them to a clear gloss if you don't mess up the face painting. Additional parts include the pilot’s pistol on his hip, two larger pouches on his belt at his back and another smaller one at the front. The final resin part is a circular base with deck plating and grating moulded in so that you can pose him separately without creating a full diorama base. The spare heads might also come in handy if your boxing has a resin figure with a solid visor, which is a nice bonus if you’re not afraid of a little light decapitation at your workbench. You’ll need to check your references for painting your model, as the instructions deal solely with the construction of the figure. It’s a good excuse to re-watch the show though, which is nice. Colonial Viper Mk.VII Seat (10020-1/32 for Moebius) The set arrives in a small box like the pilot’s, and contains a complete replacement for the kit’s horribly simple seat in resin, having very naturalistic cloth effect for the cushions that look like they’ve seen some butts. The seat is a single resin part, and is accompanied by a good-sized PE sheet, which contains a seat-base with inserts to represent the bolts holding it down. It also includes a full set of well-detailed five-point seatbelts that have highly realistic furniture, and even have extra parts that represent the attachment points of the belts on the base of the seat. With sympathetic painting and some care, they should look very realistic. Colonial Hangar Equipment Vol.1 (11820-1/32 for Moebius) This set arrives in a larger box, and is a boon to anyone wishing to depict their Viper or Raptor models from Moebius/Revell, which are all scaled to 1:32. The set is mixed resin and PE, and contains seven resin parts, plus two sheets of PE. From these you can make up a step-platform, an access ladder, and you also have two drums to dot around the hangar. The platform is made entirely from PE, which folds up to create a three-step platform that would be useful for a maintenance situation. The access ladder consists of a resin base, into which the two tubular frames slot, after having the moulding flash removed between the tubing. Then a number of tread-plated steps are made up and attached across the small diagonal rungs running up the frames, with a larger standing platform at the top, plus another small step. Finally, a stiffening strip is attached under the top step, with a tube surrounding it thanks to a slot in one side, and a choice of widths to allow a better fit. The two drums are each single parts, and just need their casting blocks removed, then any clean-up that may be required before painting them a suitable colour. Colonial Viper Mk.II Wheel Bay (10720-1/32 for Moebius) The Mk. II is a product of an earlier level of technology in the BSG universe, resembling the original series’ Vipers very closely. They were about to be part of the museum that Galactica was to become when the Cylons attacked, so they were brought back to fighting condition for the next five series of combat. This set suffers from an initial misnomer, as none of the Vipers have wheels, but ignoring that there’s detail in abundance on show with this set. It arrives in the dark-themed flat-pack we’ve come to know and love, and contains two sheets of brass PE, one large, the other slightly smaller. The first task is to remove a lower portion of the rear-upper fuselage to make space for the bays, plus another bay cut out of the underside of the fuselage, centring on the cut-out beneath the nose gear aperture that is laid over it later. The nose gear leg itself is relieved of its tab, then the nose bay is folded up from a single part that has extra layers added behind to give it some depth. Once this is glued within the bay, the cut-out you made earlier can be checked and adjusted if necessary. The nose gear leg has its base extended by a box of PE that is detailed with side panels to obtain the correct height of the new bay. The main bays on the kit are merely holes in the underside of the fuselage, into which the gear legs are glued. All this is remedied by firstly adding detail skins around the base of the legs that are just inside the aperture with a set of parts to hide the bland plastic, then a single double-width bay roof is folded up from the large parts on the smaller fret. There are a lot of small folds required, so make sure you have your PE pliers handy, as the results will be impressive and worth the effort. The bay is inserted into the lower fuselage, and two bulkheads are attached at the ends after being detailed with extra parts, using a folded lip to give the structure more strength. New bay doors are then laminated up and have separate hinges added before they are glued into position to each side of the three bays. Conclusion The BSG ships are still pretty iconic and good-looking ships that have only been kitted in styrene by Moebius in 1:32 and 1:72, and while they’re great in outline, their interiors and bays are lacking by modern standards. This range of sets from those good people from GreenStrawberry gives the modeller a serious choice of excellent detail upgrades. Choose from any of these sets, or the ones we’ve reviewed previously, such as the nozzles for the Viper Mk.II, FruitPACK detail set for the Viper Mk.VII, and for the other Moebius kit of the Raptor, all of which are a huge boost to the details. So say we all. Very highly recommended. Review sample courtesy of
 -
 Arrr mmmm wellll…… I hadn’t planned this but I couldn’t help myself, the Mk.II arrived yesterday and after looking at I figured why not! So here’s build #4 and I know I’m going to regret starting this one as I have way too much on as it is, but with my work being what it is at the moment I have extra time. All wrapped up and waiting to go…. …and to prove I have a very unhealthy obsession with AM stuff, some AM stuff! The nozzles are actually quite nicely detailed, I wished they done the same for the Mk.VII, it’s a pain the mod work required with them. ..and of course the PE! With these and the Hind I’m playing with over 20 sheets of PE….it’s going to do my head and eyes in! The moulds for this were done in 2010 and this moulding (like the Mk.VII) was done in 2014, I know this as it’s printed inside the wing of both models, that wee black writing. Anyway, my complaint with all Chinese produced models is that the models wear out really quickly as can be seen by the flash here. My Hind was done in 2004, not quite as bad but still has a lot of flash and poor moulding! Anyway, moving on…. I get to keep the cockpit tub with this one, just add PE, there are a couple of annoying sink holes on the sidewalls. I’ve chopped the old nozzles off. The plastic is REALL soft, fells almost like those old vinyl plastic models Airfix and others use to produce. Wings and tail went together without issues, least with these I don’t have to worry about thick leading and trailing edges! Undercarriage is together, the poor moulding really showed on these, lots of cleaning up was required and they were a bit warped. There’s some PE to go on the main gear. I now get to play with 2 Starbucks ………he drifts off into his own little fantasy world……. Unfortunately, that tart Captain Scarlet has shown up hoping for a Starbuck sandwich! I planned this as Viper weekend so should be able to get a lot done if not distracted…….. ……..oh Starbuck?
- 2 replies
-
- 4
-

-
- Mobius
- Viper Mk.II
- (and 1 more)
-
…..and she’s mighty well wee weed off about it too! Ok build #2. I’ve had this model for ages, Black Sun’s 1/72nd resin Viper Mk.VII. I think I bought it not long after I built the Caprica Viper for a SciFi GB some years ago. This is a beautiful little resin model which is now a little harder to get and quite expensive!!! The detailing and moulding is superb, so it’s should pretty much fall together. It comes with a comprehensive set of instruction which will be helpful for both models. She’ll be a nice addition to go with the Caprica Viper.
-
Colonial Viper Mk.VII (FP06 for Moebius) 1:32 GreenStrawberry Battlestar Galactica was a firm favourite with kids in the 80s, and its reimagining in the early 2000s brought a whole new generation of fans into the mix, as well as some complex, exciting stories and a different organic Cylon than the shiny metal clankers we had become used to. The ships also received a make-over, although the Colonial Viper still showed its Aaron Spelling produced origins, retaining the same overall shape for the older Marks, and for the later Mk.VII a sleek, streamlined hull that still bore a family resemblance to the original. Its fatal flaw was its software that let the Cylons disable them when the time came for their invasion and attempted genocide of the colonies. Those that survived the initial onslaught were stripped of the virus that had disabled them, and were later increased in numbers after the Galactica encountered the Battlestar Pegasus, which had manufacturing capabilities that the older Galactica didn't possess. This FruitPACK allows the modeller to purchase the two Photo-Etch (PE) sets available for the 1:32 Moebius model of this sleek fighter, which includes both the Wheel Bay & Nozzles set (01215-1/32) and the Cockpit & Exterior set (01015-1/32) in one thick card envelope printed in the usual dark theme of all their boxes. Once the tape has been cut from the tongue, the resealable envelope divulges the two sets that are themselves wrapped in their individual foil packages in which they are sold separately. Cockpit & Exterior set (01015-1/32) This set consists of a single large fret of PE, a sheet of stickers for the instruments, a sheet of acetate with printed instrument for a lit model, and the instruction booklet. This is a complete replacement for almost the entire cockpit, and construction begins with the side consoles using your choice of stickers or acetate, with the completed sub-assemblies attached to the larger parts for later insertion into the new cockpit. The cockpit floor is next with foot plates and rudder pedals added before it too is put to one side. The seatbelts are a complex affair and have separate buckles that are fitted pretty much like the real thing and have the same four belts as a modern fighter pilot would have plus an extra central strap between the pilot's legs - probably to discourage hard deceleration! The cockpit tub is folded up from a large part with a few of the instrument screens added to the sides, and the consoles slipped in from the top. Here a number of small L-shaped parts can be used to assist in the strengthening of joins if you feel you need them, as attaching edges of PE is often tricky with small contact areas. The kit seat has its lower sides reduced in thickness to accommodate the new seatbelts and is then set aside while the instructions go off and detail the three fin-mounted guns, make up some very nice RBF tags printed double-sided in red, then add a launch hook to the front gear leg. The instrument panel is a complex affair with three main segments, all of which have large detailed screens that are represented by stickers or acetate again. There is also an angled keyboard at the front of the panel, which also has stickers or acetate, and folds around to give the impression of a three-dimensional part. The completed panel is inserted into the cockpit tub after the floor, completing the majority of the internal work. If you plan to pose the cockpit open with the canopy raised you will need to remove a small area behind the cockpit that is marked in red and apply a small PE insert to the hinge-point before making and installing the canopy. The kit's clear canopy is augmented by a panel that wraps around the rear and incorporates the new hinge as well as some internal details and rams that hold it open. These are left off the closed cockpit, which must have a tiny fillet removed around the sides to fit in the aperture after the alterations. The cockpit tub is inserted from below into the upper fuselage, and the final few parts are vents for the nose intake and the ancillary intake in front of the nose gear bay. Wheel Bay & Nozzles set (01215-1/32) The kit wheel bays have a little detail in the roof but are lacking around the walls, which is part of the main reason for this set. The simple kit bay doors are first relieved of their clunky hinges, then skinned inside with layered PE parts and more realistic hinges. The bays themselves have sidewall detail added and the nose gear bay also gets a roof insert that takes the detail up a level. The boxes in the rear bays are joined by additional wiring harnesses, then the bay doors are joined at the edges, having location points etched into the new sides. The three engine nozzles are hexagonal and have rough detail moulded inside them, which must first be removed to provide a good mating surface for the new parts that are folded up and fitted with a perforated backplate to facilitate lighting. The engines are each closed up around this new assembly, noting that the top engine has a smaller diameter than the bottom two and has a thin detail strip added at the front. Once glued together, small vanes are added to the very tip of each nozzle to give the impression of some kind of steering ability. Conclusion Yet another cracking set from GreenStrawberry, improving a kit that just lacks a little for those that like their detail sharp and adding a discount over buying them separately. Add this to your Viper and you'll stand out from the crowd. Very highly recommended. Review sample courtesy of
-
I'd like to introduce my Galactica. Moebius, Paragrafix PE's, a few Shapeways parts, a lot of scratch, additional Greeblies and lights. Normally I build historical ship models out of materials like pear, boxwood or something like that 😛 but SciFy was always my 2nd passion and so I took a break from wood and learned to work a little plastic. The Galactica is my first "real" plastic model and my first airbrush, fiberglass, decals, etched parts experience. Thanks for watching, Dirk
- 3 replies
-
- 16
-
-

-
- Battlestar Galactica
- Moebius
- (and 1 more)
-
 ...Nothing but the rain! May I present one Viper Mk.II from the re-imagined Battlestar Galactica universe, but then you all knew that anyway! This is the Revell boxed Mobius kit which I decided I would light with LEDs. This model has been a first for a number of reasons; first 1/32 scale model, first to be lit and first to have a 'proper' base. I purchased the Green Strawberry detailing kit for the cockpit and extra detail, and painted with the usual mix of Humbrol primer and Tamiya acrylics, weathering with sanding sticks, oil paints and washes. The model was an absolute pig to put together with a really clunky design and several millimeter gaps in some places but it went together in the end and most of the shoddiness is hidden. The idea for the base came from Plasmo modelling, I can't take credit for that. I'm pleased with her overall, but if I were to do it again, I'd try and light the nav lights and look for some accurate tail numbers, as the one's provided with the kit does not appear to match any 'birds' Starbuck flew. Hope you enjoy! JB
- 18 replies
-
- 44
-
-
- Battlestar Galactica
- Viper
- (and 1 more)
-
 Hey everyone. This is only my third model kit as an adult. The first two were a TIE interceptor and TIE fighter. I started this build about a year ago, worked on it for a while and then put it aside as a series of cascading life problems overwhelmed my time. I finally picked this back up about two months ago and have been slowly working my way toward the finish line. I am not a fast builder by any means. The pilot is now not going to be used. The photo etch probably won't be seen very well either. Photo etch landing bays will be largely hidden now that I've decided to mount this to a custom landing pad. Original cockpit seat with photo etch belts. I decided I hated this seat and redid it. More below. Some 3D printed parts I'm going to use to liven up the landing pad. Painted, weathered, and with some decals. This is going to be an open pit in the landing bay. Build from sheet styrene, with some TIE fighter base connectors, a guitar string, some solder, a small metal tube, and a few pieces of rube styrene as details. The new cockpit seat compared to the old one. I'm much happier. Took a lot of sanding and filing on the bottom to make it fit. I did reuse the photo etch belts. In the cockpit. Landing pad started. This is just a FOR SALE sign from a hardware store. Weathered and with a cool white SMD in place in the pit. The black base is a $12 picture frame with some foam board beneath the for sale sign for strength. Lighting test of the cockpit. If you compare this to the earlier unlit cockpit you'll see I swapped out the main view screen image. The first one just looks too much like Eric Cartman -- it's all I could see. So I cut that out and used a different one.
 -
Colonial Viper Mk.II (04818-1/72 for Moebius) 1:72 GreenStrawberry I reviewed the GreenStrawberry set for the 1:32 Moebius Viper II a wee while back here, and now here comes one for the smaller 1:72 kit, again from Moebius. It's a different tack for obvious reasons, but as usual with GreenStrawberry Photo-Etch (PE) and Mask sets, it arrives in a flat resealable package, with a black-themed backing card protecting the contents and the instructions that are sandwiched between, showing off the contents at the front. The set concentrates heavily on the cockpit, with many of the parts devoted to bring the level of detail there up to the highest standard, and opening up the possibility of back-lighting the instrument panels, which are completely overhauled with new laminated panels (of early & late types), coaming, side consoles and even a pedal box in the footwell. A sheet of acetate prints are supplied for the screens in the panels, and a set of crew belts finish off the revamp. Moving outside, the exhausts are detailed with cog-like inserts and additional parts between the nozzles, including wirings for the nacelles. A new intake grille is supplied for the nose, and small detail parts are applied to the fuselage sides and behind pilot's head, with additional canopy frame details added to the exterior of the clear part. On the nose gear leg an additional skin and launch hook is fitted, and new set of gear bay doors are supplied all round, which have much better scale fidelity. As a nice bonus, a number of PE rings are included that can be used in conjunction with the colour printed red "remove before flight" tags that are cut from the paper sheet and placed around the airframe for a more convincing and technical look to the space-frame. Running a red pen around the cut edges will hide the white of the paper and improve the look. Conclusion A really nice upgrade to a pretty small model that will bring it to the next level, and as you may have noticed from the pictures, it will suffice to detail two of these kits, so you only need one set per box, as there's two kits in each one (just in case you hadn't noticed!). Review sample courtesy of
-
Colonial Raptor Interior Set (04217-1/32 for Moebius) 1:32 GreenStrawberry The reboot of Battlestar Galactica in the noughgties gave us a collection of new Colonial and Cylon ships to lust after, and those kind folks over the ocean at Moebius soon acquired the rights to make models of the ships, with the Vipers and Raiders being accompanied by the Galactica and Pegasus, to name but a few. The smaller ships have been made in a consistent 1:32 scale, which has been a boon to us modellers. It has taken quite a few years for the Colonial Raptor to be kitted, and we have watched the saga unfold on Moebius' Facebook page and the forums until its recent release along with its separate weapons set, which has pleased many, including myself. The Raptor is the Colonial gunship and troop carrier, capable of fielding an arsenal of weapons as well as travelling long distance without an accompanying Battlestar. Moebius's kit was well received, but like most models it can be improved upon, and GreenStrawberry's designers must have been working from the moment the kit was released to come up with this comprehensive interior set. It arrives in standard GS packaging, with a central piece of hefty cardboard wrapped in a header card and a large Photo-Etch PE brass fret at the front, with two more separated by pieces of black paper to prevent chaffing. Inside are the instructions that gives you all the information you need to update your kit, plus a piece of acetate sheet printed with instruments, and a piece of thin paper that has the screen and instrument dials printed on it. The Raptor is well-appointed with sensors, with buttons, switches and large screens everywhere that are visible through both the fishbowl canopy and the large side door where the crew move in and out. Consequently, the sheets with the screens and such are quite large, and will make the displays come alive once installed. Construction begins with an upgrade to the pilot and co-pilot seats, which receive new side panels and a full set of crew belts that work just like the real things, with buckles that the belts feed through, so anneal the parts to save yourself some hassle when bending them. The flight crew consoles are next, with a trio of large displays and two addition screens mounted on arms over the main panel, all of which have card or acetate inserts to give them life. The side consoles are given the same treatment, and small areas of the cockpit must be stripped of detail to facilitate this. The centre console is shortened and a set of tread-plate skins are added to the floor of both the cockpit and the rear crew area, while a pair of rudder pedals are installed for the flight crew under their new consoles. The bulkheads between the cockpit and rear are skinned with new detail panels, with jump-seats added, and some minor changes to the shape of the bulkheads achieved in the process. Opposite the crew access there is a large console wall that an operator sits at for tactical, sensor and weapons work, which is strewn with screens. The kit parts must first be pared away before the new installation can be inserted after layering PE and acetate or paper screens, taking up a substantial part of the interior in the process. More screens are provided to the left, and the keyboard-centred instrument panel for the rear crew is built up and inserted later in the build once the rear bulkhead is first reduced and then rebuilt with more detail and a serious face-lift, which includes new instruments and another jump-seat, with an angled panel between the rear and side walls. The right bulkhead between the cockpit crew and the rear is then fabricated and installed between the two areas, which both sides having a loose "grapple net" hanging down. Finally, a set of roof parts are added to give more detail to that area. Conclusion When you look at the instructions it's not surprising that there are three large sheets of PE in the packet, as almost every area is treated to a highly detailed and comprehensive upgrade. Check your references for the colour scheme (any excuse to watch it again), and a superbly detailed interior can be constructed. Extremely highly recommended. Review sample courtesy of
-
Colonial Viper Mk.II (00917-1/32 for Moebius Kit) 1:32 GreenStrawberry Those industrious folks at GreenStrawberry just keep on bringing out new sets for all our favourite Sci-Fi models, and long may that continue! This time it's the Moebius Viper Mk.II from the re-imagined Battlestar Galactica, which is sometimes reboxed under the Revell brand, so if you have that kit, these will fit. A small but tough card box protects the contents, and inside the resin exhausts are bagged separately from the accompanying Photo-Etch (PE) sheet, with the instructions folded to keep everything stable in transit. You have to do a little surgery to the kit parts before you begin, starting with removing the kit engine bells from the endcap of the fuselage, plus the cowling flanges that this part would otherwise fit to, none of which should tax your average modeller. Construction of the three exhausts are functionally identical, but the top exhaust is slightly smaller, so has different part numbers. The aft of the exhaust is sanded flat to remove the flash over its end, and three layers of PE are inserted from the rear, stopping at the correct point inside the nozzle. Optionally you can install the bullets in the centre of the rearmost piece of PE, with the smaller top engine having a different part number and size. Casting is good, with just a few bubbles around the exhaust that should be pretty easy to remedy with some lengths of styrene rod super-glued in place and sanded flush. Once painted and maybe even lit with LEDs, they should vastly improve the look of the rear of the kit. Review sample courtesy of
-
Hello! Here is my 1/32 Colonial Viper Mk.II upgraded to a "What if?" Viper MK.II in Battlestar Pegasus markings.
- 13 replies
-
- 13
-
-
- Battlestar Galactica
- Battlestar Pegasus
- (and 1 more)
-
 Hi Guys, just thought I'd post a few pics and link to the rest on my FB page of my most recent build which has some WIP of this and my other recent builds! This one was built by kit bashing two Revell Galactica kit, but there are enough parts left over to build some more kit bashes!... Anyway enough talking! Thanks and enjoy! https://www.facebook.com/chriscardwellmodels/?fref=ts
 -
At long last I am calling this one done, my scratch built Colonial Fleet Shipyard from BSG. I'll not show all the pics here... im too lazy to copy and paste them all over...so i'll just show a few and give a link to the photobucket album!! Thanks! http://s181.photobucket.com/user/chris1984_99_99/library/Colonial%20Fleet%20Shipyard
- 5 replies
-
- 5
-
-
- bsg
- battlestar galactica
- (and 2 more)
-
Hmm. I've been umm-ing and aah-ing about this one for a while now, so thought I'd stick it on here to see if anybody had any views on it. I've not gone with the kit instructions on this one (evidently) as far as the colour scheme goes, trying my old layered drybrushing / washes rigmarole to see if I could get close to the look of the cgi, but I have a sneaking feeling it looks a bit like a refugee from the Star Wars universe – not a bad thing in itself, but woefully un-canon! True, the camera flash has made it look lighter and whiter than it is in real life, but I think it still might be a tad pale. I'm toying with the idea of giving it another coat of silvery-tinted varnish. Good idea? Bad idea? I've left the front probulon thingy off as at some point the model's going to go in the post, and that'll go for a burton for certain. Other than that, oob, (Revell boxing) and had great fun building it, despite the obvious bloopers (Don't look too closely at the alignment of the sidepod interior decals, inter alia) Thanks for looking, dave.
-
Hi guys, this was a bit of an experiment ive been wanting to do for some time. Below is a screen grab from the Battlestar Galactica Mini Series, it shows a Battlestar similar to the Galactica hit and adrift, and it gave me an idea. I thought to myself, hmmmmm ...so, rather than posting all the photos, here is the end product, and a link to the folder with all the WIP photos for your viewing pleasure. http://s181.photobucket.com/user/chris1984_99_99/library/Battlestar%20Titanic?sort=3&page=4 I still need to get a base made for it, but I think im finished with the kit itself. Its my first time doing an explosion this way, so any words of advice or how to improve would greatly be appreciated! Thanks! Enjoy!
- 20 replies
-
- 13
-
-
- battlestar
- galactica
- (and 8 more)
-
All finished my Revell NuBSG Centurian. He stands about 14inches tall. The main skeleton in Humbrol enamel Metal Cote steel and the armour is Halfords Chrome rattle can. Lots of other metalics on the weapons, waist, tupeing in the neck etc. Very pleased with how this bad boy turned out and highly recommend the kit. Its amazing what you see in a photo that you dont see when its sitting in front of you! Spotted some small bits of cleanup to be done, but nothing major. thanks for watching and commenting guys, Sean
-
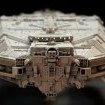
This interpretation of the Battlestar Galacticas sistership has been built by Panzer Vor!!, AKA Dave.
-
Just saw this today online, apparently theyre going to make a new Battlestar Galactica film. Im excited but also apprehensive! The reboot series was and is one of the best tv shows I have ever seen. Tough act to follow! http://www.theverge.com/2014/4/7/5591894/new-battlestar-galactica-movie-will-be-a-reboot
-
Well thats another finished, I think! Maybe just 1 or 2 more things to add to it at a later date, but thats it 99% complete! Had a bit of an issue with the varnish effecting the decals, as in it started to melt them for some reason, didnt have that problem with the previous kit, but I managed to salvage it just!
- 4 replies
-
- 1
-
-
- battlestar galactica
- viper
- (and 4 more)
-
I built a MkII Viper a few months ago and a friend ended up buying it, so I couldnt do without one myself as I think they are among the best looking fighters in Science Fiction, so ive ended up building another. I recently completed the MkVII version in under a day to set myself a challange to see if I could do it, this time however, that was not possible, there is simply too much work involved in the MkII. So instead its taken a leisurely 2 days to complete minus weathering which I shall do later today! More pics to follow!
- 2 replies
-
- 1
-
-
- battlestar Galactica
- viper
- (and 5 more)