Search the Community
Showing results for tags 'airliner'.
-
This doesn't need much introduction, Its the Tu-144 'Concordski'. I love the look of this aeroplane, elegant yet brutal at the same time. The ICM kit is very nice, fit is excellent and it has very finely engraved panel lines all over. Tips for anyone buliding this kit - follow the instructions! Fit undercarriage parts D22 and D23 during engine pod construction, as shown on the amendment sheet. You'll struggle to get them in later. I think the instructions have misnumbered intake trunking parts D1 and D12. Swap them over and check the fit to the wing. The decals are prone to splitting. They are fine if you put them on and don't move them around too much. Note that you put on a section of cheat line, then a door, then another section of cheatline, then a door etc. I didn't realise this and put the first two cheatlines on, butted up together. The I realised my error and moving them apart I had problems with them splitting, but was able to rescue it. Got to build a Concorde now to go with it! Thanks for looking John
- 29 replies
-
- 16
-

-
Hello guys. That´s my last for 2015, a 737-800w in a special Gol scheme, celebrating 10 years of the airline. Kit Revell, almost out of the box, except the winglets. Decal Gio Decals.
-
 1:144 Boeing 737-200 Busy Bee. Lima November decals. I saw this humourously liveried Boeing 737-200C parked on the ramp at Oslo Fornebu airport back in 1986, and thought 'I would like to make a model of that', so 30 years on, I have! I started with the old Airfix kit of 1969, and decided to see what improvements to could be made to it. These came down to: - Replace the cockpit glazing with the part provided in Daco's 737 kits. - Scratchbuild some interior detail for the cockpit - Open up the main and nosewheel bays, which are just shallow opening on the kit - Improve the engines. They are too short in the kit, and have the early 'skinny' pylons only applicable to the first 100 or so machines produced. - The passenger cabin windows are just little square shapes. I filed the all top and botton to open them up to oval shape. 2 were filled in and re-done further apart to allow for the cargo door. - This aircraft was equipped withe the 'Gravel kit' for operation off rough fields and gravel runways. Basically this is a large deflector plate fitted behind the nose wheels, and some pipes feeding compressed air forwards from the engine nacelles to blast any FOD away from the intakes. The nose plate stays horizontal all through the retraction cycle as the leg retracts forward, and ends up in its own housing grafted onto the lower nose. There is a great youtube of one landing and taking off on Youtube here Just look at all the crud kicked up! This is actually the second 737 that I have applied these mods too, the fiirst (in Air Europe livery) is complete but I have not posted it yet as I am making a diorama, and painting the little passengers walking out to it is taking ages! Some of the scratchbuilt parts Cockpit and crew painted up Nosebay on an unmodified kit, and the modified/scratched parts Noseleg additions. Done by eye from internet photos, as I could not find drawings Main gear bay. Just a blank on the standard kit, looks so much better opened up; Engines after accurising/improving. Lengthened with a section from a 1:48 bomb (covered with a band of white filler), and pylons fattened with plastic sheet & Milliput; And finally 'with something else' - the other 737 waiting to be finished. I did even more on this one, opening up the front & rear galleys, and luggage bay, and integral front airstairs. It also has all the mods I did on 'Busy Bee' apart from the gravel kit. Special thanks to Skodadriver Dave who very kindly sent me the Daco clear cockpit sections & the frame decals for them, and enabled this project to go ahead. Happy new year to all, and thanks for looking. John
- 21 replies
-
- 33
-
-

-
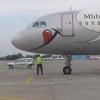
 Recently completed this one - my last civvie of the year. This is the Revell 1/144 A320 kit built oob except for using Classic-Airlines decals to depict Aer Lingus retro-jet EI-DVM, which I bought at SMW. I like this kit, though I still have to build one of the newer Zvezda examples, and the laser-printed decals went on really well, my only criticisms being that there is no decal placement guide, just a colour diagram from one aspect, and there are one or two things missing, most prominently the 'Airbus A320' script above the cheatline at the rear of the fuselage. Constructive critiques welcome
- 21 replies
-
- 24
-
-

Airfix Boeing 737-200 Brittania Build 1:144
Hamdhan777 posted a topic in Work in Progress - Aircraft
Hello, After my spitfire (http://www.britmodel...e-starter-mkia/) I'm going to do my second build ever, my first airliner ever. Quite excited for this one. I'll be making the Airfix 737-200 in Brittania Airways colours. As I'm a beginner I'd ask for all the help you guys can give me The unboxing of the kit is here: Tomorrow I'll glue the fuselage halves together and begin construction. I am planning to fill the windows with UHU and maybe cover it up with some Revell Plasto to make it solid (Thin layer of Plasto on the outside with UHU clear glue on the inside part of the windows to reinforce it). What do you guys think? I'll then slap on the window decals later. If anybody has any tips before I even start, please share your knowledge oh wise ones! Wish me luck! Hamdhan -
VC10 – Middle East Airlines 9G-ABP, Chartered from Ghana Airways, 1968 Airfix VC10 with modified and rescribed wings. The wings have the extended inboard leading edge of the Super VC10, with the drooped tip and vortex generators added. Commission build for a VC10 enthusiast. Decals specially printed by Nick Webb (classic-airlines.com).
- 30 replies
-
- 30
-
-
De Havilland Comet 1A G-ANAV – BOAC South African Airways Charter – 1953 FRsin (injected plastic) kit. A fairly rough kit but it turned out OK. The decals were excellent. Undercarriage was replaced because the kit items were too small. Finish is Halfords Appliance White on top with Halfords Nissan Silver below, coated with Rub N Buff, polished and sealed with Klear. Commission build for a Comet enthusiast.
- 18 replies
-
- 25
-
-
Douglas DC-8-62 1/144 Minicraft (converted), Lima November decals. After the VC-10, the next best looking airliner is the Douglas DC-8, and the best looking of those are the shorter fuselage versions. The Minicraft DC-8 series of kits are amongst the very best airliner kits you can get, they are beautifully moulded, accurate, and have flawless fit. It's a funny thing about the Minicraft range, all the Douglas aircraft are really good, and all the Boeing ones are... well, I don't buy them. This is the 'Hawiian Air' DC-8-63 boxing, with the fuselage cut down to convert it to the shorter -62. Very helpfully the kit has engraved cut lines inside the fuselage to show you where to cut. Other than that, the construction is pretty much straight out of the box. The wings and tailplanes are such a good fit I haven't even bothered to glue them in. They just fit nice and snug on their own. I've used multiple shades of Alclad on the metal areas, and Halfords appliance white on the fuselage top. The Lima November decals come in the Longboat scheme for the versions of the DC-8 that SAS used, the 55, 62, 63, and Freighters. A huge number of fleet names & reg's are provided, along with enough cheat line for the longest, that you may need to cut down for your chosen version. That's what came out of the fuselage fore and aft of the wing; And finally, the 'With something esle' shot. This time the Airfix Caravelle generously given to me when I couldn't find one, by that true gent, Martin Hale, and finished in 26 deacls SAS scheme. Thanks for looking, John [EDIT] 11/08/2014 Wow, thanks for all the kind comments folks, it is very much appreciated. I thought airliners were very much a minority interest Thanks, Gary I can do one of those. The DC-9 & decals are in the stash waiting its turn, and the Viscount is planned, but I have this one; And then it's predecessor, the DC-7C [/EDIT] Thanks again everyone.
- 41 replies
-
- 37
-
-
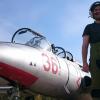
 I have been trying to complete a number of long standing builds and this has been on the back burner for quite a while. I finally completed it a couple of days ago. It's the S&M Models kit and I have used Two-Six decals. I hope that you like it, next up will be the Airfix MiG-15 which I will be working on between my MiG-21 builds for the STGB.
- 51 replies
-
- 12
-
-
 ...that next to the engines, that is! Hi chaps, I was just browsing through Pointerdog7's decal list and from doing a bit of on-line research I got to discover this picture: http://commons.wikimedia.org/wiki/File:Uganda_Airlines_Boeing_707_Groves-1.jpg Can anyone please tell me what that pod hanging near the wing to fuselage join is? Was there another example hanging on the opposite side? Any detail pictures of it anywhere? I was pondering about what livery to use on my first 707 and this looks kind of interesting. I also noticed that there were at least two slightly different liveries worn by Uganda Airlines 707s: the one pictured above and this: Is the livery as shown by the Pointerdog decals the second (final) one? Any idea what year the font and tail design got changed? Thank you! Cheers, Niki
 -
 Hi, Thought I'd post some pictures of my completed DC-6 in TEAL markings. TEAL used three DC-6s between 1954 and 1962 I believe and this is the Minicraft kit of the VC-118 with Old Models Decals used. I added the astrodome and what I think is a navigation equipment 'canoe' on the lower port fuselage. The kit went together well, although some of the smaller parts are a little rough/oversize, especially when compared to a kit like the new GWH 1/144 Avro Vulcan! I had a problem with the decals, which I also experienced with two other sets of laser decals from Old Models - they sometimes tended to fold/peal upwards and not stick. I think I have narrowed the problem down to the Micro Sol, which I think might dissolve the decal glue? Anyway, Micro Set works fine. As usual, the photos reveal a multitude of sins! Oh well, nice to have this surprisingly big airliner alongside my more modern ones. It's also such a beautiful, classic design I think! Cheers for now, Ian
- 16 replies
-
- 17
-
-
First, a look inside the box. Zvezda's IL-62 is one of the most detailed 1/144 kits I've done. The tiny parts are simply lovely to contemplate, but a trifle difficult to actually manipulate. I began by gluing the main wheel well parts into the inside of the upper wings. The wing bay walls are mis-numbered on the instruction sheet. Zvezda would have you glue them into the wrong sides, but simply trying them out reveals that there's only one way they can fit. Reverse part numbers C58 and C59 on the instructions. Next, the clear parts. The tiny little lav windows in the rear fuselage are prone to going spoing out of the tweezers and flying into the mouth of the carpet monster. Luckily a drop of superglue will fill the hole without difficulty, and dry perfectly clear. I gave up on the tiny little windows and used superglue. The long strips are a little warped, but react well to liquid glue. The cockpit is amazing. I've seen 1/72 cockpits with fewer details. All of this is likely never to be seen again, but it's fantastically detailed, even down to the difference between the Captain's and First Officer's yokes. The instructions goof again for the centre cockpit jump seat. It's called out as C13 when in reality it's B13 on the sprues.
-
I've been having a tidy up weekend trying to complete all those 'nearly finished' models lurking around the workbench, and there are about 8 of them. I had two 737's that were almost finished in the Christmas holidays, and have been waiting for the final bits. I have been working my way through building one of each of the New Generation Boeing 737's, which is a complete redesign of the classic Boeing 737 100, 200, 300, 400, and 500 series airliner. It features new engines, new wings, tail and undercarriage amongst other things, and has very little in common with the Classic. The NG starts with the shortest variant, the 600, and has a progressively larger fuselage through the 700, 800 and 900. Revell do a kit of the 800 which is not bad but requires mods to the engines and winglets, and the window line is too low so they need filling and repalcing with decals. To make a 700 and a 900 I used two kits cut up at the same time. Basically what you do is cut one fuselage into 3, making the cuts close to the leading and trailing edges of the wing. On the other fuselage you make the cuts as far from the wing as you can. Then by swapping the two centre sections, you have a long fuselage and a short fuselage. Obviously you do it by accurate measuring, I'm only trying to simplify the description here. (Edit - All 4 models here are built from the Revell 737-800 kit, with shortened/lengthened fuselages) Anyway, I ended up with a 700 and a 900 series fuselage. Both were built side by side. The 700 has Skyeurope decals by Boa Agency. That paint job involved a lot of fiddly masking, the blue, white, and red fuselage & engines are all masked & sprayed. For a while they featured famous Slovakian beauties, this one is Adriana Karembeu The 900 is in KLM coluurs using Draw decals, and very good they are. Here they are, for comparison I have included previuosly build 600 and 800 models. The 700; Biggest of the lot, the 900; An 800 in Kulula livery, Draw decals. The shortest of the lot, a 600 in SAS livery from Lima November decals Not easy to photograph in a line up, apologies for the poor pictures. Left to right 900, 800, 700, and 600. Thanks for looking, John
- 31 replies
-
- 14
-
-
-
I finally found some time to start this build. This is going to be my first WIP and my very first mixed media kit so let's hope I don't mess this up... Let's see what we have in the box: The overall level of detail is pretty good with fine panel lines on both the fuselage and the resin parts. The metal castings are also quite decent, though I'll have to find replacements for the NLG wheels... Decals are from TwoSix with a separate tiny sheet containing the white markings.
-
 Hello all, Here is my first topic, and it is about my last model, a B727 from the new Airfix kit. I used Continental Micronesia decals. I bought them on F-dcal, and I was satisfied by the quality. I did not pay a special attention to the accuracy of the model, thus I didn't make major changes on the plastic kit (to be honest I wanted to finish it rather quickly). Yet I know some details are not reproduced (on the wings and the gears). I chose to glaze the windscreen and the windows instead of filling and adding the decals. Only I didn't use the small Airfix clear parts, but placed plastic sheet and Clearfix. Here again you will notice it's not perfect (first time I try it). Continental Micronesia was founded in 1968 (as Air Micronesia) and ceased its operations in 2010, when Continental merged with United. It used to have routes to Hawaii, Asia (mainly, if not only, Japan) , Micronesia and Australia as well as it was island hopping. The paint job is done with brush for all colors except white, which is Tamiya Gloss White. I obtain a glossier finished by spraying a grey primer (Tamiya too) instead of a white one. The paint job "pattern" on the wing is done a little bit randomly because there wasn't many pictures on the internet. I had made the 3 Pitot tubes but my little brother broke them ... I hope you will enjoy. (I will probably prepare a diorama+backround for my next models ...) Cheers, Jean
- 11 replies
-
- 11
-
-
 Well, I realise it's a bit late in the day to start a WIP on this one, but technically it's not finished yet, so here goes. I picked up this kit quite cheaply from Creative Models and I am quite pleased with it. 1/200 is not a scale I've built in before, but for aircraft of this size it still gives a fairly sizable model. On the whole, this is a good kit - fit is generally very good, with a couple of minor exceptions (wing halves). It looks pretty accurate to me, and unlike the Zvezda/Revell version includes separate parts for the Trent 1000 and GEnX engines (although to be honest the differences are quite subtle). The only error I have noted is the APU intake being moulded on the wrong side of the fin. Panel lines are a little on the heavy side, particularly on the fuselage. I had originally planned this as a LOT Polish Airlines aircraft, but having got two sets of decals (both laser printed) wasn't really all that happy with the resolution (being particularly picky really), so I've gone with the kit decals. Coincidentally, I also saw this aircraft when it visited the Farnborough Airshow back in 2010 when it did a flypast with two Spitfires (http://www.airliners.net/photo/Boeing/Boeing-787-8-Dreamliner/1745320/L/&sid=a9351297298616bba1b5f732614e8323). This is meant to be a quick (for me) build, so I've dispensed with the landing gear and done it in flight. It's painted in Tamiya acrylic spray and Alclad laquers for the leading edges/APU exhaust. Engines and stabilisers are still to be done, and it's still awaiting a clear gloss coat of some description: Untitled by Caution Wake Turbulence, on Flickr Untitled by Caution Wake Turbulence, on Flickr Untitled by Caution Wake Turbulence, on Flickr Untitled by Caution Wake Turbulence, on Flickr I still need to tidy up the tail decals a little. The kit decals are alright, if a little thick and on the matt side. Hope you like it! Cheers, Andrew
 -
1/144 Bristol Britannia, F-RSIN British Eagle This is another 'nostalgia build' of my memories of Heathrow in the 1960's. I remember seeing these as a kid, looking lovely on the ramp. British Eagle used them on a trooping flight contract to Germany, so anf ex Army guys might well remember them. They were also used on regular passenger flights and ranged far and wide. It was agreat shame when Eagle went out of business. This is the F-RSIN kit, a short run plastic injection moulding and one of the many great subjects they do. It is not a 'shake and bake' kit but builds up very nicely and without any real problems. I messed up one of the tail decals and emailed Laurent at F-RSIN who helped me out very quickly with superb customer service. His advice was to coat the decals with Microscale decal film, which i did and had no further problems. Hers she is a lovely kit, aircraft and colour scheme. I hope you like, Thanks for looking John
- 49 replies
-
- 30
-
-
Boeing 747-200 Thai International Revel 1:144 Been building this on & off for a couple of years now, and finally declared it finished today. It is the Revell E-4B boxing, with decals taken from the 747-200 Thai boxing, supplied by my good mate Mr Stringbag who will be doing the BA version at some point, so kindly let me have the Thai set. I had a problem in that I left the windows open to glaze them with Microscale krystal kleer later as all the windows were cut out on the cheatline decal. The problem was the holes didn't line up very well so progress was slow as I had to section the decal into inch long peices. It could still do with some silver window surrounds, but I haven't been able to locate a set for a 747. One day I will! Here we go; And the obligatoty 'with something else' picture. This time the smallest Boeing in service, the 737-500. Thanks for looking, John
- 16 replies
-
- 12
-
-
Another review build commences. Hasegawa's venerable 767-300 is still an impressive model. The first thing to do with the 767 is to fill in those ugly windows. Once again I used my Milliput snake trick. The left fuselage half is filled while the right side waits Push the putty through the windows so it sticks out and completely fills each aperture Trim each window flush with the fuselage and then run a dampened fingertip down the window line to smooth everything off. This will help to reduce the amount of sanding which will be necessary, an important task for a kit which has raised panel lines. Once the windows have been filled, fuselage assembly goes quickly As do the wings. Test fitting reveals that the fit is a trifle too sloppy to allow for the wings and fuselage to be painted separately. My model will sit overnight to allow the putty and glue to cure.
-
Convair 440 Metropolitan 1:144 Welsh Models with Lima November decals Like many twin engine airlinres of the 1940's, 50's, and 60's the Convair 240 started life as a DC-3 replacement, and went through several developments. This version, the 440, was in answer to the Vickers Viscount and featured more soundproofing and aerodynamically improved cowlings. In service with SAS from 1956 to 1976, they were configured with 52-56 seats and operated with an excellent safety record, not one of SAS's fleet was ever lost. (although in 1965 LN-KLE on a crew training flight hit some trees and landed with various bit of branches embedded in it!) An attractive aeroplane, I wanted on in my collection and obtained the Welsh models kit couple of years ago. Of course this resulted in Authentic Airliners releasing a beautiful resin kit once I started mine! I've been working on it 'now and again' for over a year now, and finally finished it off this week. I bought Lima November's lovely decal sheet 'Early SAS Conviar 440's' as I like this scheme best, and also the decal sheet in my kit was the later scheme and incompletely printed anyway. I made my own little engine fronts from rod and card, so that I could have the cowling fronts correctly open. I cut out and glazed the cockpit windows, but because I had used a full 'keel' inside the fuselage halves, you can't see through from one side to the other! Lesson learned. Here she is (pictures are about life-size) Here is one I prepared earlier, Roden's DC-7c also in Lima Novembers SAS decals; And finally, my growing collection of Welsh Models Twin engine airliners; Thanks for looking, John
- 19 replies
-
- 12
-
-
A short while ago, Aeroscale received Hasegawa's new 777-300ER for review. Once I finished the review, it was time to build. Since the kit offers window decals (and since ANA's window pattern does not match the window holes), I needed to fill the windows. Cue rolling up ropes of Milliput Press it into the windows from behind Et voila! Filled windows At 1/200 scale the build goes fairly rapidly and shortly I had the fuselage halves together A little sanding, building and painting later... Then the basic gloss white and "Boeing Grey" went on Testors Steel from the little square bottle was used for the Corrogard inspar areas. I couldn't resist a test fit of the engines and stabilisers A ton of masking was needed before I could paint the Alclad on the leading edges Then finally I could begin decalling Finished; just needing a few touch-ups As the decals dried, they pulled away from the base of the fin, so I will need to mix up some custom blues to cover the white
-
Wearing Two Six decals As Air Canada's newest addition.
-
Finished this one yesterday, the rarely modelled HP Herald. It is the Welsh Models Vacform kit with resin engines and white metal undercarriage. I used my usual method of a keel in the fuselage halves rather than transverse bulkheads, it is so much easier and stronger too. Ther are a few things to watch for if you are building this kit. 1) The resin engines attach to a 'plinth' moulded on the underside of each wing. I attached mine nice and precisely, but something didn't look right when I dry fitted it on the fuselage, the starboard engine was off the centreline with the front being further from the fuselage than it should. Finally I traced it to the 'plinth' on the underside of the starboard wing. On the vacform sheet measure the front of the plinth to the wing root. Then the rear of it. The rear is just over a mil closer the root, kicking the engine out of line. No problem now that you know about it, you can correct it when gluing it on. I tried removing my resin engine to correct it, but the vac wing started to split, so I have to live with it. 2) The Upper wing has constant dihedral, resulting in a 'V' shape in the above fuselage section. This is not right, it should be a flat airfoil section. Simple to fix with milliput and sanding. 3) The undercarraige was too long. Whan I fitted mine it looked awfully 'stilty' standing way too high. I trimmed the legs down until I was happy with the sit, taking probably 3 mil off each main leg. 4) The white metal props are broad blade, square tipped, I filed mine down to thinner round tipped ones used on Heralds. The decals come in the kit and are laser printed by Twosix decals, and go on very nicely. My only query is with the painting instructions which show pale grey tailplanes. The pictures I can find all show black or dark blue. I went for the dark blue to match the fin & rudder. The starboard (left hand in this picture) engine is a touch out of line, as explained above. You can correct yours if you build one! And finally my usual 'two ship' picture, this one with is more succesful rival, the Fokker F-27 which outsold it by more than 10 to 1. Thanks for looking, John