Search the Community
Showing results for tags 'airfix'.
-
Having built a few of the (newish) 1/72 Airfix 109E-4/7 kits I wanted to do an E-1. Rather than try and find a E-1 kit, or use an E-3, I decided I would have a go at modifying an Airfix E-4. This required a change of canopy to the earlier style, and removal of the 20mm cannon, as the E-1 had 7.92mm MG 17's in the wings. I had in my stash a couple of E-1 style vac canopies to suit Heller, Matchbox and Airfix 109, but I believe that this must be for the older tool kit, as the vac canopy was a bit narrow. I have an Avis 109D kit in the stash and it has 2 canopies in it (not sure why). So I used one of these as it fit okay and while not great, it was acceptable by my standards. I did a work in progress, but can't figure out how to link here. It was an enjoyable build,however next time I think I will use a Tamiya E-3. Built as Yellow 14 of 6 (J) TrGr 186 1939-40 using Print Scale decals. Painted with GUNZE aqueous RLM 70/71/65. This is the first time I have used these paints on the exterior of a model, and they spray beautifully.
- 12 replies
-
- 23
-

-
Good morning all! When going to my local model shop the other day to add to my newly acquired taste (not literally-tasting paint wouldn't be very good for your health ) of Vallejo paints, I stumbled across this kit. In regards to the paints it is a major turning point for me, I have been used to the Humbrol Enamel paints since I first began modelling about 10 years ago and since my "revival" in the hobby about 3 years ago and I have found that the Vallejo paints are less resilient but provide a better coating I believe in terms of the aesthetic appearance. In addition to this, they can be dilluted with water (saving a lot of money on thinners and being better for my general health too). Anyway the kit, it was about £5 I seem to recall which is not bad at all for a newly tooled kit and dare I say, what a pleasure it was to build too! I did make a bit of a mess of it in places and I suppose it was more of an experiment piece to test different techniques and different finishes (my first time using the vallejo silver and the fluorescent red), but nevertheless I believe this is not too bad a model-if I do say so myself. So, without further rambling, here we are: Thanks for looking, Sam
-
Hi folks, I tend not to do build logs on BM, but thought I'd show a photo of my current wip, the Airfix Bf109E, as I made a somewhat disparaging remark about it on my profile. It is a nice wee kit (the emphasis being on the 'wee', for those of us whose origins are North of Hadrian's Wall), but has some really annoying engineering / fit. Now I can bollix up a kit with an ability matched by few others, but when bits of a new tool Airfix don't fit off the sprue, then I get a bit annoyed. The wing uppers and lowers didn't match up and the lower edge of the LE slats sat proud of the forward edge of the lower wing, also the wing tips and ailerons didn't sit in the same plane, all of which required some fettling of the mating portions of the wing pieces to sort out. The sprue gates are quite oversized and I removed a chunk of the outer edge of the tailplanes (actually the elevators) when I removed them from the sprues with side cutters. That explains the rather odd shape of the outer edge of the elevators in the picture below. In addition, there are some really small pieces that I'm not looking forward to removing from the sprue (Pitot tube, aileron mass balances, gun barrels, etc.). Also removing the mould seams from the tailplane support struts was lots of fun. Right, rant mode is now off. Apart from the above, it's gone together fairly well, although some mechanical deformation of the upper engine cowling piece was necessary to aid fit, and some filler was required at the fuselage / wing underside interface. Anyway, I'm now onto painting, and the second coat of RAF Dark Green sorry, RLM71 dunkelgrun, has just been applied. I'm using the Bf109E colour demarkations from Michael Ullmann's Luftwaffe Colours book and I have just realised that I've got the positions wrong on the starboard wing. Oh poo! Still, we're hopefully on the home straight now, so just have to grit my teeth and get it done. regards, Martin
- 5 replies
-
- 3
-
-
- Bf109E
- Battle of Britain
- (and 3 more)
-
Hi Here's my finished lightly weathered Lightning. I hope you enjoy WIP thread here: http://www.britmodeller.com/forums/index.php?/topic/234980669-airfix-172-english-electric-lightning/ Thanks for looking
- 26 replies
-
- 27
-
-
So after taking several months between my builds, here's the second of the Spitfires I got from the D-day anniversary offers on the Airfix website barely three weeks after the first. Nice, easy build finished in the Swedish scheme. Only down point was the decals were a bit thick and took some effort to settle nicely, though they would not go into the panel lines. Brush painted with Humbrol enamel, I've heard the colour match isn't perfect but I like the shade and I'm not worried too much about that level of accuracy. This was my second attempt at a panel wash using the Humbrol black wash. Its perhaps a little heavy for some but as its my first success its hard to be in any way upset about it. I've not attempted any weathering as yet and these seem to have been kept very clean from what I've seen so I didn't see any reason to make this my first attempt. Onto some pics. I really need to find a better set up for my photos. In all I'm extremely happy with how this one turned out. EDIT: Forgot to say, the underside camera lenses fell out of place when I was trying to take a scrap of paint off them. Frustration.
-
 Hey everyone and here's the latest from me, finished for the Phantom GB here on Britmodeller. Yes, it's Airfix's ancient (1971 issue) F-4B Phantom that I think I bought out of sheer nostalgia and also after reading the excellent Osprey book pictured below (which has the kit's wingman on the cover). The full WIP thread is here but to recap: Kit: Airfix 04013 F-4B Phantom 1/72 Details: Some panel lines rescribed, Eduard Zoom photoetch for the kits seats and cockpit (which was scratchbuilt) Paint: White from a rattle can, all other paints Revell Acrylic, brush-painted. Johnson' Klear, Flory Models Wash, W&N Matt varnish Decals: Mix of Airfx kit for the Stars & Bars and Afterburner decals for squadron markings, A/c: VF-21 'Freelancers' of Lt Dave Batson & LCDR Rob Doremus, Callsign 'Sundown 102', USS Midway, 17 June 1965 - Mig 17 shotdown. Definitely not the most detailed or accurate F-4 kit out there by a long way but it was the first time I used etch, first time I built an F-4 and I had a lot of fun with the build. She might be a little too Matt in finish (hard to tell when most of the pictures were B&W) but I'm happy how the old girl cleaned up and I think she looks like a Phantom! Thanks for looking and until the next time! Dermot
- 11 replies
-
- 15
-
-
 Just saw it in the Airfix newsletter. Here is more: http://www.airfix.com/uk-en/news/workbench/5334/?utm_campaign=563760_Airfix+Kitstarter+New+Additions&utm_medium=email&utm_source=Hornby+PLC&utm_content=Workbench&_$ja=tsid:71284&dm_i=2DJZ,C300,4ATX0G,RZJ7,1 Cheers, Peter
 -
Hi, The Airfix Harrier GR9A Starter set with 'aftermarket' decals (that is, I bought the full decal sheet from Hornby, gotta love the stencils) Bits and pieces cut out: and primed:
-

Airfix 1/48 Hurricane,17 Sqn,Debden 1940.
stevej60 posted a topic in Ready for Inspection - Aircraft
Hi folk,s an off camera build over the last few week's has been Airfix's new tool Hurricane finished in the colour's of 17 Squadron flown by P/O Steven's during the Battle of Britain.The kit has been well covered here with one or two superb example's already posted,I added a break pipe;s to the u/c doors which I noted on the wealth of information available here on BM mainly down to Troy, also a mirror on the Glazing and weathered using Maskol then promptly missed off the characteristic staining underneath and on the u/c door's,Ah well! Hope you like. Very much a practice piece for another entry in the BoB GB.- 25 replies
-
- 25
-
-
Hi, So I thought I'd just post up a couple of quick snaps of the first Gnat now I've finished the Decals over the weekend. I can't decide on if I should weather her or not as they're so tiny in this scale. The canopy isn't actually fixed in place at the moment as I still need to pop a couple coats of Klear on to seal the decals, which is why theres a bit of a gap. It's a pity the orange bleeds through the roundels a bit and theres one or two other things I'm not happy with but on the whole it came out ok. Still at least I should be able to fix the things bugging me on the 2nd one's build! Any advise on weathering would be greatly appreciated Edit: I just noticed I haven't fitted the aerials on the spine LoL - oh well I will get that done tonight I suppose! Edit Edited: Antenna fitted, photos switched to new ones LoL Thanks for looking! Mark
- 22 replies
-
- 26
-
-
Hi I thought I'd do this build as a WIP. Novice skills, so please bear with me Memo to self: when washing the kit in warm soapy water don't use a really stiff brush and damage delicate parts again. Normally I'd follow the instructions religiously but decided this time to do the bits I want to do in the order I want to do them. So am looking to prime a lot of parts at the same time, etc.
-
Hello All, I managed to get some half-decent pictures of my speed-build 1/72 Airfix Fw190D today. I made a few tiny improvements but it was mainly OOB with the kit's own decals. The decals performed flawlessly, much to my surprise! The fuselage slogan decal as supplied looks a bit like some wobbly white lines and blobs, so I added a few touches of paint to make it look like lettering. Still illegible, but it looks a lot better. All brush painted with Humbrol Acrylics, using the new RLM colours as appropriate. W-a-y not perfect (and where did that pitot tube go??) but great fun to do. Thanks for looking! Adrian
- 10 replies
-
- 11
-
-
 Hello! As summer reading I've laid my hands on Slaget om England, Christer Bergströms latest book on the Battle of Britain (To be published in english during 2015 http://www.bergstrombooks.se/battleofbritain.htm ) He seems to be of the opinion that the Bf110 wasn't that rubbish, just used the wrong way. Escorting bombers instead of fighter sweeps (over middle and north of england) is not the way to go. Anyway, I thought about the Bf110, looked at my stash and decided that i needed a small simple build, so naturally the complex Eduard is out. I can only manage one complex build per year or something of that effect. But I do have this: All the parts for a C is there, and with a little help from a friend i also got hold of the Italeri decals for M8+CP You can tell that this is from a different subcontractor than what Airfix is using now. The plastic is harder, the panel lines wider, but the mold separation lines are smaller. I can only imagine how the 1/24 Typhoon would've looked coming from this supplier instead! A slight case of wing warping was noted Boilding water, and brute force clamping took care of that Then I started with the cockpit And main lading gear Landing gear is quite detailed, but the cockpit is very plain. I'll add some strips ans wires there to make it look a little more busy. In worst case, I can always count on the thick greenhouse canopy to hide the worst That's another one added to the bench, and no one rescued from the shelf of doom:
 -
 This is my first RFI and I do appreciate that there are many better modellers than me on here but I enjoyed making it. It is an Airfix Modeller's Club special edition and comes along with a Swordfish. The kit is brush painted with Xtracrylix paints and I used a Peewit paint mask. It went together pretty straightforwardly but the under fuselage insert for the arrestor hook was a bit of a challenge. And I don't think I did the best job on it. Originally the pilot's head barely cleared the cockpit sill so I packed up the seat with scrap. Hope it passes muster. I had terrible problems with Photobucket so sorry if the pictures are ropey
- 12 replies
-
- 17
-
-
- Operation Torch
- Sea Hurricane
- (and 2 more)
-
Hello All, Airfix's P-40B in 1/72 scale finished as Clive Caldwells mount. Happy modelling all Ian
- 19 replies
-
- 36
-
-
The new Airfix kit. 8. Staffel, III Gruppen, Kampfgeschwader 77, Laon/Couvron, Northern France, July 1940.
-
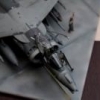
 E.E. Lightning F.2A XN778/A "King Cobra" 92 Squadron RAF Gutersloh, Germany, 1977 Flown by C.O. Wg Cdr Ed Durham Kit: Airfix A04054 Scale: 1:72 Paint: Tamiya and Alclad Decals: Kit and Xtradecal X72-155 Another little masterpiece from Airfix, not only a joy to build but in my opinion the best 1:72 kit of a lightning in existence. Thanks for looking
- 41 replies
-
- 21
-
-
 I made the most of the Wonderland Models' fathers' day offers and got myself a Tuc to do as a bit of a mojo booster (Plus, RAF Bathroom needed a trainer). I've done one before so I knew what to expect. A bit of work in places, but I'm pleased with the outcome. I finished this as the Church Fenton display aircraft, mainly as I remember seeing these and Jet Provosts flying low over my house as a youngster from CF and Linton-on-Ouse. As intended it's all OOB apart from some etched belts from Eduard and PJ Productions pilots. Base is a bathroom tile covered in fine grit sandpaper keeping up the RAF Bathroom tradition. Not intended to be a close-up kit, but looks great from a distance...with scrunched up eyes...in the dark... I hope you enjoy! David
- 19 replies
-
- 29
-
-
- Church Fenton
- Airfix
- (and 2 more)
-
Morning all,here,s my take on Airfix,s venerable old 1/48 scale Stuka,after my initial disappointment at this boxing not having a Battle of Britain option and as the damn thing was only seven quid I had nothing to loose in having a crack at the North African based scheme also offered,so here she is and if you fancy a quarter scale Stuka don,t write this kit of as it builds beautifully and those rivet,s really look OK under paint,trials and tribulations here- http://www.britmodeller.com/forums/index.php?/topic/234984087-airfix-148-stuka-quick-build/
-
With some trepidation, my first RfI... I got back into modelling fairly recently; this is my first 'try and get a reasonably decent result' build, as well as an opportunity to try out airbrushing. I had a lot of trouble with the decals. Not long after doing them I saw a post from someone else here building this kit (or what I assume is the reboxing of it with the Gnat) who commented about how bad they were, so I was relieved it wasn't just me. Thin and fragile, and came out pale and rather speckled, and the less said about the ones for the underside arrow the better. Efforts to patch up with white paint only showed up the problems more... Other lessons learned included making sure I had a proper fit. I ended up with slightly down-bent wings that needed straightening, but that left me with a lot of problems getting the intakes to fit. Built OOB, except for two Pavla Mk 10 seats as I wanted to build without aircrew in the cockpit. Oh, and the pitot tube is replaced by a pin - even that is far more realistic looking than the plastic part supplied! Painted in Humbrol Arrow Red and finished with several coats of Humbrol Clear for the right gloss finish.
-
 I've been busy trying to get the bench cleared up for this one, the modelling event of the year. I've become an admirer of the Polish 303 'Kosciuszko' Squadron over the past year or two, and I figure this GB is a great opportunity to honor them. I'm planning on building the new tool Airfix kit as L2099, RF-O, one of two 303 fabric winged Hurricanes I've managed to find (the other is L1696). It was used by Walery Zak, Josef Frantisek, Athol Forbes, Marian Belc and Witold Lokuciewski (and that's just the pilots I could find in various sources) to claim victories throughout September and October of 1940. The second Hurricane will be converted to a metal wing following Tony O'Toole's (tonyot) example. I'm still not sure which specific 303 aircraft it will be though.
 -
 T11 by jongwinnett, on Flickr T10 by jongwinnett, on Flickr T9 by jongwinnett, on Flickr T3 by jongwinnett, on Flickr T1 by jongwinnett, on Flickr de Havilland DH.82a Tiger Moth by jongwinnett, on Flickr WIP
- 17 replies
-
- 28
-
-
Hi everyone, I'm in with this old relic, also pulled deep from the stash. I think I bought it in a fit of nostalgia and never considered building it...until now and will be my first Phantom! Markings will be from Afterburner decals for one of the first Mig kills from Vietnam. Will give it a little bit of a attention and just have some fun with it. Really looking forward to this GB! All the best, Dermot
- 37 replies
-
- 8
-
-
- Airfix
- USS Midway
- (and 3 more)
-
 Hi All, This is a first post in WIP for me. I normally don't have the time to take photos and then post updates etc. but I figured, for this particular topic I would make a huge exception :D Just some caveats before I start: I'm a horribly slow builder - if you are expecting lots of updates over the coming days it likely won't happen - more like updates will occur once or maybe twice a week (mind you, this gives you more time to look at all the really good builders on this site :) :) ) I haven't attempted a conversion "on my own" before but I figured this was a pretty basic one to begin with so please bear with me I am really looking forward to building this!! Some background: When I first got "back into" building kits in my late 30's early 40's I wanted to build a Canadian Tiger Moth. Being Canadian myself it was something that was, to me, unique - and it meant a fairly easy paint job (Trainer Yellow with some black bits ) - The only Tiger Moth option that I was aware of in 1/72, at that time, was the venerable Airfix one. I did have the ability to order a canopy from Aeroclub which I had spotted at the LHS but my first attempt at building the kit went horribly wrong. I lacked experience and, basically, patience. Now, with a bit of both under my belt, along with the impetus of Paul J's comments in the Tiger Moth Options thread, John Adams' comments in general and the wealth of information online and close at hand (I am about an hour and 10 minutes from the Canadian Warplane Heritage Museum - CWHM - which has a wonderful Canadian built DH.82c in flying condition) I hope that I can tackle the conversion. I also have the Pavla kit of the DH.82c but never had the "guts" to tackle it. Having dealt with a couple Pavla kits in the past (Airspeed Oxford and Cessna Crane) I would rather "pass" on trying to tackle the kit since I believe the Airfix kit will actually be "easier" even though it involves converting the basic DH.82a configuration. I will, however, use the Pavla kit as a "guide" of sorts (look at all those quotation marks in this paragraph!! ) for items such as the instrument panels etc. The Kit, Some Additions And Some Changes: I'm not going to go into sprue shots of the kit but I will point out where I feel there are changes to be made in order to get the DH.82a to become the DH.82c. Additions to the basic kit (for my model) will be the following: Aeroclub Gipsy Major Engine - thanks to John Adams for sending me one of these (and it includes the correct prop as well!) Some home made brass items (cowling, trim tabs, maybe the fairings for the fuselage cables) New Interplane struts - made from thin wall brass tube Aeroclub Canopy - again, thanks to John! Different Decals (again some supplied by and thanks to John Adams, others from the existing Pavla kit) Exhaust Shroud As per the comments in the recent Tiger Moth threads in the Interwar forum and along with the multitude of images of the CWHM DH.82c online there are things that need to be corrected in the Airfix kit in order to make it Canuckable Changes to the basic kit include: removing the baggage compartment Moving the landing gear forward Using the tailwheel (included in the kit!!) Cutting out the cockpit doors Not using the fuselage strakes The Reference Aircraft http://www.warplane.com/vintage-aircraft-collection/aircraft-history.aspx?aircraftId=14 Built in 1942 at Downsview (Toronto) Ontario this particular Tiger Moth did go through some restoration - I still need to find out if it's built back to the spec as though it had come off the production line at De Havilland or if there were changes made to the aircraft during restoration. Photos coming soon!! Cheers, Dave
 -
 Hello folks, My turn to ask the same old questions again about Spitfires. I'm looking into building a Spitfire Mk. Vb as used by No. 322 Squadron, using the Airfix kit. I have some decals for these, with a few options, but unfortunatly some of the details aren't mentioned. I did some searching, but couldn't find much. I did see some flight sim skins and profiles that suggests clipped wings on at least one of them, but I have no idea how accurate that would be. What I'm basically asking is, can I build any of the following Vb's, using what's in the Airfix kit? BM354, VL-A W3127, VL-P AB818, VL-N BM515, VL-P AA967, VL-A WW2 stuff isn't one of my stronger subjects, and I see 3 different kinds of canopies, two different kind of props, 3 different sets of exhausts, etc. It is kinda confusing sometimes. Anyway, if someone could assist me a bit on this, I would be very grateful. Thanks!