Search the Community
Showing results for tags 'airfix'.
-
Built this more or less OOB, only additions were antenna and fin cap extension. Kit is the MPC boxing of the Airfix DC-9 using USMC decals from Draw Decal.
- 11 replies
-
- 15
-

-
Afternoon Fellow modellers Here is the new Airfix Harrier GR3 with Pavla nozzles and Eduard PE. The decals are from Xtradecal and the Houchin starter from Flightpath Do you remember when back in the 1970s we saw the Harrier GR3 as one of our most fearsome ground attack aircraft? They would pop out from the woods and take off from a road. Not sure in that era of dumb munitions whether they really would have been all that effective? Andrew
- 27 replies
-
- 43
-
-
 Have just completed this build for the NATO 80's Group Build. I used the new 1/72 Airfix GR3, Eduard zoom, Freightdogs corrected fin & Pavla gun pods. All brush painted using good ol Humbrol enamels & weathered with Ammo Black night panel wash & Tamiya weathering sets. The base board is a small plank of wood covered in modelling clay, painted with Hum 29 & Tamiya browns and weathered with Revell mud green powder. This is what I was aiming for And this is what I managed May I introduce Sqn Ldr Tes Tickle rolling in on the range Thanks for looking, as always C&C's welcomed.
- 12 replies
-
- 36
-
-
This is my first ever participation in a GB, and although four months is a long time, I'm a slow builder and the time frame coincides with peak work period, some planned holiday, and a probable job search, so spare time is likely to be very limited on occasions. Plus, it's summer! So, bearing that in mind, I've opted for this kit as my initial contribution. It's the relatively new Airfix moulding, packaged with VVS decals in the Airfix Club kit from a few years back. I built the Flying Tigers P-40 last year for my son's ceiling display, and I don't recall any major issues with the kit, so it should be a straightforward OOB build. The challenge for me will be to do the winter whitewash. It's not something I've tried before and I'm a wielder of hairy sticks, so I'm not feeling too confident. The kit decals depict White 58 of 20 GvIAP, with a scheme absolutely plastered in whitewash. The info on Massimo Tessitori's site (http://mig3.sovietwarplanes.com/lendlease/p-40/tapani/p-40b-c/58khlobystov.htm) has the whitewashing rather more restrained, and on balance I prefer that both aesthetically and as I can at least see the research underlying that scheme with my own eyes. I believe box and sprue photos are traditional at this stage, if only I could get photobucket to work properly, I would post. Maybe tomorrow it'll behave...
-
 I bought this set for three quid at home bargains and decided to start work on it so next post I will have the interior,prop,rockets,bombs and fuel tanks. I hope you will decide to follow this topic and comment because I would really appreciate the support on my first model i'm posting on britmoddeler.
- 16 replies
-
- 3
-
-
- mustang
- North American
- (and 2 more)
-
Hi all, Could any owners of the Airfix Annual No.6 tell me the quality + detail of the Highball conversion in it, since I don't really want to be spending £30+postage plus the kit price, for the PD or Blackbird conversion. I am guessing that the conversion will be a traditional block of balsa style thing, but since it would have been released only a couple of years after the 30 year rule, I'm a bit worried about accuracy. Maybe Neil might consider doing a limited re-run of his brilliant conversion set, since the demand seems to be so high? Thanks in advance, Seabo14
- 2 replies
-
- 1
-
-
- Airfix Annual
- Highball
- (and 6 more)
-
 Good evening! Impulse purchase from a local store - found the A-4B Skyhawk starter set by Airfix in 1/72 for a fiver and couldn't resist. I know there are quite a few on here but thought I'd share my attempt. Added a resin ejector seat, scratch built the area behind the seat and replaced the basic cannons with resin examples. I had to shave a considerable amount off the bottom of the ejector seat to get the item to fit correctly in the pit and had to make my own pull handle after the item arrived slightly damaged. Building was a breeze except for concealing the join on the top of the fuselage which took lots of filler, sanding and re-scribing panel lines and even now still i can see a little bit of the join. I've not matched the grey very well this time with my Tamiya blends and also wished I had put down a layer of white under the red as it's too dark. I am going to go back and touch some area's up after looking at the pictures and matt coat the ejector seat and bomb. I normally finish my models in matt varnish but left this one glossy as most of the pictures I could find show the plane to have a shiny finish. Anyway - here's the pics and thanks for looking!
- 14 replies
-
- 26
-
-
Well, since my 2 current builds (both 1:72 scale WWI aircraft, which is my speciality) are on hold for parts, and I don't want to "start" anything new, I've decided to finally dig out the old Airfix kit that's been in my stash for over 30 years. I did make a start on it back then, but stopped due to lack of good references (I was obviously not TOO dumb a kid!). This will be a long term build, as I intend to finish the 2 that are "in progress" before I get seriously involved in this one, but I will post updates as and when I get anything done. Since I now have a good few pics as referances and a pretty good build log to check up on from another modeller, I have made a new start on this one, and have spent the last 2 days cleaning up what I'd already done many years ago, and correcting the kit parts. I've got a fair bit done, but there are plenty more improvements needed before construction proper can begin, and that will probably wait until my Muromets is finished. Here's where I am now: The chassis: I've drilled out the front end, thinning the top and bottom parts of the chassis rails and extending the gap in the U frame further forward to where it should be... (since these pics were taken I've also removed the big doughnut that is supposed to represent the stearing rack mount). The stearing column: The bevel gear end was way too big, so I removed it, cut off the plug on the top and the bevel gear housing, thinned the housing by over 1/2, replaced the shaft with 9/32nd tube, chamfered at one end to blend into the stearing column, and reattached the other bits, blending them in with Mr Dissolved Putty. I think the lower part of the bevel housing that was cut off the original may be a little small, but it'll do. The firewall: I removed the moulded oil lines and the blank over the oil tank hole, the latter was replaced with card. The moulding for the throttle mounting was added from stock rod, glued together to get the right size, then sanded to shape. I added rod to the lower edge of the firewall where it meets the floor, then sanded it to the correct slanted profile to match the slope of the floor. 5 thou sheet has also been added to the rear of the firewall to give the correct smooth surface, and the flange around the edge. I also corrected the small lip on both upper corners which shouldn't be there. The floor: the hashed steel moulding has been removed, and the floor now needs to be narrowed slightly at the front - the sloped part is only between the firewall edges, not running right up to the bodywork. The fuel tank: a start has been made on stripping the moulded detail, wire mesh has been ordered to replace it. There are also some nuts missing on the firewall, I've ordered some and they're on their way! This is turning out to be very enjoyable! Any advice from car model builders will be welcome, it's over 25 years since I built one and it was OOB! Particular help will be needed for sources for wiring/plumbing materials, replacement resin nuts/bolts (I have some plain nuts on order but can't find castle nuts or dome nuts) and any other auto specific parts I may need (carb linkages?) all of course, in 1:12th scale..... Ian
- 254 replies
-
- 1
-
-
- Bentley
- Limeypilot
- (and 1 more)
-
Now I originally made a 1/72 version of this but did so many things wrong that I wanted to try again and picked up this kit for the same price as the 1/72 version would you believe! The first thing I wanted to get right was the nose weight, but I still managed not to put enough in, so it sits precariously on a rod at the rear of the aircraft. Some of the decals aren't in the right place, and almost all of them have white edges, but I'm pretty proud of my build. Let me know what you think. Cheers Joe,
-
MPC 22" Rescue Eagle 4 Transporter
JMChladek posted a topic in Ready for Inspection - SF & RealSpace
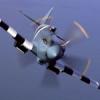
I finished up this project about a month ago for a contest. The model I used was not a production MPC kit, but rather one of the 12 first run test shots done last September (Jamie Hood made a brief mention in the special SF&FM Eagle issue that one went to a Jerseyfest contest winner, that was me). I documented the early part of the build for this on Youtube, but kind of lost interest when the production kits came out. Still, I knew I had to finish it so I got done what needed to be done before the Wonderfest convention. Technically there are still some things I want to do to it as I need to add some stripes to the spine and a little more weathering. But overall it is done. Since we don't have access to the Eagle color of choice here in the states, I went with a mixture of Testors Camouflage gray and 30% white to match the production plastic coloring (which was apparently matched to the original studio model paint). The pod however was done in Tamiya AS-20 U.S. Navy Insigia White and it is a DEAD ON match to the plastic color. The red stripes were done in Floquil caboose red. The main Eagle paint and decal work represents the #1 44" model as it appeared from about "The Last Sunset" to just before "Space Brain". The pod is painted up to represent the rescue pod in "Collision Course" and features red stripes that don't go all the way to the bottom or into the window frames. I believe this was the last time a 44" model was painted with a rescue pod as future appearances that weren't stock footage used the 22" model. For this project, I also made use of the rather expensive aluminium engine bells from Round 2 and the thruster bells. They look great, although next time I do one I'll go the Alclad route on plastic. I've also got 4.6 mm standoffs inside each gear pod to get the model to sit level at the proper height mainly because I didn't have access to the springs used on the production kit. Even with the springs, standoffs are a VERY good idea to keep the model sitting level because the engine bells do make the model a bit tail heavy otherwise. I also installed a battery powered lighting system in the nose to illuminate the cockpit interior and the astronauts. Everything (CR-123A battery, two LEDs, power switch) is self contained in the nose and the nose itself is held on with magnets so I can detach it when I wish to.- 8 replies
-
- 10
-
-
- Space 1999
- MPC
- (and 1 more)
-
An old airfix Swordfish given to me by a friend who found it in a box of ebay stuff. And since his very young daughter wanted to send me something too I've named it after her. Thus the non original naming of it Jess.
-
Hello again fellow Britmodellers, I'm back with my second WIP. This time it's an Airfix Canberra. I have been working on the cockpit so far, and IMHO it is looking alright. Hope this one goes well, and should have my F-16 double RFI in a minute or so. Rob
-
Here is the Airfix 1/72 C-47 when based at Sembach with the 66th TRW. It is not an easy build due to my mistakes (both the build and decals) and some tight tolerances but will have a go at another and avoid the pitfalls. The decals came from XVTonker on here, who produced some decals for USAFE C-47, Furball Decals for the stars and bars and a Scalemaster sheet for the USAF titles. The metal finish was done with Tamiya Aluminium spray can and various panels with Vallejo Metal Color. Robert
- 11 replies
-
- 23
-
-

Airfoil 1/144 BE Red Square Vanguard 1/144
lomasca posted a topic in Ready for Inspection - Aircraft
I finished it! Dog of a kit, but very satisfying to complete such a beautiful aircraft. I made this as a father's ay gift for my dad. I wanted to make it in flying jack (my favourite BEA livery) but it turns out my dad hated it! (though it clearly looked better on the Trident) Some of my earliest memories are of us going round the Vanguard at Brooklands. Stand arrived a week after this was completed too thanks to Humbrol digging through their warehouse. They don't make them like this anymore! -
Here is my bash at the Airfix BE2c. Straight OOB. Went together really well and looks a nice little machine. The boxing has two options that flown by William Leefe Robinson of 39 Squadron RFC, in which he shot down a Zeppelin. I chose the RNAS option which doesn't identify the squadron but is the Royal Naval Air Squadron East Fortune, East Lothian, December 1916. I chose this one due to my FAA/RNAS interests, the option for the rockets on the struts and the fact I had worked a little at East Fortune Hospital, which is on the same basic site, back in the '80's. The WIP can be found http://www.britmodeller.com/forums/index.php?/topic/235003821-be2c/page-1 . As said straight out of the box using one set of the transfers provided. I used Revell Aqua Olive Green for the PC10 and Citadel Bleached Bone with a touch of yellow for the Linen. Had a bash at natural wood which is variable. No rigging as life's too short. I like it and it's a good build, had fun doing it. Foliage deliberate (or possibly optional)
-
 I was fortunate in receiving some help from Edgar when I built my Spitfire for last year's Battle of Britain GB. As a tribute to his generosity, I would like to dedicate my build of a No. 19 Squadron Spitfire from August 1938 to him. Early Spitfires from No. 19 Squadron are well documented and the model will be a great companion to my No. 111 Squadron Hurricane when I get finally back onto it. Even though in a stock standard colour scheme, the upper wing yellow roundels do give it a unique look. I haven't made up my mind to do K9797 with a red 19 Or K9794 with a yellow 19 Or K9795 with a white 19... I will build again the new tool Airfix 1/48 Spitfire Mk.I. Unfortunately the time frame for this GB is too short for me to finish this build as I like to use some additional accessories and incorporate some additional detail like RIVETS - and participating currently in another 4 GBs with 13 models doesn't help. So I will take my time for this build and keep updating the build progress from time to time. I am looking forward in getting started. Cheers, Peter
 -
Hi all,"got you a Typhoon and 190" came the text from my eldest after a visit to Home Bargains so I was expecting the one with the snake markings which to be honest I binned last year due to the worst warped fuselage I've ever encountered. Anyway I was delighted to find it was the later boxing in which the issue has been resolved so as a warm up to the larger Eduard kit I,ll pop this one in the mix,not sure of the scheme the box top is calling, but I,m sure I have markings for an Italian based machine in sand and green.
-
I just noticed this in a copy of Scale Aircraft Modeller for February 1979: So stop yer nonsense
-
I've finished my Seafire in the Spitfire GB and before finishing the Draagonfly in the Helicopter GB (I have lost my MoJo on it a little) so rather than do the sensible thing I've decide to embark on this. I'm going to do the RNAS option, partly as it fits into my Royal Navy aircraft collection but more for the fact it's an East Fortune based aircraft and I worked on and off at the old East Fortune hospital a few years back. And the rockets on the outer struts look great.
-
Being at least partly responsible for creating what is now an 18-month old little chap, part of my fatherly remit obviously encompasses the finer points of aircraft identification. The trio below are all from the defunct Airfix 'Mini Kits' series of 1/100 unassembled, but pre-painted kits. I'm happy to report that 'Spitfire' is already a (very repetitive at the moment) part of his vocabulary. Exactly what to teach him as regards the FW is currently a matter of debate. cheers, Jason
-
 This is my attempt at 'White 19', the subject of a very famous photograph of 19 Squadron RAF, the first unit to receive the Spitfire. The victim kit is the Airfix Series 2 boxing with a scratch built early-type pitot and the protruding gun barrels represented by stretched cotton buds. Brush painted with Humbrol Enamel Dark Earth, Sovereign Hobbies Dark Green and, Tamiya acrylic Flat Aluminium. The decals are Illiad Design. Should you wish to view the WIP, it's here. As usual, I can see all the mistakes. Oh well. (Edited to correct spelling.)
 -
Finally finished Popsie, a 1955 MkVII Lancaster in 617 markings. Popsie was flown by Sgt Eric Quinney and I was inspired to build this, with "Edam" mine after chatting with him at Duxford. There have been many build threads of the new tool Airfix, so didn't do one (perhaps for the next build) The biggest headache I had was the mine and the side baffles. The mine itself was made from a block of balsa, carved down to hopefully be the right size/shape. The nav/observer is from an HS-126 early war observer aircraft. The base made from a chopping block, with layers of blues and blacks with clear silicone for the water effect. Hopefully it has worked, I'm happy with my first attempt at displaying like this (and I've just noticed the real wheel has gone awol!)
- 13 replies
-
- 15
-
-
Here is my rendition of Airfix's little Albatross DV built OOB in the colours of Baron von Richthofen. The first OOB build did in um dunno years at least.... I could not help but improve the kit a bit by scratch building the Daimler engine, making the prop from laminated Balsa wood and making the Spandau guns myself. For the latter I used a very fine mesh to represent the cooling jackets. Not perfect but in that scale it does the trick. Smaller improvements are an instrument panel and compass for Manfred. The rigging I made from very fine Tungsten wire not the ideal solution. The whole system of plastic wings and Tungsten wires is somewhat temperature sensitive, causing the wires to sag at times. I still need to get hold of something stretchy to keep the bracing wires tight. What first pulled me towards this build was the natural plywood of the fuselage I wanted to try and emulate that. I am in two minds about the effect I created; sometimes I think I over done it and other times I think it is way too subtle. But be it as it may, it is done now. And it is a colourful addition to my little collection of models. And a bit of detail of the scratch built engine, prop and Spandau guns: R
-
De Havilland Tiger Moth Airfix 1:72 These are the re-tooled Airfix kit. It is a huge improvement over the original kit from the 1950s. The plastic is brittle though, and the struts easily broken. Not one of my four have the kit supplied tail skid, they all broke off during construction and were replaced with brass wire. But don't be put off, it is a lovely little kit for the more experienced modeller. Oh, and the control horns on the tail are not on the lower surfaces, so I made my own. Rigging is with invisible mending thread, Decals on ZK-BFH and G-ADJJ from Hannants Xtrdecal sheet 72204 'De Havilland Tiger Moth part 2'. I already built one of each straight from the box, and will probably do a couple more. Thanks for looking John
- 20 replies
-
- 32
-
-
- Tiger Moth
- Airfix
- (and 1 more)
-
19 Squadron, RAF, were the first unit to receive the Spitfire and subject of possibly the most famous photo of Spitfires (you know the one I mean). I shall be using the Airfix MkI(early)/ MkII boxing. and Iliad Design decals. I've made a start, painting the interior and various bits and bobs. The black is good old Humbrol 33, used as a undercoat for Tamiya aluminium. I've just realised that I haven't removed the the ejector marks from the cockpit, I better do that (although no-one will see them when it's closed-up, I'll know their there). Apologies for the variable quality of the photos, they were taken at 6:30am this morning and I hadn't woken-up properly (or drunk quite enough tea to operate properly). (Edited to correct the topic title... I managed to spell Airfix incorrectly(!))