Search the Community
Showing results for tags 'aftermarket'.
-
Hello All, It’s been a while but I’m back and wanting to get my mojo back and after some help please. I’ve got a 1/48 Eduard Mig-23MF/ML Bedna boxing and I would like to add some Eduard resin to the kit. I’ve looked at Hannants, and Eduard do two different versions of the intakes, wheel wells, undercarriage and exhaust. One set for the MF and one set for the ML. The boxing I have lists both MF/ML in the same box and looking at the instructions there are only one set of intakes, undercarriage wells and wheels but two exhaust. My question is, can I get away with just buying the MF set of items and these will suffice for the ML also, or are there big difference between the two? I’m not sure which scheme and mark I want to build yet as I am just looking at options. I’ve studied the aftermarket pictures on Hannants and the Eduard website and can’t really see much difference between them, but they have different part numbers listed. Many thanks for your help and advice. Ashley
-
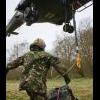
Hello again my fellow modellers. This time allow me to bother you with my attempt to build a Royal Canadian Navy McDonnell F2H-3 Banshee. Come for the resin, come for the colour scheme, come for my stupid ideas. But first things first. The kit: I guess by now you know I need new RCN decals... Now on the plastic. Engraved panel lines as you can see: and yes, that's the MLG wheel well but you won't be needing much more when everything is in place. Hmmm, the cockpit I think I'll need to do something about. Let's have a closer look at the canopy: Even has rivet detail on it! And although it's clear enough, its thickness causes severe distortions. Or maybe I'm just a spoilt brat. I'll have to think about it... Landing gear, pylons, exhaust, inlets etc. Not many parts. A simple little kit and great value for money if you ask me. And the fit looks like it's exceptionally good even straight out of the sprue without glue: Keep in mind this is a 1987 kit! And the NLG wheel well area (Spoiler alert!) Yes, I gave in to the resin sirens... I'm weak, I know... Obscureco resin set, CanMilAir decals and (for the first time for me) MRP paint. I have everything lined up, all set. How hard can it be anyway? As always thank you for looking and thank you for leaving a comment. Ta ta for now.
-
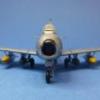
 Saab SK60/105 Ejection Seats (483D003 for Pilot Replicas) 1:48 Pilot Replicas We’ve just finished reviewing the new injection moulded 1:48 Saab SK.60 kit from Pilot Replicas, and have cleared away all the drool, but it’s not over yet. As is the modern fashion, several aftermarket sets have been produced to be available on launch to augment the detail of the base kit, for those amongst us that are detail obsessed. The sets are 3D printed, and offer incredible detail when compared to even the best injection-moulding techniques, whilst having the unexpected bonus of reducing the part count. The sets arrive in small but sturdy cardboard boxes with an adhesive label differentiating them, and the parts inside are protected by a folded Ziploc bag, while any Photo-Etch (PE) are taped inside the lid. This first set contains a pair of ejection seats to upgrade from the four-part kit seats, that are pretty decent. The set has both seats attached by tendril-like supports to a single printing base, and a small PE fret that contain the perforated backplate to be glued onto two circular turrets moulded into the back of the headbox. Once you have cut the parts away from their supports and removed the tiny pips that these leave behind, the PE is cut from the sheet and glued with CA to the back, completing the build phase. The detail is phenomenal, as you can see from the photo below, and includes a full set of crew belts that will respond well to sympathetic detail painting before being installed within the cockpit as drop-in replacements. Conclusion The detail is jaw-dropping, and will improve the look of the cockpit immensely in one fell swoop, which will be highly visible through the goldfish bowl-like canopy. Very highly recommended. Review sample courtesy of
 -
 This is the big Moebius styrene kit that probably needs no introduction. Currently I'm at a "proof of concept" stage in trying to decide how to wire this for lights. I've got some other projects on the go, too, so I suspect this will be a sporadic log. The kit is supported by a long steel spine that runs the length of the craft from the base of the centre engine bell at rear to the back of the round command sphere at front. It's actually composed of two separate rods, of equal length, which join in a steel sleeve concealed inside the antenna module. There's a lot of space inside the kit's hollow engine compartment, so it's an obvious place to stow batteries, and the two steel rods of the spine are actually rather robust tubes, so in principle they could carry wiring from the back to the front of the kit. Here's what the inside of the engine compartment looks like, with the steel rod in place, protruding from the rear to support the rear engine bell: I made some mods to the upper half of the engine compartment to turn it into a lid for this "battery bay": I've extended the original locating holes for the outer plating into slots, and I've removed the front locating flange, so this piece now works as a removable cover: Next task was to prove that I could get some decent wiring through the tubing. With a little fiddling and some mineral oil I eventually managed to screw a twisted pair through both lengths of tubing: Here are the two rods assembled end to end, linked by the central sleeve fitting, to give an impression of how long this assembly is going to be: Next I wanted to trim a short length off the rear rod, so that it finished inside the "battery bay", but I needed to add some sort of structure inside the bay, so that the engine compartment remains supported. It doesn't need to be particularly robust, since there's not much weight at the back of the kit. I came up with this, which is drying in place supported by the full-length rod: I could actually have made it a little more robust if I'd thought to drill out the plastic case at each end of my brass rods---these holes would have been concealed by the external detail panels. As it is, they're simply epoxied in place. After letting that assembly dry overnight, I measured the length I needed to remove from my rear rod. Here I have the rod in its correct position, with the rear end against a stop inside the central engine bell, and I've marked the point at which it protrudes from the rear of my improvised support structure: On the principle of measuring twice and cutting once, I also assembled the four base units for the rear cargo pods, and made sure that once they were threaded on to the rod, an appropriate length of rod protruded at the front end to engage with the central sleeve. Then I pulled back my wiring and Dremelled off 1¾ inches of steel. Here's the post-lopping assembly, showing I can now get my wires into the bay, with the correct length of steel extending forwards to engage with the central sleeve. There's room for a couple of switched AA 3V boxes---one for the engines and one for the command sphere. And there's room to glue in a couple of connection blocks at the rear. To get wiring to the engine bells, I can use the original central hole for the steel rod, and I've drilled out the supports for the two lateral engines: As it stands, this leaves the engines bells relatively unsupported, so I may drill out further and add three styrene tubing sleeves to replace the original supports. At the front end, only one hole needed drilled, in the rear part of the command sphere, just large enough to allow the wiring through while still allowing the structure to serve as a locating stop for the front end of the steel rod. That's it for now.
- 59 replies
-
- 15
-

-

-
Want to know the community's opinion on Tally Ho! decals. I'm after how easy they're to use (if they slide over the model's surface before pressing them down with a cottob bud), and if they react well to Microsol (or any other softening solution). Asking because my attempts to use decals from Eastern Europe (ICM, Eduard) left me with transfers stuck solid to the surface of the model before being able to slide them into their final position. This is the set I'm interested in getting: https://www.scalemates.com/cs/kits/tally-ho-cz-32005-fw-190-friedrich--120715
-
Does any know of aftermatket exhaust pipes, like those shown below, that will fit an Airfix 1/72 Tomahawk kit? Chris
-
Dear friends, we present some new products from ARMORY Novelties available. Ready for shipment! Fairey Flycatcher late Jaguar-IV engine Scale 1/48 Plastic parts. Resin engine Photo etching Colorful beautiful decal Messerschmitt Bf 109E Foreign Service Aces Pt.1 scale 1/144 2 kits in the box Messerschmitt Bf 109E Foreign Service Aces Pt.2 scale 1/144 2 kits in the box Regards, Amarket www.amarket-model.com
-
This is a kit I've had on my to-do list for a relatively short time, but needs must, opportunity rises etc. etc... Did not expect to join the GB at the beginning, however, being confined to home there's no time like now. So, without further ado, I present you: The Swedish* Heavy Metal Display - Solo build. The kit is delivered in a sturdy, compact, but tall two-part packaging: Clicking around the site, I've also taken the liberty of adding some Aftermarket bits. Consisting of some LED lights:
-
Hey everyone! I could use some of your expertise about now. I need a set of 1/48 seat belts/harnesses appropriate for the Meteor Mk I prototype. I've been doing a bit of online shopping and see several types of RAF WWII belts. Can anyone please suggest which would be suitable for my Tamiya model? Any favorites out there? I've never used fabric belts but they would seem better intuitively to me. I've found pre-painted metal belts difficult to pose naturally. Thanks in advance for any help or suggestions! Cheers! Gary
-
Hey my modelling guru's, I need some info on using resin upgrades, and I have not been able to find much via YT. Partly because I am in a new house and haven't been able to get my internet hooked up yet, so I have to buy load on my crappy phone, and its REALLY SLOW, plus, most of the videos are based on full resin kits in Gundam or something, not really the kind of upgrade kits we face. Anyway, I am pretty sure I got the cleaning resin part, using respirators when sanding/cutting (what ever happened to the old highschool shop class, where lost fingers were a thing of pride, we are too safety conscious these days!) Anyway, I have some resin conversions from CMK in 1/48. Wow, these bits are small, looks like antenna and or pitot tubes stuck to the big resin base. Any tricks to removing them without destroying the actual parts? They look very delicate, and there is ten tikes the amount of wasted resin, as the actual parts, is that normal. Then a have some resin nozzles in 48 (why is that called quarter scale? I thought 1/4 =quarter scale) anyway, I am not sure how to best remove those nozzles without damaging the nozzles themselves? Any links to videos would be great for later, just some pictures and explaining will do just fine too. Thanks in advance, as always, Anthony stalker6recon D'Agostino
-
Late to the field, but with a nice compact build that should be fairly quick. I'll be building an A12 Matilda II CS of the Australian 2/4 armoured. Based on this picture found with a quick web search; Box shot And sprue shot Not shown here, because it's still on the way from Parabellum, is the Gasoline Matilda Frog conversion kit that I will be raiding the turret collar, tracks and brush guards etc from. I also think I have RB models Besa barrels in the stash, if so I will be using one in this build as well. Work has commenced, more pics tomorrow.
-
I've got two Takom 1/35 FV432's to build, and looking at the gpmg's in the kit I think a little a/m- a metal barrel, some etch perhaps - might improve it. Or even a resin job. I've done a search in Hannants as a start, with negative results. Probably poor search terms, but I have tried a fair few options. Seeking advice from the (shameless flattery!) Excellent AFV modellers on B/M as to is such a/m exists, and who makes it.
-
 Eduard Photo Etch Detail Sets for Airfix Fairey Swordfish Kit 1:72 Eduard Of all Airfix’s recent kits, the 1:72 Swordfish seems to be the one that has set the benchmark for future releases. Airfix really seem to have hit the mark with their Stringbag, as the kit features a perfect blend of fine detail, clever engineering and buildability. Now Eduard have released a brace of photo etch detail sets to build on the kit’s tremendous foundations. Swordfish (self adhesive) 1:72 Eduard The first set is a one-stop-shop for producing a super-detailed Swordfish. There are a multitude of parts for the kit’s already lovely cockpit. Starting from the bottom, the floor of the cockpit receives some additional details which help to add a realistic finish to the kit part. Belts are provided for the crew seats, as well as a new multi-part instrument panel and similar pre-painted parts for the radio kit. Details are provided for both the fixed, forward-firing Vickers Gun and the rear-firing .303 in Lewis Gun, including a tiny ring and bead gun sight. A whole host of smaller parts, such as throttle levers and cables for the control column, are provided as well. The overall effect will be a superbly detailed cockpit – no bad thing for a biplane with no canopy to get in the way! Eduard haven’t stopped there, however. The rest of the airframe benefits from a number of extra details too. There are quite a few surface panels provided which represent various access hatches. Having used a set of these on my recent Ju 88AA-4 build review, I can testify that they look excellent once in place. The Bristol Pegasus also receives some attention by way of ignition wiring and other details. As with the cockpit, there are literally dozens of small parts for detailing the undercarriage and inter-wing struts. Lovely as the Airfix kit is, the wing fold is one area that looks a little spartan. Happily, Eduard have this covered with some nice etch parts that capture the look of the real thing. Details are also provided for the ordnance supplied with the kit, including the torpedo. There are even details for the floats supplied with the brand new float plane version as well. Swordfish Zoom (self adhesive) 1:72 Eduard This ‘Zoom’ set is comprised of just the pre-painted self-adhesive fret from the set reviewed above. It is therefore cheaper and, presumably, zoomier. Conclusion How do you make an excellent kit even better? Add some fine photo etched details of course! If the Airfix Swordfish wasn’t brilliant enough already, Eduard have now enabled us to wring even more detail from the sprues. With the new floatplane version of the kit now available, it’s the perfect time to get stuck into what should be an absorbing build. Highly recommended. Review samples courtesy of
 -
Hello all, I am currently building two Eduard Fw190-A8s and am looking for a prop with external weights for one of my chosen options. Here’s the build: http://www.britmodeller.com/forums/index.php?/topic/235035722-eduard-fw-190-a8-dual-build/ Can anyone suggest an aftermarket company that produces this in 1/48th, preferably in the UK. Thanks Howard
-
 Hi everybody, Me and Juan (JFVicente) decided to try a parallel build this time. A few months ago, Juan asked me to sell him decals and masks for "Blue 57" from Begemot decal sheet. I said to him he will get them for free (whole Flanker Family 2 sheet) if we do two Flankers together. Then he promised a pair of aftermarket Alamo missiles, and in return I will send him my Archers, as Eduard gives too much for single plane in one box. So, I took another Ukrainian Flanker, from Eduard re-edition of Academy, and here we are. Each of us will complete different Ukrainian single seater. I will go for "Blue 56" and it will be built in Karlovac, Croatia. http://www.airliners.net/photo/Ukraine---Air/Sukhoi-Su-27S/0607109/L/ While Juan will make "Blue 57" in Madrid, Spain. http://www.airliners.net/photo/Ukraine---Air/Sukhoi-Su-27S/2250983/L/ We decided to start it now - this project was postponed due to our commitment on 1:72 scale projects: Juan with his superior Hasegawa Su-33 and me with my Italeri Su-34. So, we both have some "Flanker experience" in the past. We would also like you support us all the way, as it's first parallel build for both of us. Also, Juan usually makes 1:72 scale planes only, while I have already one unfinished Flanker in 1:48, started many, many years ago. So we expect a lot of motivation and hugs from you. No kissy, kissy this time. To preserve our "momentum" in this joint project we decided to open one topic for both planes. You will have everything on single place, regardless of update frequency. It could be that one of us goes faster or slower, or we will have different approach, but the goal is the same. In the next posts each of us will present his model with all the goodies we have collected. Juan, I wish you the best modeling time during next few months. Stay tuned, Tomislav
- 55 replies
-
- 2
-
-
- Academy
- aftermarket
- (and 5 more)
-
Howdy all. I have a question about aftermarket stuff for a Tamiya 1/35 Sdkfz 251/9 Ausf D. I have tracks lined up ,but don't know what to get to improve the detail of the kit. The only thing I can find specifically for this vehicle is a Verlinden set that has some photo etch and stowage type stuff. Other than that all I can find for Tamiya kits are other versions, i.e., 251/1, 251/7 and what not. So my questions are these: anybody have experience with the Verlinden set? and; will the other version stuff work for a 251/9 as long as it is the Ausf D? My knowledge of these vehicles is severely limited, so any help would be appreciated.
-
Hi all, I've been building the Revell A319/20's recently, putting a little more work into them each time. I'd really like some metal fan blades for the engines. A quick search hasn't turned up any. Does anyone know if they're out there? Chris
-
Good morning, I just thought I might ask the advice and opinions of members of the forum in regards to a project i'm starting. I was thinking of doing a 1:72 Airfix Vulcan "properly"; with aftermarket engines, intakes (possibly, you'll see later) and the white ensign model (WEM) stuff. I've also thought it might be an appropriate model to do some rescribing for the first time, along with flory washes, photo etch and resin- I had to choose this model So the few questions I would like to ask are as follows: 1. Can you use a steel ruler and is it adviseable for linear panel lines as a guide- rather than masking tape? 2. (Perhaps the most important decision) Which Vulcan to do?! I've got a choice between XH558 and XL360- having been in XL360 and purely because I quite like the 617 tail marking (I might be turning into an "anorak" ) I feel a greater sense of attachment to her, although I have seen XH558 display at Throckmorton last year and so I am quite keen on her too! 3. Should I have "everything" open (gear down, airbrakes down, bomb bay doors open, crew hatch open)? Or should I save some money and (if I should choose XL360) build the Coventry Vulcan as it currently is (and save additional money with FOD covers for the ghastly kit intakes)? Note: I would have built the Cosford Vulcan but I'm not keen on the highly glossed finish of XM598 4. Any other advice for building the Airfix kit? Joins to watch out for, etc. I know that 2 and 3 are very subjective points but I would greatly value your opinions. Many thanks, Sam Edit: the 617 tail marking on XL360 Edit 2: -Are there any definitive colour matches out there for either 558 or 360?
-
The next project, Need a break from green and black so I have decided to finish this project. I started it last year and for some reason put it to one side. Now I'm going to finish it. I was this morning going to start on the AFV Club Scimitar but having a few part started kits knocking around slowly getting damaged I thought it best to try and get some finished. A lot of work involved as the Tamiya kit is dated, It still builds into a great little tank if you put your mind too it. Dan
- 232 replies
-
- 5
-
-
- Build Blog
- US Army
- (and 2 more)
-
HI chaps, this has been on my most wanted list for a while now and i finally managed to get one yesterday. Its an absolute monster of a kit, but i'm wondering if there is any 'must have' aftermarket for it? I'm hoping to make a start on it early in the new year, thinking about creating a diorama with it recovering a tank (not sure what yet though, could even use a Tiger 1 i have waiting to built) If anyone here has built one i would be very interested to hear your thoughts on it, and pics would be a bonus. Thanks, Nick
-
I was chatting with an acquaintance the other day combining my twin passions of modelling & technology! He mentioned how 3D printing was coming on leaps & bounds and how it would find its way into the home before too long. Having seen for myself at CES 13 in Vegas (the massive annual consumer electronics show) & in TV reports from CES 14, it's clear this area is one to watch. Are they any views how this would impact on the accessorises/after-market market for modelling? The clever bit will be doing the design work on CAD and then selling the files as downloads that can be 'printed' remotely. Perhaps your 'Local Model Shop' (if you have one!) would be able to justify investing in a printer, which would also help bring people to the store. No mucking around with casting - just 'print' on demand. No stock holding. From what I understand the detailing is pretty good nowadays, the materials pretty workable and you can even 'print' now in different colours. Thoughts?
-
Hi folks, I'm currently beginning the 1/48 Airfix Sea Harrier FRS 1 which is a solid base kit but seriously lacking in detail. I've already purchased cockpit goodies and some PE from Eduard but wondered if anyone has experience of the best purchases for after market air intakes, undercarriage, ordnance etc to help make it sing. If anyone has any advice or guidance it would be extremely appreciated Many thanks Kris
-
Are there any after-market resin or photo-etch parts which are really recommended for this kit, or is it good enough out of the box? If any resin parts are really beneficial, are they an easy fit? Derek
-
 Hi All, After passing the mark of 10 builds (3 for real and 7 test subjects) the newbie here is setting a bit of a challenge and will try to build the RAF Reg Arrow 50th display season (1:48). This one here. My plan is to have it in rest and with open canopy which then requires nice details as it will also be my first aircraft that will have a base. So I thought about asking you guys for suggestions of 2 aftermarket products, a set of seats as this one wont have pilots and a cockpit details set (maybe just the dashboard details would do). Also any other tip about this kit is welcome. I know that it seems like they fixed the issue with the decal which apparently was to thin... Cheers Dema PS if that is not the right forum, please relocate that for me.
 -
Hi, I'm not sure if I am posting in the correct section so apologies if I am not! So as I'm just easing myself back into the hobby I saw the 1/72 Gnat T.1 kit and had to pick it up so I think I am going to make this my next build as its looks a nice easy straight forward build, however I am considering upgrading the cockpit to an aftermarket set. Has anyone else built one of these and used the Pavla Pit and if so were there any issues I should consider prior to ordering one? I guess if I am going to use the pit kit the next question is has anyone cut the canopy so that it can be left open to admire the additional detail and if so do you have any tips? Its as cheap as kits come really so Im not too bothered if I do make a hash of it, I just thought I would see if anyone had any advice to save any frustration that may be heading my way! Cheers


(510x640)-Copy(95x120).thumb.jpg.33073138e01aa81779639a845926753e.jpg)