Search the Community
Showing results for tags 'academy'.
-
AT-6C/D & SNJ-3/3C Texan (SH72450) ’Training to Win’ 1:72 Special Hobby The North American Aviation T-6 Texan has a long history dating from its inception as the NA-16 in 1935 right up to 1970, and even today there are flying versions in various Warbird associations, sometimes masquerading as Mitsubishi Zeroes in films. The T-6 (in various designations from NA-16, through B1 to T-6 etc.) was originally produced as a basic trainer but over time it was upgraded to an advanced trainer (AT-6 Texan) with improved performance for basic and combat type flying training, plus an added facility for training rear gunners. The T-6 was also supplied to Britain and Commonwealth nations and designated the Harvard (I & II) and was in service during WW2 and for many years post war. Many British, Commonwealth and American pilots earned their wings flying a Texan, although it was known to have a fairly severe stall characteristic. Powered by a Pratt & Whitney R-1340 Wasp that gave it a unique harsh buzzing engine note, the SNJ-3C was fitted with arrestor gear to facilitate deck landing trials for pilots destined to serve on aircraft carriers. The Kit This is a re-boxing of the Academy kit by Special Hobby with an additional injected clear sprue for the different canopies used and some resin parts, a small Photo-Etch (PE) fret, a miniscule slip of pre-printed clear acetate sheet, a decal sheet and instruction booklet. The Academy kit is well-regarded, so the additional parts and decal sheet should give the model an additional boost by the time you have completed it. Construction begins with the cockpit, starting with the two seats, which both get a new set of PE four-point seat belts before they are glued to the cockpit floor, which also receives a linked pair of control columns running down much of the centre of the floor. The sidewalls are applied to the floor along with a central coaming, rear bulkhead and rear deck, with a decal for the instrument panel under the coaming. The front panel also has a decal, and is attached to a spur inside the front of the cockpit aperture within the fuselage, while the cockpit assembly is held in place by a number of raised supports, but first several small sections around the cockpit and front cowling are removed, as shown in red. Only one decal option doesn’t have the resin insert in the starboard side of the nose cowling, so get your decal option sorted early in the process to avoid issues. The exhaust collector ring is slid over the fluted front of the fuselage, then the engine is made up, consisting of a bulkhead to which the engine is moulded as one part, fixing on a ledge inside the resin cowling, except the first decal option, which uses the kit part. The twin bladed prop inserts into the front of the bell-housing and is secured at the rear by a small cup that can leave the blade mobile. The low-mounted wings are supplied full-width on the underside, into which the central bay insert is placed, painting the area interior green, as well as small sections of the inside of the upper wings where the gear legs will fix. It can then be mated with the fuselage, and the completed engine assembly attaches by two pegs at the front. A resin machine gun with fairing is glued onto the starboard side in front of the cockpit for one decal option, and the gunsight is only needed that same option, folding up into a triangular shape, with the glazing replicated by the small and eminently losable slip of acetate, taking great care with the glue. The elevators are each a single part and fix to the tail by the usual slot and tab method, then the canopy can be installed, starting with the windscreen, then adding the two rear sections that are found on the additional clear sprue. Another clear part forms the glazing for the wing-mounted landing light in the leading edge of each wing, and a pitot inserts into the starboard wingtip. An intake attaches to the port side of the forward fuselage, then right in the pilot’s eyeline, a post for the radio antenna is fixed to the deck in front of the windscreen. Inverting the model (taking care of that antenna), the landing gear can be made up from individual legs with separate outer bay doors and wheels. The tail wheel has a choice of a faired-in assembly for one option, or a bare wheel with strut moulded-in for the rest. One camouflage option also needs an arrestor hook and curved bumper from the resin parts glued in front of the tail wheel. The final act is adding an intake under the rear of the engine cowling and a pair of actuators to the undersides of the elevators. You are also invited to fill a small hole under the wings in between the two main gear bays, and flat-back three raised lights under the fuselage as these variants didn’t have the recognition lights fitted. Markings There are a generous seven decal options on the sheet included with the kit, and each one has a page devoted to it with four views and a list of colours using names and Gunze codes. Most of them are painted silver, but with enough variation to appeal to most modellers, but my favourite is the one in blue grey. From the box you can build one of the following: AT-6D-NT Texan 4134617 ‘Bridget SPM Baby’, 67th Tactical Reconnaissance Group, Middle Wallop (USAAF Station 449), Great Britain, 1944 SNJ-3C Texan BuNo. 6792, J-9, NAS Glenview, Illinois, Autumn 1942 SNJ-3C Texan BuNo. 6792, 11-1, Marine Aircraft Group 11, Cactus Air Force, Turtle Bay, Espiritu Santo, South Pacific, October 1943 AT-6C 42-3996, 77th Flying Training Wing, Foster Field, Texas, 1943 SNJ-3 Texan BuNo. 6773, Training Squadron Three, Detachment 8-B, NAS Pensacola, Florida, 1942 AT-6C Texan, 41-17249, X-508, Luke Field, Arizona, 1942 AT-6C Texan, 41-17249, X-508, Luke Field, Arizona, 1942 The decals are printed in the Czech Republic, and are in good register, colour density and sharpness, with a thin gloss carrier film over the printed areas. Looking at the carrier film I surmise that they are printed by Eduard, and as of 2021, the carrier film from Eduard decals can be coaxed away from the printed part of the decal after they have been applied, effectively rendering them carrier-free, making the decals much thinner and more realistic, and obviating the need to apply successive coats of clear varnish to hide the edges of the film. It’s a great step further in realism from my point of view, and having now tested them on my recent F4F-3 Wildcat, I’m a fan. Conclusion A welcome reboxing of a well-regarded kit with some resin and PE extras to give it some individuality, and a host of interesting decal options that you can remove the carrier film from after application. Highly recommended. Review sample courtesy of
-
 Had this kit since it came out, just needed a good excuse to get it started & here it is. The only D-Day special that I didn't manage to get a photo of with these markings, got the other two so building this will make up for it. I've been told that 91-0603 with the D-Day stripes & yellow tail was slightly more elusive of the three which only makes me feel slightly better! So - Academy kit - 1/72 F-15E 494th 91-0603 of the 48th FW. Initially I would have liked to build it out of the box, but the engine nozzles look ok but not as refined as I'd like so if anyone could recommend some decent resin nozzles for it would be appreciated. I might even buy some 3d printed cockpit details, not sure yet. Just a small start to it. Removing the seam line on the canopy then a dip to help give it some clarity after a fine buffing. That's it for now. Will be minimum time available this week to go any further with it as I hopefully will try & get some pics at LN on my day off. Also does anybody know if the blue tail F-15C of the 493rd "D-Day Special" has been done in decal form? Would be great if this is out there somewhere. Martin
- 11 replies
-
- 6
-

-
- 1/72 F-15E
- Academy
- (and 1 more)
-
 Hello everyone! Here's my rendition of the much-maligned Academy 1/72 Spitfire Mk. XIV kit. Dare I say it on Britmodeller of all places, but I admit that I'm not that knowledgeable about the Spitfire, particularly the Griffin-engined marks. The kit was a gift from my now ex-girlfriend back in 2018, when she kindly tried nudge me back into the hobby as a respite from a severe work burnout. It sat in the stash for a while but over the past couple of years I found myself quite in debt (a mortgage and family health issues, not the criminal sort), so having a lot of free time at home, I started building through the kits stash, a dozen kits that were sitting idle for well over fifteen years, when I bought them back in high school. In fact, I completed this kit back in May of this year, but I've been a bit lax about taking photos and sharing the build - because if there's anything worse than my modelling skills, it's my skill as a photographer! I believe much has been written about the Academy kit. It's a strangely mixed bag of very fine engraved panel lines, excellent cockpit detail, incorrect overall shape, very incorrectly shaped radiators, thick and incorrect decals. Given my lack of in-depth knowledge on the subject, I decided to go easy on this one and not try to correct the geometry errors but build it mostly out of the box with minor improvements - I added a glass reflector gunsight, and "padded" the seatbelt decals with masking tape. This didn't turn out as good as I hoped but it's still better than flat decals on the seat. The tires are finely detailed and wight-flattened out of the sprue but there are alignment pins that causes the flat area to sit at an angle against the ground, so I had to reshape them using several layers of CA glue and a lot of sanding to get them aligned. Paints are entirely my own mix of Mr. Color acrylics, top coated with a 1-to-3 mix of Mr. Color acrylic gloss and matt varnish. Initially I used the decals for the DW-D service tag but as the Academy decals were way too dark for RAF Sky, and somewhat transparent, I had to mix a new batch of Sky and paint over them with a brush, then coat with varnish again. Definitely was a nerve shattering experience as I repainted it on the evening before taking the model to an expo last week. It seems that the yellow bands on the wingtips should be smaller but I'm going to overlook that one. Spitfire Mk. XIV RB159, DW-D, No. 610 Squadron "County of Chester, Summer 1944, flown by CO Richard Newbury who shot down 9 V-1 flying bombs. Wikimedia commons photo of the real plane. Anyway, enough blabbering, here's the end result!
 -
Here is my latest and probably my most detailed 1/72 model to date. I used the "old" 😉 but still very good kit by Academy released in 2007. Good fit, decent detail and great decals printed by Cartograf. To show more movement and detail I've dropped the front slats, ailerons and flaps and I've added the nice and crisp Aires cockpit resin set and Black Dog's box which includes the electronic bays, canon, radar, spine and engine. The Black Dog set is good but is not at the same fine level as the Aries one, and in fact some of the pieces had pretty bad fit, so I ended up replacing them with some scratch build ones like the partition wall in the engine bay or the hatches for the avionics. All weathering was done using oil paints. F/A-18A+ US Marine Corps VMFA-232 "Red Devils", USS Nimitz, Persian Gulf 2007 Thanks for looking!
- 49 replies
-
- 83
-
-

-
Hi all, My mad dash to finish up shelf-queens continues. The next one off the shelf of doom (tm) is Academy's fantastic F-84. I only changed out Academy's dodgy decals with a random Superscale sheet I had laying around. I forget the squadron, but I believe it's from a unit stationed in West Germany in the early 1950s. The kit has a well-earned reputation for being excellent, and construction was problem free. The project stalled on my desk mainly because of my fickle ways, and because I forgot to add nose-weight. I had it assembled, painted, and even partially decaled, but set it aside when I realized it would be a tail-sitter. Then earlier this year I discovered a product called liquid gravity. I was able to get enough of the tiny pellets in through the open nose to make the kit almost balanced. More weight was then added into the drop tanks, and problem solved! The Superscale sheet was sized for the Tamiya kit and so didn't fit exactly. Gaps along edges needed to be touched up with paint, and some creative centering and stretching of decals was required on areas where its less obvious. The drop tank checkers were particularly tricky, and I messed up the alternating pattern at the top where the two halves meet. I can live with it, I Imagine Airman Pyle soldered two wrong tank halves together or whatever :) If its screw-upable in 1:72 it could have been screw-upable in 1:1. Looking at the finished kit, I wonder why I let it sit unfinished on the shelf for five years. It ain't perfect l, but I'm happy with it.
-
 Everyone builds airplanes, but I don't. This needs to be fixed. I want to build a prototype XF6F1 Hellcat. I will use the ACADEMY model.
 -
Hello guys I would like to show you my new model F-15SA (saudi advanced) royal saudi Air Force Actually the kit I use is Academy F-15K 1/72 but I design and print some F-15SA part the decal is custom made I hope you like it ˆ_ˆ
-
 Academy is to re-release its 1/72nd Lockheed Martin F-22A Raptor kit with ref. 12527 Sources: http://www.academy.co.kr/6q/board_news_main.asp?pMenuId=BOARD00002&pCode=9035&pCategory=NEWS1 https://www.facebook.com/academytoy/photos/pb.1450541581840342.-2207520000.1442819447./1718872271673937/?type=3&permPage=1 F-22A Raptor "94th FS, Langley AFB" V.P.
 -
Good day friends, Here is the second kit I was able to complete after my hiatus from Britmodeller. This is the F-35B from Academy. While I am not fond of the subject, I am of the kit. This offering from Academy turned out to be one of the most enjoyable and fun kits to spend some time on. The highlights are as follows………… 1. Built straight out of the box. I did NOT add the variety of ordnance, markings / decals, or other details. 2. Overall color : Mission Models Have Glass Grey #MMP-083 ( FS 36170 ) 3. Weathered using washes The level of detail is superb with this kit and more importantly, the fit is excellent!!!!! Often, when a kit has an abundance of detail, the fit between parts tends to suffer. Not with this one. This STOVL version can be built with all of the doors opened and exhaust nozzle pointed downward or in the option I chose here. Furthermore, newer versions of the F-35 are the overall Have Glass grey ( with a bit of sheen to it ) and no longer employ the complex lighter edge colors for specific panels although decals are provided to create one. I enjoyed the kit so much that I went out and purchased two more. This is a great kit and I recommend it for all skill levels. Thank you in advance, Mike ( My apologies for the poor quality of photographs of this Academy F-35 and my previous Tamiya P-47. I do not have the proper studio for the high quality photographs that are so commonly found here. Portable lighting, white poster board paper as a background, an IPad, and my poor skills do not produce the desired results. )
-
With all that has befallen the UK in the last few days, it has been all too easy to overlook other worldwide events. Yesterday, 11th September, was the 21st anniversary of the massive co-ordinated terrorist attacks on the United States. This year also sees 50 years since the F-15 first flew. To mark both events, I have built the 1/72 Academy F-15E kit, with Two Bobs decals for "Lady Liberty" of the 48th Fighter Wing (The Statue of Liberty Wing), USAF Europe, based at RAF Lakenheath in the UK. This aircraft also bears the image of the Twin Towers along with the text "Never Forget". ... and with my other build of the month, more of which later !
-
Hello all, This is Academy's 1/72 P-47D Razorback painted in the markings of Lt. Donovan Smith's aircraft "Ole Cock". There were a few corrections made to the kit, most notably changing wingsides for the pitot tube from right to left; but other than that the kit is pretty good and the detail is very sharp. The kit was painted with gunze and real colors acrilycs, chipping fluid was used to weather the model. The aftermarket products used are PE for the interior, True Details wheels and a Master pitot tube, I also used a spare Tamiya P-47D propeller. The decals used are Hussar, part of their book Fighting units in color 56th Fighter Group part 1. Hope you enjoy!
- 15 replies
-
- 43
-
-

Messerschmitt Me.163B "Komet", 1/72 Academy
SarmaT posted a topic in Ready for Inspection - Aircraft
Greetings, friends, colleagues and forum guests! I'd like to show one of my models, which I completed at the end of last year. I am not a fan of Luftwaffe models, however, German jets of the end of WWII, including "paper" projects, so called "Luft'46" excite my imagination. Me-163B "Komet" is one of them. Indeed, one of the first jet aircrafts in the world, which was put into service and actually participated in the battles, and there was only enough fuel for 7 minutes of engine operation. An interceptor fighter that did not have the opportunity to repeat the attack. There are also a lot of interesting things in its appearance: the “tailless” a/c, which threw off a cart with wheels during takeoff and landed on a retractable ski, probably had the first cockpit glass without a binding. So I could not pass by the "Komet". Those few facts that I knew about it made me eager to have such an aircraft in my collection, and an inexpensive set from Academy, which also includes a tractor, determined the final decision. As usual, I would like to show pictures of the model first and then in the next post to reveal some steps of assembly.- 23 replies
-
- 37
-
-
-
Hi all, had nothing small and simple enough to knock together in 24 hours that I hadn't already started so had to raid my dads stash for his Academy MiG-21. Nice, simple kit- comes with Finnish decals but since its just a MiG-21F-13 I may use some spare decals and do it in an East German scheme, maybe even a Vietnamese or Chinese scheme as a J-7. Looking forward to taking part in my first Blitzbuild weekend. Thanks for looking in!
-
 My entry, Academy's newish Eagle. Sexy sprue glamor shot: And the parts that have always left me puzzled. The kit is very well detailed for the scale, panel lines are finely engraved, and then you get to the burner cans. Seriously? Anyway, got 2 resin seats on their way to me. There was a very long internal debate about getting some resin upgrades for the cans, but alas, I cheaped out. Will see what I can achieve with fine wire and plasticard if the mood strikes me. Roll on the 27th!
 -
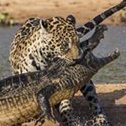
 #17/2022 My dad´s next completion. It´s a long way to Mukumbura... Used the old Academy kit from 1997. It has its flaws and issues but overall not that bad. Wings to fuselage joints and air intakes needed some more filler and work. The cockpit is rather basic and the seat too small. Used cockpt sidewalls and seat from a True Details cockpit set. The landing gear and covers (and their mounts) are a bit fragile. The frontal front cover broke off twice. Although the Hawker main landing gear has a bit of an "O leg" character, Academy´s legs look a bit too much inwards, my dad didn´t change that. The Academy kit only includes the 100mm rocket pods which the Rhodesian Airforce didn´t use. Took some suiting 68mm pods from the Airfix Hunter F.6 kit. Had an Xtradecal sheet and one from Fundekals. Used the Xtradecal ones because their size of the roundels did fit better to the Academy kit. Model shows an aircraft of the RhAF in the early 70ies when all their aircraft still wore all ID and national markings which were all removed later on in the war. This aircraft had its number "1821" applied on the frontal front gear cover. Xtradecal provided no number, Fundekals only "821", so kept it off. The Rhodesian and later Zimbabwe Hunters had distinctive yellow stencils on each fuselage side of the cockpit, which aren´t provided by neither of the two sheets. Painted with Tamiya XF-52 Flat Earth and XF-81 Dark Green (RAF). The sliding canopy is too thick and narrow to display it open, so you should use a vacform one if you wanna do it open. Maybe gonna build a new Rhodesian Hunter someday with the Airfix kit. Build thread here https://www.britmodeller.com/forums/index.php?/topic/235109869-bush-war148-hawker-hunter-fga9-rhodesian-airforce/ DSC_0001 by grimreaper110, auf Flickr DSC_0002 by grimreaper110, auf Flickr DSC_0001 by grimreaper110, auf Flickr DSC_0001 by grimreaper110, auf Flickr DSC_0005 by grimreaper110, auf Flickr DSC_0006 by grimreaper110, auf Flickr DSC_0007 by grimreaper110, auf Flickr DSC_0008 by grimreaper110, auf Flickr DSC_0009 by grimreaper110, auf Flickr DSC_0010 by grimreaper110, auf Flickr DSC_0011 by grimreaper110, auf Flickr DSC_0012 by grimreaper110, auf Flickr DSC_0013 by grimreaper110, auf Flickr DSC_0014 by grimreaper110, auf Flickr DSC_0015 by grimreaper110, auf Flickr DSC_0016 by grimreaper110, auf Flickr DSC_0017 by grimreaper110, auf Flickr DSC_0018 by grimreaper110, auf Flickr DSC_0019 by grimreaper110, auf Flickr DSC_0020 by grimreaper110, auf Flickr DSC_0021 by grimreaper110, auf Flickr
 -
This will be a 1/48 Sabre in USAF colours, but first I need to explain why… Back in August 2020 I was contacted by an old acquaintance who’d rescued a battered F-86F forward fuselage and wanted my advice on trying to identify it. I assumed it would be either an ex-USN F-86F drone, or possibly even a mis-identified US Army QF-86E. But photos told a very different story: this aircraft was no recent recovery but something obviously much older in terms of the period it had spent as a wreck. Rumour had it that the aircraft had, “…bellied-in to an airbase in the Midwest, somewhere like Ohio or Illinois, in the 1950s”. A collector had then bought it as scrap from the base sometime in the 1960s. There were no data plates apparent, and nothing visible in terms of paint or markings. But I could see it was definitely an F-86F, and tantalisingly the new owner said he could just make out “Air Force F-86F-25-NH” and “51-133…” stencilled beneath the cockpit. So those years of transcribing record cards came to the fore, and straight away I managed to get a shortlist of maybe 15 F-86F-25s in the 51-133xx block which had been written off; and from that, five which had been lost outside of the west coast. And of those five, just one had crashed in the Midwest – in Illinois in fact. This aircraft had landed and caught fire, the pilot escaping. The owner later told me he deliberately hadn’t mentioned evidence of fire damage to anyone and so my Illinois candidate appeared to match the damage he’d found on his fuselage. Evidence of squadron markings sealed the deal and the Sabre was positively identified as s/n 51-13395, which had suffered a landing accident on 14 July 1953. The story of its survival is quite a tale. The 479th Fighter Bomber Wing (FBW) had been activated on 1 December 1952 at George AFB in California, assuming the personnel and assets of the 131st FBW, an Air National Guard (ANG) unit. The 131st had been called to active duty in March 1951 and with its three attached F-51D Mustang Squadrons (the 110th Fighter Bomber Squadron (FBS), Missouri ANG; 170th FBS, Illinois ANG; and the 192nd FBS, Nevada ANG), had moved from the Midwest via Bergstrom AFB in Texas for assignment to Tactical Air Command (TAC) and set up home at George AFB in California. When the 479th FBW was activated, it was assigned to Ninth Air Force and commanded by Col Virgil L Zoller; Col Woodrow W Ramsey took command of the tactical Group, which comprised three fighter bomber squadrons (FBS), the 434th, 435th and 436th; the 435th FBS took over the aircraft and assets of the 192nd FBS (deployed in Iceland) and would continue to operate the F-51D there. Each of the flying squadrons was assigned an individual colour: red for 434th FBS; green for 435th FBS and blue for the 436th. Conversion from the F-51D to modern F-86F equipment began in early 1953, with 436th FBS the first to do so. All of the Group’s new aircraft would be the F-86F-25 version, with the ‘dual-store’ wing and ‘6-3’ leading edge. The transition from propeller-driven Mustang to jet-powered Sabre was largely complete by 30 June, when all but two of the new type had been received. 51-13395 had been received on 3 June and assigned to 435th FBS. 434th FBS: 435th FBS: 436th FBS (with Arctic conspicuity markings applied during Alaska deployment) Newly-converted to the Sabre, one of the first tasks for the 435th FBS was to deploy a number of aircraft to Detroit-Wayne Major Airport in support of the International Aviation Exposition. The event, which would run from 9 thru 12 July 1953, was open to the public, with tickets priced at $1.50 for general admission and $2.50 for reserved seating; children under 12 would be admitted free. July 9 was promoted as Ladies Day, with successive days being titled Aviation Industry Day; Aviation Pioneer Day and Salute to Armed Forces. The squadron deployed eight F-86Fs from George AFB so that they could position one (51-13361) in the static display at Detroit and the remaining aircraft to Selfridge AFB, 40 miles to the northeast. The mission was led by squadron commander Maj William Nacy in F-86F 51-13361 and his crews included Korean War ace Capt Joseph McConnell, who had just returned from the Far East and been assigned as a flight commander with the 435th FBS for just a month. The Sabres arrived at their Selfridge and Detroit destinations on or before Wednesday 8 July. The static machine at Wayne Major was placed in a row of USAF aircraft while the Selfridge group had their drop tanks removed and would be flown across to Detroit so that they could be in place there each day. The “Salute to Armed Forces” display on Sunday 12 July kicked off with the arrival of a Navy F9F Cougar and a 435th FBS Sabre, both of which had just completed a symbolic flight from Kitty Hawk, NC – the site of the Wright Brother’s first powered flight just half a century earlier. But undoubtedly the highlight of the day was the appearance of seven Korean War aces, who each arrived over the display area at high speed in the F-86Fs previously positioned at Selfridge by the 435th. At the conclusion of their segment, the aces landed at Wayne Major to meet their adoring public. Aside from Joseph McConnell, the other MiG-killers comprised Col Royal N Baker, Lt Col Richard D Creighton, Maj Frederick C Blesse, Capt Emanuel Fernandez, Jr, Capt Ralph Gibson and 1/Lt James F Low. With the show complete, the task of ferrying 51-13395 back to George AFB fell to 1/Lt Charles Eichbaum, who had previously flown it at Selfridge and probably also from California. The first leg was from Detroit to Selfridge, where ground crews refitted the drop tanks and serviced the aircraft with 835 gallons of fuel and 8 quarts of oil, probably on Monday 13 July. The following day, Eichbaum and two other Sabres led by Maj Nacy departed Selfridge at 8am and set course for George AFB via their first refuelling stop at Scott AFB, Illinois. Lieutenant Eichbaum later stated of this flight, “After flying approximately 20 or 25 minutes [at 25,000 ft] I noticed my drop tank amber light come on. This light when lit, indicates that the drop tanks are empty under normal conditions. The fuel quantity gauge for internal fuel was indicating that fuel was now being used from the internal tanks. I called my flight leader and told him my drop tanks were empty, as I thought that they were. At 1750 pounds of fuel [approximately 265 gallons] as read by my fuel quantity gauge I called him again and gave him my fuel reading. He told me to land at Chanute which was about 30 or 35 miles to the right of our course. I broke out of formation and contacted Chanute Tower and told them of my trouble". This is Lt Eichbaum pictured whilst in jet training at Bryan AFB: He continued, “Since I had lined up on Runway 18 I asked for that runway and proceeded to make a normal approach with my base leg out slightly so that I could set down on the end of the runway. I came in over the fence at about 155 or 160 knots with power about 75%. When I saw I was going to land on the end of the runway I cut the power. I started my round-out and as I was rounding out close to the ground my left wing dropped. I started to add power and right aileron, but it was too late as I had hit on the left gear. I cut power and kept the plane going straight down the runway. The plane was leaning to the left and I thought I had a low gear or a soft tire. The Tower told me my left wing-tank was on fire. Immediately I stopped the plane, stop-cocked the throttle, shut off the engine master switch and battery switch, released myself from the safety belt and shoulder harness, and got out of the plane as soon as possible.” The base fire department deployed three appliances to the scene of the accident but by the time the fire had been contained, the aft section of the fuselage had burned through and the left wing was badly damaged. Investigation later revealed that a fuel connection to the left-hand drop tank was loose, which had interrupted the flow of fuel and resulted in an out-of-balance fuel load. The damage is shown below, and highlighted in red, the evidence of squadron markings applied on the vertical tail. Following its accident, the Sabre was transferred to the 3345th Technical Training Wing at Chanute AFB and recommended for salvage. It would appear that 51-13395’s burned carcass was parted out shortly after the accident and the heavily-damaged aft fuselage section scrapped immediately. The proximity to Chanute’s Technical Training school would make it probable that the Sabre’s J47 engine made its way there, to be used as an instructional aid. But the forward fuselage survived largely intact, along with a section of wing; its condition would have made it suitable as a fire/rescue training aid at Chanute, and evidence on the surviving airframe supports this theory. Circa 1960 the forward fuselage of ‘395 was disposed of, to Earl Reinert, an Illinois-based pioneer of the post-war warbird movement. A few years after Reinert had started collecting old aircraft, a young carpenter in Newbury, Ohio also caught the bug, frustrated at seeing the nation’s aviation heritage ending up in the smelter. His name was Walter Soplata, and he would arguably become more well-known than Earl. In early 1966, Walter became the new owner of the mortal remains of F-86F 51-13395 and its forward fuselage and wing section were loaded onto Walt’s trailer and towed by a very rickety Chevrolet Suburban, back to Ohio. Walt had paid Reinert $100; at the time of its accident, ‘395 had been valued at $159,377 (airframe) and $58,505 (engine). But being so badly damaged, Walt wasn’t particularly interested in displaying the Sabre, and it is likely that he saw it as a possible source of parts or even as a future trade. So it sat, unloved for many years in the back garden and gradually faded into anonymity. In the mid-1990s it passed to a collector in Oklahoma, and then in 2020 to its new owner in Alabama. The photo below shows the forward fuselage whilst at Walter Soplata's property: To the model. At the start of 2022 I used two Airfix 1/48 Sabre 4 kits to make a TF-86 trainer - WIP and RFI here: I had lots of parts left over from the trainer conversion, and wanted to use them if possible. Going even further back, several decades ago I used the 1/48 Academy F-86F as the basis of a CAC Sabre 32 conversion, using the High Planes fuselage. So as a result I have had an Academy fuselage spare also. With these in mind, I aim to depict F-86F s/n 51-13395 in 435th FBS colours by kit-bashing these bits together plus a few other parts. The basics of the kit-bash will be: Airfix wings, glazing, tailplane, drop tanks, cockpit and landing gear Academy fuselage and intake Eduard F-86F kit markings (modified) and Caracal serial numbers Eduard PE for cockpit details Scratch-built ejection seat The cockpit will be black throughout, since the Interior Grey scheme was introduced just after ‘our’ Sabre at Columbus, from s/n 51-13398. Several misconceptions also need to be mentioned here. First of all the notion (stated in a number of F-86 publications) that Korean War ace James Jabara flew with the 435th FBS. This is likely due to fellow ace Joe McConnell being assigned to the squadron and causing confusion. Either way, the ‘Jabara’ story seems to have gained erroneous credence, despite him being in Korea and then assigned to an F-86D training unit (4750th TW at Yuma AFB from 1 September 1953) for the entire period that the 435th operated the F-86F. He also wasn’t one of the aces who flew the squadron aircraft in 1953. Here are a few incorrectly-annotated images for example: Secondly, and more widespread is the belief that 435th FBS Sabres were trimmed in red rather than green. Not only has this error been perpetuated in at least one publication, but Eduard also got it wrong with their version of the Hasegawa F-86F kit and there’s even an airworthy Sabre painted in the incorrect red colours! These renditions (bar Eduard) even go so far as to apply Jabara’s name to the canopy rail! To clarify, 435th FBS Sabres had green trim, which is corroborated by the colour photographs above and at the bottom of this post. Not only this, but red has been independently confirmed as the colour allotted to 434th FBS (and via the really poor-quality shot I obtained from a 434th FBS crew chief many years ago above). The origin of green for 435th FBS seems related to it being known as “the shamrock squadron” within the Group, with many of the 435th Sabres wearing a green trefoil leaf on their right-hand gun door. Furthermore, there are small areas of green-coloured trim remaining on the less vulnerable areas of 51-13395. This is one of the green-painted areas: And this is the "Jabara" aircraft, with the canopy rail not showing his name, but apparently that of "Pilot Capt Jones R. A". So quite a story and hopefully putting all those disparate parts together in model form will somehow serve to correct the various bits of physical and historical damage from the past. These are the main bits I'm using. Academy fuselage halves and intake ring. I now think that the other parts are Revell F-86D and I'm not sure if I'll be using those. And the remaining Airfix bits - note that the fore and aft sections of the lower wing are missing from their donation to the TF-86 conversion: And this one made me laugh: I was so convinced that I had a wingtip/aileron part missing that I even annotated the 'only' one I had (arrow). No prizes if you can spot the other one (I spotted it but only after emptying the bin where I'd just thrown some sprues)... And some invaluable Caracal serial numbers in the correct NAA font: So I have a bit of work to do but it's only plastic. What's the worst that can happen?
- 44 replies
-
- 27
-
-
-
 Hi all, After what seemed like forever (though actually just 4 months, because I got sidetracked by other projects) I managed to finish Academy's 1/72 Hellcat, the kit itself isn’t bad at all, the shapes look good and the detail is pretty good too, though there are some downsides too, some of the pieces are a little thick, some putty is needed in some places and the cockpit detail is a little lacking, but overall, a pretty good kit. The kit is mostly OOB except for some Eduard photo-etched (used in the cockpit and engine) and resin wheels, and replacement gun barrels made out of brass tubes. I also added a resin pilot figure, which I painted, to add some scale to the build . The model was painted using gunze, AK real colors and mig acrylics. I used Illiad's millestone decals for this build, the decals where pretty thin and tend to break a lot. The weathering was done using mig enamel washes, and for the exhaust burns, I used Tamiya weathering powders. I am still learning a lot about modelling, especially aircraft modelling, so I took this kit as a challenge to expand my modelling skills; this is only my third aircraft model and, this was also my first-time doing exhaust burns. I hope you enjoy it! Comments and constructive criticism welcome! Next up an Airfix and Tamiya 1/72 P-51D mustang! My Dad helped me take a pic of the underside.
 -
It´s a long way to Mukumbura..... My dad´s next project, soon to be started DSC_0010 by grimreaper110, auf Flickr gonna do the lower scheme DSC_0011 by grimreaper110, auf Flickr
-
 Hi all. It's been a slow year at Casa de Crosby but a second build has crawled it's way over the line. The kit is the quite nice 1/72 Academy F/A-18D converted to an Aussie B. In order to get to the B version that we flew, a few lumps and bumps need to be removed from the plastic as well as a few omissions in the way of the ECM blister behind the canopy and the cheeks of the nose. Aussie machines also had the catapult launch bar replaced with a square piece of steel bar similar in weight to the original launch bar. They did operate without the launch bar for some time however shimmy problems of the nose gear required the installation of the bar to negate this problem. Another item that needs to be addressed for RAAF machines is the tail stiffener on the left side of each of the fins. The Kinetic kit comes with the stiffeners as etch items so I scanned then traced them in Affinity Studio, scaled them down to 1/72 and then cut them in vinyl. A bit of Mr Surfacer of the top and they blend in well. The reinforcing cleats at base on the inside of the fins are also needed however as this kit was a D version they weren't supplied. If you've the A/A+ boxing you'll be in luck as they are included. I made mine from some plastic card cut to appropriate size and shape. The decals are from Ronin Graphics here in Australia. They are very thin and the colour density is excellent but they are quite fragile if not handled correctly. I managed to fold a section of the tiger decals on itself so had to order a second set...doh. Anyone want a 95% complete set of this scheme in 72nd? A colour chip of the orange is also provided with the decals so some paint alchemy, 30 minutes and lots of test spraying and I think I nailed the colour. There are many photos of this jet showing how worn out the grey scheme was at the end of its service life. A good example are the stabs. The left and right side are inter-changeable and this can be seen in the photos with the lighter colour of the underside appearing on the top side indicating they had been swapped out. I could spend hours on the weathering of the airframe but I'm happy with where I've got it to. Perhaps if it was 48th I'd spend a lot more time on it. Enough words, onto the pics. Hope you like! Mick The sticker is courtesy of a local chap in my home town who does a heap of cool retro style ADF stickers. The badge is also the official number of total hours that RAAF Hornets flew during their years of service. Bancroft (the workshop mascot) has lined up for the first ride.
- 20 replies
-
- 42
-
-
-
 Hi all Here are the photos for my latest finished model. Academy kit 1/72 Very nice kit to build straight out of the box. I didi a few scratch built details like the seatbelts for the ejection seat, the canopy tinting, threads on the tyres and a landing light on the nose landing gear. I regretted to made the option to leave the canopy open since it was very hard to glue it in place and it still a little bit crooked. The have glass painting was a mixed of Tamiya and Gunze to get the match. I've tried SMS 69 Have Glass but I wasn't happy with the colour (too greenish to my taste). Comments and critics are welcomed.
- 3 replies
-
- 20
-
-
-
- ArmouredSprue
- Academy
- (and 1 more)
-
I am a prolific model kit purchaser and pretty good at starting projects, but not so good at seeing them through to completion. Hence my appearance here at Britmodeller in a bid to curb this trend. Thinking pragmatically, my subject choice is modest in terms of size and difficulty, and perhaps most importantly will not feature aftermarket goodies or a complex paint scheme. So, here we go with Academy's new tooling from last year. According to various reviews I have read, this is more accurate than the Great Wall Hobby offering from 2020, so when I saw it going for a decent price at RIAT a week or so ago, temptation prevailed. Having built so many good Academy kits over the years, I felt confident that this would be a good decision.
-
Another filler kit to fill the Canberra paint drying time the Academy F4f-4. No real period pictures of the Wildcat with the star and bar roundel scheme so opted to use a few pics from life magazine with the star and bar and reference material. It’s a very simple kit if almost say starter kit but goes together well. Grand total of 8 decals although 4 where no use to my example. (Aircraft number) As always I look forward to your comments/tips/suggestions.
-
 This is the latest build I finished, just a couple days before signing up. The Vindicator was an American inter-war carrier-based dive-bomber and one of the first monoplanes to enter military service for the country. As such, you can see a lot of older design trends based off of biplanes in the design, such as the fabric tail-boom, the whole engine being self-contained in the front cowling, and the full set of flight controls in the rear cockpit, thus allowing the plane to be flown from the backseat (for pilots used to biplanes who preferred flying from there, and as a backup in case the pilot was lost/incapacitated). The kit was from Academy, with original molding by Accurate Miniatures. The plane next to a reference photo (my plane is US Navy operated, whereas the plane in the picture was US Marine Corps operated, per the paint schemes). Zooming out a bit for a better view of the overall aircraft. Constant combat drilling leading up to the Battle of Midway has taken its toll, and the plane is fairly dirty. The front canopy was glued open as it would not sit very well in the closed position. Rear profile, we can see the scratch-marks around the often-used panels. All the rear canopy pieces are glued in the closed position, as trying to fit all of them underneath the central canopy piece to have them open is a disaster waiting to happen with the OOB parts. I'd need to vacuum-form the canopy to do that properly. Also by my references, the solid portion of the rear canopy went between either a full metal plate covering or having the inside covered with the windows still there (I put it down to earlier models being converted). I opted for the latter option since it looks more interesting, but the former can be done by sanding off the canopy window frames in that area. The plane was equipped with a Pratt & Whitney R1530 Twin Wasp radial engine. with a two-blade Hamilton Standard propeller. The engine cylinder banks in the kit were good, but then they went and ruined the whole thing with one of the worst attempts at injection-molding ignition wires I've seen in a long time. Needless to say, I discarded all that and scratch-built all the finer details inside the engine (connecting rods and ignition wires). It was well worth the effort. The propeller does not spin because I was dumb and forgot to install the spinner inside the engine, so I had to glue it. From cockpit with instrument panel (photo-etch upgrade from Eduard). The shape of the instrument panel was actually a pretty major inaccuracy in the kit; OOB it had indented side frames leading up to the top, whereas on the real plane they were straight. I used Milliput to correct the shape. This made fitting it a major pain, but I eventually found a home for it, and thankfully left myself just enough room to fit the tubular bomb sight. Back cockpit, with navigation antenna, seatbelts, and rear machine gun visible. Underneath the plane. we can see the salty tropical air has not been kind to this bird. Getting in closer for a better view of the landing gear assembly (they rotated 90 degrees and retracted into the round divots behind them), as well as the oil and dirt stains on the bottom. I like the way the wear turned out on the bomb, as well. And last but not least a group-shot of the Vindicator with a bunch of her friends from Midway. I've got a Buffalo, a Wildcat, and a Devastator. The Dauntless is in my build queue, but I'm waiting for more materials for it, as I am doing it in 1/32 scale. That's all for now. Hope you enjoyed the photos, and I'll see you soon in the WIP forums for my next build!
 -
Thought I'd start to share my completed builds from my inventory. To make it easier for myself, I'll also go in alphabetical order of manufacturer (so expect a fair few Airfix kits next ) so here begins with Academy's 1:144 B-1b Lancer. Lovely little kit with the exception of the top to bottom join along the front fuselage to nose section and the incredibly lacking detail on the afterburners. All finished in Hataka Orange Line paints. I do have another one of these kits in my stash in which I plan to get some 3D printed engine exhausts for it instead of the awful kit options. I built this kit with the ability to swing the wings to my liking so the wing sleeves were glued in the open option. Depicted as B-1b Lancer 86-0139 "Drifter" as she was the first B1 I had ever seen at the fence of RAF Fairford. A great and late friend printed the nose art decal for me from a photo from the original painter of the nose art. Thanks for looking and don't hesitate to ask any questions!
- 13 replies
-
- 43
-
-
Hi all, My third completion of the year so far is the Academy F86-30 Sabre of 39 FIS/51 FIW. This Is Capt. Charles McSwain’s machine based at Suwon (K13) in 1953 and was option one on the kit’s decal sheet. I wanted to build this one as it is just so colourful, with fantastic nose art on the port side. Also I thought it would be a good way to get over my fear of natural metal finishes. I’ve never built one before and I really want to build the B47 I have in my stash so I need some practice! This was mostly built from the box, the only additions being some PE which added cockpit details and replaced the seat. I used Vallejo Metal colours (steel, Alu, white alu, dark alu and silver) for various panels on the airframe then weathered with clay washes and oils to try to replicate the duller finish visible in the colour pictures in Ospreys Front Line Colour No2. All in it was a reasonably straight forward build with only a few small fit issues. The decals however were a different story. The carrier film was a bit resistant to Sol and Set needing work to settle down nicely. The yellow tactical bands were a total fail being brittle, poor fit and refusing to conform. I ended up masking and painting the yellow and black bands instead. I also painted the checker boards on the tail as well. Other than that you can judge the results for yourself. Feel free to comment and give tips, as I said this was my first nmf so it’s not perfect and next time I would spend a bit more time on the prep as there are a few areas where I can see some faint scratches. Happy modelling.


.thumb.jpg.cfc129272ffec824439b15e6013d5952.jpg)