Search the Community
Showing results for tags 'academy'.
-
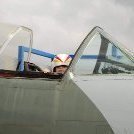
Hi all - this is Academy's 1/48 Bf109K-4 kit, finished in the colours of '265' - a machine discovered at Amberg at the end of the war and carrying no unit markings - just the last three digits of the werk nummer roughly sprayed onto the fuselage sides. Several b/w pics of this plane (unusually of both sides) are in circulation, so the markings and camo pattern are easy enough to identify. The actual colours, not so much. I did build this a/c a couple of years ago from a Hasegawa kit, but it got trodden on recently during some redecoration work at home (the less said about that, the better). So a couple of years on and this is a chance to 're-imagine' some Luftwaffe late-war camo colours, and un-painted (but not necessarily 'bare metal') undersides and put a replacement '265' back on the shelf. Anyway, enough chat, here's the pics..
-
Hello folks 🥳 I am ready 😎 MD See you soon ☮️
-
Hi folks, Hope everyone is keeping safe and well. It seems like ages ago that I signed up to join this GB and yet at the same time it seems to have come around so quickly This will be my first GB for this year and I'm really looking forward to it. For my entry - I've decided to incorporate the subject of the GB with another particular interest of mine - the IDF. I thought, what can be better than being able to represent a Sherman - how about an IDF Sherman - or specifically the M-51 Super Sherman from the 1/35 Academy kit. To whet your appetites - here's the obligatory box art shot as well as some pics of the sprues etc: I can't wait to get started!! This will be an OOB build and having had a good look at the sprues etc it seems to be a very nice kit and has some excellent details. So here's to next weekend - good look with your builds everyone - can't wait to see all the end results in the gallery. Take care and best wishes Kris
-
 80 years past, the momentum shift in the pacific war known as Midway was fought and this obsolete, yet valiant machine helped to turn the tide, or at least it tried. After building a Japanese subject for the Pearl Harbor anniversary I figured I'd switch sides for Midway. This was Academy's rebox of the Accurate Miniatures kit and although the detail was nice, it didn't seem to go together that well in places, plus the instructions weren't 100 percent clear at all times. Nevertheless it's done, I can finally relax and re-stress myself again with the next build. https://youtu.be/JlDyq231ZMk
 -
I thought that I would jump in with Academy's kit of the A-37B Dragonfly for this group build. The box has three sprues of parts (2 for the airframe, 1 for munitions), a clear sprue for the canopy parts and decal options for USAF or ROKAF aircraft. by John L, on Flickr by John L, on Flickr by John L, on Flickr
-
.thumb.jpg.3d6eff3e2f6cc042679bca864bcb2b1a.jpg) A second RFI from Tweener in under a month? Today I've got the 1/72 Academy P-47 Bubbletop in the markings of "OH JOHNNIE", as flown by Lt. Raymond Knight in some of the last days of the war, before the final action that cost Knight his life. During a strike on a German airfield in the Po Valley. Knight's aircraft took heavy damage during several strafing runs that brought about the destruction of a large number of enemy aircraft and supplies. Knight was known to fly the first run over enemy airfields alone in order to put together the most accurate plan of attack, and to ensure his fellow pilots had the highest chance of avoiding dangers while making effective runs of their own. On his last flight, Knight repeated this process and managed to escape safely. His aircraft, struck multiple times, seemed unlikely to make it back to base on the far side of the Apennine mountains. Despite this, Knight was aware that his unit was keenly short of replacement parts and aircraft, and so declined to bail out over friendly territory. Knight was killed when his aircraft slammed into a mountain on the return flight - only 2 weeks before the end of the War in Europe. More here - https://www.thisdayinaviation.com/tag/oh-johnnie/ I decided to build this P-47 after obtaining the DK Decals 350FG decal sheet, which contains markings for assorted P-39s and 47s flown by that group and their compatriot Brazilians, as well as decals for a Hurricane squadron hack, captured BF-109G, and a Brazilian Cub. I'm currently working on one of the 39s, as well as the 109, and I have the Cub in the stash too. For now, here is the P-47 Note that the Neutral grey is undoubtedly too dark - I don't understand how Vallejo got this so wrong in their model color range, and fairly spot on in their Air range, but in any case, I painted this before I had the latter paint or the knowledge to do better, and I don't think it looks too bad. Wings were sprayed with TS-17, and the OD is Model Masters. I believe it's Vietnam Era land vehicle OD, but I like the look of it and miss MM dearly. The build itself was entirely pain free, though I expect my next Jug will be the Tamiya kit. I've got about 10 options for markings and 100 other projects first, so don't hold your breath for that one. A Hurricane, Skycar, and JU-52 next. I'll leave you with a shot of the business end - Best, Tweener
A second RFI from Tweener in under a month? Today I've got the 1/72 Academy P-47 Bubbletop in the markings of "OH JOHNNIE", as flown by Lt. Raymond Knight in some of the last days of the war, before the final action that cost Knight his life. During a strike on a German airfield in the Po Valley. Knight's aircraft took heavy damage during several strafing runs that brought about the destruction of a large number of enemy aircraft and supplies. Knight was known to fly the first run over enemy airfields alone in order to put together the most accurate plan of attack, and to ensure his fellow pilots had the highest chance of avoiding dangers while making effective runs of their own. On his last flight, Knight repeated this process and managed to escape safely. His aircraft, struck multiple times, seemed unlikely to make it back to base on the far side of the Apennine mountains. Despite this, Knight was aware that his unit was keenly short of replacement parts and aircraft, and so declined to bail out over friendly territory. Knight was killed when his aircraft slammed into a mountain on the return flight - only 2 weeks before the end of the War in Europe. More here - https://www.thisdayinaviation.com/tag/oh-johnnie/ I decided to build this P-47 after obtaining the DK Decals 350FG decal sheet, which contains markings for assorted P-39s and 47s flown by that group and their compatriot Brazilians, as well as decals for a Hurricane squadron hack, captured BF-109G, and a Brazilian Cub. I'm currently working on one of the 39s, as well as the 109, and I have the Cub in the stash too. For now, here is the P-47 Note that the Neutral grey is undoubtedly too dark - I don't understand how Vallejo got this so wrong in their model color range, and fairly spot on in their Air range, but in any case, I painted this before I had the latter paint or the knowledge to do better, and I don't think it looks too bad. Wings were sprayed with TS-17, and the OD is Model Masters. I believe it's Vietnam Era land vehicle OD, but I like the look of it and miss MM dearly. The build itself was entirely pain free, though I expect my next Jug will be the Tamiya kit. I've got about 10 options for markings and 100 other projects first, so don't hold your breath for that one. A Hurricane, Skycar, and JU-52 next. I'll leave you with a shot of the business end - Best, Tweener -
Hello Fellow Modelers! Here is the second aircraft of my Blackbirds series: The Academy F-117A. When I started this project long time ago, finding an accurate kit of this strange beast was challenging, as all models available on the market were wrong to extra wrong! Finally, I chose the Academy kit, which has the advantage to have an opened bomb bay. However, I did a lot of modifications on the kit and spent some money in PE parts. The big challenges were to raise all the panels lines to have a correct faceted aspect, using thin Evergreen strip styrene and to cut the fake air intakes grils and to replace them by very fine mesh. I decided to represent the vertical stabilizers in the rest position but their complex geometry and inner profile doesn't t help. Flaps down was easier. Basically the kit has wrong undercarriage and wheels, poor cockpit, the wheel wells are not deep enough, poor representation of the sensors and the shape of the intakes is questionable to my opinion. For this, nothing to do but for the rest, I took wheels from an F-15C kit (they are similar) cockpit was entirely redone, a resin ACEII seat and a complete reshaping of the false wheel wells and bomb bay. A lot of work for a disappointing result; Painting and markings: "Normal" challenge with the black tint, I used the same technique as for my SR-71, several layers of brownish, blueish etc blacks. To remember the "good old days when I served in the FAF (I was on duty the night it happened in CAOC Vicenza), my model represents the famous "Vega 31" which was shot down by the Serbian Air Defense. Decals come from the excellent "Two Bobs" sheet. The photos: and the little dio: the Dodge RAM pick up comes from F4 Model, not easy to build, the transparent parts are too thick and the kit is basic for the price... As a conclusion, very disappointing, I will definitively build another Nighthawk, may be the new Hasegawa kit (THE model of this strange aircraft at that scale???).
-
Manufacturer: Academy. Aftermarket: Woodland Scenics foliage, wooden base from Hobbycraft and some lead wire for detailing. Paints: Tamiya, Mr Hobby, AK, Flory Models wash and pigments. Weathering: AK and Flory Models products. Link to build thread: Hi all, I am calling this Easter build done. I originally had no plans to build anything for Easter; however, on looking through my stash l thought I would give this 1995 Academy kit a go. It was very nicely detailed, the only grumbles were vague instruction diagrams and the front wind shield was a poor fit. But overall, it was a great build, maybe a bit too ambitious for a quick build, but I pushed on and got there in the end. I hope the photos do it justice, with all of the wire cutters and antenna all over the fuselage it was a bit of a porcupine to handle, that's why I decided a small base would be a safer way to display it. Thanks for looking in on this build and happy modelling.
-
Hi guys, thought I'd build this old Academy kit that I have dragged from my stash earlier today. This should be a fun and quick project, wish me luck!
-
Hi there The Mustang is waiting for its 3D printed MLG's, following an attack by the carpet monster. The 2 X P-400 are drying up from an enamel paint layer - will take some time. I found myself with some bench time (the wife is down with Covid-19 in the bedroom ) So... I did not want to start a new kit - as this is just a temporary halt. It's not that I do not know which kit is next, but I try not to have too many kits in progress. I could have spend some time arranging stuff around the bench - boring After a while I decided to deal with this B-29 - as it is a big build with lots of parts, so I can sneak some progress here and there. This kit has a story - so let me share it. As you know - my dad was an a/c mechanic with the IAF. You can find one of his stories here. He was also a modeler and got me into the hobby when I was a kid. The story goes that at the night I was born he completed a big B-29, and with the family growing and the salary not, it was the last model he built for a long time. Later on he introduced me to modeling and we build together. These building sessions are some of the happier memories of my childhood. The B-29, along with a couple other kits (B-17, Anson, F-4) were hung up in our family room and later on moved to a shelf in my room. They were the basis for my model collection. I fondly remember the silver monster. I can't recall if it was a 1/48 or a 1/72. I will have to look up some old photos. I remember it was big but back then I was way smaller myself. When I got back to the hobby, my Dad was interested in all the updates and in my builds. We talked for a while about building another kit together, 'for old times sake'. When I moved to our current home, and got myself a decent bench, we talked some more and I suggested we build a B-29 - as kind of a 'getting back to modelling' build. It took us a long time to finally find the time. My parents live an hour from our home but most of the time they get here on family occasions. After a long time, we arranged for them to come early on some family gathering and we sat together. Even in 1-72, the B-29 is a BIG kit, with a decent number of parts. We started with airbrushing the bombs (all 32 of them) - and it was a new experience for dad. When I was a kid we could not afford an airbrush and all painting was done with Enamels and a brush. We followed up with some silver painting of some parts and then time ran out. Dad was happy but it was clear that sitting down with me and building was hard for him - his eye sight is not what it used to be. The kit being a 1-72 did not help either. Since then, the huge box is kind of a fixture in the back part of the bench. Last month, my dad turned 80, and it dawned on me that if I want to celebrate the completion of this kit with my Dad, I need to push forward on my own and find other ways to make it a shared and meaningful experience. With this idea racing in the back of my mind, my eyes fell on the 'fixture' and I decided that this will the 'micro project' I will spend some time on, and keep doing little steps with this kit in hope to get it to the paint booth and then finish it up. I opened the box, took some pictures of the things we started, spent some time arranging the setup - opening a new build folder on my drive, opening a new project and album on Scalemates, Opening a new album on Imgur and writing this up. A lot of setup for one build So, here we go: Kit sprues, box, instruction and two after market items - a decal sheet and a PE set: I decided to start with the cockpit, as per the instruction. This was a short sitting so I just cut and cleaned all the parts, glued some parts - those that make sense to glue before paint, reviewed the PE instructions to see I'm not building something I will have to remove. Then I sorted the parts to the 'green pile' - those will get a Z-C coat, and to the 'black pile' - those will get ..... a flat black coat. Green pile: Black pile: Stuff: That's it for tonight, and probably for a while. Ran
- 17 replies
-
- 12
-

-
In July of 1943 JG 2's second staffel was reassigned from day fighter duties to a crash course in night fighting to hopefully stem the tide of RAF night bombing. None of the unit's Fw 190s were equipped with radar, as a set small enough wouldn't debut for several more months. Pilots were given a quick course in flying with only instruments and direction from ground controllers. Initially, the new Nachtjaeger were refinished in overall black, however it was quickly found out that it was nearly impossible and dangerous to fly in formation at night in such a dress. After a few unsuccessful missions, the Fw. 190s were refinished in an overall RLM 76 gray. In this scheme the aircraft flew for the next few months before actual radar equipped Focke Wulfs were assigned to nachtjaeger groups later that fall. IMG_5247 by Evan Bailly, on Flickr A quick little few-night build of the venerable old Academy kit that has been floating around in the attic for almost two decades. It was built with the help of an Eduard PE cockpit and a few other bobbles; brake lines from fine wire, antenna wire from EZ Line, et al. Finishes are mostly Vallejo Air Acrylics and the decals were provided by Owl, representing Lt. Detlef Grossfuss' charge. IMG_5253 by Evan Bailly, on Flickr IMG_5249 by Evan Bailly, on Flickr IMG_5240 by Evan Bailly, on Flickr IMG_5251 by Evan Bailly, on Flickr IMG_5243 by Evan Bailly, on Flickr IMG_5244 by Evan Bailly, on Flickr IMG_5237 by Evan Bailly, on Flickr
- 13 replies
-
- 26
-
-
 This Academy boxing of the F-18 will be the first of my entries for the group build and will be finished with the Blue Angels decals supplied in the box. by John L, on Flickr by John L, on Flickr
 -
Here is my contribution to the GB, the Academy M4A3 with dozer blade & the Bolddivision T31 Demolition Tank turret. This Academy kit of the M4A3 Sherman was released in 2006 & includes the only injection molded model kit of the M1A1 dozer blade released to date, unfortunately they only produced it for a few years & it has since become hard to find secondhand. After looking for about a year I managed to find one on eBay for a reasonable price just last month though. This resin conversion was originally released by Cromwell models about 10 years ago & had been long out of production with prices on eBay reaching ridiculous triple digit amounts. Thankfully Bolddivision got a hold of the master & have re-released it along with metal barrels & some new photo-etch parts. The T31 Demolition Tank was as the name suggests an engineering vehicle designed to demolish hardened targets such as anti-tank obstacles & bunkers. To do this it was equipped with two 7.2-Inch rocket launchers fitted to pods on either side of the turret that were feed by rotating drum magazines (the gun barrel in the middle of the turret is a dummy). The T31 prototype was built in August 1945 & tested but with the end of the war development was stopped & the prototype lost to history.
- 21 replies
-
- 9
-
-

-
- Academy
- Bolddivision
- (and 1 more)
-
.thumb.jpg.d3635a7ef6507d35f372dd09671fe96f.jpg) The Curtiss Hawk 75A, was an important fighter the during the WWII when a total of 44 planes were used in the Finnish Air Force from 1941 onwards. During the so called Continuation War against the USSR the Finnish pilots achieved a total of 190 victories with these planes. I built the model from an Academy kit in 1/48 scale and used the excellent “In-Scale” decals for the plane registered CU-580.The kit was ok to build and the amount of puttying and sanding was anyway reasonable. However, I made several corrections to the kit. The antenna was incorrectly shaped and too long, the pitot tube was too long, the rudder antenna spike was missing and the landing gear covers were incorrectly shaped. I also replaced the crosshairs and the pilot seat with photoetched parts. The machine guns in the nose were made of a thin brass tube. I used Xtracolor paints for the camo and sealed the decals with Humbrol matt varnish . I weathered the model with Mig’s powders. I decided to keep the plane relatively clean, because my model depicts the CU-580 in a very good photo when the plane had only been in use for a month.
The Curtiss Hawk 75A, was an important fighter the during the WWII when a total of 44 planes were used in the Finnish Air Force from 1941 onwards. During the so called Continuation War against the USSR the Finnish pilots achieved a total of 190 victories with these planes. I built the model from an Academy kit in 1/48 scale and used the excellent “In-Scale” decals for the plane registered CU-580.The kit was ok to build and the amount of puttying and sanding was anyway reasonable. However, I made several corrections to the kit. The antenna was incorrectly shaped and too long, the pitot tube was too long, the rudder antenna spike was missing and the landing gear covers were incorrectly shaped. I also replaced the crosshairs and the pilot seat with photoetched parts. The machine guns in the nose were made of a thin brass tube. I used Xtracolor paints for the camo and sealed the decals with Humbrol matt varnish . I weathered the model with Mig’s powders. I decided to keep the plane relatively clean, because my model depicts the CU-580 in a very good photo when the plane had only been in use for a month. -
 My entry for this GB is the rather nice looking Academy F18. I am using the F18A+ boxing that has all the bits for a CF1, and plan on using PE meant for the Hasegawa kit for the wing tip missile rails, as the model will be unarmed. It is going to be finished in a Leading Edge Decal sheet for the RCAF 75th Anniversary colour scheme, which was bought at a Duxford Airshow some years ago. Just finishing off an Airfix Harrier GR1 and so full steam head with this and a Siskin for the Matchbox GB nest week.
 -
Here is my 1/72nd Academy F/A-18C that I just finished as part of the Hornet group build. I used the Wolfpack dropped flaps wing set and custom printed decals for the digital hornet of VMFA-314. The WIP is here: I think I need to spend some time to develop my photography skills, or at least dig out the SLR instead of using the cell phone… but here she is. VMFA-314 Digital Hornet-01 by holtaa, on Flickr VMFA-314 Digital Hornet-01 by holtaa, on Flickr VMFA-314 Digital Hornet-03 by holtaa, on Flickr VMFA-314 Digital Hornet-06 by holtaa, on Flickr VMFA-314 Digital Hornet-07 by holtaa, on Flickr VMFA-314 Digital Hornet-08 by holtaa, on Flickr VMFA-314 Digital Hornet-09 by holtaa, on Flickr VMFA-314 Digital Hornet-10 by holtaa, on Flickr VMFA-314 Digital Hornet-11 by holtaa, on Flickr VMFA-314 Digital Hornet-12 by holtaa, on Flickr VMFA-314 Digital Hornet-13 by holtaa, on Flickr VMFA-314 Digital Hornet-14 by holtaa, on Flickr VMFA-314 Digital Hornet-15 by holtaa, on Flickr Thanks for taking a look.
- 5 replies
-
- 33
-
-
- Masking Hell
- Academy
- (and 1 more)
-
Hello and welcome to my next "Work in Progress", a build of Academy's British Army AH-64D. I've not built a helicopter before and I decided it was time to put that right! Having spent the last 10 months working on Eduard's Coastal Command Liberator I wanted something smaller and, dare I say it, more out of the box which I should be able to get done in a month or two. First impressions of the kit are really good - the instructions are clear and the bits I have dry fitted so far seem to go together without much hassle. As is traditional I've started with the cockpit and it looks great with nice detailed control panels and consoles - no need for any aftermarket etch here! The only thing I've updated so far are the seats. These will be quite visible under the canopy and I've spruced them up a bit with some milliput cushions, embossed with a cotton cloth, and foil belts, here's the before and after: Then all the various bits and pieces got a shot of tamiya rubber black followed by a slightly lighter highlighting coat: I painted the cushions by hand with a dark grey, applied the plain green decals for the screens, gave everything a drybrush with another shade of grey and finally picked out the buttons and switches with a fine brush: It's nothing special but it's got a certain "pop" and I'm really pleased to have finished off a cockpit in a few hours for once! Hopefully this one should come together quite quickly, any tips or things to watch out for would be greatly appreciated! Thanks for dropping by, Sam
- 26 replies
-
- 21
-
-
This one will be a birthday present for our son, 22 years in late February, and an Ilmavoimat reserve Hornet armourer. I'll build the HN out of the Academy box but "MLU-update" the weapons from my spares - AIM-9X:s, AIM-120C:s, a Litening-pod and a pair of JDAM:s should look nice. Finnish Hornets were originally "just" F-18C/D:s without any A2G capability. That was very much changed in the MLU-program, and they now possess capability to carry and deploy JSOW and JASSM too (but I only have JDAM:s). My son said he often got to work on HN-457, the last Hornet built in Finland and then delivered to Ilmavoimat. The plane was named "Kreivi (Count Eric) von Rosen" honouring the Swedish nobleman who donated the first aircraft to our young - infant, infact - nation and its air force in March 1918. I know that specific plane is too much modeled one but I don´t think Olli knows that . V-P
- 51 replies
-
- 12
-
-
- Ilmavoimat
- Academy
- (and 1 more)
-
 Edit 7.3.2023: Finished in the current edition of KUTA 🙂 You know what´s the current exchange rate of Airfix plastics to Academy plastics? Last spring it was four Airfix Lancaster propellers to one complete Academy Wildcat kit (and then some, but more about that someday in another GB far away...). You see, I sent @JOCKNEY the unnecessary to me paddle blade props from the PO*S Lanc build that he needed for the Grand Slam variant. Lo and behold, Pat sent me a complete Wildcat (+ a Typhoon...) in exchange. Thanks! I shall try to give it my best now! Once again the sprues (in the bag), instructions, Blackbird Models Op. Torch Martlet decals and my Airfix Torch Martlet build from the Grumman GB a few years (?) ago. I´ll try to match the looks of these two birds as far as possible. I know the Academy kit represents a different variant and is somewhat incorrect for a Martlet IV, but I´ll live with it. The most obvious mod I need to do will be the removal of the (carb intake?) opening in the 12 o´clock position of the cowling. V-P Edit 23.2. after studying the subject by the link @825 supplied me below - thanks! So, as my decals are for serial number FN104, it turned out to be a Wildcat Mk.IV, not a Martlet at all. Short chord cowl with one small cowl flap on either side. Hamilton Standard Hydromatic uncuffed propeller. Folding, 6 gun wings. F4F-4 style pitot. Colors that were very close, if not matches to Extra Dark Sea Grey, Dark Slate Grey and Sky. Cockpit was Bronze Green, and the remaining interior was painted in “Grumman Grey” including the cowl’s interior. The lower parts of the landing gear was a heat resistant black, the remainder could be either Grumman Grey or Sky. The notches where the wheel sat was in Sky. Prop was black with 4” yellow tips. The wheel hubs were Sky on the outer cover and aluminum on the inner. A priceless pack of information - thanks Bruce Archer!
- 14 replies
-
- 10
-
-
Place holder for: Which be built as A21-029 with the top hat and cane Box contents: and a few extras: I may not use the AIM-132s as all the photos I have of A21-029 show it unarmed. I have ordered a replacement set of decals from Hawkeye as the kit ones don’t look particularly accurate, especially the side flash and magpie which look far to pale. AW
-
RAAF F/A-18 Hornet A21-29, 75 Squadron Top Hat scheme. Academy kit, Quickboost Seat, Reskit wheels; kit, Italeri (from a trashed kit) and Hawkeye Models decals; MiG AMMO acrylics FS 35237 Grey Blue, FS 36335 Light Ghost Grey, Vallejo Metal Colours. Built in the F/A-18 Hornet STGB. Thanks for looking. AW
-
OK my first GB. I model planes with my 10 yr old son. We were talking about what we wanted to model and we wrote a long list of carrier based aircraft we wanted to complete. The Hornet fits in nicely and was on our list and then I spotted this GB! So thought I'd dive in. I've currently got a Tomcat on the go, and also a Sea Vixen with my son. I suspect the Tomcat may have to take a backseat while I work on this. I was originally just going to add the cheap 1/72 Italeri F/A 18 to my stash, but was advised by @PhantomBigStu and @vppelt68 that the Academy was a better bet for a few more quid. So I ordered one and it arrived today. The online seller packaged it in a lovely environmentally friendly cardboard package 👍 Mr Postie left it outside the house as no-one was in and it was completely sodden by the time I got home . Ahh well luckily the model box inside the package wasn't too bad (you can see the wet bits in the photos) and the only bit not in a plastic bag in the box was the instructions which were a little damp but nothing to worry about. Sooooooo. Plan is. Build this completely OOB. Not sure which of the 3 decal options I will apply. I'll probably let my son decide. I'll be hand painting using mainly Revell Enamels. I'm just about to see if there are any colours I need to order, and wash the sprue. Thanks for having us along.
-
I will be joining with two builds, firstly the classic Hasegawa 1/72 kit using Hawkeye decals for a delivery scheme 77SQN jet. Next will be another 77SQN jet from the Academy 1/72 kit with OP Okra markings. I had planned both wheels up but I have a bit of AM for the Academy kit in the form of folded and drooped flap/slat wings which I should use. Images to come....
-
My contribution to the GB will be the 1/72 Academy F/A-18C, with the VFA-192 "World Famous Golden Dragons" markings. I had originally intended to use this kit as the base for a fictional what-if build, but I've decided to instead use a different kit for that project though, so now it's just going to be a quick & simple OOB build. The kit comes with decals for three different aircraft, I'm going to use the VFA-192 ones because umm dragons are cool... Someone else is building the same kit in the GB hopefully they dont pick the same markings 😅
-
I shall be building this using the Eduard "Striking Eagles" limited edition boxing of Academy plastic, which inludes cockpit and exterior photo etch plus resin seats, wheels and cans. Two Bob's decals for the airframe identity and also perhaps for the stencils. It was hard to choose a specific aircraft from the decal sheet but I like the Twin Towers "Never Forget" logo which was also carried on the port nose. I'm saving my Academy F-15C MSIP boxing for later in the year but also have an Academy "Seymour Johnson" which might make an appearance in this GB - well, plenty of other aircraft to choose from on the decals. Mike


Wedge-TailedEaglePortraitRaptorDomains.thumb.jpg.41a306d3445a68f0f2df773e01776ea6.jpg)