Search the Community
Showing results for tags 'academy'.
-
Being currently a lot into Helos, it is almost inevitable that I come across the Boeing AH-64. Also, as it followed the AH-1 in the service of various armed forces and the related tenders around the world, it's only consequent it will follow it on my workbench. So it will be the Westland build incarnation of the AH-64, and Academy has a nice kit in 1/72 available, and since quite a while, me in my stash. It's this: It includes decals for the one Capt. Harry Wales, Prince of Sussex flew at RAF Cosworth Airshow in 2013, and I am tempted to do this. You know, a little bit of glamour on the shelf, not always just blunt plastic in olive drab without any personality, but some glitz of the real world red carpet airfields we so rare get close to. And here's the chance - what a rare occasion for us in the airplane section...
-
Hello team, I'm planning on doing a CAC Sabre Mk 32 using the Tasman conversion with the Academy F-86F kit. I plan on chopping the aft end of the fuselage off the Academy kit and fitting that to the Tasman kit to get the open airbrakes similar to what Courageous did a few years ago with their CAC Sabre (I couldn't work out how to link a WIP thread). In regards to the Academy kit the shape of the airbrake bays need adjusting from a square to a tapered lower edge. Does anybody know the size or angle of the airbrake? If anyone has done this, how did you go about it? Any info would be great. Thanks. JG.
-
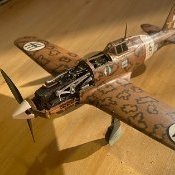
Hello everyone again. Mustang P-51B, pilot - Donald Beerbower What has been improved in the Academy set: Firstly, these are the landing gear bays. All manufacturers offer them in the wrong shape, because... plastic does not allow them to be cast in the required volume. The niches were completely cut out and built from scratch. The machine gun ports have been redesigned, arranged in a cascade and equipped with barrels made of syringe needles and metal tubes. The rear support was dismembered and also completely rebuilt using metal components. The rear support niche is also somewhat filled with parts. Oil and cooling radiators were made and filled with radiator niche parts. The main landing gear struts were also modified on our own - the shock absorber rods were replaced, and the two-link links were cut out. The cockpit was partially redone on our own, complemented by etching from Eduard. Mounted landing light, manufacturer - Elf, Navigation lights - pins made of drawn transparent sprue, painted with a mixture of futura and acrylic. Other additions include True Detail wheels, QuickBoost exhaust tips, and a Squadron vacuum canopy. The main identification marks are decals from KitsWorld, technical inscriptions are from Techmod. *Sorry for the automatic translation and thanks for watching.
- 29 replies
-
- 83
-

-

-
My other P-47 build will be of aircraft 42-8130, known as "Frankie". This Razorback operated in the Pacific, flown by Captain Samuel V. Blair, who scored 3 aerial victorious in this aircraft. Frankie was heavily damaged while landing in late '43, determined to be a lost and pushed off to the side at Hood Point Airfield, New Guinea. It was recovered in 1968, and despite initial plans for restoration, has been sold several times since. Most recently, this aircraft was bought by PIMA Air and Space Museum, where it will be restored. I've had the basic Academy 1/72 Razorback sitting around for a while, and figured this would be an excellent time to build it. Decals are by HGW Models
- 21 replies
-
- 13
-
-
This vessel doesn't need an introduction, but I'll write one anyway: The R.M.S Titanic was a British ocean liner, one of three Olympic-class ships and the largest ship in gross tonnage at the time. During her maiden voyage from Southampton to New York she struck an iceberg at the North Atlantic and sank in just under three hours, resulting in the death of 1,496 of the 2,208 passengers and crew. This was the event that immortalized her name in history. This is Academy's non-premium version of the model, meaning that it only came with the model itself; It didn't have any of the extras that came with the other boxings of the kit such as photoetch or wood decks. Other aftermarket used was Eduard's photoetch set and Master's Olympic-class brass mast set. Other corrections or additions were either scratchbuilt or 3D printed. Here are the photos, before I get into the details of the kit (This is going to be bandwidth-heavy): This is the single longest (8 months) project and largest, most difficult build I've done and it definitely tested my limits as a scale modeller. Being that I usually do aircraft I had to learn multiple skills on the spot to get this model across the finish line. The materials and tools used are fairly straightforward; All of the paints on the model except the white (MRP), anti-fouling red (Mix of (XF-2:2/XF-7:1) and some of the thinner brown parts (light brown marker) were painted with Tamiya acrylics. If I were to revisit this build I'd probably lighten the mix of anti-fouling red and use a much lighter color for the wooden decks and the dark mast color, though. The rigging came from Infini's Super Fine Black Lycra rigging (40 denier), but for the Marconi array that connects the masts I decided to experiment by heating the black PLA filament I use for my 3D printer and pulling it, like stretched sprue. The material behaves like it as well, but is tougher and sags much more consistently than sprue (although more brittle). I used this on the model but the sag disappeared when I attached the lines attaching it to the boat deck and those lycra lines pulled it taut. I would definitely recommend trying it out if you have some PLA to spare at home for rigging that has to droop. As for the quality of the kit, well, of the large scale kits of Titanic the Academy's probably the best one for beginners, but that doesn't say much given that its competitors are a kit released in 1976 and a monster that's twice the size. The way it goes together is relatively straightforward if tedious, but the instructions frequently make it difficult to be sure on anything or to figure out how some parts are supposed to be placed, something that's crucial when there are up to 20 copies of the same ventilator, pipe or crane. The fit isn't great either, especially with the decks and superstructure. It's also highly inconsistent in this regard; sometimes a part will fit just as it's supposed to, and on other times it has to be wrestled in to place. The worst part came when it came to the forward "wall" of the superstructure; This is the part where the bridge windows are located. The gap is inconsistent on each side and I had to use a lot of plastic card shims to get it in place properly, and even then some of the seams are still slightly visible. The inaccuracies on this kit can get annoying as well, so much so that I can't really go into too much detail listing all of them unless I want to make this much longer than it already is. Any builder of the Titanic could uncover many of them through just checking surface-level photos and references and correct accordingly, but I suppose the most important corrections to make are adding a set of missing emergency "cutter" lifeboats (the ones that are opened and hang over the ship), and the lack of C-Deck openings under the forecastle and poop deck. I implemented as many of these as I could but there are some that I had to leave in. For all the inaccuracies, it builds up to a nice looking model in the end, however, and the kit still stands up to what other companies have to offer and is superior to the Revell kit in the same scale. There are many things in the build I know I could have done better in or rushed too much in; but after many months of work I'm just satisfied to call it done for now. Maybe I'll be able to build something closer to the real thing in the future. Thanks for reading!
- 21 replies
-
- 59
-
-
-
 Well it's all a bit late but I'd like to enter these two: and: they are both relatively modern, state of the art kits. The Revell mould seems tired and has a lot of flash, particularly round the open cowling flaps: Revell correctly gets the gun alignment parallel to the ground, Academy doesn't. But the elephant in the room is the huge difference in fuselage depth: The Revell one (lighter plastic) has a huge belly. Now I don't know for sure (Academy is a -D, Revell is an -M) but I (and the Internet) think that may be a mistake on Revell's part. More digging required... Regards, Adrian
- 120 replies
-
- 10
-
-
 Academy has just reboxed/reissued the Minicraft 1/144th Boeing E-3G AEW&C Sentry/AWACS kit under ref. 12629 Sources: https://www.hpd.ca/index.php?main_page=product_info&cPath=1625_1642&products_id=72336 https://mmzone.co.kr/mms_tool/mt_view.php?mms_db_name=mmz_free&no=397759 V.P.
 -
Place holder for my entry. Last year I bought this Academy Gabreski duo P-47 and F-86: The Thunderbolt I will build as Dave Schilling’s last mount, a P47M without the fin fillet using these decals: The Sabre I am saving for next years STGB. AW
-
First announced Academy reboxing scheduled for release in January 2023 - ref. 12353 - Vought F4U-4 Corsair - Battle of Chosin Reservoir Sources: https://1999.co.jp/eng/10935104 https://mmzone.co.kr/mms_tool/mt_view.php?mms_db_name=mmz_review&no=38038 http://www.interallied.co.jp/release/2022/11/13489 V.P.
-
 Folks, I've done yet another Warrior. This one as a leaving present for Tim. He's been trying to get my Warrior off me since I did it, and since he used to command one, I thought I'd do one as a gift. I finished it a while ago but I didn't want to spoil his surprise when he got it. The kit is Academy with Eduard etch (if ever there was a kit that needed etch it was this one). I love the kit (this is my 4th iteration!) but it is showing it's age and somethings, like the telescopes, are out of scale. The Meng version is a great kit but you cannot do a bog standard 510 from it. The cam net and covers are scratch built. Paints are Mig, Tamiya and Humbrol, gloss coat was Quick Shine and Vallejo for the matt. The IRR green was Mig NATO Green with a few drops of yellow. Pin wash was oil paint and terps. Weathering is Mig dark earth and dust, mixed with plaster for the thick mud. I used resin for the lights. Bill
- 13 replies
-
- 26
-
-
Greetings. The model was assembled several years ago. Briefly about the construction: of the ready-made additions, I used only a small set of photo-etching from Eduard, which applied almost exclusively to the cockpit, while the canopy was still made in a closed version, since at that time it was not ready to work with “vacuum” products, but “ native” lantern is thick. Well, the barrels were replaced with brass ones from Aber, although the latter are also far from ideal in terms of the fact that the wing-mounted 13 mm machine guns should be in a perforated casing; I couldn’t imitate these casings myself. Otherwise, the same cockpit was subjected to the greatest modifications using available materials. Significantly altered the landing gear struts and flaps - reducing the thickness of the flaps, rods from medical needles, jumpers of the flaps, cut off and made again, because relatives do not reach the landing gear, the brake pipes are made of thin wire. The riveting has been improved in some places, unrealistic sagging of the fabric on mechanized surfaces has been removed, and the rudder contour has been trimmed. The 7.7 mm machine gun port on the fuselage is plugged, as it should be on the 52c modification. I drilled out the exhaust pipes as far as possible and worked on their shape, cut ventilation windows for cooling the oil tank and removed the thickness of the fuselage side in this place. Navigation lights from the CMK set. The shape and details of the air intake have been corrected, as well as some other minor details. In terms of the quality of the kit, I can list several shortcomings - this is the already mentioned undercut of the rudder contour; poor fit between the wing and the fuselage (I removed the shelves above the wing, a gap along the bottom of the fuselage); These also include landing gear flaps. Painted primarily with Tamiya acrylics. I didn’t use Academy decals; they turned out to be very inconvenient to use; they were replaced with decals from AML. *Sorry for the automatic translation
-
 Evening all, after roughly 2.5 years my carrier deck diorama is done - just in time for SMW! It's an F/A-18C CAG aircraft from VFA-113 'Stingers', with the carrier deck based loosely on CVN-76 USS Ronald Reagan, circa 2005. Carrier deck is scratchbuilt, utilising the Flightpath US Navy Carrier Deck Diorama set. The Hornet is the Academy kit with much aftermarket (see build thread linked below), figures from Reedoak (4) and Scale 3D (1). The decals are from Superscale (set no. 72-904). The A/S32A-32 'Spotting dolly' and Nitrogen Trolley are fantastic little resin kits from Brengun. The LED lights in the hangar roof are ready-wired sets from Small Scale Lights - really glad I included these as they lend a nice realistic ambience (IMHO). The build thread is here if you are after more details. The diorama is called 'Hornet's Nest' - thanks again to @AlxBNE for the inspiration! Final pics below, hope you like them.
- 47 replies
-
- 98
-
-
-
Hi folks, I'm late to the party with this one I'm afraid. Times just got away from me and this STGB had crept up without me realising. Anyway, thank you to @Corsairfoxfouruncle and @81-er for the greenlight to throw my hat into the ring as I really wanted to enter something into this GB as the P-47 is one of my favourite warbirds. So after a root around in my stash, I decided to go for this one: I've made a start and good progress so far - pics to follow shortly. Hopefully I'll be able to get cracking and be able to get her finished in time as I'm not renowned for being the quickest of builders 🤞 Good luck to everyone with their builds too - looking forward to seeing them all in the gallery. Kris
-
Although I built one of these many, many years ago in my youth, this subject is outside my normal sphere of interest or knowledge. That said, who cannot love the lines of the Blackbird. I remember a TV programme many years ago about this aircraft, how the crew wore space suits and how fuel leaked wherever it stood, but it was all worth it for the performance. There really isn't much to this kit. Not that many parts, goes together without issue, and it looks the part to me. Painted with Vallejo, Humbrol, Revell, and Hataka acrylics.
-
Hey, looking at the rapidly growing built models clogging up my bookcase shelves, I thought to myself " I haven't got a proper APC, yes I have the Namer (big) and the Nagmachon (So many metal bars!) but not the legend that is the M113. So Jadlam it was, and with express next day delivery selected I was hoping to have it in my hands before the weekend, alas it's somewhere between Bristol and the North East and the Royal Mail tracking is useless. So here's the box art from their website. Hopefully it turns up tomorrow or at least before the weekend (first child free one since lockdown), I'm curious to see what it's like as Scalemates doesn't have much on and the instructions are for a different version, the figures will be a first for me. Will be right out of the box, no eduard etch sets for me (that's money I can use on the Merkava 4) and I should have enough of the AK paint left otherwise it's a trip to the Folks/Brother for a bit of light robbery. Hopefully an update soon.
-
In 2022 catalogue, Academy is to release a new tool 1/48th Grumman F4F-4 Wildcat - Battle of Midway - kit - ref. 12355 Despite rumours It won't be a rebox from the future Eduard F4F kits family (thread), dixit words from M. Vladimir Šulc, boss from Eduard–Model Accesorries ltd., as from M. Gustav Jung, boss from Wolfpack Design, who's close ties with Academy Hobby Model Kits - see here: link Source: https://www.facebook.com/photo?fbid=4666693050091873&set=pcb.4666695563424955 V.P.
-
 IMG_4255 by Evan Bailly, on Flickr Following the early success of Germany’s Stuka dive bombers, the US Army decided that it had better get on the bandwagon and come up with a dive bomber of their own. Luckily, the US Navy and Curtiss were already well into the development of the “Helldiver” a then modern, large, single-engined carrier dive bomber. Curtiss had supplied the Army with three generations of Shrike attack aircraft since the 1920s, so it seemed a natural fit. The bean counters rejoiced too, this would be one of the first truly multi-service aircraft programs. However, transforming Curtiss’ bomber into a standardized jack of all trades for both services resulted in degraded performance through additional equipment and weight, delaying production for approximately two years, and exploding costs. By the time the aircraft, called the A-25A Shrike by the Army and the SB2C Helldiver by the Navy, was ready for acceptance, the Army had decided that it didn’t need a dive bomber at all. The P-47s had proven far more than capable in ground attacks. The initial variants used by the Navy were a disaster in combat, a fact that was rectified by a considerable Navy-only redesign. The A-25A never saw combat. Of the 900 built, around 500 were transferred to the Marines who used them in a few Pacific backwaters. The remainder ended up restricted from combat duty and were used as transports, trainers, and target tugs. A-25A serial number 42-79744 was assigned to the 3rd Target Tow Squadron at Fort Stewart Georgia. This and similar squadrons were notable in that they were almost entirely “manned” by women. “Kathie-M” was usually piloted by WASP Helen Wyatt Snapp, towing a large fabric panel to be used as a target by trainee fighter pilots, bomber gunners, and anti-aircraft artillery men. IMG_4190 by Evan Bailly, on Flickr My model started as Academy’s 1/72 Scale SB2C-5. A bit of work was required to change it into an A-25. A three blade prop was made from one provided by a Tamiya Corsair, the blades shortened and reprofiled. The spinner was made from a heavily modified one from the spares box. The wing armament and arrestor hook were removed and the gunner/radio station was modified: a gun mount was made with no guns and the life raft compartment was removed. Some other army specific details were added, some were left off as being more work than would be noticeable. Finally the aircraft was painted in Curtiss’ distinctive olive drab, medium green, and medium gray scheme with markings provided by Wolfpack Decals. IMG_4249 by Evan Bailly, on Flickr IMG_4253 by Evan Bailly, on Flickr IMG_4251 by Evan Bailly, on Flickr
 -
 Hello colleagues! This is my first post in the armour section, I hope you'll like it. The previous Macchi C.202 was a challenge to finish because it is so delicate, this was rather a laborious kit to finish. For the main interior colours I used Humbrol 224 Dark Slate grey, and another Humbrol for the white, possibly Humbrol Ivory. The mechanical parts are gun metal + aluminium dry brush, and as a finish PLW Deep Brown wash. The shells are painted with Humbrol 54 brass metallic. For the main exterior colours I used: Tamiya XF-60 Dark Yellow, Tamiya XF-64 Red Brown and Tamiya Dark Green XF-61. The model is stock, but it was lacking interior decals so I bought Archer Fine transfers decals: German 88mm ammo stencils and Panther and Tiger stencils (for interior). I kept weathering and damage to a minimum, I do not have much experience in that anyway. I wanted a tank in a nice condition albeit oily, the wash is PLW Deep Brown. There is no varnish on this one, just paint. Here is the Google album with all the pictures.
- 23 replies
-
- 23
-
-
-
Answer Plastic Kits is to release 1/48th Korea Aerospace Industries (KAI) FA-50/TA-50 Fighting Eagle/Golden Eagle kits. Release is expected in the Summer 2023. This kit will be based on the Academy's KAI T-50 Golden Eagle original kit with new injected plastic parts (no resin). Source: https://www.facebook.com/Answerkits/posts/pfbid037MHsRTQnB1XfmHg65qQWkb1CAifqTK2hSbQb5dxDmRb3jzFQ2ALCrVb9TWTXBXoil - ref. AA48021 - KAI FA-50 Fighting Eagle - Polish AF & RoKAF - ref. AA48022 - KAI T-50 Golden Eagle - Indonesia, Philippines and Thailand AF V.P.
- 6 replies
-
- 4
-
-
-
- FA-50
- Answer Plastic Kits
- (and 1 more)
-
Hiya I have decided to try this F-14A. I know it has it's flaws and fit issues, oh well. I couldn't afford the Tamiya. Fun will be had and satisfaction gained. 🤓
-
Well another seadog going back to the land having been relegated to the kitchen table for any form of modelling I went back to the Old Academy kit just to keep building while the rest of the family have taken over my house and model room. Already built and base coated the main easy 8 now have to add the Dozer and crew with stowage just to keep me sane between all the decorating for the daughter's new house. Stay Safe beefy
- 23 replies
-
- 17
-
-
This is my complete model of Academy's M1151, painted with Tamiya lacquers and weathered with oils and pigments.
-
it seems to be the same plastic as the OIF kit with new decals: http://www.academy.co.kr/eng/1p/1p_plaview.asp?pView=PLA0000001&pCode=849&pScale=SCALE00002
-
Built pretty much from the box, swapped the top .30 turret for a Sherman split hatch cuppola and left-off the tool boxes from rear. Paints are all Tamiya acrylics mixed by eye to 'try' and make the SCC13 Jungle Green. I've no idea what colour the earth is in Mandalay Burma, so mixed up some Mig Farm Soil & Vietnam Earth pigments and hoped for the best... Decals are by Star (35-C-1120) for a vehicle of the 3rd Carabiniers, 245th Indian Tank Brigade in Spring '45. Please feel free to make any comments or suggestions. All the best from New Zealand. Ian.
- 10 replies
-
- 35
-
-
-
Hi all I'd like to join with this 1/200 scale kit from Academy please. It's a simple kit, but the parts are nicely moulded. The decals look nice too, although I'll only be using the windows. The kit comes without any undercarriage and is intended to built built 'wheels up' (a stand is provided). A previous owner of my kit was obviously intending to fit an undercarriage using gear from some other aircraft (definitely not a B-17), and has ground away the retracted wheel from one wing. As I'll be going back to the 'in flight' pose, I'll need to reinstate the missing wheel. Keen to build an RAF aircraft, I've been looking for some suitable schemes and come across the decal sheet for 241 (MET) Squadron, based in Iceland. I'm attracted by the nose art (is this unusual on RAF Forts?), in particular 'Hekla Hettie' (I know an annoying cat called Hettie). Here's a link to the decal sheet. I'll need to recreate these markings in 1/200. Otherwise, the only modification that I think I'll need to make is to remove the ventral ball turret. I'm no expert though, so please do set me straight if necessary . Cheers


Wedge-TailedEaglePortraitRaptorDomains.thumb.jpg.41a306d3445a68f0f2df773e01776ea6.jpg)