Search the Community
Showing results for tags 'Zvezda'.
-
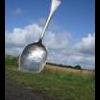
As a companion to the IL-96 I posted a few days ago, here's Zvezda's Il-86. Nice kit with well fitting parts Slightly odd colour scheme in the kit as it didn't match the box - no flag on the fin. I got a set from 26decals which were excellent in their fit and appplication. Finished in Halfords Appliance White and Xtracrylix Light Aircraft Grey in the scheme worn by CCCP-86066 as at Farnborough in 1984. With the IL-96-300
-
HI Pals, On this occasion, I would like to share with you, mounting an ISU-152 Zvezda brand. I decided to try this kit because if I do not end up liking the finished model, it is a tank destroyer, not a tank. I think it's the cheapest kit, so if not just liking me, spending has been minimal, and will OOB by other side, for the same reason. Anyway, I've seen other models Zvezda in the forum, and have been proud. The first photos are of almost finished model, for though I was taking pictures, I unfortunately the lost / deleted without noticing. I do not remember having special problems mounting at the moment, perhaps with fuel tanks that have just not fit quite right and I had to sand the adjustments. Soon more updates, thx for watch and comment, cheers mates
- 105 replies
-
- 10
-

-
 Good evening. The opening cermony of the Winter Olympics is to an end. And it's time for me to present my Olympic build of 2014. Tu-160 Blackjack - The White Swan from Zvezda in 1/144 Boxshot. Contents. Ordnance, 6 Kh-55 Raduga Cruise missiles. An open bombay with ordnance was the deciding feature that made me buy the Zvezda Swan before Trumpeters version. And since I'm almost addicted to PE I couldn't resist this little sheet from Extratech. A few parts in clear plastic. My White Swan will be the Ilya Muromets - named after a legendary Russian folkhero. I now got sexteen lovley days at the worktable and some great sports on the TV in front of me. /Bosse
 -
Hello all, My contribution to this GB will be Zvezda's excellent Mi-35m Hind. I have the Begemot decal sheet with markings for several Russian Federation, Azerbaijani, Brazilian, Iraqi, and Venezuelan markings. Most of the marking options are a bit dull. Though this is more the fault of the real Mi-35 being painted in dull schemes, than it is Begemot's. I'm pretty sure I'll be building the Brazilian version, as its at least a bit different from what is typically seen (at least in North American modeling circles). Besides, South and Central American subjects are very under-represented in my collection. I've heard many good things about the Zvezda kit, so this should be a fun project. I'm planning on doing the build with all engines and doors open. Wish me luck. Here is the obligatory parts shot. Construction should begin in earnest, shortly.
-
Despite being my favorite modern jet and both being born in 1977 this is only the 2nd flanker kit I've made in 26 years. I have plans to build may more but was drawn to do this two tone bright blue scheme first. Coming off the back of building hurricanes and wildcats you forget how big the damned thing is. This is a fighter that is nearly as long as a Lancaster! This was the first Zvezda kit I have built though it wont be the last, a beautiful kit to build with only a few breakdown compromises to allow other variants to be tooled. Painted using Mr.Color acrylics with a bit of oil paint weathering. Any comments or suggestions welcome
- 21 replies
-
- 11
-
-
Here's what I got for my birthday from my best mate (well I got more stuff non related to modelling): Q:"Don't you do only aircraft?" A: "No,I don't". However I will not start working on it till my AB arrives and till I finish the Phantom.And taking in consideration that school is starting in a few days that will take a while .
-
 Hi Friends, The following items have been added to our regular stock: - T-60 GAZ plant production 1942 from Ace in 1:72 scale (ACE72541) - Sandbags for the BTR-80 #2 from DAN Models in 1:35 scale (DAN35301) - U.S.Tractor w/Towing Winch & Crewmen.Special Edition from MiniArt in 1:35 scale (MA35225) - T-44 M Soviet medium tank from MiniArt in 1:35 scale (MA37002) - Tram Crew with Passengers from MiniArt in 1:35 scale (MA38007) - Soviet WW2 hand weapons (Nagant, Mosin Kar. Mod. 38, TT, PPS-43, PPsh, PTRD, SVT) from Ace in 1:72 scale (PE7227) - T-35 Soviet heavy tank from Zvezda in 1:35 scale (ZVE3667) - Russian fighter-bomber "Su-34" from Zvezda in 1:72 scale (ZVE7298) Sincerely, Alex Scale-model-kits.com - plastic scale model kits on-line shop
 -
Hello Everyone! I would like to share this build from early 2015. Living in sunny Goa, India where a squadron of the Ka-28 used to be based, I used to see these birds flying around overhead. Their characteristic shape with the lack of a tail rotor made for a very unique sight. The kit used was the Zvezda Ka-27, so to convert it to the Ka-28 (Ka-PL), I scratch built the tanks beneath the exhaust, the extended starboard cockpit window along with some rudimentary cockpit detailing. At the time, I lacked styrene sheet to build the tanks, so I attempted dissolving some sprue in paint-stripper and poured it to dry out flat on a sheet of glass. I effectively knocked off a few years off my life span dealing with that noxious stuff. Also added some riveting, drilled out a few absent vents and the radio antennae. I got the rotor setup all wrong though- Not sure where I messed up. Decals and stencils were from Begemot. A picture to compare the before and after weathering. The final matte coat toned things down quite a bit. Thanks for watching! Cheers, Alex.
- 12 replies
-
- 27
-
-
- kamov
- Indian Navy
- (and 2 more)
-
Hello, After purchasing this yesterday I've decided to use this kit as a boost/kick up the backside for the mojo, I'm aware my track record of starting builds but not finishing them isn't good but this is a kit I have wanted for a while now.. IMG_9082 by John Rooney, on Flickr IMG_9084 by John Rooney, on Flickr IMG_9086 by John Rooney, on Flickr IMG_9088 by John Rooney, on Flickr IMG_9091 by John Rooney, on Flickr IMG_9092 by John Rooney, on Flickr IMG_9094 by John Rooney, on Flickr IMG_9096 by John Rooney, on Flickr Thanks for Looking! John
- 4 replies
-
- 5
-
-
- Tupolev Tu-160
- Blackjack
- (and 1 more)
-
 Hi Folks, here is my Zvezda Ju 87 painted up as an R2 White H from 1/StG1 based in Krainici in Bulgaria during the Balkans campaign of 1941. This is a snap together type of kit but don't let that fool you as the engineering and fit of this kit is excellent. The only detail missed that I could spot were the lack of aileron mass balances. My only concern was that the clear plastic didn't like being polished and was a bit awkward to fit together but other than that this was an enjoyable, stress-free build. i wanted something a bit different from the kit supplied options so used some Tally Ho decals from the "Achtung Stuka!" decal sheet. This was my first time I have tried the 'Mr Paint' range of acrylic paints and I have to say that I am very impressed both with the way they sprayed and the colour match too, I will definitely be using them again and can recommend them highly. Duncan B
- 31 replies
-
- 34
-
-
Hello all A few pics of my latest completion - this is Zvezda's Lavochkin LA-5 in 1/48. This is a lovely kit with a lot of detail, some it unseen deep into the fuselage. In more skilled hands, it could be displayed with all the engine and gun detail exposed. I made a bit of a hash of aligning all the struts of the frame that holds the engine in place, so backtracked from that option and closed her up to hide my errors. Also managed to lose the pitot tube - having escaped the jaws of the carpet monster, i fell prey to the laminate wood monster as the part pinged off into the unknown... Had some minor issues with the canopy, which didn't like being dipped in clear gloss at all, but still a very enjoyable build. It was painted in a mix of Tamiya and Mr Hobby acrylics, weathered with Flory's dark dirt wash, oils and thin acrylic mix for the exhaust stains. Thanks for looking Adam
- 17 replies
-
- 19
-
-
Check out the new Zvezda 2015 catalogue http://scalemodels.ru/modules/news/img_8359_1419369777_Catalogue_2015_Cover_22_000021.jpg.html Can't wait!! Could a 757 and an MD-11 be a possibility now? Ian
-
This is Zvezda's latest "ultimate kit" which was released earlier this year. It includes extra details such as options for open cabin doors, extended flaps/slats and even extended undercarriage oleos to represent a final approach mode. I've built this version in Thomas Cook's new "sunny heart" colour scheme with just flaps/slats extended into the landing position. Some say that this new livery is drab compared with Thomas Cook's previous two-tone blue scheme, but I think its actually quite striking. The kit goes together really well and was a delight to build, although some care is needed in assembling the extended flaps - the kit instructions need a bit of interpretation. Also the kit doesn't come with wingtip sharklets which are now fitted to most new A320 family aircraft, so these are add-ons from Braz which were easy to fit. The Thomas Cook decals are home made with the detail decals (windows, doors, etc) from Daco. Paints used for the Thomas Cook colours are Yellow Revell 310, Dark Grey Revell 378 and Mid Grey Humbrol 128. I think that Zvezda are definitely setting the standard for airliner models. Their next release will be a Boeing 777-300ER - bring it on! Thanks for looking. Tim
- 23 replies
-
- 24
-
-
 Apparently news of this has surfaced at Telford, although I haven't seen anything official yet. A re-box of the Zvezda kit with decals for KLM. Anyone seen any more? Cheers, Andrew
 -
Hello, I thought the best way to introduce myself here would be to post a gallery of a recently finished model. So here it is. Su-27SM from Zvezda. My second (and third) model in “current moddeling era” (I used to build models as a kid, and last year I decided it is time to get back to it and do it properly this time – first was Su-34, painted with traditional brushes, there was Kfir I don’t count cause it was only an airbrush practice, and since January 2015 I was building this one and F-14A from Academy simultaneously), one with which I am quite satisfied. There were some obvious errors made, but I am happy with overall look. Especially preshading made the camo look lively. It is armed only with R-73s, as I didn’t want to spoil the line of this beauty. Opened airbrake is enough. Made out of the box, plus eduard’s photo-etched interior, metal pitot tube, some led cables and plastic profiles in landing gear bays, plus missiles’ heads made with transparent epoxide glue. As for the engines, it was the first time with metalizers (model master) so they are far from perfect. I overdid it with “smoked” effect. The model is mostly clean as this is how they look like on photos. Enjoy! I will post F-14A soon as well. Michael And couple of photos with her buddy from the workshop:
- 25 replies
-
- 27
-
-
With the forthcoming Airfix and just released Zvezda Ju87B kits, I was wondering if it's worth keeping my unbuilt Fujimi Ju87B (Immelman boxing) or selling it in favour of either of the 2 new kits. Any thoughts anyone? Has anyone actually got hold of the new Zvezda kit? Or has any thoughts on previews of the Airfix kit and how they compare to the existing Fujimi kit? thanks Mike
-
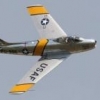
 #29/2015 Zvezda kit with decals from LF Models, painted with Gunze and Tamiya acrylics, antenna wires with EZ Line. In 1943 the Spanish Airforce received about a dozen F-4s which were stationed partly in France and Spain. Not much info about these, seems a few were painted in single RLM79. According to the old, non available anymore French book "AVIONS Hors Série No. 5 Les Messerschmitt Espagnols" some were painted in a 3-tone camo similiar to the Spanish He112, to say colors close to the early Luftwaffe ones. You find profiles on the web that show a green-green-grey camo, also LF Models manual shows that scheme but my dad kept to the "Luftwaffe" grey-green-brown color scheme.
- 14 replies
-
- 29
-
-
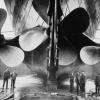
Introduction Time for my first WIP-contribution to this forum. It regards a 1/350 HMS Dreadnought by Zvezda, with aftermarket stuff from Pontos and WEM. Scratchwork beside the aftermarket stuff will be plentiful. For reference purposes I mainly use John Roberts' magnificent book "The Battleship Dreadnought - Anatomy of the ship" featuring hundreds of drawings. Beside that I use old photographs from a Dreadnought photo DVD that can be purchased and Kagero's 3D-book and drawing, although the latter are not a reliable source. My impression of the kit Zvezda have done a great job on some aspects such as certain detailing, not so good of others. The biggest problem is that Zvezda have copied the port and starboard sides of the hull: to be exact, the starboard side is mirrored onto the port side. This is thoroughly incorrect as the layout of ports and side scuttles ('portholes') on respective sides are anything but symmetrical. The only thing differing the Zvezda port from starboard is the single hawsepipe (port) vs. the double hawsepipe on starboard. By the way if you think that's a good reason to choose a Trumpeter Dreadnought, think again; that kit has exactly the same flaw. Quite the coincidence, obviously. The problem that Zvezda faced when they were engineering this kit must have been that there are no drawings available of the ship's port side. Plenty of pictures though and on pages 79-87 of the Roberts book there are very precise drawings showing the position of the side scuttles and ports on both sides. My impression of the literature Roberts' book is simply excellent in almost every way. One should use this as a primary source of reference if desiring to scratchbuild this ship. I have not seen any obvious mistakes in the book thus far. Kagero's book is very nice but not for recreating the hull. Like Zvezda and Trumpeter, they have not based their drawing on Roberts' drawings but, rather, seem to have made estimations based on pictures. Comparing Roberts' drawings and Kagero's book to real photographs, it is understandable that certain mistakes were made by Kagero, but still it's a shame (also for their own efforts) because they have done such an amazing job on the 3D-rendering. I recommend using both books (Kagero's to a certain extent as mentioned) and I also recommend purchasing the picture DVD. It features more than 50 photographs of HMS Dreadnought I had not found via Google. This topic I usually take a lot of pictures and describe almost everything I do. I know some of you will like that, others will not. As this is my first WIP-topic on this forum I'll just try to design this topic as I usually do and see what you'll think of it. If my elaborateness is not much desired I'll keep it more compact next time. I started building this ship about a year ago but not much visual progress was made due to the above-mentioned problems. Actually, the only visible progress is 'going back to basic' as I sanded the two hull sides flat. Of course, at first I didn't see Zvezda's errors. Then I followed Kagero's plans, then I found out that also Kagero's plans are faulty, etc. etc. Other builds have also interfered with this one. Many, many mistakes were made and corrected. I always describe my own errors, hoping that others will learn from them. Time spent on the Dreadnought before the following picture was taken: 97 hours. Number of pictures taken and described until then: 117. Let's start from that point! Oh yes.. as a non-native speaker mistakes in language can be made. I'd very much appreciate it if you guys correct me if I use certain terms incorrectly. The build 118. Originally I didn't know how to make the cone-shaped relief at the hawsepipe. So I decided to move that relief a few millimeters. Starting by drilling a hole. 119. Removal of the part by using a microsaw and a sharp hobby knife. 120. After the amputation. 121. Filing the plastic a bit towards the designated position, then glueing both parts together (some pieces of Evergreen are added, not yet installed when the picture was taken). 122. Gluing the brass sheet onto the polystyrene. Secure with a plastic modeling support. 123. Making the next piece of brass sheet (toward 'P' barbette). The impressions are where the side scuttles should be drilled (1 mm.). 124. Holes are drilled into the plastic. 125. And then I started anew (yet again), because the two pieces of brass sheet didn't connect / align. Something just wasn't right... It obviously had something to do with the troublesome mathematics involved in calculating the sizes and lengths. Without the use of a 3D-model the lengths are virtually impossible to calculate for someone with limited math skills such as myself. A hull has two curvatures: horizontal and vertical. Because of that, calculating the lengths of sheet or distances between side scuttles is almost impossible. On top of that, certain horizontal lines which I thought to be dead straight turned out to be slightly curved. Time to say goodbye to (some) calculations, as on 1/350 a deviation of merely a tenth of a millimeter is visible. After some deliberations I decided to try to tackle this in a different, more thorough, way. I followed the following step by step-plan: 1) Sideview drawing: measure distances flying deck -> sea level, every 5 resp. 10 millimeter along the hull, accuracy 1/100th of a millimeter. 2) Sideview drawing: measure distances high deck -> sea level, every 5 resp. 10 millimeter along the hull, accuracy 1/100th of a millimeter. 3) Sideview drawing: measure all distances regarding armor plates (4 lines horizontal along the full length of the hull, 4 lines vertical). 4) Draw all other objects such as side scuttles, ports, hawsepipe etc. and measure their heights as well as horizontal position from bow. 5) Multiplying all values *1,097 (scale 1/350) and adding 2,75 millimeter due to raised height -> Zvezda apparently added 2,75 millimeters to the sea level line along the length of the hull. 6) Top view drawing: measure distances of all side scuttles (port side), top row and bottom row. Multiplying by 1,097. 7) Positioning the brass sheet onto the model and scratching every individual spot into the brass with an electronic marking gauge. This way, a sort of puzzle evolves, which needs to be carved out and on which holes are to be drilled. Hereunder I illustrate these things through photographs. To start, I attach the brass sheet and measure it. 126. Working with two rules simultaneously. 127. Scratching the lines. Where there were height differences between two impressions, scratching was performed, for example, by moving the gauge from left to right and at the same time lightly and gradually rotating the gauge. 128. Due to copyright reasons I cannot show (parts) of the drawings featuring measurements. Quite of few of them are present, it was a lot of work. 129. Interim score: a couple of lines were drawn. 130. I don't often need my outside caliper, but now it comes in very handy! Using it, the contours of the bow could be perfectly scratched into the brass. 131. The construction on the following picture needs some explanation. I used it to mark the horizontal position of the side scuttles and ports on the brass sheet. 1) Ruler is attached by tape to table, perpendicular to table ('work bench') side. 2) Hull is also on table, along table side so perpendicular to ruler, also taped to the table. 3) Electronic marking gauge (I'll hereinafter call that simply 'gauge') is used parallel to the ruler on one side and equal to the ruler on the other side. That way, a 'sideview-straightness' is created. 4) If according to the drawing 100 millimeters behind the bow a side scuttle is present, that number must be multiplied by 1,097. The gauge is extended to 109,7 millimeter and is positioned over the ruler (which is taped onto the table). Where the extended arm of the gauge touches the hull, I mark a little dot using a 0,3mm. fineliner. 5) Using a folding knife (see photo) or ruler, a vertical line kan be drawn. Somewhere along that line the side scuttle will be drilled. The height will be determined later. 6) To keep an overview of the situation, I number the side scuttles and ports. This makes for a precise measurement as ruler and ship are perpendicular and solidly taped to the table, plus all measurements are based on the Roberts' drawings. 132. Marking with the fineliner. 133. Current status. 134. Markings are where the side scuttle holes should be drilled: simply measured on the drawing, multiplied by 1,097 and 2,75 millimeters added. 135. And this is what it looks like after -finally- the brass is detached from the hull. Beside measurements, it took about 5 hours to prepare this piece for carving and drilling. Very excited and slightly nervous... I can't make any mistake now or I have to restart yet again! 136. Meanwhile I have learned how to make a cone shape in brass... by using a 0,5mm. metal drill on a Boschhammer machine ! I tried to drill a hole but it just didn't work. Everytime I tried I got a cone. At one point I thought... hey, wait a minute! This is exactly what I need! Still, practice is necessary. To make a nice round cone I had to practice a couple of times, scrapping quite a bit of brass sheet . 137. The scratches will be deepened and thereafter bent back and forth, so that the sheet will eventually break along the fold lines. 138. Drilling was done -as you can imagine- extremely carefully. I really couldn't afford to make any mistake. 139. On the next picture (don't mind the bent cone) you can see the peculiar way the heights of the side scuttles vary. Only by the curvature of the hull and the sheet (when attached to the hull), it will appear straight. But this result I could never have attained by calculating only... 140. Filing the backside of the brass in order to make it nice and flat, makes for two accessory advantages: it creates grip for the glue to 'bite' and it nicely precurves the sheet. 141. This time it (logically) fits. Nevertheless for me it is marvelous to see this result after so much work (most of which is not discussed in this first post). 142. To demonstrate the size, in comparison with a 1/24 scale Krupp Titan-engine, see the next picture. Also the reinstated cone is visible here. Spent time thus far: 113.
- 49 replies
-
- 4
-
-
- hms
- dreadnought
- (and 5 more)
-
Hi all, I've just received a Zvedza Tiger today purchased via ebay and to my shock/horror...I discovered I'm missing the flexible band tracks. I've contacted the seller, but in the meantime, what decent third party, reasonably priced track options are there? I've only used the flexible tracks previously, and quiet happy using them, so something similar would be ideal, though cursory glance seems to suggest idividual tracks would be the only available option. Regarsds, Greg
-
 History: The battleship Borodino was the lead ship of a class of five pre-Dreadnoughts built for the Imperial Russian Navy. Launched in 1901 from the New Admiralty yard in Saint Petersburg, she was intended as an improved Tsessarevitch, however the thickness and coverage of the armour was reduced. Main armament consisted of four 12 inch guns in two twin turrets, twelve 6 inch guns in six turrets, and twenty 11 pdr guns housed in casemates. Borodino fought against the Imperial Japanese Navy at the Battle of Tsushima alongside three of her sister ships, and was lost due to a magazine explosion after Japanese shells penetrated her armour. The Kit: The model is built using Zvezda's 1/350 Borodino; the wooden decks are by Artwox; etch is by Gold Medal Models with the exception of the lifebelts (Lucky Model), and the nameplates which are by North Star. The rigging is Uschi .005mm rigging thread. Thank you very much for looking in; the build log can be found here in the work in Progress section: http://www.britmodeller.com/forums/index.php?/topic/234980144-1350-russian-pre-dreadnought-borodino/page-1 Regards, Ross.
- 11 replies
-
- 19
-
-
1/72 ex-Zvezda Su-27SM Flanker coming soon http://www.revell.de/en/products/model-building/aircraft/military-modern/id/04937.html instructions are online: http://www.revell.de/fileadmin/import/images/bau/04937_%23BAU_SUKHOI_SU-27_SM_FLANKER.PDF
-
Flew back from our honeymoon to Grand Canaria in 1991 on this after waiting at the airport for about 5 hours for the fog to clear over the UK. Don't remember much of the flight as I went to sleep very quickly but the typically Russian aircraft smell inside was very noticeable. Very nice Zvezda kit with my own decals. Steve
- 11 replies
-
- 13
-
-
-
I started this conversion some time ago (before the Revell kit was announced and released) i spent a lot of time refinishing the fuselage as I kept stuffing it up. Decalling is almost finished, still need to sort out the engines paint wise and add the gear. The decals are from Hawkeye Models, sheet designed by Scott G on a request from me. The tail kangaroos are from their A380 sheet and fit quite well. They just need the tip of the tail trimmed once the decals are dry. Quite happy with how this is turning out Just spent about 40 mins trying to lineup the nose cargo door decals Aarrrggghhhh! Oh that will have to do....
-
Zvezda is finally making a Mig-29! (At least I think this is not another version of the old rebox?) http://www.zvezda.org.ru/samolety-1-72/7278/

-1-1MINIATURA.thumb.jpg.bd7a7e672869500d45ee6e80478f6f25.jpg)