Search the Community
Showing results for tags 'Ww1'.
-
 As a Fokker Dr.I popped up last week on RFI, I thought I'd add a couple more, together with an E.V and a Sopwith Pup ... Fokker Dr.I (serial unknown) flown by Staffelfuhrer August Raben, Jasta 18, 1918. Revell 1/48th scale. Brush painted acrylics, home-made decals. Fokker Dr.I, 546/17, Jasta 11, early 1918. Eduard 1/48th scale weekend edition, OOB build with kit decals. Brush painted acrylics. Fokker E.V (aka D.VIII) flown by Theodor Osterkamp, Eduard Weekend Edition, 1/48th scale. Brush painted acrylics. Sopwith "Navy" Pup, Flashback Limited Edition, 1/48th scale. Brushed acrylics, kit / home-made decals. B2192, attributed to Capt Foote and Capt. H. H. Balfour at the Gosport School of Special Flying, 1917. For more photos (gluttons for punishment) and details of builds, follow links in signature to web site / club site respectively. All feedback welcome, as ever.
- 17 replies
-
- 23
-

-
- Fokker DR.I
- Sopwith Pup
- (and 1 more)
-
This is the first time I have put something in RFI. I finished this about 3 weeks ago. I thought there would have been more of these to be seen on this site. Its a nice wee kit, very nice details and rather fragile. The rigging helps strengthen it. The fuselage stripes are decals. The top and bottom pieces do not align with the side pieces. I think whoever drew them forgot that a stripe cut an angle is wider than a straight across cut. The rigging is done with stretched polythene plastic sprue. Sprue from a set of Airfix figures. It can be stretched till its very thin and it has a small amount of elasticity to it: enough to pull tight for rigging, as here. The wires at the front of the wings were done with one long piece, as were the aft wing wires.
-
 Seatbelts RFC WW1 (32857) and Seatbelts German WW1 (32858) 1:32 Eduard pre-painted Etched brass. The last 10 years has seen a big rise in interest in Great war aviation modelling, particularly in 1:32 scale. There are the beautiful Wingnut Wings kits, and others from Roden, Special Hobby, and Academy. With their large scale open cockpits, seatbelts are a necessity, and both Wingnut Wings and Special Hobby supply them as unpainted etched brass items in their kits. However, painting them is not every ones favourite task, and one look at these will convince most modellers not to even try, but just buy a set. The detail on them is way beyond what anyone could expect to paint by hand, with miniature stitching in perfect patterns. Seatbelts RFC WW1 (32857) Two complete sets are provided to make each of the 'Early' and 'Late' versions, the differences being in the lap belts. The buckles are offered as separate items to be threaded on to the 'fabric' sections, and several overlapping straps are attached, along with individual metal plates. All of which makes for a finer representation than other types of etched seatbelts that are 'all in one' . This type of Sutton harness is particularly applicable to the Sopwith Camel and may also have been fitted to SE5.a's, Pups, and other types according to pilot preference. It was a late war design so checking of references for particular aircraft is recommended. It would also have been used extensively post war, as it was a superior design to the 'lap only' belts in use during most of the great war. With Wingnut Wings Camel due to be released at some time this year (we hope!) this set is very welcome. Seatbelts German WW1 (32858) No less than five complete sets of belts are offered here, and like the RFC set above, the buckles are separate parts to be threaded on. The painting is superb, and really needs to be looked at under a magnifying glass to appreciate how good it is. Most of the belts are the 'lap' type that secured around the pilots waist without any shoulder straps. Each of them is in a different colour, with linen, tan, red and dark brown. One complete four point harness is provided, of the type typically fitted to Albatros and Pfalz fighters. The other 'lap' seatbelts in the set will be suitable for the Albatros CIII, Hannover CL.III, amongst many multi seaters, plus various Fokker and Aviatik machines. Conclusion Both of these sets are well worth having and provide a far superior result than can possibly be obtained by hand painting. They will anyway be essential for Roden and Academy kits as no seatbelts at all come with these kits. It will be a great idea to pose the shoulder straps of the four point sets hanging outside the cockpit, ready for the pilot to clamber in. This can frequently be seen in period photographs, and will show these lovely belts off to advantage. RFC German Review sample courtesy of
 -
Finally completed my Pegasus Bristol M1C in 1/72, a lot more work than I was expecting. believe it or not it's harder to rig a mono plane than a bi-plane simply because there is no second wing to pass the cable through and tension it before gluing. consequently the rigging is stretched sprue. The kit propeller and hub were scrapped and replaced wit a spare from a Bristol Scout, the original was simply too big. Back to WW2 stuff for the next build.
-
Aces High Magazine. WW1 Centenary. Perhaps best known for their paints and weathering products, AK Interactive have now moved into publishing their own aviation modelling magazine 'Aces High'. Issue 2 is themed 'WW1 Centenary' and is devoted to models from that era. Five different aircraft builds are featured in 1/32 and 1/48, these being the DH.2, Sopwith Pup, and Hannover CL.II form Wingnut Wings, and Fokker DR.1 and Nieuport 23 from Eduard. More than this though, there is a feature on figure painting, a 1/32 fuel cart, and a 1/72 Mack Bulldog truck. This is a great idea, as although many of us are primarily aircraft builders, we like to add accessories and figures to our showcases. The magazine seems to be squarely aimed at people who actually build their models, as there is only minimal text to introduce each subject. The bulk of the pages are reserved to explain and illustrate how to achieve some of those tricky results that you see on top class models. Sequences of photographs are used to show step by step how to build and paint an engine for example, or wooden propeller, or wheels, and so on. I particularly like the section explaining how the Wingnut Wings Hannover was rigged, as this is an area I know I need to improve on myself. I really like this method of explanation, several times I found myself thinking 'oh, so that is how it is done' as I read through the articles. Each finished model is shown from several angles, the DH.2 is a particularly impressive piece of work. The printing throughout is on good quality glossy paper, with full colour photographs and supporting text keyed to each picture. 72 pages are provided, of which only 6 are used for advertisements, and that includes the back cover with a rather nice Wingnut Wings ad on! 'Aces High' is available through AK Interactive's own website, and I notice that Amazon and EBay also list it. The 'Next issue' teaser at the back of issue 2 tells us that issue 3 will be themed on late war Japanese fighters, figures, and vehicles. This is a very impressive new magazine, clearly written by modellers for modellers, and I wholeheartedly recommend that you get hold of a copy and see for yourself. It's a good read and you are almost certainly going to pick up some very useful new tips. Review sample courtesy of
- 2 replies
-
- 1
-
-
- Aces High
- AK Interactive
- (and 1 more)
-
Hey again folks, This is a bust I completed just before Christmas for my local IPMS club Christmas competition, he got 2nd place which I was mightily chuffed with considering the quality of the other work on show from the aircraft and armour modellers, not forgetting the pesky ship diorama that got 1st place (well deserved I may add, it was a cracking diorama and even made last month's Airfix mag). Anyhoo, the bust is from Model Cellar and is entitled Over The Top. He is sold as a Captain of The Gloucester Regt but I've reworked him slightly to depict a Captain of The Norfolk Regt, to give him a more local feel. The base and cap badge were purchased seperately and the barbed wire, poppy and parchment were scratch built. He is painted mostly in water mixable oils over acrylic base coat with the exception of the helmet which was airbrushed in acrylics so that I could try some chipping effects for the first time. Comments and critique are most welcome, as always, for both the model and the photography (I'm still learning, as I'm sure we all are) Thanks for tuning in. Cheers, Billy
-
A quick question: What type of car would be used by a german WW1 pilot? in 1/32 - would it be german - like a Mercedes or could it be any sort of car? I'm contemplating doing a vignette in 1/32 and would like to include a car, but which one? Can I use any of Airfix' classic carkits? Can you help? Cheers Hans J
-
I'm please at last to say that the new Gunthwaite RAF pilots featured in my build of the Revell SE 5a are now available. The figures are based on a well-known photograph of No. 1 Squadron at Clairmarais South in July 1918. There are three sets each of three figures. My build of the SE 5a is here: http://www.britmodeller.com/forums/index.php?/topic/234975077-se5a-update-with-pilots/ More details on the Gunthwaite website. Al
- 4 replies
-
- 2
-
-
- Gunthwaite
- WW1
- (and 3 more)
-
I have been stuck in the house for close to two months now with a partially slipped disc and other lower back problems. Due to one thing and another I really haven't felt like modelling even though I had two Elves sitting on the bench all primed up ready to paint. So after a chat with Mike yesterday he persuaded me to get this one out of the stash and build it straight out of the box. I was going to add some turned machine gun barrels, but will now save those for a later build. The kit is a little awkward, particularly in getting the fighting compartment panels aligned, but I used the interior rhomboid to act as a template and all is good. The number of wheels is fun, but they positively lock into one half of the rhomboid allowing just a tweak here and there to get them all lined up between the two halves. The rhomboid section in the picture isn't glued yet, hence the clamp.
-
Here's a health and safety warning .... "This thread contains images some viewers may find disturbing" Ignore this warning at your peril if you want to reach the end of this thread without feeling the need to vent your anger in any way, shape or form, particularly if you are an ardent Wingnut Wings fan or a rivet counter. This is an RFI of the WNW kit that is much sought after yet is no longer in production, but ... * It is by a distinctly average model builder of WW1 aircraft - in fact any type of model * It does not incorporate the use of turnbuckles - sacrilege to many for a kit of this scale - but it has been rigged - inside and out * It is brush painted (in a mixture of enamels and acrylics) and never been anywhere near an airbrush * It bears some resemblance to the aircraft it depicts - the person I built it for, SWMBO, is not concerned with historical accuracy * It has not been weathered to near death and destruction in the interests of "realism" * It was built for the pleasure of building a kit (I know, a bit odd these days) and not the masochism that accompanies the need to be 100% accurate to the last stitch and the desperate need for approval and inclusion. End of health warnings. So why have I posted this then? Well, it's because despite all of the above, it's a model, it's my hobby and I can. And there may be some of you who like it and it might bring a smile to your day. Okay, for those of you still with me, this is my version of N500, the prototype Sopwith Triplane - the aircraft that is replicated in the Great War Display Team and based at White Waltham airfield. Should you wish to replicate, or avoid replicating, the CDL effect is Precision Paints' Mid-Sandstone enamel, the wood-effect is Humbrol Wood base layer with artist acrylic browns of various shades layered over the top, metal is Humbrol rattle can aluminium, rigging is Albion Alloys silver-nickel wire for support struts and knit-in elastic thread coloured by felt pen for the control wires. Decals are from the kit. Vallejo matt varnish finish, but wing undersides were left with a glossy Klear finish to mimic the reflective dope finish it wore in real life (okay so I did look something up). Oh yes, the spots on the engine cowling were applied by a "Pilot Super Color" pemanent (silver) ink pen (which dries without the need for a protective varnish finish). So how did it turn out ... Comments welcome as ever. Viewers who have been affected by the images shown in this thread may wish to see more at here.
- 34 replies
-
- 32
-
-
- Sopwith Triplane
- Wingnut Wings
- (and 2 more)
-
Well then, let's see how this goes! My first Eduard 1/48 WW1 model, following on from many 1/72s over the years and a handful of 1/28 Revells. Kit box and sprue shots: There are two versions in the box - N1531, Guynemer's fourth fighter, painted in plain aluminium dope with "Vieux Charles" written on black pennants hanging off the interplant struts. The second version, N1530, was the fifth aircraft and lacks Guynemer's iconic name for his aircraft anywhere in the livery, but has a green/brown camouflage on the upper surfaces of the wings. At this stage I am leaning towards N1531 because I feel that Guynemer's aircraft should have "Vieux Charles" on them somewhere. However my concerns at this stage are: 1) how to paint the tricolore on the aerodynamic nose cone. Looks like a trip to masking hell! 2) how to make the pennant look like a pennant However, while I try to figure these things out, I will get on with the basics. Rigging will be drill 'n' fill. I looked at using buckles but this is such a tiny model that it would be gilding the lily.
-
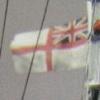
 HMS Timbertown was an internment camp in Holland during the first world war for 1500 sailors of the Royal Naval Division There is a television programme still available, and for a while yet, on the BBC iPlayer (27/02/2015). http://www.bbc.co.uk/programmes/b04kg1q1 The programme is in Gaelic, but don't worry there are English sub-titles. It's rather interesting and describes some of what happened to these sailors. Little known facts such as how sailors had UK leave but had to return to their Dutch prison are dealt with. If you don't normally watch the BBC Alba service, (and I can't say as I do), have a look.
-
- 1
-
-
- RND
- Naval Division
- (and 5 more)
-
Renault FT-17 Riveted Turret Meng 1/35 Hi Guys This was built back in August last year, finished in about a week as it was such a fun build. Although it doesn't include the full interior of the previous cast turret release, the addition of a full vignette base more than makes up for it, especially as it retails for nearly half the price of the first release. I thought the multi-part nature of the hull and turret would make the fit iffy but it went together really well although the eagle-eyed among you might notice that the rear hatch on the turret is on the rear right instead of the rear left were it should be which is very much down to me not paying attention, not the kit. The base sand was airbrushed but I hand painted the green and brown camo as I couldn't face the masking job required. Wish I'd changed the coil springs for ones a bit thicker but I couldn't find anything suitable at the time. Hope you enjoy the shots A couple of the finished build before being based And the finished vignette Thanks for looking Andy
- 20 replies
-
- 11
-
-
"Far From Home" BE2e (A10817) 67 Squadron near Gaza 1917. Oil on canvas (mounted on board 23.5" x 19") Lt Gerald C Stones (observer) from Wisbech Australia and 2Lt Joseph A Morgon (British pilot attached to 67 from the RFC) where both killed 30 May 1917 flying A1807 when their aircraft whilst on an artillery observation mission was brought down by anti aircraft fire near Gaza. Thanks for looking, Terry
-
It's that time of year again to show off my plastic shelf fillers for 2014. If you're browsing this thread, you must be looking for a cure for insomnia, so I hope this helps … The start of the year saw the "finish" of my "Harrier 20/20 Vision" project, completing the remaining four Harriers. Next year the new phase begins! First up was the Spanish Navy Harrier EAV-8B II (Monogram 1/48th) … … and the other variant flown now by the Spanish Navy, the Harrier EAV-8B II Plus (Hasegawa, 1/48th) … … crossing the Atlantic, here's a Harrier AV-8B II Plus with the USMC (Hasegawa, 1/48th) … … and to complete the set, the Naval Strike Wing Harrier GR.7 (Hasegawa, 1/48th). You can see the complete set (to-date) here. What to do next? Well, it was the 100th Anniversary of the start of the Great War, so it made sense to build some more models of that era and after all, I am a member of the IPMS Great War SIG. First was the RAF SE5a w/Wolsey Viper (Roden 1/48th) ... … and then an Italian Nieuport Ni-17 (Eduard, 1/48th) … … followed by a Fokker D.VII, one of the mounts of Herman Goerring (Monogram, 1/48th) … … and to complete the series, a LVG Roland C.II in a very-unlikely-to-be-accurate rendition of the "Western Front, Summer 1917" scheme in the weekend edition kit (Eduard, 1/48th). Finding the need to escape from the rigours of rigging and super-glueing everything but the right thing, I thought I'd go for some very light relief. Yes, I went to work on an egg! Building one from the box contents was dismissed as being a little boring, so I went for eggsageration with some light scrambling and poached a few ideas from other people's builds ... (right, that's enough of that ). First of all I built "Lady Angela", the name given to the P-47 Thunderbolts flown by Lt William C Diman whilst with the 395th Fighter Squadron ... (Hasegawa Egg Plane) … the next egg was the TBF Avenger which I "converted" into a TBM-3E Avenger "Fire Bomber" with the Californian Hemet Valley Fire Service. A change to the rear cockpit and a facsimilie of the front of the bomb / torpedo bay to represent the water tank completed the customisation ... (Hasegawa Egg Plane) … and the last in this three minute egg mini series was a captured butcher bird, a Focke-Wulf Fw190 flown by Major Jim Dalglish, wearing a suitably bright colour scheme of red and lemon yellow, presumably in the hopes that his fellow air force pilots would not shoot him down? … (Hasegawa Egg Plane) A pick-up-and-drop summer build was the entry for the West Middlesex Scale Model Club's 6 Month Challenge competition. This year we asked to do something with a KIS-5 truck (least, I think that's what it was). Anyway, this is what my glue-sniffing brain came up with, "Keep It Silly Stunts" ... a Revell SE5A completed the set-up ... I then returned to the Harrier fold with a Harrier GR3 in arctic camouflage, but this got stuck on the back burner for a number of different reasons and for some more light relief I decided to team up with Panzer Vor! and do an egg plane/egg ship diorama for the Middle Wallop model show. For the aircraft, we chose the Mitsubishi A6M Zero ... (Hasegawa Egg Plane) And for the ship, the Fujimi Akagi ... (Fujimi Chibi-Maru Kantai series) And this is the diorama they ended up in … sadly Dave's Zero didn't make it off the deck after he soaked the wing in glue to make it stick (or something like that). This will be added soon as he now has a replacement kit. The ship is the Yamoto, another in the Fujimi series and apparently not an easy build. Dave - mine went together easy - you picked the wrong option! It should be noted that SHAR2 was particularly unimpressed with this diorama for some strange reason! Something to do with it not being right and proper! Personally, I thought it was a shame there were only 6 egg planes (2 were mine) on display at SMW2014. It's all getting far too serious at that show! Merry Xmas and Best Wishes to all for 2015. That’s All Folks!
-
Hi folks, Things have been very busy over the last month for various reasons, but I eventually found time to attach my figure and photograph this beast: It's a kit I knew I was going to buy when I saw the announcement, and it got built immediately. Quick to put together but took a while to paint and finish. I would've entered it in the WW1 GB but stupidly while I started it in the right period, I didn't take pictures to document the construction since it all rather fell together. Of course I only remembered the GB once I was well past the 25% point. Oh well I also had a go at painting a 1/35 figure for the first time - I've painted quite a few fantasy and sci-fi figures but nothing like this, so that was quite a steep learning curve. I'm pretty happy with how he came out although I can see lots of problems too. At least I have some ideas about how to approach these in future. I thought Tamiya's inclusion of the infantry set in the box of the export versions was a good idea and makes this kit seem like good value despite the motorisation probably pushing the price up. Mine does run - it's only sitting on the base - but I forgot to make a movie. It climbs well and can cope with decent-sized obstacles too. Here are a few details and such. The spade is rescued from a Dragon Ostwind I think, and the tarp is Tamiya epoxy putty rolled out and folded. The rather nice metal chains came in the kit, as did the unditching beam although I carved the wood grain myself since it was plain plastic. I also replaced the tow cable with a metal one which caused me a great deal of trouble as it's very springy and didn't want to mate with the ends or stay in the right place. Weathering is a mixture of MIG pigments and MIG and AK enamel products. I looked at period photos from the IWM for inspiration but didn't follow them too closely, so this is more of an interpretation than a realistic depiction. Photos were taken on a big piece of white paper with my NEX and a macro lens. I did the basic processing in Lightroom and added the text and other nonsense in Photoshop. They're supposed to be a tribute to Tamiya's box art style, I hope that's not too pretentious! Thanks for looking, and thanks to everyone who commented on the WIP thread - it was really helpful. Cheers, Will
- 16 replies
-
- 10
-
-
Siemens-Schuckert D.III 1:48 Eduard The Siemens-Schuckert D.III served in comparatively small numbers on the western front in the final few months of the Great war. It's ancestry goes back to the SSW (Siemens-Schuckert Werke) D.1, which was designed in 1916 as a response to the agile little French Nieuport 11. Its most interesting feature was that the propeller rotated in the opposite direction to the way the rotary engine spun, cancelling out the torque effect. The Siemens-Halske ShIII engine suffered from the poor quality oil available, and initially was dogged with overheating problems. However the D.III proved to be faster than both the Albatros D.V and the Fokker D.VII, and most notably had a phenomenal rate of climb for its day. 40 D.III's were sent to the front line for evaluation in March/May 1918 where they performed well when the engines were working, and it was felt that a useful fighting machine could be developed. They were all returned to the factory for upgrading, with a new rudder, elevators, shorter wings and new spinner and cowl. These aircraft mainly went to home defence units, where their high climb rate made them useful bomber interceptors. The D.IV was developed in parallel, with wings shorter in span and chord, and started to be issued to the front line in August 1918. By this time the war was entering it's final stages, and the D.IV was the familiar story of too little, too late. It was potentially the best German fighter of the war, but remains one of those great 'might-have-beens'. The kit. It has been a while since Eduard added to their range of 1/48 Great war aircraft, so this is an extremely welcome new release. They produced an earlier kit in the 1990's, with a brass etched interior and fairly basic injection moulded parts. Be assured, this kit is all new and has nothing in common with the old version. Presented in an attractive orange-stripe 'Profipack' box, the kit contains two sprues of injection moulded parts, two packs of decals, a pre-coloured etch brass fret, a small set of Kabuki tape masks, and a nicely illustrated set of instructions. Looking at the plastic parts, it is obvious that Eduard have taken a step forwards with their moulding techniques, which were always good but are now even better. The parts are crisply moulded in a medium grey plastic with absolutely no evidence of any flash. Sprue A holds the engine, interior, and fine detail parts, whilst sprue B has all the main airframe components. Particularly noteworthy is the way that have managed to mould open louvers on the underside of the cowling, and the beautifully rendered rib tapes with their delicate stitching. Fantastic! There is a lot of interior structure supplied, and it should look great when painted and assembled. As usual there are a number of photo etched parts to enhance things, and you have the choice of solid plastic or etch jacketed Spandaus to suit your skill level. The strutting looks like it should be pretty easy to assemble, the D.III has 'N' struts on the fuselage and the outer 2 struts are actually a single 'U' shaped assembly, as per the real aircraft. The amount of rigging is not too bad, mainly being 2 'X's on each wing bay. Eduard supply some etched brass eyelets and turnbuckles, a 'first' in one of their kits as far as I am aware, probably suitable for the more advanced modeller. You can of course stick to your preferred method of rigging, but it's nice to have this option and I will be tempted to give them a try. Decals. The main decal pack contains 3 sheets, with the largest being the 5 colour lozenge fabric areas, in 'cookie cutter' format. A second sheet supplies the numerous rib tapes, whilst the 3rd holds the BalkenKreuz and individual aircraft markings. All are produced by Cartograf, with sharp, clear printing, and appear to be very thin. A second decal pack is supplied, with 2 strips of the upper surface lozenge in it. It is not clear why, as they are not referenced in the instructions, so I assume they might be for any patching up you may need to do. Brass Etch. The fret offers an alternative seat back (also in plastic), seat belts, machine gun jackets, and amongst other various parts are the aforementioned eyelets and turnbuckles. Also in the ziplock bag are the optional windscreens. Masks. The small square of Kabuki tape provides a set of pre-cut masks for the wheel centres, easing the job of painting the tyres. Options. Five different D.III's can be made from the kit, Eduard have chosen a very good range of different and colourful machines. A. Jasta 4, Ltn. Ernst Udet, Metz, October 3, 1918. B. Jasta 85, (Kest 5) Ltn Heinrich Dembowsky, Schaffenhausen, November 13 1918. C. Jasta 15, Chery-les-Pouilly, July 1918. D. 1626/18, Kest 4b, Vzfw. Reimann, September 1918. E. 3025/18, Trier, December 1918 to January 1919. Conclusion. This is a stunning little kit of an interesting and charismatic aeroplane that all Great war modellers will want in their collection. Eduard have made a superb job of it, the moudling quality looks exceptionally high and the whole package has been produced to a very high standard. I first became interested in Great War aeroplanes in the 1990's due to the kits Eduard was producing, and did in fact build the original release of the SSW D.III. They have produced a fabulous range of models in the intervening years, and this is surely one of the best yet. Also available, 3 Upgrade sets Highly recommended. Review sample courtesy of
-

1/72 Smer Fokker E.III - Complete
Pin posted a topic in World War One, 100th Anniversary Group Build
Two weeks till the end of the GB. Enough to build little Fokker -
Started this morning The only problem with the body - relatively large hole that can be easily cured with dissolved putty, excess of which is removed with nail polish remover result - the hole has vanished I replaced plastic gun with aluminium tube from Albion Alloys that I sanded to make it more cone like Also replaced machine gun barrels with thin tubes First coat of primer to reveal defects
-
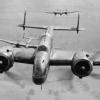
Challenging kit - I still can not believe I dared Whatever .... First few shots Let's get started Two out of four engines I'm not happy with the lozenge decals that are supplied with the kit. Thinking about printing my own 5 colour night lozenge decals. Test pattern prints Dry fitting of engine assembly to nacelles The /\-shaped stands seem too fragile and missing cowlings - thinking about replacing them with metal struts Bombs. A lot of bombs. Each requires sanding and puttying
-
 Hello all. Now that my Mustang STGB entry is finished and I cannot find a suitable model for the D-Day GB I thought I would throw my hat in to the ring with Emhar's MkA Medium Tank. I've never done armour before (apart from the odd Rhino Transport from when I played 40k) so this will be a new experience for me, also on the off chance that you've seen either of the other two builds I've done recently you'll see that I'm just returning to the hobby. So don't be expecting anything spectacular. Still armed with this walk around and this book I'm going to gove it a damn good try. I'll be modelling the vehicle after the one featured in the walk around which was commanded by C.H.Sewell who was awarded the VC for rescuing the crew of an overturned tank and being killed in that action. This vehicle is currently on display at Bovington Tank Museum. I'm not going to super-detail the thing or anything, for one thing I'm nit up to the task, but I will be adding and subtracting things to make it look more like the one at Bovington. Which i think is only going to involve some very slight modifications such as adding fuse wire grab handles and the like. Anyway, on to the pictures: Messy workbench. With my Mustang STGB hanging out on the corner of the desk begging to be knocked off. Box shot. (blurry) Sprue shots Construction started but...I forgot to take any pictures. So here's some of the little bits I'm adding. This flappy thing was about 12" wide at scale so I chopped it off and added some thin plasticard that was formed around the original piece. It should look like this: Though looking at that thing below...I realise I've left it as the kit intended which is wrong as they have a weird stand off behind them. I'm not sure if I can just pull it off or I might have to fill the gap. If I do remove the piece though the 'flappy thing' will hang over far too much. The fit of the top deck was also wuite poor and will require a lot of sanding and filling. Which means I'll have to add the rivets back. I've heard PVA glue and a cocktail stick can be used for this? I also had to add a shim of plasticard under the cabin. Anyway, that's where I'm up to now. I just need to decide what to do with the 'flappy bit' area. Cheers for looking.
 -
Ahoy Chaps. I was intending on taking a bit of a hiatus from model makering and focus on playing with trains for a while. But I thought some form of WW1 Centenary tribute build would be in order. So here is my build of the Revell 1.28 Sopwith Camel, No. 10 Squadron, Royal Naval Air Service, Teteghem, France, March 1918 All brush painted with Revell acrylics, except for some Humbrol Acrylic Flesh and Tamiya Semi-Gloss clear. This is obviously an example with the rarely seen upsidedown axle modification, because I'm an idiot... A lot of flash, sink marks and holes that hadn't quite made it all the way through. The instructions were a touch vague in parts, in others I would argue just plain wrong... Fit was a bit troublesome with a lot of the parts thicker on one half than the other, so there are a few somewhat impressive joins on it... The worst part is probably the fit of the ribs into the wing, trying to work out where to remove the plastic. Anyhoo, it looks like an aeroplane, sort of..
-
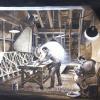
Hello everyone, this is my first post on this lovely forum. I didn't know where to put this diorama with Hansa-brandenburg B.I by Legato kits so I decided to post it here, I hope it's OK. This model was a nightmare so Im not really happy with a result but Im happy that is finally behind me :-\. Diorama was built from scratch, The tree was made of a copper wire and putty, The bench, well and other wooden elements were made of balsa wood,the axe was made of shaving razor, I used a NOCH grass for rail models and for the leaves I used a home-grown dried spices. The Figures of mechanic and a civilian is by Preiser, also in scale 1:72. All in all it was a quite fun build Here's the result: CHEERS FROM SLOVENIA, regards Gašper Podbregar
- 17 replies
-
- 14
-
-
Hey everyone , This is my 1/72 Airfix Sopwith Pup, finally got it finished after about 2 months of on and off building Please have read and take a look Brief History The Sopwith Pup was a British biplane fighter built by Sopwith Aviation Company in 1916. It entered service with 'A' Squadron of the RNAS (Navy Branch) in May 1916. By October that year, the plane was on the Western Front fighting with 8(N) squadron where it's exceptional performance saw it shoot down 20 German aircraft in 4 months. In December of 1916, the RFC received their first Pup, with it being used in 3,4,8 and 9(N) Squadrons before being replaced by the heavier-armed Sopwith Camel in mid 1917. The Camel was a much more successful aircraft, having credited over 1 200 enemy fighters destroyed; and it's ground-attack role also being effective until the end of the war. The Model I found this build easy enough for a beginner like myself, but the kit did need a bit of filler here and there and some work done, but hey can't complain The fit was alright, and the painting etc. was easy enough. Scheme This is Sopwith Pup N6453. Flown by Squadron Commander Edwin Harris Dunning DSC (1892-1917). Dunning was credited for the first pilot to land an aircraft on a moving ship, when on 02/08/1917 he landed on HMS Furious. Tragically, he was killed the second time he attempted it when the engine stalled on approach. He is buried at St. Lawrence's Church, Bradfield, Essex. Thanks for looking Dylan P.S Yes I didn't attempt rigging
-
Hi all, Fresh off the butchers block is this old SMER Albatros, its an 'interesting' kit, thought i'd use it to practice wood grain using oils that i've never used before, came out ok, in fact the kit scrubbed up ok with a bit of work. Did a bit of re-scribing, lots of sanding and a bit of scratch building, all good fun! So here it is: 1/48 SMER Albatros, Lt Werner Voss, June 1917 cheers Simon PS: dont suppose anyone has some spare decals for this kit as I damaged one of the heats?