Search the Community
Showing results for tags 'Weathering'.
-
My wife got me P-47, in the pipeline there are also mustang and mig-21. All require part- or all- natural metal finish. I often see good models made this way. I wonder, how to make them this good. Standard paints allow to apply camo->acrylic clear gloss->decals->gloss again->oil/enamel pinwash and other oils etc. I will probably use alclads II since the choice of colours is quite big and I know the quality is good. There are some questions I'd like to ask. 1. Should I coat alclad with clear paint (clear gloss I assume)? how to apply decals? Directly onto alclad? Should I secure decals with another layer of clear? 2. How does alclad react to oil wash and white spirit? I tried it on model master metalizers and I cannot say it was a success - white spirit was washing away metalizer with the excess of the wash. 3. If oil washes are not good, should I look for something else? I was recommended a water wash - but I cannot find this kind of wash in Polish shops... Maybe I'll try to do a water wash myself - out of water, dishwashing fluid and paints used by kids in school (no idea how are they called in English;))? 4. The same questions as regards weathering. I guess what I'm trying to establish is how to make good natural metal finish, with wash and weathering, without loosing the natural metal look, using alclad (or maybe other metalizers are better - like gunze's super metallic). I do have sealer for metalizer from model master (and their metalizers). It looks ok but to be honest you loose "metal" look after spraying. It is good enough for exhausts, but to make a whole model this way - you could use reguar paint instead I think...
-
Hi all ... I'm starting my second build and I'd like some advice on how to achieve the required result. I'm building an EE Lightening and I'd like to achieve a wethered / worn effect on the cockpit floor. This is the first time I've tried this (learning as I go) so any advice appreciated. Here's a link to an image I'm working from And here is the basic coat on the sprue Any help appreciated on how to achieve the "worn floor" effect. It won't be easily seen in the finished model but it's a good excercise for me to start with in learning new tips and tricks. Thanks for looking
-
 Good day all, I'm just about to start my second model and I've been reading the forums to try to figure out in what order to do things while building a model. However ... it seems that there are a number of ways of doing things and a multitude of techniques and products. So for us new or returning to the modelling game I'd like to see if we can produce something like a modelling 101 ... the basics. Sticking with things more readily available in your local HobbyCraft, for example, is one way to get people started and to a good finish on a model without being overwhelmed by the options out there. So ..... Here's where I'm at before I start my next model. Can some of you more experienced modellers (most of you lol) help guide me through my thinking and advise on where I'm missunderstanding various steps. Step 1 - Priming. I'm using Humbrol Enamel Paints on Airfix kits. Is priming needed or will the enamel paints adhere well to clean plastic? Step 2 - Painting detailed parts. As stated I'm starting with Humbrol Enamel paints. Shaking the paints to death seems to be needed a lot but does work. I'm applying the paint by hand with various brushes but how many coats of enamel should be needed ? Also if the paint seems to be running a little thin is this just a case of needing to shake a little more ? Avoiding painting the surfaces where glue is to be applied is also a must or components won't fit. Step 3 - Assembly. I've worked out that glasswork needs to be added after the exterior painting is completed so the bits under the glasswork are the right colour. So slow assembly of the model needs to take place. Humbrol filler can be used to fill in any imperfections in the joins and then smoothed off. Fine emery boards are good for smoothing away the bits left after removing the parts from the mouldings. Step 4 - Paint glasswork Step 5 - Coat glasswork in Humbrol Clear Step 6 - Add glasswork decals Step 7 - Again coat glasswork in Humbrol Clear to seal Step 8 - Paint assembled bodywork Step 9 - Seal bodywork with Humbrol Clear Step 10 - Apply decals Step 11 - Seal decals with Humbrol Clear Step 12 - Apply weathering effects using weathering powders watered down with some Humbro thinners. Build up effect slowly and wash down with thinners and a cotton bud. Step 13 - Have a coffee Now the above is where i'm currently at as a basic walk through on how to get your modelling restarted but I'm open to comments and suggestions. I'll also try to add the next build into the work in progress thread so I can pick up advice along the way. I'm trying to keep things simple but effective for starters so if I'm way off on something then please let me know. Would appreciate the help/advice Thanks Dave.
 -
Hi All, While I'm happy with most of my standard weathering methods I often wander down the paint aisle of my local hobby shop. I also browse online and I see Mig Jimenez's name/work/methods thrown around quite a bit. I always thought that Vallejo brand paints were somewhat associated with Mig; then I noted that there was AK Interactive which also seemed to be associated with Mig and then I see "Ammo" by Mig Jimenez and finally there's "Mig Productions" which also produce a number of weathering powders etc. All the products SEEM to be similar but the lines also seem to differentiate themselves in various ways - either with a broader selection or with specific focus. What I'm curious about is this: Are these different product lines really that different? For example, I wouldn't want to order Ammo's "Neutral Brown" panel wash and AK Interactive's Paneliner For Brown and Green Camouflage only to find out that they are, basically, the same thing. Overall.. I'm confused by those product lines and the various amounts of weathering items which are offered within each of them because they all seem.. well.. "the same" (for lack of better wording). Any insight on these products? Cheers, Dave
-
Hi All This is the latest in an ongoing series of noob questions: I've just read about oil dot weathering, it looks a relatively simple and effective technique for subtle weathering and I'm keen to give it a go on my next model (a Tsetse fly Mossie). Before I go shopping- what oils do people recommend buying, and what colours should I get? I see burnt umber mentioned a lot on t'internet... I'm in the UK, so that will influence my shopping choices. Also, are there any obvious pitfalls I should avoid before I have a crack at it? E.g. I like to paint with acrylic paints, not sure if that makes a difference? TIA Adrian
-
Weathering Set Revell With the number of companies producing an ever bewildering array of weathering powders and paints you’d be right in thinking that there couldn’t be room for anyone else to enter the fray. But it seems Revell have decided to do just that with this set of six weathering powders. Contained in a quite neat cardboard box, which has obviously been designed to be hung from a display unit, are six small plastic pots, reminiscent of their acrylic paints, with flip open lids. The powders themselves appear to be very finely ground, and yet quite dense in colour, so you shouldn’t need a lot to create the desired effect. The six pigments are:- Mud Green Dark Brown Rust red Sand Yellow Deep black Snow white According to the descriptive and colourful instruction leaflet that comes with the set, these pigments can be used dry, or thinned with water. They can also be combined to create different colours and effects. There are photographs showing how to use them and also text giving ideas of how to create variations in tone and how paint weathers. Conclusion As mentioned at the beginning of this review there are a lot of weathering sets already on the market, so it’s quite interesting to see Revell releasing these. That said, they do look and feel very fine and depending on the price point they could be a good starter set for those who would like to add some weathering to their models, or the modeller who is on a budget. Revell model kits are available from all good toy and model retailers. For further information visit or
-
Hi Guys, Here's my take on a burnt out and damaged Super Sherman. The Kit is a 1/35 M50 by Dragon No strict historical references used here just good fun and trying to improve on my techniques etc Cheers! Sam
- 9 replies
-
- 9
-

-
- Dragon
- Supersherman
- (and 4 more)
-
Hi fellow modellers. I have just used Future as a gloss coat for the first time. I normally use Enamel or Lacquer glosscoats that I would weather easily with acrylic/water based washes and chalk/pastel water sludges My question now is this...... With Future being acrylic .........what are my choices now for weathering????? Can I still use watered down acrylics or will that soften/remove the Future coat? Should I now used thinned enamels or oils for washes and panel lines. But what do I thin them with and clean them up with?? What about the pre-made stuff like Flory or Tamiya washes? Are they suitable for using on a Klear topcoat??? if so what can you safely clean them off with? I understand you shouldn't use ammonia based anything on Future to clean up (I believe) but is Isopropyl Alcohol or Methylated spirits okay. Is MicroSol and Micro Set still okay for settling decals that have been applied on a Future gloss coat Can you use water to clean up at all on a dried Furture Top coat or is that just not on. Any list of fluids/materials/thinning agents/weathering agents/solvents/aftermarket or specialist products etc that can be used safely for weathering and panel line highlights on a Future gloss coat would be greatly appreciated. Happy modelling everyone! Cheers Bruce
-
As an absolute newbie to weathering, can anyone give me some advice on where to start learning this fine art? books, videos, techniques? websites? Essential materials? Im kindof restarting modelling after a long long break, have just bought my first H&S airbrush and a few airfix WW2 Brit & German kits. Some of your models Ive seen on here by you guys are mind bogglingly insaine. Im truely humbled. There are some really talented people on here and I would love to know how you guys do it properly. Any help gratefully recieved. Keep up the good work guys. Richie
-
Hi All, I am new to modelling and have a reasonably basic question that I hope someone can help with. I have an aircraft that has matt black panelled sections on the wings but I need to weather them slightly. As they are black I am unsure the best method to achieve a realistic sun fade type effect. I though of using pigments in a lighter shade but before doing so wanted to ask the experts. Cheers
-
Hello everyone! I've been doing some 1/1 scale modeling on my home lately so my smaller scale projects are waiting, mostly Heinkel He 111 that I started.. :] But the problem is I can't keep my hands off of some plastic so I decided I should do a quick and simple build, and my build of choice is Stearman Kaydet by Revell, 1/72 scale.. :] Now, I need your help! What I would like to know is what kind of weathering, exhaust stains, mud splashes, paint chipping and general extended usage deterioration could one see on one of these planes back in the day when they were extensively used? I wouldn't mind overdoing it a little bit, just as long as it is in correct places.. Any photos you may have, suggestions, anything would be helpful! :] Also, many pictures on the internet show the different propeller color/material..I'm guessing the original used was wooden, and the later restorations feature metal propellers? Anyway, type in question is N2S, known as the "Yellow Peril", with the tail number/registration as shown on the picture below.. I'm not sure where and on what kind of runway this particular unit was used, maybe that could be a factor in deciding proper weathering too.. Any help is very appreciated! :]
-
 Well, here’s my first RFI on Britmodeller and on my first proper build since I picked up the hobby again after 30 or so years. Treat me gently! A whole number of firsts with this build and learning all the time; First time I’ve used my airbrush, First bit of scratch building (I mucked up the front wheel well cover & had to botch a replacement!), First tricycle landing gear I’ve made (needed weight in the nose), First use of MicroSet & MicroSol, First time I’ve tried weathering. I used the ‘Airfix book of scale modelling’ by Jonathan Mock for inspiration as well as various other sources but it was an OOB build for starters. The build went OK as far as I can remember – managed to break the mechanism for the sliding canopy so that’s glued straight on and the canopy has gone a bit foggy. The undercarriage only just clears the wing stores but it's OOB and as per instructions so I guess that's how it was. I left it pristine for a couple of months building up the courage to try some weathering. Just finishing my next build (Airfix 1/72 Vulcan), which needed some weathering, so watched the Flory Models videos again and took the plunge – reasonably pleased with the result & I glad I tried it. Going to have to get a Mig as a suitably adversary! Here are some pics .... Nice and clean The moment of truth with Flory’s ‘Dark Wash’. The finished article Thanks for looking, Andrew
 -
Just finishing my XH558 rendering of the Airfix 1/72 kit - will post to RFI when done. It's had numerous coats of Humbrol Clear before decaling and a couple after and it's got quite a nice deep lustre about it. I'm about to do a quick panel line wash with Flory Models 'Grime' and then a final coat of varnish, final assembly and et voila! The question is should that final coat be Humbrol Clear again or Xtracrylix Satin? I've looked at loads of pictures (including the VTTS publications actually of the contemporary XH558) and it seems pretty shiny to me so I'm of a mind to stay with gloss but could be persuaded otherwise ...... Any thoughts before I commit myself? Many thanks, Andrew BTW, it is the Falklands War 25 years edition so based on the Vulcan Display Flight I guess rather than the XH558 we know today - the moulding was the old 1980s one, which was pretty shabby compared to modern kits and the decals weren't the best but I've had fun and learnt loads!
-
Hi, a bit of a newbie question, here. I'm planning on buying the Airfix JS-3 1:76 scale model soon. What Humbrol colour acrylic would you suggest for a snow camouflage? Thanks.
-
Hello guys and girls! Just finished what has to be the best model I have every built! Ever so proud of it! Also first time I tried out using Humbrol weathering wash, (First time using a wash at all!) Also first time using Humbrol Clear, and it works a charm! The clever people say that it is basically the same as Johnsons Klear. Anyway, back to the model. It went together ever so nicely, and only took a few days to complete, and that was to my own surprise rather quick compared to what I normally do! But I just could not leave this model! So, this is how it turned out. _DSC0774 by Matcham11, on Flickr _DSC0775 by Matcham11, on Flickr _DSC0776 by Matcham11, on Flickr _DSC0777 by Matcham11, on Flickr _DSC0778 by Matcham11, on Flickr _DSC0779 by Matcham11, on Flickr Robin
-
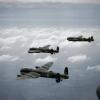
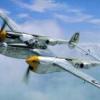
 I'm inviting your comments and votes on something which fascinates me. I've spent an interesting afternoon looking at colour photos of RAF WWII aircraft. (I appreciate that the colours themselves are unreliable evidence due to differential fading and wacky 1940s emulsions, BUT the tonal variations are clear.) I've also had a quick look at web pictures of more modern aircraft. The funny thing is that I can't find a single clear photograph of an aircraft with stripes such as I depict with pre/post-shading techniques. I see mucky marks caused by fitter's feet and spilt oil. I see random fading, chipping, and a host of variations from flat blocks of colour. But I can find nothing to suggest darkened stripes, however subtle, around panels or mechanical hinges, or emphasising internal structure through the aircraft skin(!). The pre/post-shading fashion seems to have started about ten to twelve years ago. I remember seeing a copy of Fine Scale Modelling about that time with a cover photo of an Avenger looking as though it had been quilted. I scoffed back then. Yet now I do it. I've been doing it because everyone else seems to like it. Ready for Inspection posts with lots of stylized shading always attract much praise for the paintwork. But now I'm thinking I am blindly (lol) making my models less representative of the real thing with my strange stylistic habit. The panel line wash craze is similarly baffling to me. I've always thought they were spurious and today I've been looking for evidence to refute my opinion. Well, from time to time I have found a panel line, occasionally a really dirty one, so I'll accept that sometimes a panel line wash is true to life. But on most aircraft this simply isn't the case and when it is apparent, it's only one or two lines. I think its really ironic that as moulding technology has improved and surface detail become ever finer and more representative, I increasingly exaggerate it with dark inks and powders, making finely etched plastic resemble the old Airfix/Frog/Matchbox kits of my youth perhaps How did I ever get so weird? I think I am copying each other's models instead of looking at the real thing. Come to think of it, I've seen many comments saying that a modeller will use another modeller's model as a reference. Hmmm. I think I'm going to stop using either of these techniques. I'm going to 'work from the original' (original photos, that is) and paint what I see. I'd probably better not enter any competitions though... (Edited to remove what might be interpreted as criticism of other people's methods or making fun of their work. After all, it's only a hobby!.)
- 36 replies
-
- 3
-
-
- weathering
- panel lines
- (and 5 more)
-
Recently got a Tamiya 1/48 dambusters/gran slam version, my question is normally i usually do a bit of weathering on my aircraft dont generally like fresh paint on aircraft , Am going to do the dambusters version, BUT am i right in saying there would be NO weathering as the aircraft where straight from the factor as quick as they was made as well the up keep bomb,????? cheers mick
-
 Hi all, So my first build is complete. It is Revell's 1/144 F-14D Super Tomcat (04049). Built with nothing added but what was in the box. Had a few missteps along the way - broke a few things (front landing gear, arrester hook) and added a decal or two in the wrong place. But overall, it was a fun build, if small! I originally got it to get some building and painting skills before I tackle some of the larger and more expensive Fine Molds Star Wars kits, but of course I got hooked on the Tomcat (always liked it) and would now like to add to the collection. I managed to fix the front landing gear, but could not fix the arrester hook. I also broke the pitot tube - and it disappeared!! - and did not fix it. I guess I could have rebuilt it but chose not to. A few scratches on the canopy and a decent one in the side of the fuselage on the left. I used Vallejo, Tamiya, Mr. Color and Lifecolor paints on it, along with MIG Abteilung oils for the weathering. Tried the AK-Interactive pigments but it didn't work out so well. Vallejo gloss and matt varnishes were also used. Could have gone satin I guess for the final coat, but I kinda like the look of the matt. First shot at painting something properly, so I'm kinda pleased with how it turned out. Of course, a $10 kit and about a bazillion dollars worth of paints, tools and stuff - but I'm justifying it by saying they'll all be used on the other kits! While it's my first go at painting something like this, I have to say I have trawled the forums, read online, watched YouTube and have another bazillion dollars worth of books and magazines (I'm a sucker for books though...). Airbrushed most of it (Iwata airbrush and compressor from back in the day when I was painting RC car bodies) with some brushing here and there. Not sure what else I should (or shouldn't have!) add, but please let me know if you have any comments etc. Yeah - the build is here. On to the photos!
 -
Easy 3 paint Sets Lifcolor Acrylics Lifecolor's release schedule seems rather busy of late, and the latest sets our of the gate are these four handy "Easy 3" sets that contain three bottle of paint suitable for their intended subjects. They are acrylic based, dilute and clean up with water, although their thinners is a much better solution which also helps them spray better. For more information on their use, visit one of the "Buy it Now" links where you'll find some tips on correct mixing and clean-up. Debris 1 & 2 Two sets of paints that help you with your diorama painting. It's not always easy to think what colours various parts of your diorama would be, and this set helps in that respect with descriptive colour names. Set 1Worn Brick (UA737), Deposited Dust (UA738), Broken Plaster (UA739) Set 2 Old Tile (UA740), Stone Wall (UA741), Lime Mortar (UA742) Leaking & Stains This 2 paint set covers the deposits often found on or around machinery and engines. Exhaust Oil Effect (UA261), Dirty Grease Effect (UA262), Grease Effect (UA263) RAF Battle of Britain A threesome of British early war camo colours in one handy box. The Dark Earth looks like a green when you pull it from the box, but a good shaking brings up the brown pigment, so don't be alarmed! Dark Earth (UA537), Dark Green (UA538), Sky (UA539) IDF Army Three shades of green for Israeli Defence Force uniforms. UA 437 Dark IDF Green, UA438 Medium IDF Green, UA439 Light IDF Green War on the Road Three base shades for different types of roads. UA473 Dirt Road, UA744 Middle Eastern Asphalt, UA745 European Asphalt Leaking & Stains - Grime Effects Three shades of goo. UA746 Lime Green, UA747 Dirty Green, UA748 Dirty Green Leaking & Stains - Damp Effects Three satin-gloss colours for dampness and mould. UA749 Vegetable Origin Damp Green, UA750 Vegetable Origin Damp Yellow, UA751 Dark Mould Conclusion Great sets that will broaden your paint palette nicely. I wish there were more instructions on how to use the paints however, as the Leaking & Stains set especially leaves me scratching my head a little. Clearly you're meant to dilute them to apply by brush (as splashes), or spray them to get the desired effect, but a little assistance wouldn't go amiss, even if it were just a link to a website that has some "how to" articles. The RAF set should give RAF modellers a nice handy pack for their BoB era kits as well as sparking a lively debate over the correct shade of the elusive and oft disputed RAF Sky, and the Debris & Rubble has some masterfully blended colours. I've seen broken plaster, and lime mortar on my travels, and they have captured the colours just right, with a subtle hint of pink to them. Recommended. Review sample courtesy of:
-
Weathering Techniques AK Interactive If you’ve ever wondered how some modellers create their works of art when building and finishing model ships, particularly Kriegsmarine subjects, then this DVD will help show how you can do the same. Released by AK Interactive, and produced by two great names in the manufacture of paints and weathering systems, Fernando Vallejo and Mig Jimenez. The DVD lasts around sixty minutes and takes you through the methods of weathering, adding high and low lights in a simple and easy to follow way. Whilst there are some Spanish subtitles the narration is in English. The narrator, whist actually American is very clear and concise in his diction making it very easy to follow. After the introduction of some excellent wartime footage of battleships, cruisers and destroyers, mainly Kriegsmarine, but some British there are four chapters covering the basics of weathering. The first chapter, Preparing your model covers how to paint the main colours and in what order. The second shows how to paint wooden decks and give them structure and depth. Painting and weathering the hull from top to bottom and stem to stern is covered in the third chapter. Whilst the fourth describes how to add dirt and rust to the hull and around the anchor cut outs of the heavy cruiser being built. The last two chapters cover more advanced techniques using a damaged Kriegsmarine destroyer as the subject. The fifth chapter covers chipping, using AK Interactives own worn effects fluid and rust set. The last chapter describes how to create special effects, in the case of the destroyer, bomb damage, blast effects and the resulting change in the surrounding paintwork. Naturally all paints and weathering effects are either Vallejo or AK Interactive but the techniques used by the modeller Fran Romero should be able to be repeated using your own favourite paints. Conclusion This is the first time I’ve seen a DVD like this and I have to say I am very impressed. I’ve not really thought about weathering my maritime builds to such an extent before, particularly as I generally don’t do seascapes, but this has inspired me to certainly give it go on my current and future builds. This is a great way to learn new techniques and the production of the DVD is superb. My only concern was the background music, which at times sounded like something out of a 70’s porn movie. If you’re like me, you don’t normally do weathering, then have a look at this video and give it a go. Highly recommended. Review sample courtesy of
-
Naval Weathering Sets AK Interactive So, you’ve read the review, bought and viewed the weathering DVD reviewed HERE and now you want to start trying out the techniques demonstrated in it. To begin with you need to get some weathering effects and AK Interactive has released two sets just for the maritime modeller. Each set has three 35ml jars of weathering colours. They are to the usual AK Interactive standard, being easy to use straight from the bottle after a good vigorous shake. The only downside for some modellers is the need to use white spirit to reduce and clean up the areas being weathered. The first set, naturally named Naval 1, (AK 555), contains a wash for grey hulls, (AK-302), a wash for Kriegsmarine ships, (AK-303) and a brown streaking grime for red hulls, (AK-304). The second set, Naval 2, (AK 556), contains a dark wash for wooden decks, (AK-301), streaking grime for light grey ships (AK-305) and salt streaks for ships, (AK-306). Using either a combination of colours or the whole set, with care and attention some really great effects should be manageable for the weathering beginner. Conclusion These sets are a very welcome addition to AK Interactives product line as maritime modellers seem to get left behind when it comes to products like these. Being easy to use and very effective I can recommended them to all maritime modellers, whether you build as a mounted display or a seascape the look of a model can be transformed. I will certainly be putting these to good use. Review sample courtesy of
-
- 1
-
-
- AK Interactive
- Naval
- (and 2 more)
-
Streaking Effects Enamel Paint Set AK Interactive Mig Jiminez's new(ish) venture continues to bring out innovative products for use in enhancing the realism of your armour models. This set is a triple pack of the familiar bottles of enamel paint mixtures, of the following colours: Streaking Grime - a rich dirty brown Rust Streaks - a very red brown Winter Streaking Grime - A greyish green colour Application is fairly straight forward, requiring you to paint some vertical streaks in an irregular pattern on any surfaces where rain, dirt or snow would run down over, and then blending them using a wide flat bristled brush dampened with white spirit. In the right hands, these effects can be stunning, but as with any technique, it takes time to master, and studying real examples is a good idea before trying it for yourself. Below are links to some excellent "how to" articles on the AK website, which cover each colour individually: Streaking Grime Rust Streaks Winter Streaking Grime Conclusion The AK range is a boon to the AFV modeller, and can just as easily be used to weather aircraft if the need dictates. These products are quick and easy to use, removing all the hassle and mess of mixing your own washes and filters. This set should come in very useful for rain soaked vehicles from any era - just check your references, and when you think it's sufficiently weathered, that's when to stop! Highly recommended. Review sample courtesy of