Search the Community
Showing results for tags 'Warhammer'.
-
 Hi folk, I finished my Imperial Knight kit and enjoyed every minute. A quick step-by-step is here should anyone wish to view it: http://www.britmodeller.com/forums/index.php?/topic/234993227-warhammer-40k-imperial-knight-carapace-and-other-bits-done/ I opted for the Knight Galant boxing which adds more versions over the original kit. It costs a tenner more but you get the choice of carapace mounted weaponry and new main weapons over and above the first edition. I'm not a gamer so, on this occasion I chose a colour scheme that I liked and it evolved into something resembling "House Terryn" in the GW Codex. GW cleverly give the modeller or gamer a lot of freedom when they write their Codexes. If you prefer to make something up entirely then they call those Knights "Freeblades" and allow the modeller to work them in with their own backstory. Great lateral thinking. I bought the Codex as a kind of inspirational tool and marvelled at the painting skills that the 'Eavy Metal workshop have lavished on their miniatures. Beautiful painting in a typical GW style. Great to look at. I also watched some Youtube tutorials to get a feel for the kit before I started. Most modellers choose a very artistic finish to their creations. Some employ wild airbrush techniques, others use amazing hand painted murals to add that wow factor. Some are pristine, others are heavily weathered. Each finished model is unique to the builder and most of them look superb. I decided that I'd like to try some of the techniques that the armour community use on a regular basis. This model would give me a chance to flex my artistic side in way that aircraft modelling rarely permits. Chipped and worn paint, rust and weathering, basing, all techniques that I only use occasionally. For this model I used the GW Chaos black spray can to prime the bare plastic and give a good key for the next layers. I then sprayed some Alclad II lacquer over this on the chassis components like the legs and body of the knight. Many modellers will finish the main components in metal colours then apply the colourful house schemes to the armour panels but I've gone a slightly different route. Instead of bare metal I chose to paint everything in the way armour gets painted. It's not cammo of course but it is universally covered in the same way a tank or APC might be.. With the Alclad II stainless steel down I added salt in places and sprayed on a coat of hairspray in readiness for the initial weathering stages. I used a combination of acrylic blues through the airbrush starting with the darkest shade and working my way through three layers getting gradually lighter. This is not the actual House Terryn base colour, just something I had on my paint shelf.
- 7 replies
-
- 7
-

-
- Warhammer
- Warhammer 40K
- (and 6 more)
-
Hello Everyone, As some of you might've seen, earlier in the year I was given a building from a teacher where I work for his Warhammer Club (clicky linky herey). He liked the one, I done for him that he asked me to do another. I did have a defense line thing which I painted and gave back, but I seemed to have lost the pictures for it... I dunno... Anyhow, he also gave me something called a Firestorm Redoubt, apparently it's for Anti-Air... you can tell I am an avid player huh? Pictures below What do you guys think of my desk at work? Kinda messy huh? The joys of working in IT Still not too sure if I over-done the dry brushing, but the teacher I gave it to love it. So thats all good. I've had an Ultramarines "Battleforce" set for about 10 years now. I got it for cheap somewhere that escapes me right now. Well in this set is something that is called a Rhino, it looks likes some kinda APC/IFV to me. As the teacher fights with the Ultramarines I done it in those colours with the 4th Company/Chapter?? I dont know what they are called, please excuse my ignorance. Pictures below. I attempted to paint the inside, not too sure if I pulled it off or not. Not even sure if that is how they are supposed to look like inside?? I did give it a satin coat before I handed it over, but it looks more gloss to me. I think I have finally found that gloss varnish I lost last year... oopps. Overall, it wasn't a bad model to make. Not sure if I like the warhammer way of painting tho, as in you assemble it all first then paint. I have a Devilfish (I believe) to paint. Gotta look into what colours they are painted. Hope you like them both. Kind Regards, Dazz
-
Grot Tanks Warhammer 40,000 In a discussion about scratch building for Warhammer, modelglue had asked me to post some shots of these Grot Tanks, so here they are. These were all built 2-3 years ago, mainly as little "palate cleansers" between bigger projects. Forgeworld produce a set of four resin tanks, but they cost a small fortune and it's much more fun to build your own. Pretty much anything goes with these things and, as they're for Orks/Grots, it doesn't really matter if everything fits properly. In fact it's better if they don't. They make great stress relief builds, just stick plastic together any way you want, then paint them, again, anyway you want. Some of these were given a rather garish version of the caunter scheme. The first one was pretty basic (as, in truth, are the rest). Just a box for the hull and two more boxes for the track sponsons with a few added details. I think it took about a day to build and another to paint. The second is my least liked. The general design didn't really work that well but, if nothing else, it was a good canvas for some over-the-top weathering. The rockets were left over from the GW Ork Bommer. The third is the smallest and was the hardest to build. I decided to give it a "crooked house" look by making all the hull panels out of square. Doing that, and making it all sit level at the same time, needed more brain than I generally have available. Number 4 is probably the most cohesive design, probably because there's a hint of Tiger in there if you squint. And the last one (so far) is a bit boring really. Not the most inspiring design or paint job, although I do quite like the egg shaped track run. That's it for now. I've got some parts cut out somewhere for a rhomboid Mk IV style design, but haven't had time to do anything with it yet. Andy
-
Sydonian Dragoon Adeptus Mechanicus Warhammer 40,000 This is GW's Sydonian Dragoon from the Ironstrider kit. No WIP as it was just thrown together as a quick side project. It's a typical GW model; quite nice mouldings except for a few clunky areas, much smaller than you expect it to be and stupidly over-priced (£26 for a flimsy end opening box containing two small sprues the size of a regular Airfix 1/72 kit). Apart from drilling out the gun barrel and exhausts, it was straight from the box. Painted in turquoise and cream for no other reason than I liked the colour combination and didn't much like the GW red/cream scheme. Hope you enjoy the shots Thanks for looking Andy
-
Dark Eldar Talos Pain Engine Hi guys, I thought I'd upload some of my older GW builds. I haven't done any for a while now as the price for the newer kits is getting pretty steep and the designs aren't what they once were but as stand alone models they make great builds and are useful for trying new techniques that can then be applied to regular models. So to start with this is the Talos Pain Engine given a corroded finish with Model Mates rust effects and some hairspray chipping. Enjoy the shots Thanks for looking Andy
-
Hello all, I am not actually too sure if this counts as a "Sci-fi" build? It's got a laser-cannon of some kind on the top now so I am going to classify it as such. This is also my first commissioned build, a teacher at the school I work at found out that I like "bashing plastic together" as he puts it. He is a massive Warhammer fan and runs the Warhammer club at the school. I dont know why, but he is trying to get me to join in, and he asked me to paint up one of his building. Here is what I started with... After a few hours of filling and sanding, then priming and painting. I decided that I didn't like the first attempt so I repainted the whole thing and was handed back the below. The teacher loved it alot, dunno if he intends to give me some more or not... Sorry for the dodgy pictures, these where taken on my phone. This is the first building I have ever done, so I realise it is not perfect (is any model in reality?) but I do want to improve my skills. I will take on all criticism (constructive) and see where it leads me. I am planning on making something like this again, probably not soon tho. Thank you for looking. Kind Regards, Dazz
-
Hi folks, I'm never quite sure where to post my non-Sci-Fi figure stuff. I put the work-in-progress in the Figures subforum, but then there are separate Figure and Ready for Inspection subforums here as well. Not that it really matters! Here are some recently-released Games Workshop ghosts. I painted them because I liked all the movement, and I wanted to try some ideas for painting glowing ethereal stuff which I could try on some of their larger undead models. These "Spirit Hosts" are on 40mm bases and each base is supposed to represent a swarm of ghostly foes. The basic colours are an airbrushed mix of Tamiya Acrylics, going for a sort of glow-in-the-dark look. I started with a mid green and worked up to pure yellow on the insides of the ghosts, and where they emerge from the skeletons. My initial plan was to paint them inside-out, and put shadows on all the raised parts, but when I tried it I didn't like the look. I repainted the test model and went with edge highlights over the airbrushed base, and then glazes over everything to tie it together. The highlights are a bit sloppy (done in front of the telly) but the glazes help smooth them out. I also varied the glazes from yellow in the bright spots, through green in the middles, to blue on the thin bits like hands and faces. All the gravestones were painted with Citadel paints under a magnifier. I sealed everything with Alclad Klear Flat (so great!) and then treated the blades with various metallics, a teal-black wash, and a rub with AK Dark Steel graphite. I think they've come up quite well, and they made a nice break from other things I've been working on. Better get on and finish that tank now! Cheers, Will
-
Hi folks, I've been painting these newish plastic Spirit Host figures as a diversion between other things. It's not going entirely to plan but I'm starting to get them into some kind of shape and I think I can see my way to the end now They're quite fiddly to assemble - lots of thin bits all standing up in 3D - and I ended up giving up on some of the seams and things after two rounds of cleanup and primer, so they're not the tidiest minis ever... I started off airbrushing them with a mixture of Tamiya acrylics - I think mainly IJN Cockpit Green and Desert Yellow, lightened and warmed with Flat White and Flat Yellow as they got brighter. The idea was to have a bright light source where the tail of the middle ghost is bursting out of the tortured skeleton (!) and then some internal light for the body of each ghost as well. I was going to try and paint highlights "inside-out" so that it looked like the ghosts glowed from the inside but my attempt went quite badly and I ended up trying something different. This is a mixture of a couple of loose edge highlights and some yellow-green glazes over the airbrushed shading: My wife thinks they should be teal-white rather than green-yellow as they look a bit cabbagey, but I wanted something with a hint of "glow in the dark" to it. I need to clean these up a bit more under a magnifier and repaint the failed one, then follow the same steps on the other two bases. I also need to figure out what to do with the blades. Cheers, Will
-
Hi everyone, With modelling time at the bench at a premium these days I picked up this project that I'd set aside for a while. This figure is the white metal Games Workshop Daemon Prince. It can be used in either the Warhammer or 40K universes as a Chaos character. I'm no gamer so can't tell you anything about the way it plays, sorry. The kit builds easily from only a few pieces. I had to use some green stuff in some joins but nothing over the top. The model is brush painted (approximately) as per the box artwork using Citadel and Valejo acrylics over a Chaos black spray primer.
-
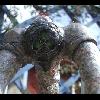
 Modified rider Modified gunsight This is the forge world sguiggoth. This model took me a few hundred hours to complete over a period of about 18 months. This is my first all resin model that I've finished, it represents many first time achievements for me as a model maker. The kit is quite good although some of the flash (which is normal for resin) is a lot thicker than most resin items that I've used on my other models kits (Aires/FreightDogModels). It is slightly softer too, although the forge world resin is fairly consistent (I have loads in boxes!) it is expensive if you consider £ v's quality. That being said it still builds up well with very little filler being used, the legs are the most difficult joint to fit and align, some of the scales need reworking. I have modified this kit from the box (or bag!) the additions/mods are the rider/guider, the gunsight and the two rear most totem poles. The arms on both figures required some work to get the arms to sit right. The reigns are from Christmas cracker jewellery. The gun barrel, which must be bought separately, has been drilled and his missing tooth is the result of "an accident". I dropped it! The worst part about this model is that I had to give it away, I built it for my brother, it was a free gift for him. Inspiration drawn from crocodile, blue tongued lizard and spotted gheko. All paints from games workshop except Matt varnish which was humbrol. The base is mainly tamiya texture paint with some odd bits dotted about, old paintbrush bristles for long dry grass and more random bits and pieces from various sources.
 -
Hi All Im looking for cheap starter warhammer or scale model tool kits any one all surgestions greatfully received, Thanks.
-
This is my Baneblade, posed in my snowladen garden. Only extra work was the upgunning using an old biro tube.
-
So here we go... Not sure if I should post it to the WIP...but might be somehow considering this is only the first of a squad. Will add here photos of the others as i start/complete them. Greyknight Terminator with power sword and bolter Thanks for looking, Alex
-
I was recently lucky enough to visit Games Workshop's HQ, Warhammer World, in Nottingham for a game of 40k - and somehow ended up buying these dudes. This is the start of a slow project to build up a few units of Empire so I can play a few skirmishes with a mate of mine who is desperate for an opponent! They would also make a great Mordheim war band. They fellas are known as Manann's Blades, and come as a resin set of 10 figures from Warhammer Forge, although the arms (minus the shields, which are in the set) have to find from one of GW's plastic sets. The guy in the middle is called Captain Edvard Van Der Kraal, and he comes from a 3 figure command set that also contains the standard bearer (behind him) and a musician. Here's another shot. Painted using Citadel Acrylics and washes over a Halford's white spray undercoat. Excuse the wonky angles and out of focus blokes, I find photographing models exceptionally hard! There are 6 more guys in the works for this detachment - although I also have a cannon and crew I may move onto next. Cheers for looking!