Search the Community
Showing results for tags 'Ultracast'.
Found 22 results
-
Here is my attempt at painting the figures from Tamiya's Spitfire Mk IX kit along with a couple from Ultracast: #54009 "RAF Fighter Pilot, Battle of Britain 1940" and #54011 "RAF Fighter Pilot Mid-late War 1943-1945". Both of the Ultracast figures were beautifully cast and Mike Good's sculpting was wonderful and full of crisp, accurate detail. I highly recommend them to accompany your 1/32 aircraft. I will eventually put the Battle of Britain pilot and the Special Hobby Airacobra onto a base. Goodness knows when I will get around to building the Spitfire - but at least I'll have some figures ready for it. Thank you for looking - and any comments would be much appreciated!
-
Good afternoon. Here is my contribution to Bethpage`s finest products. Hobbyboss`s FM2 Wildcat in 1/48th scale. I will using a Freightdog decalsheet with an aircraft from 794 sqn Fleet Air Arm just after the end of WW2. I have done a small amout of work in cockpit but not significant! will also be using an Ultracast seat which has a Sutton Harness, hope that is okay? Some photos. Regards Grahame.
-
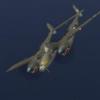
 I am really hoping for a quick result this time, because this has to be finished by Thursday night. I've taken it so far, and now it requires Stew's non-judgemental judgement. This is about not giving Stew the satisfaction of not mentioning the fact that he was right and I haven't finished yet another thing! So, Tamiya Mossie with resin bits. The purpose is to bring to the Scottish National Scale Model Show a model built using the Pangolin two-stage engines, plus some Ultracast bits because they make things better than not having them. Obviously all paints are Colourcoats with ACRN07 Ocean Grey, ACRN09 Dark Green, ACRN17 Night and ACRN28 Interior Grey Green featuring most predominantly. Fearing running out of time, I didn't use the control surfaces in the end, and on closer inspection the canopy masks from the drawer were for the Revell one I have in the stash so I ended up doing it by hand which angered me because I hate masking. So first of all it needs propeller bosses. These aren't on the engine castings as they'd be too weak. Normally I'd try to use brass for this sort of thing but didn't have any the right diameter and definitely didn't have time to faff about waiting on mail order so I cut out the kit ones and superglued them in. Next the engines need cut from the Tamiya kit. It's pretty easy - straight cuts along kit panel lines are all that is required: The fit is much better than when I tried this using Paragon castings (not because there's anything wrong with Paragon castings, only that they were explicitly designed for the Airfix kit and hence don't fit the Tamiya kit very well!) The cockpit was roughly painted - no fancy work here - and everything is OOB save for the Ultracast seats which are better and have seatbelts which are visible through Tamiya glazings. The Tamiya decal seatbelts don't cut the mustard: That done, it was closed up, given what little seam work Tamiya kits usually need (which did include a thin scraping to blend in the nacelles to my liking, but nothing major). It was then airbrushed straight onto bare plastic/resin/filler without priming, black basing, preshading or any of that caper: The grey and green were airbrushed freehand. Not my best work, but still learning the new airbrush. It'll be ok though. These colours were minimally masked in strategic places (fuselage demarcation, wing roots, tailplane roots, cowling demarcations) and the rest was sprayed Night. It currently has a gloss enamel clearcoat curing and I hope to get the decals on tonight: Two or three weekends ago, when Stew was last here helping with paint tinning, I came downstairs and confessed that I had cut the single piece bomb door moulding in half to show them open. Stew looked as alarmed as he did disgusted with my stupidity - because now I had given myself a Bombay interior to paint as well! The propeller tips were painted yellow last night, and will get the rest painted black tonight. Unlike my usual habits, the undercarriage is completely painted and assembled already so can get plugged right in once the decals are on. I haven't painted the 6-stack exhausts yet but should hopefully be able to fit that in before Thursday night!
- 25 replies
-
- 12
-

-
We've now got all of Ultracast's 1/48 and 1/32 scale pilot figures and separate heads (nobody likes all their pilots to look like genetic clones!) in stock: American British German Japanese Russian
-
I'm calling this finishedish. I may tinker a bit more but it's basically done.
- 16 replies
-
- 27
-
-
- Colourcoats
- Ultracast
- (and 1 more)
-
I don't 'do' New Year so as well as getting on with existing models I started another which I also hope will be easy enough for me to finish in a reasonable timescale. The quite nice Eduard 1/48 Grumman F6F-3 Hellcat. It's the Weekend Edition kit which I bought for £7 but it does need some add-ons so I ended up getting the Eduard Zoom set to go with it, and a set of Montex masks. Looking at some photographs, the kit and Ultracast's Hellcat seats, I decided the kit wasn't really good enough and raided the stock room as is the whole point of running a model-related business The bulkhead needs cut up for the photo etched improvements behind the headrest (the basic kit omits the rear view windows, for example) and the big block moulded in place of the tubular structure correctly depicted by Ultracast has to go too so there wouldn't be much of the kit bulkhead left. Hence, I used it as a pattern and zipped my Olfa cutter round it to get a new one from plasticard Here you go DuncanB - that's what the -3's rear windows are there for. The pilot should be able to see through them over his shoulder but every kit I remember seeing or building of the Hellcat neglects to include these. So far, I've removed the moulded side console detail and glued on the foldy-uppy PE parts so I could shoot some Colourcoats ACUS09 ANA611 Interior Green prior to sticking on the pre-coloured brass bits, paint the seat belts and do some of that arty stuff to bring out some details. Now it's green, this is what the seat and new bulkhead are going to look like, which I personally feel is a vast improvement on the alternative. To be fair to Eduard, the Zoom set does include a fold-up seat which is better than the plastic one, but the seat mounts are still over simplified for my tastes here.
- 105 replies
-
- 10
-
-
- Yet another one
- Eduard
- (and 1 more)
-
Welcome to what should be the second build of this GB, the venerable Hasegawa Bf109G-6. I have had this kit for some time, collecting bits of AM, awaiting the right moment to present itself. The obligatory opening shots: Again the final scheme is undecided as yet but it will be one of the two provided: For Grislawski's aircraft, I also pulled the profile from the Eduard Bf109G-06 Royal Class to compare: Bartel's aircraft need a tropical filter and that is included in the AM: Onto the AM. Well if I cannot do something with this lot, I should give up. First is the HGW Riveting set, a first for me but I am keen to put my toe in the water, so to speak. On the metal side of the AM aisle we have Eduard full PE set, blotch mask set which may or may not get a run, canopy mask, Rexx exhausts and Master Barrels Fw190A-6 armament set for the MG131 tips, MG151 barrel for the gondolas and pitot: Moving over to the resin side of the AM aisle, we have Ultracast extra wide prop blades, wheels (on order) and Bf109G seat with belts, EE spinner, QB Tropical filter So that sees me set up for an exciting run of firsts. Regards,
- 7 replies
-
- 5
-
-
- HGW rivets
- Master Barrels
- (and 1 more)
-
 already announced in the GB chat and already great input over there!! - thanks decided on this one : P-51D Mustang AIR14 PAYERNE 2014 100 Years of Swiss air force celebrations Tamiya 1/48 Syhart Decals D-FPSI was marked as Swis Airforce J-901 and flew together with an F-18C Hornet and an M.S. 406 that is the plane : http://www.warbirdinformationexchange.org/phpBB3/viewtopic.php?f=3&t=39806 seems that I need to do something about the prop, ad it fly with uncuffed Hamilton Standards.... the kit only has cuffed and Aero versions included I started work no glue yet, but fit in very good! great kit! any idea of cockpit colour on this one? flat black? or a more original zinc green? thanks for comments and tips, I am a total Mustang newbe
- 37 replies
-
- 3
-
-
- Syhart Decals
- Ultracast
- (and 1 more)
-
 Hi gang, right time for another build. I've had this in the stash for a while, and bought the excellent Aviaeology decals when they came out. http://www.aviaeolog...m/aod48003.html I mean a Tiffie with a sharkmouth? - what is not to like? I also bought a truck load of Ultracast parts to enhance the build at the same time. Then I hit what I thought was as tumbling block, and put the whole thing on hold...until recently when a chance discovery in the spares stach, tipped of by a post on here, re started the project. Little needs to be said about the Hasegawa Typhoon. Apart from the cockpit infills, it fits really well, and has no real vices. I've built 2 of them already so this is a chance to add some extra bits too. So in no real order - here we go: First - the cockpit infills. Experience suggests that adding these to each fuselage half first so they are flush, making good the join lines and rescribing is the best way to deal with the less than ideal fit. Here you can see this done, which gives a smooth join on the fuselage sides, but will leave a small gap on the fuselage centre line join. Nothing a plastic shim won't fix though. A damn sight easier than having no gap at the top and a step on the sides! I've also opened up the foot and hand holds on the side too. Inside the moulded detail has been removed as I'll be adding my own. Here is the resin feast that is Ultracast's sonata to the Tiffie: All well cast with no pin holes and fantastic detail. The wider Tempest tailpanes are a simple push fit, and de rigeur for any very late war Typhoon, while the exhausts are a drop fit replacement and a great improvement on the kit parts. They are also, in case you ask, much nicer than the Quickboost resin exhausts ( which Ive used before) being the correct size (the QB ones have always seemed just a tad small to my mind). The seat features a cast-in late war "Q" harness, and as the cockpit opening is rather small this will be a a really obvious bit. Wheels have really nice detail, and the new radiator part has the late war "cuckoo" filter - again a must for a Tiffie from this period. Now for that stumbling block I mentioned. The rocket rails. We are all used to the Tiffie Mk I steel rocket rail with its gently tapering front and twin horizontal launch rails. Here's one attached to a Sherman - yes I know! All Hasegawa's rocket Tiffie boxings come with these.( Mk I rails that it is not Shermans!) However from late 1944 onwards the MkI rails were replaced by the lightweight MKIII aluminium rails. They look very different, as you can see below. And my particular carcharadontic Tiffie, MR-U MP197 245 sqn, shows 2 of the MKIIIs fitted under each wing with a long range drop tank. The MKIII rails are quite fine with subtle rivet detail, and I wasnt amazingly convinced I could scratch them convincingly. While there are some MKIII resin rails available from Airwaves, theres a snag with these.... However I stumbled over a BM thread about Mossie rocket rails, which also showed MK III rails, and as I had bits left from a Tamiya Mossie in the spares stash, a quick check revealed 8 MK III rails sitting unnoticed in the box. Huzzar!!!. The attachment stubs are different for the Tiffie, which is the problem with the Airwaves et - as these seem to be MK III rails attached to Mk I stubs, but thanks to the gracious help of "Mr Typhoon" Chris Thomas - some e-mail pics quickly allowed me to modify and scratch a prototype, Cheers Mr T! Its needs little refining - but I think I know what I'm doing now. Well I hope I do anyway. More to follow..... Cheers Jonners
 -
 P-40B Resin Prop & Exhaust Upgrades (for Airfix) 1:48 Ultracast Ultracast have a reputation for exceptional quality parts, and a penchant for WWII aircraft, so when the new Airfix P-40B was released, some new stuff was to be expected. Well, here it is! Their products are high quality resin, finely cast and with sensible casting blocks. The sets arrive in a ziplok bag with a predominantly white header card that extends down the back to provide a little extra support for the parts. There are three sets in this batch, two types of props, and a set of highly detailed exhaust stacks, as follows: P-40B/C Tubular Exhausts (48266) Two sets of exhaust stacks with high detail and delicate hollow tips, and prominent welding lines as per the real things. The casting block is simplicity itself to remove, and you are left with a pair of tabs on the rear of the parts that fit into the fuselage sides, in the same manner as the original kit parts. P-40B Hollow Steel Prop & Spinner Curtiss 11' Blade 614-1C1.5-12 (48267) The hollow props that were fitted to the early P-40s were made of steel for strength, and had sharp "needle" tips. This set includes a 2-part spinner with a back-plate onto which three blades attach via a flat section at the root of the blade. There is a little wiggle-room here when fitting, so ensure you have them correctly aligned on the base before the glue cures. With the three blades in place, the spinner cap is installed, and you can admire the superb raised detail around the spinner. P-40B Aluiminium Prop & Spinner Curtiss 11' Blade 89201-3 (48267) Lighter aluminium blades were also fitted later to the P-40, with a slightly broader tip to the blades, and some minor differences to the spinner's back-plate in the shape of the blade exit points, and were usually seen on the AVG airframes. Construction is identical to the hollow steel set above, and the same cautionary note applies. Conclusion Great sets, and when I get around to re-starting my stalled build (I seem to have a growing number), I'll be sure to use them. As usual with resin, take the precaution of wearing a mask when cutting or sanding resin, as the tiny particles are harmful to your health if breathed in. Washing the parts in warm water will also improve the adhesion of paint, as there may still be some moulding release agent on the parts when you receive them. Highly recommended. Review sample courtesy of
 -
P-51D Mustang AIR14 PAYERNE 2014 100 Years of Swiss air force celebrations Tamiya 1/48 Syhart Decals Brassin wheels Ultracast uncuffed props and seat Quickboost exhausts Alclad II finish WIP: Mustang GB ingredients: a superb Tamiya F-51D, great Syhart Decals, Brassin wheels absolutely neccessary uncuffed props and late framed seatfrom Ultracast, and Quickboost exhausts the cockpit needed some modernization it is a warbird after all! after decaling during a night shoot! thanks for watching and comments / Werner
-
I'm going to make a little base for this and whilst I might still play about a bit with the weathering, I'm calling it done-ish. I won't pretend I'm completely satisfied with it, but then again, I never am. I've built worse. It's the Airfix new tool kit A05129 built more-or-less out of the box with the exception of a replacement resin seat c/w seatbelts and armoured backplate (48019), main wheels (48076) and exhausts (48043) from Ultracast. I stuck to my trusty Squadron green filler and the paints are all from Colourcoats (probably obviously, because accidently buying a 28,000 tin personal stash was really how this business started). Lastly, the antenna was added using the elasticated Infini Model rigging line. I use that for all my models now and every stretched sprue antenna that has been broken this year taking models to various shows (that would be all of them, actually) has been replaced with this stuff which is idiot proof and therefore ideal for me! I intend to take more photos outdoors on its sandy base with a real blue sky but the base doesn't yet exist and the blue sky requires me to not be at my day job on a day the sky isn't Ocean Grey - so it may be some time until the "proper" RFI photos if I don't post these.
- 14 replies
-
- 30
-
-
- Airfix
- Colourcoats
- (and 1 more)
-
We are very happy to announce that we will be stocking Ultracast products at Sovereign Hobbies. The first order is due to land in a couple of weeks.
-
There are many threads and questions about Spitfire propellers and which should be fitted to what mark etc. There are some great references here on Britmodeller already. This post is intended to publicise the different propellers and spinners available for Spitfires in 1/48 scale from Ultracast. All info from Ultracast's own site: Weybridge 2-blade propeller - Ultracast 48197 This propeller was installed on the first production Spitfires (K9787 to K9863) De Havilland 3-blade propeller and spinner - Ultracast 48112 This is the prop & spinner mostly commonly associated with the Mk I Spitfire, however this blade was also used on many Mk II's and Mk V's. Rotol 3-blade propeller and blunt spinner (includes blister for Coffman starter on Mk.II Spits) - Ultracast 48113 This is the prop & spinner most commonly associated with the Mk II Spitfire. This combination was also used on some Mk V's. Check your reference photos for correct prop & spinner. Rotol 3-blade metal propeller and spinner - Ultracast 48114 This prop & spinner is seen on many Mediterranean and Pacific theatre Spitfire Mk V's. Check your reference photos for correct prop & spinner. Many photos of this combination can be found on the Australian War Memorial website, including photos of Clive Caldwell standing in front of a Spitfire Mk V using these blades. Another very interesting photo can be found on Page 143 of Wings of Fame Vol. 18. This photo shows two Spitfire Mk V's undergoing service on Malta, one Spitfire has the early De Havilland blades, the other has these wider Rotols. Rotol 3-blade wooden propeller and long spinner - Ultracast 48115 This is the prop & spinner most commonly associated with the Mk V Spitfire. This set contains accurately profiled blades and a detailed spinner. Mk.IX 4-blade propeller and spinner - Ultracast 48260 Standard fare for Mk.VIII, IX and XVI Spitfires - this set contains more accurately shaped propeller blade tips, and provides missing rivet detail from the otherwise lovely new Eduard kits.
-
With; Quick Boost - Undercarriage Covers & Gun Barrels SAC – Undercarriage (which I lost part of then found it a year later, I didn’t end up fitting them) UltraCast – Props (kit ones are backwards!!) This was a build for the Splendid Cats GB, but with big changes in my work shift roster meant it wouldn’t get completed in time. So she sat near the box of doom until I was reminded about her by an interested member, so I figured I’d try to complete her. The big challenge for me was not to damage or change her finish by clear coats, the finish you see is weathering of the base black colour. I eventually found/tried some paint masks which I haven’t used before. So the only decals used are the identity numbers/letters and warning markings. In the end I fell in love with her again and am really glad I finally finished her….even if she’s a bit late for the GB! Now I just need to finish the Ta-154 to go with her! Here is the link to the build – build link Please enjoy
- 10 replies
-
- 13
-
-
Hello all Here is my latest completion - Hasegawa's 1/48 Folgore, a lovely kit to build. I'm usually an out of the box builder, but I've always had a soft spot for the look of the MC202, so was tempted into the aftermarket for this one to try and add a little extra nice detail to this build. The extras were: * Smoke ring decals from Mike Grant * Ultracast resin seat, wheels and exhausts * Montex Maxi Mask for cockpit frame and some markings * EZ line for the antenna wire The fuselage band and the white tail crosses were painted on rather than using decals, and the underside wing roundels were done with the Montex masks. However, I found these very fiddly so reverted to the decals for the upper wings. A quick note of praise for Mike Grant's smoke ring decals, these are really thin and conformed beautifully with no hint of silvering. It was painted in Tamiya acrylics XF19 Sky Grey for the underside and XF59 Desert Yellow for the upper surfaces - perhaps not the best matches for authenticity, but that's something that I'm not too fussed about. Kept the weathering light, with just an oil paint wash to highlight the panel lines and a thin dark acrylic mix for some exhaust staining. Pretty happy with how it turned out, and really enjoyed this build. Thanks for looking Adam
- 24 replies
-
- 25
-
-
Pilot Figures Ultracast 1:32 There are times when you’ve finished a model aircraft that then screams to be placed in a vignette or diorama. For that you may need a figure to give a bit of life. Ultracast have just released these two, one is rather restricted to a limited number of aircraft whereas the other is a bit more of a generic figure that could be used in all sorts of scenarios. Each of the cream resin figures is contained in a zip lock poly bag with a card header stapled to it. [54015] Actually designed for the Tamiya 1:32 Corsair kits, this figure of Gregory “Pappy” Boyington, but could equally be used in a 1:32 P-40 Warhawk of the Flying Tigers unit. The figure is in a seated position and is beautifully sculpted by Mike Good with a lot of detail that will need some very careful painting to make the most of. The figure is separated into torso, head, arms, legs and undone helmet strap. The torso is complete with seatbelts and life vest whilst the head is moulded with the helmet, plus goggles perched on top. The Arms are posed as to be holding he control column in the left hand and the throttles in the right. The face is very well done and does actually look like the real Congressional Medal of Honour holder as seen in the many pictures online. [54016] This figure is more generic, and therefore more versatile. Once again sculpted by Mike Good, and is of a German WWII fighter pilot form the mid to late period. In a standing pose the figure comes with torso and legs moulded together, but with separate arms and heads. I say heads as there is a choice of either one in flying helmet or one peaked cap. Rather un-pc these days, but fine for the period, the figure is shown smoking a cigarette, held in his right hand. The model also has a separate holster. Conclusion Ultracast figures are new to me, but from having a good look at them they really are top quality. Mike Good lives up to his name with some excellent sculpting of the masters. You really need to be up to speed with your figure painting though to give them the paint job they deserve. Very highly recommended. Review sample courtesy of
-
Encouraged by all the great comments I received for my Komet I'd now like to show you the Ta152c I completed at the back end of last year. Its the Hobbyboss kit, which my mate Parabat kindly bought me so I really wanted to do it justice. The kit as anyone knows who is interested is not with out it's faults but luckily all of these can be addressed with various after market sets, and these are what I used, Quickboost exhausts, Quickboost prop and spinner, Quickboost corrected cowling, Eduard BigEd which included the flaps, Ultracast seat, Ultracast wheels, The lower wing as the wrong inspection flaps so these were filled and re scribed in the correct position, I gave it a full rivet job, split and turned the tail wheel and dropped the rear control surfaces, filled in the gaps that the kit as where the upper wing wheel wells meet the fuse and made up a rear bulk head so you can't see into the cockpit! made up the barrels and pitot out of brass tube. All the markings are done with Mal's Masks, and the weathering done with oils. The prominent chipping on the under side of the engine cowl as seen in the many photos of this particular aircraft, was done with AK worn effects, as was the wear on the wings. The one thing I did forget to add was the tail wheel retraction wire on the starboard u/c leg. Hope you like it. A few in progress pics, Tim.
- 20 replies
-
- 18
-
-
- Hobbyboss.
- Ultracast
- (and 2 more)
-
P-40 Tomahawk Resin Seats (various) 1:48 Ultracast It looks to be a bit of a minefield choosing the correct seat for your Tomahawk, and in their usual meticulous manner, they have created a range of four seats for early Tomahawks, as follows: P-40 Early Square Back export seat without harnesses – for early war RAF, RAAF, SAAF and Flying Tigers (AVG) aircraft. P-40 Early Square Back export seat with wide lap belt harness – for Flying Tigers (AVG) aircraft. P-40B/C seat with wide lap belt harness – suitable for all USAAF aircraft prior to mid 1942. P-40 Early Square Back seat with British Sutton harness – for early war RAF, RAAF, SAAF aircraft. As usual with Ultracast's products, and as their name suggests, the casting is superb, with lots of fine detail captured, and some fantastically naturalistic draping of the belts on the seats. The casting blocks are attached to the parts by fine lengths of "flash" that should be simple to remove with a sharp knife or razor saw, so clean-up should be minimal. The seats with circular mounting points at the top also have a little flash between the two fine tubes, which can be removed with the tip of a new #11 scalpel. A good wash in some soapy water, and some sympathetic painting will dramatically improve the look of your Tomahawk's cockpit. Very highly recommended. Review sample courtesy of
- 1 reply
-
- 1
-
-
Hello everyone, I've been banging away at this one for a few months now and finally managed to get it finished yesterday, I admire those who can maintain interest in a project for months on end. I asked a few questions over on the WWII forum when I started this project which is how I ended up doing this particular aircraft, the masks I'd purchased had a few accuracy issues but I had all the relevant bits for this aircraft which the very helpful Chris Thomas pointed me towards so a very large thanks to you Chris. I used the following after market bits and bobs, Barracudacast cockpit, wheels, intake and exhausts. Ultracast Tempest tailplanes and tail wheel well. I used some montex masks for the SF codes but had to cut the N myself, the masks were a bit stretched so I opted to use decals for the roundels and fin flashes. A couple with a little photo editing as per Mr Arkady! Thanks for taking the time to look and all comments are very welcome. Cheers...
-
 Evening all Over on the aircraft modelling section I've been putting together the rather splendid Tamiya 1/32 Spitfire Mk IXc. http://www.britmodeller.com/forums/index.php?/topic/234943780-tamiya-132-spitfire-mk-ixc/#entry1364846 my intention has always to create a diorama depicting a fictitious scene at RAF Palestine 1947. The title of my diorama will be 'A hard day in the office' and it will involve 2 pilot figures and a Willys Jeep , the one you see here and the rather beautiful Ultracast 1943-45 RAF pilot figure. S/L Prat is my first ever attempt at creating a person in miniature so please have a look and tell me honestly what you think. I've really enjoyed the challenge of painting him and I can see myself doing more figures in the future.... Well here he is S/L Prat.. Any comments, criticism, pointers on how to improve will be gratefully received. Yours aye Iain
 -
Mosquito Wheels (5 types) 1:48 Ultracast Ultracast are a well-known Canadian aftermarket company that produce top-quality resin, as well as stocking a range of items from a number of other companies. This month sees them release a gaggle of resin replacement wheels for pretty much all 1:48 De Havilland Mosquitoes, with a variety of tread and hub patterns that should cater for most needs. Casting is first rate, and detail is very crisp indeed, with only a small casting gate to cut through to liberate the wheels from their blocks, which is situated on the very slightly bulged and flattened weighted bottom. A pair of triangular support "wings" are there to assist with casting and the easy removal of bubbles, and there is a little bit of clean-up needed where this intersects the tread pattern. The five types are as follows: Spoked wheels, block tread Spoked wheels, diamond tread Standard wheels, Australian Z-block tread Standard wheels, block tread Standard wheels, diamond tread Tread patterns are very well done, and all but the Australian tyres have Goodyear logos, plus tyre data on all sets. The spoked hubs are heavily cut-out to give the illusion of depth, and they even have tiny valve cut-outs with an almost invisible valve cap projecting from the rim. Some very good casting, to be sure! Conclusion These sets give the Mosquito modeller a great way to both improve the look of their model, in the Revell kit's case do something about the over-large wheels, and add a little individualism to the finished model. Quality is very good, and once the casting block has been removed they are a drop-in replacement for the kit parts. Highly recommended. Review sample courtesy of