Search the Community
Showing results for tags 'USAF'.
-
Hello Guys, Below are the images of my "Final Reveal" for the Tamiya 1/48 Douglas A-1J Skyraider. After the images, I will include some notes regarding this build; my opinions of the kit in terms of quality, cost, value for money etc and any points to look out for if you decide to buy and build this kit. I hope you like the following views, and, forgive me for all the photos, but I always have a problem trying to decide what to show! I bought this kit for $32.00 from Hobbylinc.com last year, but it is now for sale from their website at $33.29: http://www.hobbylinc.com/tamiya-douglas-a-1j-skyraider-usaf-attack-aircraft-plastic-model-airplane-kit-1:48-scale-61073 Quality of molded product: The parts are molded well, zero flash on the majority of parts and if there was flash, it was very little. There were no warped parts and ejector pins were away from seen surfaces. The parts are molded with finely recessed panel lines to aid highlighting them when painting, and every parts details are crisp and faultless. The clear parts were very clear, not thick and there were no blemishes or distortions to disrupt the visual transparency. I give the Quality of molded product a score of 10/10 Quality of Engineering/Fits: This kit literally falls together, and without a shadow of a doubt, this has to be the best kit that I have had the pleasure to put together, out of the 15 I have built to date since starting modeling in January of 2014. The molded parts come loaded with nice details within the cockpit, on the undercarriage and the exterior surfaces. I give the Quality of Engineering/Fits a score of 10/10 Assembly and Painting Instructions: The assembly instructions come in black and white and they are clear, concise and easy to follow with each part clearly numbered along with the Tamiya color code for that part to be painted in. There is a separate sheet for painting guides for two Squadron markings. A full size view sheet is included that can be used as a paper mask for when painting your model. I always take a few photo-copies of this sheet and use the copies for this task. I give the instructions a score of 10/10 Decals: There is one sheet of decals that do not include the smaller stencils such as "Danger", "No Step" "Caution" etc and therefore, there are only 28 decals to put onto this model. That includes the 4 decals that go onto the propeller- one on each blade. The decals are thicker than normal, take a long time to release from the backing paper and some are delicate when applying to the plane. I had one tear on me, but I managed to position the two torn parts together to hide the tear. Be careful and patient when using these decals. I give the decals a score of 6 out of 10. Packaging: There are four bags of light grey/beige sprues and a bag with a clear sprue inside. These are within a card exterior box base and lid which is pretty sturdy, has great artwork and some images of the finished model in the two different color/marking schemes on two opposite sides of the box. I give the packaging 9/10 Value for money: 10/10! Would I recommend this kit...a resounding YES, ABSOLUTELY!! It offers a great looking build with two full sprues of weapons/ordnance and options for layout of those weapons. It includes a nicely detailed cockpit that looks great built OOB! There are options to have the rear canopy open or closed, the two fuselage and one ventral air-brake doors open or closed, the ailerons posed up or down, a detailed radial engine and a Pilot figure to finish it off. There are after-market extras that can be purchased for enhancing this kit, such as resin cockpit tub and ejector seats, PE parts and resin bombs and undercarriage, should you feel the need to "enhance" this kit further, although in my opinion it looks great built OOB. My only two "issues" with this kit are; 1) The decals; if Tamiya were to include Cartograf decals into this kit, it would have a perfect score of 10 out of 10. 2) The artwork on the box illustrates a "Whip Antenna" on the port-side of the fuselage next to the rear sliding canopy, but this isn't included in the kit. I therefore scratch built the Whip Antenna" mounting block by carving/sanding the end of a piece of sprue and cutting it off. I then stuck this to the end of a cocktail stick and painted it black. I then made the Antenna by using the "Stretched Sprue" method and cut a piece to length, stuck it to the mounting block and painted that black. When it was dry, I mounted it to the plane. If you're thinking of buying this kit, think no more, go ahead, make your day, you won't be disappointed!! Below is my "Final Reveal" YouTube video link for this build: https://www.youtube.com/edit?o=U&video_id=hzqeA71uvB4 Thanks in advance for taking a look and commenting, much appreciated! Cheers, Martin
- 17 replies
-
- 22
-

-
Hi Everyone, Finally finished my attempt at making an early F-4E from Hasegawas 1/48 kit Wanted to do one after seeing that some recent after market sheets with a million options came out but decided that it wasn`t worth paying £20 on top of the kit price, so.... found a set of CAM Decals for a third of the price and was immediately drawn to this one as it had a different set of teeth to the ones you normally see. Had to make a few alterations to the kit as the serial no of the aircraft pointed to an unslatted version, so had to deleted the slats and various lumps and bumps on the airframe Went with the extended gun barrel as I found many pic`s of a/c with earlier serial no`s had this fitted Also wanted to load it up with an alternative to the usual low drag bombs, Sidewinders and tanks so went for the Super Bullpups and Bombs So went for the Super Bullpups and bombs as I found on a photo of anothe Korat Phantom Otherwise just had to make some rear view mirrors and added the crew for a change Hope you enjoy, thanks for looking Cheers Russ
- 31 replies
-
- 28
-
-
 Hi Everyone, Here is my 4th completed build for 2015, Revell 1:72 Bell UH-1N, 69-16670, USAF, 90th Missile Wing, F.E. Warren AFB, Wyoming, 2005. This is the start of my completed helicopter builds for 2015 as I have 3 more helicopter kits for this year (Airwolf, Lynx AH-7 and Lynx HMA.8). Here are the photos. Thanks for looking everyone. ATB, Rick
 -
Some superb diorama ideas here from Davis-Monthan Air Force Base, commonly known as The Boneyard, where the 309th Aerospace Maintenance and Regeneration Group (AMARG) takes care of disused warplanes and fighter jets. http://www.bing.com/maps/#Y3A9NTEuNTA2NDAxfi0wLjEyNzEwMCZsdmw9NiZzdHk9ciZlbz0wJnNzPXlwLllONjh4MjM0MTQxODIxfnBnLjF+cmFkLjgw Go to the Bird's Eye tab, zoom in, rotate for some stunning views.
-
- 1
-
-
- Davis-Monthan Air Force Base
- The Boneyard
- (and 8 more)
-
On Wednesday I popped down to Classic Air Force with some paint brushes to do a touch-up on one of the exhibits but not long after I arrived I heard a strange noise in the distance. The cloud base was almost zero and I couldn't even see the control tower across the runway. The 'strange noise' passed somewhere over the top of us but came back 10 minutes later by which time the cloud base had lifted to a couple of hundred feet. The visitor turned out to be this Osprey, the first time I've seen or heard one. Fortunately it parked right outside the museum for a couple of hours.
-
Does anybody have a good reference or indeed references for the vehicles used by the USAF for airfield defence in Vietnam? I think I've read that they were mainly scrounged and improvised from what could be found & bartered for from local army units. Thanks very much. I know the title is spelt wrong, but I can't figure out how to change it. Ah well.
-
Well another project completed. Revell SR-71A Blackbird based out of Beale Air Force Base, California. My only criticism with this kit is that even with all of the decals they say to put on it for the Beale Air Force Base version it appears slightly plain (no pun intended). To that effect, I am thinking of using some of the decals from the alternate version of this kit (USAF/ USAF Symbol and US Air Force text) to improve the look of it, but the Beale AFB version did not have these decals on it. Opinions on this welcome. Anyway onto the photos. Blackbird head on. Blackbird in its new home (at least until the B-1B is decalled) excuse part of my book collection :-) Comments on this welcome, but again I have to say this one has come out quite nicely, especially as this was one of my earliest model builds after restarting the hobby. Thanks for looking. Rick
-
 Hey All Just a heads up for anyone in Norwich, theres a Harvard parked up against the fence at the control tower. Its G-BUKY. Leaving at some point today. Thanks Bradley
 -
I've just seen this image of a US aircraft in a revetment in Vietnam and it looks as if it could be simple to scratchbuild a diorama in 1:144 - if I had the dimensions! Can anyone here please help with sizes or better still plans of these types of revetments? I'm looking for details of the ones for fighters (Phantom etc.); transports (C-130 Hercules etc.) and helicopters (Huey's and Cayuse etc.) during the Vietnam war. Thanks in advance Mike
-
A little background - THe first model I've ever been truly happy with was a Revel-Monogram F-15E. It's the only model I've managed to get the preshading, weather and washes to look 'right' on. This was over 4 years ago now and despite numerous attempts, I've not managed to finish a kit since, including a 2 year hiatus. Here she is - The tail numbers are painted on and incorrect, the reason being I the F-15 in Lockon/DCS and wanted it to reflect my tail number (LN, 003) In order to try and get myself back in gear, I'm doing another F-15, this time a C to try and get back up and running! It's the Academy set which I managed to pick up for £19.99 in the Modelzone sale. It comes with a small PE fret and a decent weapons loadout. The airframe goes together in a front cockpit and radar section, pancake fuselage and then the wings are mounted flush to the body. There have been a few issues as the build has gone along - The front wheel well didn't fit at all. The instructions call the nose to be joined, the cockpit to be mounted on top of the wheel bay and then slid into place. The cockpit however doesn't sit right! To get around this, I first trimmed the bottom to allow the wheel bay to fit. This was then glued into place and left. Once it was firm, the mounting pegs where sanded flush and I manually lined the cockpit up inside the chassis. The intakes are quite frankly rubbish. For some reason, they leave some 1cm square holes once completely built up if you don't card them over! As I'm posing the intakes in the powered down position, it's hardly hard to see into this section. Wing fitment has been poor however I accrue 50% of this down to poor building technique (yeah, I rushed putting the pan cake together). Quite a lot of Milliput and Green stuff later and I've just about recovered the seams along with the re-scribing. I'll get some pictures up soon of the current build. Currently can't decide on the paint scheme though, I'm torn 50/50 been accurate and making a desert aggressor colouring!
-
Revell 1/144 F-15E Strike Eagle Tigermeet of the Americas 2005 Built for the F-15 Single type Group Build, used Zactomodels resin parts for the exhausts and seats, Humrol Rattle can 27 for the main colour as Tamiya GS Grey was too dark for this scale and Humrol acrylics with the good old hairy stick. Bulld thread is here http://www.britmodeller.com/forums/index.php?/topic/234932729-1144-revell-f-15e-strike-eagle-tmota-2005done/ Gallery Thread is here http://www.britmodeller.com/forums/index.php?/topic/234932391-gallery/ Pics here... Next to her sister in arms.....my other entry the Revell F-15E modified to the one time proposed F-15N Sea Eagle.
-
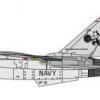
I've been building this one for Aeroscale's Night Fighters group build. First the box and a look at the sprues And the decal sheet Wings together The cockpit sits upon the intake and the bits visible behind the cockpit are not neglected The fit is phenominaly good I I didn't need to use any filler, and the only sanding was around the intake where it joined the nose. Now for some light gull grey which serves both as primer and the colour of the inspar area Anti glare panel and radome And now some silver, buffed up with SNJ powder Now begins the mind-numbing task of applying all the stencils. Most companies include the owner's manuals when they sell airplanes. North American decided to save paper and paint the manual right onto the airframe. This is the result of four sessions of decalling. Next I need to do some detail painting, then I can get the rest of the stencils onto the underside.
-
Hi all, just thought I`d show you some pic`s of my very latest effort: Hasegawas RF-4 Phantom in 1/48 Built from the RF-4B kit, as I couldn`t find a `C` version and done as `Snoopy War`s Hell` from the 11th TRS, 432nd TRW, Udorn, Thailand circa 1969 Apart from after-market decals it`s mostly OOB exceptions being; home made seat belts , rear view mirrors, detail on rear cockpit stbd side and ECM pod from Hasegawa weapons set Had to cut a few lumps and bumps off the kit but most of the `C` bits were on the sprues took a while to get finally finished for some reason. Hope you enjoy looking at Cheers Russ
-
In with this one, hope to start this soon but need to get my F-15 builds done for another Group build, so it may be slow progress at first. Anyway box and other shots below, two choices for this but leaning towards the Dyess one as a Bone with the bat symbol on its tail seems to suit the aircraft.... Nice box art Bagged sprues, no comments on the background,... Updated Resin Cans Decals

.thumb.jpg.d17ff607fc7e89ed057e63fcb6f2a888.jpg)