
Search the Community
Showing results for tags 'US Navy'.
-
During research for a new book, I found this amazing picture library of Ulithi Anchorage from 1944-45. Ulithi Atoll and the US Navy 1944-45 So many great pictures of the anchorage and the array of ships and various stories. Just keep scrolling down till you reach the button that says "Load 490 More Images"! Hope you find this useful, as I have. Alan
-
Hi I am thinking that Privateer with Bat(s?) missile(s) would be a very attractive model to construct. I know that some use of this radar guided missile was done during WWII in Pacific since April 1944 (https://en.wikipedia.org/wiki/ASM-N-2_Bat ) . Any info on this will be apprecieted - I hope not only by me , Especially photos from combat use - to identify the exact Priveeter carrying it... Best regards Jerzy-Wojtek
-
Hey, I'd like to share with you my most recent addition to the shelves: Trumpeter's 1/350 scale USS Independence LCS-2. Apart from the way too soft photo-etch the kit is really good and I enjoyed it. I Hope you like my little ship! Cheers, Tom
-
Hi mates, I'm back for another go at it. This time it's the iconic (or is it venerable, I'm never quire sure) old Monogram kit of the Grumman F7F-3 Tigercat in 1:72 scale. The Monogram kit dates back to 1967 (not long after I started modelling) and can easily be found at contests, swap meets, flea markets, dusty attics, and mouldy fruit cellars. I got mine for an easy $3.00 at the 2012 ROCON contest (Rochester, NY). The shape of the old kit is very good, but being from that just-out-of-the-womb period in the history of plastic modelling, it's a bit short in the detail department. Little things, like the entire cockpit and the wheel wells are, well, missing. It's not like some parts in my kit were lost along the way, but more like the parts were never intended to be there to begin with. Luckily, we have the aftermarket detail company Aires more than willing to take my hard earned money by offering a complete Grumman F7F Extreme Detailing Set (suitable not only for the Monogram kit but also for the same when dressed in Revell garb) for a paltry $55.00!! Isn't capitalism a wonderful thing? So here are the raw materials: The blue stuff is the kit, the resin-y coloured stuff is the, um, resin. I've already removed some of the resin parts from their pour blocks, and I can say that I'm quite pleased with the quality. I haven't seen any bubbles or such yet (knock wood). There are some extra kit parts that I'm not showing (engines, cowlings, etc.) since they will be replaced by the resin. Oddly enough, the wings are mostly recessed panel lines, but the rest of the kit is raised. No matter, I shall be re-scribing the fuselage as part of the project. Ugh. Speaking of the resin, we have a complete cockpit and two complete miniature Pratt & Whitney Double Wasp radial engines. Little kits themselves, I have the honour of installing the cylinder heads into the crankcase one at a time. Pumps and tanks are present, as are the intricate exhaust headers. Also in resin we have some of the engine mounts which will be exposed once the nacelles are cut open, and we have new front cowling pieces and main gear doors. In photoetch, we will be building new wheel wells and adding assorted fiddly detail stuff, including seat belts and a new instrument panel which accepts the supplied film instruments. There are PE ignition rings and cooling gills for the engines. And lovely copper wire, which I think will be used for the lifters. (Is that what those rods are? I'm afraid I'm a bit of a hoser when it comes to a spanner. And that's hoser in the Canadian sense, just in case it means something naughty in Britain.) Not shown are the replacement propellers and spinners that I've ordered and are whisking their way towards me at this very moment. From Missouri of all places. I think I'll also pick up a vacuform canopy, because there are a couple available and we should do our part to support the cottage industries so they can grow and turn into big black smoke (apologies to the brothers Davies). What I need is a new decal sheet. All I can find are ones for Tigercat Fire Bombers, which is not my intent. I was thinking of something more along the lines of Korean War bomber. Any ideas, mates? After my recent target tug Sea Vixen, I'm looking forward to a model where the entire fuselage is the same colour!! Stay tuned, things should start getting interesting soon! Cheers, Bill PS. It's a disease. I can't stop.
-
Vought F7U-1 Cutlass NAS Patuxent River & USS Midway, 1951 ‘Aurora’ is one of those names that have a mystical, nostalgic feel. It seems like the remaining Aurora kits are stocked in unknown dusty attics across the world. Imagine then my excitement when I came across one on sale for fiver on a stand at the Northolt Families day last year. What to do with it now? Shall I see what I can get on e-bay, put it in my own attic for a few more years....or maybe just built it !!! Yeah – just built it. This is what you get in the box: A few gigantic rivets and a pilot’s head in the cockpit was standard fare in the late 50s / early 60s. I was tempted to just put it together as-is, but the thought of getting decals to go down over those rivets made me decide to sand them all off. Control surface demarcations were raised, of course, so they had to be scribed back in. I had originally thought of leaving Jo Pilot in the cockpit, but the canopy shape was just so horribly wrong that I decided to mould a new one and along with that would be opening up the cockpit. I only put some very basic details and an approximate seat in there. There are all kinds of short cuts and dodgy shapes overall, but I thought I would leave it to keep something of the old Aurora character. That included the solid wheel wells and the original kit undercarriage, incredibly basic though it is (though eventually I did replace the torque links). Decals were the next issue. The kit ones were very, very yellowed. I liked the chosen scheme though, and found this photo of it: I found some replacement decals from Techmod, and they went on well. The small Bureau Number decal in front of the air intake was from the kit decal sheet to retain a link to the original! I wouldn’t want to do one of these again for a while, but it’s nice to have such a nostalgic model in the collection.
- 27 replies
-
- 33
-

-
Hey folks, as mentioned, my follow-up to the F-8 Crusader from a couple of weeks back is another USN subject. One of the quickest (a month-and-a-day), easiest and most relaxing builds I've ever done. The old Monogram F9F-2 Panther updated in 2009 by RoG to an F9F-5P. Only addition to the build was a Pavla resin seat everything else including the 'stickers' are straight from the box. Kit - Revell (nee Monogram). Paint - Tamiya acrylics, Xtracolour enamels. Decals - Kit. Extras - Pavla resin seat. Grumman F9F-5KD Panther VU-1, NAS Barbers Point Hawaii 1959. Paint is mostly Tamiya acrylics with the exception of the fuselage which is Xtracolours' enamel 'Engine Grey'. Nothing else to add, another 'loved every minute' build. Please feel free to make any criticism, comments or ask any questions. AFN Ian.
- 19 replies
-
- 28
-
-
 Hi This is my first gallery in this forum, so maybe few words about me. I'm from Poland and I'm mainly building americans planes. I like putty for plastic and send paper , so my last model is Northrop BT-1, which released VALOM. The build thread can be found here. Bye for now, Jaro
- 10 replies
-
- 18
-
-
Hi My next model in the series "Yellow wings" - Vought SB2U-1 Vindicator, which released Special Hobby. I build this model in the same time as BT-1, and today I finished. The build thread can be found here -> http://www.pwm.org.pl/viewtopic.php?f=12&t=77766 . And photo session with BT-1. Best regards. Jaro
- 12 replies
-
- 28
-
-
- Vought
- Vindicator
- (and 6 more)
-
 I rescued these two classic 50's naval jets from my shelf of doom. They have been sitting there for 2 years, these were my first practice builds since returning to the hobby and was about 90% finished. I had fitted both with aftermarket photo etch cockpit instruments and I fitted Montex canopy masks, however I got into building sci-fi models and other stuff over the next 2 years so last weekend I dusted them down and decided to finish them. The Panther had terrible decals, they had bubbled and cracked and a few on the Skyray as well. I had to flat them down and retouch them with an airbrush and by hand so they were never going to be show winning models. I decided to heavily weather them to hide the poor decals, there is more wrong with these planes then there is right but it seemed a shame not to finish them.
 -
Hi. This was the second model i built, and even though it was only my second model, i could tell what an awful kit it was. For a newbie anyway. Nothing really fitted at all. Part of the canopy snapped off within 5 minutes of opening, and the raised panel lines? Another steep learning curve but i’m glad i persevered with it. Learn’t loads! Like not to buy another Italeri kit. Its put me off ever buying another Italeri kit. I think i may have touched this model with a bit of filler, but for the most parts, i couldn’t muster the enthusiasm to do much with it. Airbrushing and weathering where new skills for me also to get to grips with. And it kinda shows. I really do like the Skyraider, and really enjoyed researching it but this kit stunk. Apologies for the bad vibes and the cardboard ! Anyway, all comments & remarks welcome. Cheers
- 22 replies
-
- 25
-
-
Good morning, it's time now to present some better photos of my Scooter, which was part of the Vietnam GB finished end of last year. Not much to add from the WIP, it's a nice kit with some minor problem areas (like the fuselage joints). Decal sheet was missing the AJ on the fin,which I airbrushed using a mask I cut out of a tape. Weapons are from the hasegawa weapon set, the tank is from the kit. It was the first time I used a photocube, some people think the photos were initially too brownish, so I adjusted them online. Next photos will be better, I hope! Thanks for attention, and for running the GB! Alex
- 14 replies
-
- 23
-
-
 I have a soft spot for Grumman's cats. From the cute Wildcat, to the butch Hellcat and all the way to the flashy Tomcat, I think the company has built some of the best looking fighter aircraft in history. Over the summer I started a double-build of the venerable Hasegawa kits of both these planes. It's taken quite some time to finish them, but here they are. Both kits are built straight out of the box, apart from the Sidewinders, which come from the Hasegawa Weapons Set III. Colors are Gunze acrylics and Tamiya white primer. In particular the Tiger is really a candidate for a new tooling, it has raised panel lines, most of which disappear after you have taken care of the fuselage seams. Apart from that it goes together very well, I only needed some filler on the intakes, which are a slightly dubious fit. The main landing gear is a bit of a vague fit, but doable with some trail and error. The decals had yellowed but I was lucky to get another set from a fellow BM-er. Unfortunately no aftermarket decals are available for this kit. It's decidedly underrepresented by both kit manufacturers and aftermarket companies. The Cougar is slightly newer and has the traditional Hasegawa panel lines, very fine, a bit too fine on the underside, I struggled to get the wash to adhere to them. This kit also needed some filler around the intakes and the rear wing to fuselage joint, which requires quite a lot of filler to smooth out. Apart from that, it's an easy build. This was also an older boxing and in this case the decals had both yellowed and cracked. The Cougar also isn't a popular aftermarket subject, but PrintScale do a nice sheet with some Panthers and Cougars, which I used. I believe Sword do a modern tooling of the Cougar but as far as I'm aware not the fighter version. I'm very happy to have these lovely 50s cats in my collection. Hopefully we'll get some modern toolings of both, which will be the perfect excuse to build some more of them.
- 22 replies
-
- 29
-
-
 I have just read on www.navy.mil that the US Navy has launched PCU Zumwalt, DDG-1000, the first of 3 Zumwalt class destroyers, without any fanfare (champagne over the bow etc). They cancelled the ships christening ceremony due to the recent partial government shutdown. The christening ceremony will be rescheduled for the spring. Bath Iron Works will continue working on the ship throughout winter with sea trials due to commence next winter. A year tied up to a dock is a very long time for something worth what these ships cost. Look at the size of this bad boy, compare it to the tugboat next to the bow in the photo below for an idea of scale. The ship is 610 feet long and weighing in at 15,610 tons. In comparison the Royal Navy's Type 45 destroyer is 498 feet long and weights 8,000 tons. The Zumwalts are going to be 100 feet plus larger than the largest destroyer built previously. The design of the Zumwalt reminds me of the USS Cunningham DDG-79 from the Amanda Garrett novels by James Cobb. I wonder if there is a plaque saying Designed by James Cobb.
 -
Hey everyone, While this isn't really 'armour', I couldn't think of where else to post it. So Mods, please feel free to move! This is the little 1/72 Fujimi Deck Tractor from their Flight Deck Crew set 35001. Built out of box but turned the front wheels to make it look a bit more interesting. Will probably add the driver at a later stage and maybe some scale chains if I can find them (anyone know where?) Gotta hate the macro setting on the camera - just spotted nasty seams on the wheel chock! The WIP build log is here and thanks for looking!
-
Rattling through the ship builds so far this year - here's the fourth! Trumpeter kit of the USS Hopper with many Veteran Models accessories. All the PE was in the box. Rigged with copper wire, painted in WEM enamels Haze Gray and Modern US Navy Deck Gray. One of the most enjoyable and effortless kits I've ever had the pleasure of building. Would recommend these to anyone from beginners up. Nice one Trumpeter. The second Decatur I've made in succession, now moving from tin cans to battlewagons for the rest of this year Alan
- 18 replies
-
- 21
-
-
Kit - Italeri (Esci) 1:48 Paint - All enamels over acrylic base-coats Decals - CAM 48-042 Extras - AGM-45's from Hasegawa weapons set, Mk82SE's from spares box. Douglas A-4F Skyhawk VA-152 'Mavericks' Assigned to the Air Group Commander CVW-8 USS Shangri-La Tonkin Gulf, Mid 1970 Built for the Skyhawk GB over at www.kiwimodellers.com, Not one of my best builds but alongside my Hasegawa A-4C from quite a few years back, it looks fine. Surprisingly for a kit that traces back to the very early 1980's this went together with little fuss, any problems were entirely down to my own deficiencies and impatience, and little to do with the 'plastic'. Thanks for taking the time to look and/or comment. As ever all comments, questions and criticism are welcome. Next, a trip in to the unknown for me, a sci-fi kit with my No1 son... AFN Ian.
- 18 replies
-
- 20
-
-
Hi, before I start I have no affiliation with this company what so ever. I just thought that any builders of 1/700 US or RN warships should take a look at this site. http://www.3dmodelparts.com/ship-accessories/?sort=featured&page=2 I received my order of octuple pom pom's today and am totally amazed at the quality of the parts. These are 3D printed in acrylic resin and are very fine, they are much easier than photo-etch and have 3D barrels. They can also be set at any elevation, so are ideal for diorama's. I hope that some one finds a use for these as I think they are amazing. There are several different weapons and a few structure parts available. Mick ps, I have been chatting to the owner and he is asking for suggestions on his new items.
-
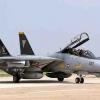
Hey, I'd like to show you my F-14D Super Tomcat in 1/72 scale. The kit is by Revell and overall pretty good. When I built this model in 2012 I wasn't that concerned about cleaning flash, filling or sanding - and thats very visible in some areas. I still hope you like it! Cheers, Tom
- 11 replies
-
- 15
-
-
Hi everyone, I'd like to present my ES-3A Shadow by Italeri. I just finished the model yesterday after a 10-month build. The S-3 Viking kit itself is ok, whereas the Shadow specific parts are absolutely horrible and don't fit at all. Im quite pleased with the result, of course some minor bits bug me, but in general I'm happy. I hope you like the model! That's it! Cheers
- 24 replies
-
- 24
-
-
Good morning, just to show some progress of the Academy Crusader. I will add the aires cockpit set (the first I ever used), and the quickboost flaps. As you may know, if the wind is raised, the flaps/slats will automatically come down. It's something which academy has forgotten. For the decals, I will use the excellent sheet from Xtradecal. I started with the white parts, which are built into the fuselage. It's all gunze flat white acrylic, then a brush cote of the german "clear" (Erdal Glänzer), and some oil wash. Wheels are done with revell anthrazite, brush painted, after a drop of highly diluted oil colour where the tire meets the rim. That give a sharp edge. Airbrake is shown without washing, to show the difference. A detail photo of the main gear bay. The lowered slats. Since the parts are already separate, I just needed to sand the edges down, and fill the gap with some sheet. On the underside, I filled the gap with some stretched sprue, glued with extra thin cement. right hand side already filled, left side to go. The cockpit. Nice details, however I prefer seats with moulded harness. A coat of primer, then DSG, some drybrushing, and detailling with revell acrylics. The dashboard looks also better than the kit part. HUD will be added later, just before the windscreen. Thanks for attention! Alex
-
 North American T-2C Buckeye Training Squadron VT-4, Pensacola, Florida, 1973 I started the old Matchbox kit with the aim of correcting all its faults and producing that perfect model that we aim for, but I gave up on that after many months and just decided to finish it. It was those Two Bobs decals that did it – they looked so nice on the sheet that I couldn’t wait to use them. I wasn’t disappointed. They were excellent decals and went on flawlessly, though I must admit I used Klear to float them all on just in case they thought about silvering. Mine was an original Matchbox kit from way back when with grey and white plastic, but the same moulds were fairly recently released by Revell in one colour of plastic. The cockpit needed a complete makeover. Pavla do the business for you in resin if you want, but mine was an old fashioned plastic reconstruction including scratch built seats and a crash-moulded clear acetate canopy, carefully blended in with Milliput. There are plenty of Matchbox trench lines to deal with. I filled the whole lot with Milliput, sanded it smooth and rescribed all the surface detail. You come across all kinds of things when you do this – for example Matchbox show the aileron chord on the upper surface to be shorter than the flap chord, but they are in fact the other way around! Anyway, you get the picture – far too much other stuff to mention here. So in the end I was glad to have a canvas on which to display those Two Bobs decals, even though it does have a few dodgy shapes here and there.
- 32 replies
-
- 40
-
-
North American A-5A Vigilante Training Squadron VAH-3, Naval Air Station Sanford, Florida, 1962 Back in the 60s when I was 16 or so I came across a guy called Jo Thompson. He turned out to be an expert on post war US Navy stuff and sent me all kinds of info which was a real gold mine for me in those days. One of those photos was this one : Ever since then I’ve been meaning to build a GJ coded Vigilante. I bought the old Monogram kit sometime in the 70s or 80s but I was too busy with work and family to build it. So at long last I got around to it! This was a basic kit to say the least. The box says 1/72, but even though the wingspan checks out as 1/72 the general bulk of the fuselage looks small when compared with the Airfix RA-5C. But I was still going to build it anyway. All surface detail (including control surfaces) were raised so there was quite a bit of scribing to do. The interior of the fuselage looked as if it was originally designed to have a spring-loaded bomb ejection system. Part of this was a rear fuselage fairing that simply had a hole in it. 3 holes, in fact, as there were also no exhausts provided! A spare set of burner cans from a Phantom came to the rescue here. Nothing fitted – much Milliput, etc – you know the story – but that’s what we do isn’t it?
- 19 replies
-
- 21
-
-
McDonnell F3H Demon Warpaint Series No.99 Hot on the heels of my last review from Guideline Publications comes No.99, the McDonnell F3H Demon. The Demon was large, ugly, underpowered and soon superceded as front-line interceptor; however it comes from an era when US military jets, especially naval ones, were adorned with bright hi-vis liveries and markings. As such, models of these would look good in any display case or collection. The F3H was McDonnell's offering of a single seat, short range, carrier-based fighter with the ability to climb rapidly to high altitude in order to intercept incoming enemy bombers; to meet the US Chief of Naval Operations requirements for the 1950's. The first prototypes, designated XF3H-1, were ordered in 1949 with the first flight being achieved in 1951. During these trials periods, considerable changes were made to the designs shape in virtually all areas of the wings, fuselage and tail; and are all described in crisp terms by the author Tony Butler within the book. Most pages within this 52 page edition contain a combination of historical and technical data, which is supplemented by photographs or profile drawings; superbly produced by Richard J. Caruana, and provide the story of the United States Navy's first all-missile-firing jet aircraft interceptor. There are 30 full colour profile drawings, laid out five to a page as shown below, and each profile has a short descriptive narrative alongside. In addition, some illustrations also have an enlarged view of that squadron's emblem and/or motto alongside. These are helpful to the modeller as colour call-outs are described by the names (i.e. Gull Grey) and also by their associated FS numbers. Also to be found within these short texts is data on the particular individual airframe illustrated and included serial, squadron and location for the aircraft at the particular date described. There is also a full colour 4-view profile and plan illustration, to be found within the front cover, providing much detail in the placement of markings and colour demarcations. There are also various tables of data distributed throughout the book, each giving a set of pertinent information relevant to the F3H Demon. As the table below shows, there is also a section on the available model kits; by manufacturer and scale, plus after-market parts and decals. This is useful for the modeller who perhaps wants to find a kit to build using this publication as a guide to colours and markings. The centre page of this book is taken up with a set of general arrangement diagrams; on a single A3 sized page in landscape format and printed to 1:72 scale (although I'm sure this could be enlarged or reduced as required with any good photocopier), and these show the layout and surface detail to a high degree. In past editions of these Warpaint Series I have found that these diagrams are usually printed on a standalone pull-out sheet, with diagrams on both sides, all held within the book by staples. This edition is slightly different as the diagrams are on a single page which means that the pages on the reverse contain text and illustrations that are part of the book and, as such, it would not be simple just to remove the g.a. diagrams (for working at the modelling bench for example) as that would make the book incomplete. This example page, below, from the book shows a typical mix of b&w and colour photo's interspersed with historical narrative plus an inserted table of relevant data. All of this, and other elements throughout the book, help to build a picture and timeline of the F3H Demon's production and service history. In total there are 29 colour and 104 b&w photograph images printed alongside the text. Other diagrams, showing development changes and ad-hoc sketches are also included. Some of the photographs are also interesting for background information, such as the early F4H-1 Phantom seen in the bottom image on this page. A set of additional close in photographs has been included in the "In detail" pages towards the back of this edition. These show extra details, especially on the early prototypes XF3H-1 and F3H-2. Conclusion Suddenly I feel an urge (or is it a Nurge?) to build the F3H Demon! Guideline Publication's latest has arrived just in time to be found on the tables at SMW 2014; or possibly as an early Christmas present? The FH3 Demon was certainly a colourful aircraft and yet still very military; and this edition is a welcome source of information on the Demon; especially for its excellently produced illustrations, both drawn and photographic, that accompany this well researched and detailed history of the first all-missile-firing naval fighter from America's early jet era. This book is one that should appeal to anyone who likes 1950's high visibility jets of the U.S. Navy and is very much recommended. Review sample courtesy of
-
 North American RA-5C VIGILANTE Warpaint Series No.97 It was a pleasant surprise for me when I found that Guideline Publications had brought out the North American RA-5C Vigilante in their Warpaint series. It is produced by Charles Stafrace and is compiled in what is now their easily recognised and highly respected format of high resolution photo cover and with an average of 62 pages of text, photos, illustrations and pull-out general arrangement plans to 1:72 scale. This volume, which is number 97 in the series, is produced to Guidelines' excellent standards with a fine mix of historical narrative and interspersed with beautifully illustrated profile drawings by Richard J. Caruana; plus sheets of informative data on versions, units and air-wings, including their deployments. This aircraft is one of those from the era of hi-vis colour markings and the book is a boon for those modellers who wish to finish their Vigilante build with colourful unit and wing markings. Having said that, the Vigilante could be classed as a bit of an odd-ball in that it had many 'first of type' features but also had an unpopular record with its crews. As Charles states in his introductory paragraph "The North American RA-5C Vigilante was a paradox, introducing aerodynamic, technological and electronic features that were state-of-the-art at the time of its introduction and which were to become standard characteristics in the combat aircraft that followed it." however it was not a popular aircraft with its crews as it cited as being very difficult to land on an aircraft carrier with the high approach speed resulting in a number of ramp strikes and associated losses of aircraft and crews. Most pages contain descriptive narratives detailing the history, advancements and variants that evolved and are interspersed with good quality colour and black/white photographs, plus illustrated with fine colour profile drawings which are professionally produced by Richard J. Caruana. A few also have data tables containing informative facts such as the specifications and dimensions of each type. As I have already mentioned, the book contains some beautifully illustrated profile drawings of the Vigilante. Each profile depicts a specific aircraft in full colour livery and markings. Beside each profile there is a narrative which describes the serial, squadron and location for the aircraft at the particular date described. In many cases, alongside the narrative is an image of the unit badge. Articles contained within the chapters give a useful insight into the development of the early pre-production airframes, again with fine colour images, and describes the efforts and issues that progressed with it becoming accepted as the RA-5C VIgilante. There are over 50 colour photographs of aircraft within this 62 page book and another 60 or so black and white photographs also. In addition there are over 35 full colour profile view illustrations of individual airframes. The pages are interspersed with tabulated data inserts, as with the one below detailing the buNo serials and their designators. Around the inserts the historical narratives continue and are complemented with photographs, many in colour, to further enhance the referencing of the these aircraft for the model enthusiast. Each book in the Warpaint Series is well known for having a set of scale plans of the subject aircraft and this edition is no exception. The pull out plan is A3 size and is printed on both sides with line drawings, giving plan and profile details of the A-5 in diagrammatic detail and is printed to 1:72 scale. Along with the excellently produced profile illustrations and individual narrative, there is also an enlarged imprint of the unit/wing emblem (if carried) for that aircraft. The extra detailing here is of great help to those possibly seeking to make their own decals if none currently exist. Additional tabulated data sheets provide where, and when these aircraft were deployed as with the table below that provides information on the ships or stations they were allocated to, for what period and their associated tail codes. All modelling enthusiasts have a desire to know more and Guideline do this by adding walkaround style photo images, detailing areas close in such as the cockpit, instrument panels and wheel wells etc. Conclusion Another fine book from Guideline Publications, detailing the markings and colour schemes of this famous aircraft. The illustrations are complemented by good historical narratives which flows nicely around a multitude of photgraphs and finely drawn illustrations. This is yet another book which should become an essential reference work on the RA-5 Vigilante alongside the modelling bench. Review sample courtesy of
 -
Hi everyone, thought I`d show you some pic`s of my just completed Hasegawa 1/48 Corsair II Finished in the 2nd decal option in the box, to represent an aircraft of: US Navy `Stingers` VA-113, USS Ranger, circa 1974 The first option being the same aircraft in Bicentennial markings 1976 Mostly OOB as usual, just added some seat belts and... some weapons from the stash. Hope you enjoy, Thanks for looking, Cheers Russ
- 41 replies
-
- 28
-


.thumb.jpg.d17ff607fc7e89ed057e63fcb6f2a888.jpg)