Search the Community
Showing results for tags 'Tropical'.
Found 13 results
-
Bf.109F-4 Weekend Edition (84188) 1:48 Eduard The Bf.109 needs little introduction, suffice to say that it was the Luftwaffe’s mainstay frontline fighter throughout WWII, and went through many incarnations in the constant leapfrogging of technology in order to keep up with and in some cases surpass the allied fighters it was up against. The F variant was the second major redesign of the basic airframe, including a further uprated engine and the attendant strengthening of the airframe that required, plus adding rounded tips to the wings that remained for the rest of the 109’s career. It fought in small numbers toward the end of the Battle of Britain and was finally phased out of front-line service in 1942 to be replaced by the Gustav, some of the obsolete airframes used as Mistel chaperones, which was a dangerous task. The Kit This is a reboxing of Eduard’s recent tool that is based upon the original Emil tooling that was released as far back as 2013, as unbelievable as that might sound. The weekend Editions have traditionally been stripped-down basic kits with one decal option and nothing else, for the dedicated modeller to build and paint them over a weekend. They’ve clearly never met me! The kit arrives in a blue-themed Weekend top-opening box, and inside are four sprues of grey styrene, a clear sprue, instruction booklet and two decal sheets that contain four marking options plus a sheet that’s devoted to just the stencils. Detail is up to Eduard’s usual high standard, without the Photo-Etch (PE) that usually accompanies their ProfiPACK editions, which will doubtless please those that are PE phobic. Construction begins in the cockpit, with styrene details aplenty, plus a nice transparent fuel feeder pipe, which is clear so that you can mask the vision port and paint the rest. This was a lo-fi way for the pilot to quickly check whether his engine was sucking vapours, or had stalled for another reason. Seatbelt decals are included, and the instrument panel has a choice of a detailed panel to paint, or a flat panel to apply a decal to, although with plenty of softening solution, you could probably apply the decal over the raised details of the other panel if you wish. The sidewalls too are decorated with more decals, after which you can close the fuselage. Don't forget to trap the tail wheel between the halves, or you'll regret it later. The backplate for the spinner and exhaust stubs are installed, and the top cowling with gun inserts is glued into place along with the intake for the engine's turbocharger, a hinge section is fixed tothe top of the cowling, and flame-hiders exhausts that are pushed through from the inside on both sides. For the tropical options, a filter body is inserted into the turbocharger intake, wrapping a decal around the cylindrical section to depict the filter material. The elevator fins are each two parts and fit using pins, with separate elevators and rudder. The wings are based upon a full-width lower, adding main gear sidewalls and split upper wings, plus separate parts for the leading-edge slats (gravity deployed when stationary), ailerons, and the two-layer flaps that butt up to the back of the radiator bays, which have details engraved front and back, as does the chin-scoop. A scrap diagram shows the correct positioning of the flaps when they are deployed. The main gear is the same narrow-track stuff of earlier models, with separate tyres and hubs, plus captive bay doors, slotting into the bay snugly. Horn-balances are fitted to the ailerons to finish under the wings. In the cockpit, the gunsight is added from a partially painted (by you) clear part, and if you add a little translucent green/blue to the edge to simulate the thickness of the glass, it will improve the look of the finished part. The windscreen is glued into position, and the canopy has head armour inserted at an angle shown by the accompanying diagram, slotting in between the windscreen and fixed rear portion, the latter having an aerial inserted into the hole in the rear. The canopy can be posed open by adding a restraint from fine wire, and some decal options have additional armour applied to the front of the windscreen, which is best done with a non-fogging glue or clear varnish. The prop is a single part, which has the two-piece spinner clamped around it, after which you can either glue it in place, or leave it loose for travel and impromptu spinning if you like. Once painting is complete, a pair of strengthening straps are applied as decals under the tail on both side for two of the decal options only. Markings Contrary to Weekend Editions of yesteryear, this boxing has four decal options, with plenty of variation in colour and location of the airframes. From the box you can build one of the following: Bf.109F-4/Trop, Wnr.8673 Hptm. Hans-Joachim Marseille, CO of 3./JG27, Quotaifiya, Egypt, September 1942 Bf.109F-4, Lt. Hans-Joachim Heyer, 8./JG54, Siverskaya, Soviet Union, 1942 Bf.109F-4/Z. Wnr.7420, Lt. Hermann A Graf, CO of 9./JG52, Kharkov-Rogan, Soviet Union, May 1942 Bf.109F-4/Trop, Wnr.10145, Fw. Rudolf Müller, 6./JG5, Petsamo, Finland, June 1942 The decals are printed by Eduard and are in good registration, sharpness and colour density, with a thin gloss carrier film cut loosely around the printed areas. The stencils are on a separate sheet, and are marked on a page of the booklet, separate from the rest of the markings to avoid confusion from trying to read overly busy diagrams. Don’t forget that as of 2021, the carrier film from Eduard decals can be coaxed away from the printed part of the decal after they have been applied, effectively rendering them carrier-free, making the decals much thinner and more realistic, and obviating the need to apply successive coats of clear varnish to hide the edges of the film. It’s a great step further in realism from my point of view. Conclusion A welcome re-release of this excellent kit without the bells and whistles that some folks don’t need or want. If you change your mind though, they’re available separately anyway for you to pick and choose. Highly recommended. Review sample courtesy of
-
I'm testing my limited knowledge of Spitfires now but would I be correct to assume that Mk.I's and Mk.II's were never tropicalized using the Vokes filter and therefore any PR Spitfires with such a filter would have been based upon the Mk.V airframe? If the latter is true, would I be correct to assume that the Mk.V's rounded oil cooler would be needed plus a Mk.V propellor unit? I'm using the Pavla set designed for the Airfix Mk.I which only shows to use the supplied resin oil cooler which doesn't look rounded. If my assumptions are correct, I can use the Airfix Va as the starting point with a spare Vb propellor and spinner. Regards Clive
-
 Hello everyone! Just finished the "good old" Hasegawa Bf109 G-4 1/32 in ProModeler (Monogram) boxing, released in the early 2000s. Overall still a great kit, built with some add ons like MDC trop filter, brass pitot tube, Uschi (Rig That Thing) elastic thread for the antenna, PE seatbelts and small plastic/metal bits to improve the appearance of this well known Gustav. Painted with Model Master enamels (RLM 78/79/80), clear coated with acrylic Mr. Color matt and gloss varnishes. Decals from the box. National emblems, A/C number and tactical markings masked and sprayed accordingly. Thanks for watching! Oscar
- 17 replies
-
- 41
-

-

-
Hello everyone Here is one of three 1:144 Focke-Wulf Fw 190Ds in fictitious schemes and/or variants I built back in 2013. In this case, it's a Platz Fw 190D-9 kit in an MTO scheme representing a fictitious machine from 4.JG27 based in Italy in 1945. The Dora never served in the MTO and I thought (correctly) that it would look great. The kit was built OOB and fully painted, weathered and varnished with brush. The JG27-specific markings (emblem, number, etc) came from a Sweet Bf 109F kit. Thank you for looking and all comments are welcome as always Miguel
-
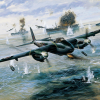
Ju-88A-11 1:48 ICM (48235) The Ju-88 was designed as a schnellbomber in the mid 30s, and at the time it was faster than current fighter designs, so it was projected that it could infiltrate, bomb and exfiltrate without being intercepted. That was the theory anyway. By the time WWII began in the west, fighters had caught up with the previously untouchable speed of the 88, and it needed escorting to protect it from its Merlin equipped opponents. It turned out to be a jack of all trades however, and was as competent as a night fighter, dive bomber or doing reconnaissance as it was bombing Britain. They even popped a big gun on the nose and sent it against tanks and bombers, with variable success. The A series sported a pair of Jumo 211 engines in cylindrical cowlings producing over 1,000hp each, and was improved gradually up until the A-17, with the A-11 being the official designation for the factory produced tropicalized version. It was fitted with filters to protect the engine from dust and dirt, as well as a rescue kit for ditching and forced landings. The Kit This is a new variation on the original tooling of an A-5 that was release recently by ICM, with new parts added to make it version specific. There are new engine nacelles and props; new fin and rudder; changes to the cockpit mounted machine-guns, and different glazing options are chosen from the same clear sprue. The box is the usual top-opening with an inner lid style, and inside you will find eight sprues in grey styrene, one in clear, decal sheet and a glossy covered instruction booklet with spot colour inside, and the decal options in full colour on the back cover. If you have been lucky enough to see the A-5, you'll know that detail is right up there in terms of quality and crispness, with ICM really improving over the last few years, which has to be great news for modellers, as they aren't frightened of tackling what to us may seem niche subject matters. With the sprue-related excitement out of the way, work on the fuselage begins with the addition of sidewall details in the capacious cockpit area. Rear bulkhead, side consoles and seats are all added to the cockpit sides for a change, with an insert in the fuselage for the circular antenna and tail wheel added into the starboard side. The instrument panel is supplied with decals, and fits into the fuselage during joining. The missing floor is added to the lower fuselage panel that includes the lower parts of the inner wings and gives the structure some strength. It also receives the rudder pedals, control column, and the two remaining crew seats before being joined to the fuselage. The tail plane has articulated flying surfaces, and the wings are supplied as top and bottom, with the flaps and ailerons separate from the box, and neat curved fairings so they look good when fitted at an angle. The flaps include the rear section of the soon-to-be-fitted nacelles, which are added as separate parts to avoid sink-marks, and these and the ailerons run full-span, terminating just as the wingtip begins. This variant was fitted with the under-fuselage gondola, and each side has separate glazing panels inserted from inside, and a seam running vertically through its length. It is added to the hole in the underside of the fuselage, with the front and rear glazing plus zwilling mounted machine guns later in the build. At this time the landing gear is made up on a pair of upstands that are added to the underwing in preparation for the installation of the nacelle cowlings. The engines have to be built up first though, consisting of a high part count with plenty of detail, and a rear firewall that securely fits inside the cowling. Even though this is an in-line engine with a V-shaped piston layout, the addition of the annular radiators gives it the look of a radial, with their representation added to the front of the cowling, obscuring much of the engine detail. The side panels can be left off to show all that detail however, and I'm sure Eduard will be along with some in-scale opened panels in due course (there might be some in my inbox, thinking about it!). The cooling flaps around the cowling are separate, and the exhausts have separate stacks, which aren't hollow but are large enough to make boring them out with a drill a possibility. The completed nacelle fit to the underwing over the top of the main gear installation, securing in place with four pegs, two on each side of each nacelle. The props are made from spinner, backplate and a single piece containing all three blades, sliding onto a pin projecting from the engine front, which will require some glue if you want to keep them on. At this point the instructions recommend adding the canopy glazing, which consists of a choice of two faceted nose cones, and the main greenhouse for the cockpit aperture. The rear portion is made from two additional parts due to its double "blown" shape to accommodate the two rearward gun positions, so that the gunner's head isn't pressed against the canopy. The guns are fitted through the windscreen and the two circular ports on the rear, although no ammo feed is supplied. Under the wings the dive spoilers are added with four bomb crutches on aerodynamic mounts, with bombs supplied that have two of their fins moulded separately, along with the stabilising struts that fit into notches in the fins. While the airframe is flipped over, the two-part wheels and twin main gear bay doors are added, both having good detail and the former a radial tread. Addition of the canopy mounted antenna completes the build, but this is likely to be done long after main painting for safety's sake! Markings The kit includes two markings options from the relevant theatre, and the first page of the painting section details the application of the numerous stencils that are supplied in the kit. There are no Swastikas on the sheet, but the Balkenkreuz are included, with a portion separated into narrow sections to ease decaling the dive spoilers. From the box you can build one of the following: Junkers Ju.88A-11 3./LG 1, North Afrika, 1942 – Afrika Brown over Hellblau RLM 65 Junkers Ju.88A-11 I./LG 1, North Afrika, 1942 – Afrika Brown with Dunkelgrun RLM 71 patches over Hellblau RLM 65 The colours are picked out using letters that correspond to a table on the front page, which gives the names and paint codes in Revell and Tamiya ranges, so should be easy to convert to your paint system of choice. The decals are printed in-house and have good register, colour density and sharpness, with additional instrument dials included on a clear carrier film to help with cockpit painting. All of the stencils are legible, and overall they inspire confidence, with a thin carrier film cut close to the printing, with a few exceptions where lettering has film that could have been dispensed with to reduce the menace of silvering. Conclusion ICM's range of Ju.88s and Do.17s are a good example of how far they have come in recent years, adding value to their brand, and improving their reputation with each release. The kit is well-detailed and comprehensive in what it includes, and with a nice pair of decal options it says "build me". Highly recommended. Review sample courtesy of
-
Hello all, I'm currently researching the Vokes filter for my Hurricane IIC build. None of the plans seem to fit the filters I see on the period photographs. Also it would appear to have slight differences between the filters. Maybe some were field replacements and others factory-installed? I have also seen the words 'Aerovee' or 'Aero-Vee' associated with 'Vokes'. What are they? Brand name, variants? I'm counting on you Hurricane fans to shed a light on that matter. Thank you for your help, Cheers, Quang
-
Hello Everyone, I've decided to do these wee ones as a starter for this GB (I'm STILL waiting for my P-47's), these will be nothing fancy and straight out of the box builds. Not that there is much aftermarket stuff for Hurricanes in 1/144. These models where previously built by Speedman back in October last year for the BoB GB. Mine wont be as good as his, but I will give it a bloody good go! Onto the pictures... I have absolutely no idea what Yuki-kun is saying and the same goes for NASA-chan. Dont ask me to read what the box says either except for the obvious. Got to love the way that Japan always has to "cutify" everything... But it does work I guess... :/ This could be handy.... Couldn't resist, the box for the Wildcats says "Two Cats in a Box!" this one just has a funky picture of Yuki-kun... I dunno.. 4 of the 5 schemes that you can build out of the box (the last one is on the box). They all look pretty much the same except for option 2 and 5, which are the ones I am going to do. This is one of the two I am going to do, I love the blue on the wing leading edges and the bolt. I am going to assume that the squiggly lines are green. I will have to read up laters. The second picture, I really like this scheme as well for some reason. Sprue shots, I am not sure why there is a clear sprue (not being able to read Japanese) I guess I will never know. They are really clear tho... thats a good start I guess. I like how the wings go together, also the canopy that's normal plastic on the sandy sprue. That'll be useful when it comes to sorting out the framing, result! Got to love all of the decals that you get in a box from Sweet models. Quite a lot of choice here and maybe something I could use on other models. I also have another boxing, which I might decide to do depending how well these go. This is the same boxing that Speedman made. I got a few models from Sweet over the years, this isn't my full collection as I have a few more Zero's, Sea Kings and the Mustangs you can see on the shelf. If I do get time for the second batch it will be using this for some kind of diorama, it'll probably be crap tho... All of the lovely bits you get in the box. Yay! So hopefully I will get some time to start these soon. Kind Regards, Dazz
-
Supermarine Spitfire Vb Airfix 1:48 The Spitfire hardly needs an introduction, an iconic war machine and graceful lines satisfying the technical theory that ‘If it looks right, it flies right’! With around 6000 aircraft produced across the various sites, the Mk.V was the most produced version of the 20,000+ built. Coming in to service in 1941, it incorporated many of the improvements developed in the Mk.III, however instead of using the planned Mk.XX Merlin which was in short supply, the Mk.45 with a single stage single supercharger was used as it could easily be fitted to the standard fuselage of the Mk.I/II. Three types of wing were available in the Mk.V range, the ‘A’ wing using the traditional 8 gun layout and the ‘B’ wing housing two 20mm cannon and 4 machine guns. The universal ‘C’ wing introduced shortly afterwards had a more flexible arrangement being able to house either the ‘A’ or ‘B’ configurations or 4 cannon and 4 machine guns. A key feature of the Mk.45 Merlin introduced in late ’41’ was the ability to cope with negative ‘g’ without cutting out significantly improving dogfight performance in an effort to close the gap on the newly developed FW190. As well as being used in the UK, the Mk.V saw considerable service abroad. The need to cope with hotter and harsher climates led to some of the ugliest and slowest Spitfires to be built (I say that in principal, but I actually like the tropical versions!). Tropical versions accommodated a deep chin Vokes filter, but the extra drag and reduced intake charge speed affected the performance by around 8mph and clime rate aby about 600ft/min. Later, in-field improvements led to a more streamlined ‘Aboukir’ tropical filter which went some way to restoring the original lines of the spitfire too. The Mk.V’s endured fierce combats with front line fighters of the Axis air forces across most theatres of WWII including Europe, the Mediterranean, Pacific and Russian. In an ironic turn of developments, the ‘stop gap’ MkV was gradually replaced by the next ‘stop gap’ version, the Mk.IX which became the second most widely produced variant. The key difference in the two aircraft was a notably longer nose to accommodate a two stage supercharger giving a much improved high altitude performance to deal with the FW190’s over Europe. The kit The release of this new kit by Airfix was somewhat of a surprise, with very little hype. Maybe a new quarter scale Spitfire just doesn’t need the marketing effort other kits require and given the interest of forums, this may well be the case. It replaces the 1977 tooling with the iconic QJ-R tropical Spitfire artwork that is probably the reason I developed such a soft spot for the ‘ugly’ Spits in the first place. That said, the Tamiya Vb is probably the current bench mark in this scale that Airfix have entered the competition with. From the various comparisons across the internet (thanks to some of the guys on here, Troy Smith in particular), it appears that Airfix have produced a gem of a kit in terms of accuracy. Comparing the two, the Airfix wing is considered more accurate and the nose correct in length, whereas the Tamiya is a few mm too short. First impressions are certainly favourable. Moulding quality is superb with the panel lines recessed and more refined than some of the recent Airfix releases. The parts breakdown add a little more complexity than the Tamiya kit which I’ll pick up in the review later on, but there is a good range of options covering most of the Vb variations. Flash is almost none existent and there are only a few observations of sink marks which I’ll mention later too. The box is thankfully top opening with stunning digital artwork of a tropical version. The instructions are excellent in my opinion with good clear steps using colour to improve clarity. So, on with assembly. Traditionally it starts with the cockpit interior. Unlike the fuselage moulded sidewall interior of the Tamiya kit, the Airfix kit has two inserts with excellent detail moulded on that mate to the fuselage inner walls. The seat comprising three main parts is also nicely formed, although looks a little thin in width by itself. Once in place, I doubt that this would be as noticeable. Unfortunately, there are no harnesses, so you may want to scratch build these, purchase some aftermarket parts or fit the included pilot. The bulk head and surrounding frame work is well catered for as is the main panel. The framework, seat and flying panel are all assembled within the two sidewall inserts making a complete interior that then sandwiches inside the fuselage halves. Before you do this however, there is an important decision to make. If you want to have the canopy closed, you have to cut a small section of the fuselage away to locate the canopy. This is one of the complexities that leads me to believe this kit is a little more challenging for novice builders. There are marks in the fuselage interior as a guide and with the right tools, is quite straight forwards. If you want the canopy open and the access door open too, it will need cutting away. Again, there are cut lines on the fuselage interior as a guide. If you do take this option however, you don’t need to use the cut-away door, there is a separate part on the sprue. The nose panel fasteners are well produced as are the various lumps and bumps around the engine area. I appreciate that there is a divided opinion on rivets on a Spitfire, but some faint rivets on the fuselage would improve the surface in my opinion. Eduard has done an excellent job of it on their Mk.IX as an example. Finally, to complete the fuselage assembly, there are two options for the cockpit forward upper bulkhead. These ‘saddle’ parts accommodate two different styles of windscreen installations. Based on experience of building modern Airfix kits, the tolerances are very precise. As such, any paint on the edges of the fuselage structure under the upper this saddle part may need sanding off for a flush fit. On with the wing assembly next. As with the fuselage, detail is nicely reproduced with the cannon bumps and wing stiffeners moulded in (you may need to remove the latter if producing an aftermarket scheme as not all had these fitted). There is a very slight sink mark in the wing tips. One of the lower wings is slightly warped being very thin, however once mated to the upper wing, this shouldn’t be a concern. The ailerons are separate parts allowing off centre positioning to add a little interest to your build. Again, there is a little more complexity here than with the Tamiya kit for comparison and I’m not sure why this option was taken by Airfix. Two spars are included with a hinge mechanism for the main gear legs. The main gear legs are then fixed to these hinge parts, but the join is just a butt joint albeit with a step. The instructions call for the correct angles of positioning both laterally and longitudinally, but care will need to be taken to get this right. A good choice of glue will be critical here and I suspect this will be a weak point if displayed wheels down. The tyres are moulded with flat spots and bulged for in the lower position with separate hub parts making painting much easier. None bulged ‘half’ tyres are included for in the retracted position. Two choices of oil cooler are included, one for the tropical version, one for the standard variant. However I thought that tropical versions also had a deeper radiator, but only one type of radiator is included, maybe someone can clarify this? On the 1/24 Spit, both radiators are included. That aside, the radiator builds up well with a separate exit flap that can be positioned at preference. With the wing in place, the chin parts can be fitted. Both standard and Vokes tropical parts are included. If you want to do an Aboukir variant, Freightdog have just released an aftermarket part which I can recommend having seen it at the Brampton show. The tail feathers are fitted next. Separate elevators and rudder parts again make for a more interesting display if you prefer to position them off centre. The fabric effect on these parts is pleasingly subtle. There are three types of exhausts included in the kit, although one type are the pre-fishtailed ones that I can only imagine were used on very early Mk.V’s at best. The two options included in the instructions are both fish tail, but one has the gun heating pipes. Two types of propellers are included in the kit. The Rotol with wooden blades looks very good although there is evidence of sink marks at the base on my example. This is quite visible, but some filler will easily sort the issue out. Whilst the blades on the DeHavilland propeller are fine, the spinner is too long. Again, Freightdog can come to the rescue here with a correct ‘stubbier’ one, or if you have one knocking around in the spares box, that might be an option. Dropping some filler inside the point of the hub might allow for it be sanded back to the correct length as another option to consider too. The cockpit options are quite thorough. You have the choice of three windscreens and canopies as well as either open or closed. Again, if you are using aftermarket decal options, do your research before choosing the correct type. The parts are very good with thin moulding and the only distortion on the blown hood parts which I would consider as minimal. Another option included in the kit is both clear and non-clear clipped wing tips. Finally there is a large slipper tank and two 250lb bombs included in the set although there is no call for the bombs in the instructions. To summarise the options included, there are: Intakes - standard or Vokes Windscreen / canopy - three styles Oil cooler - standard or tropical Wing tips - standard or clipped Aerial masts - 2 types Slipper tank 250lb bombs x2 Exhausts - 3 types Gear - retracted or lowered Decals Having built a few Airfix kits recently, the quality of the decals have been impressive. Whilst thin, they are also strong and settle down well. The decals in this kit appear to be of the same quality. Very sharp and detailed print with a slightly matt finish. As well as the plentiful stencils included, the following aircraft schemes are provided: 249Sqn (Gold Coast) RAF flown by P/O Robert Wendell “Buck” McNair DFC during Operation ‘Spotter’ from Ta’ Qali, Malta 1942 with an interesting dark earth / sea grey paint scheme BM597 (G-MKVB) restored in the colours of 317Sqn Polish Fighter Squadron. More conventional scheme and now based at Duxford with the Historic Aircraft Collection Ltd. Conclusion As mentioned at the start, this is regarded as a very accurate kit, which is a sensitive area of discussion when it comes to Spitfires. There are some steps that require care and attention during assembly which probably make it less of a beginner’s kit than the Tamiya equivalent, but the optional parts included allow for a wide range of aftermarket choices which I suspect will fuel future decal releases. The cockpit is nicely detailed, although there is still room for aftermarket improvement should you wish. All in all, an outstanding kit and probably Airfix’s best Spitfire in any scale yet. I’ve already bought another! Review sample courtesy of
- 14 replies
-
- 5
-
-
- supermarine
- airfix
- (and 6 more)
-
I remember reading the reviews for RoG's all new Ju88 back in 2011 when it came out. The reason I recall the reviews so clearly simply because they were unanimously positive, I'd go so far as to say 'glowing' every single one of them. Now my usual 'fare' is 1:48 post-war aircraft and 1;24 NASCAR stock cars, and the occasional 1:35 AFV, so a 1:72 WWII medium bomber is a couple of steps outside my normal comfort zone, but over at Modelers Alliance we decided to have a 'Bombers' Campaign/Group Build, so I thought 'why not ?, let's see what all the fuss was about'. Also, I really like the Luftwaffe desert schemes, and I knew that Kagero provided these decals with their Top Drawings book on the Ju88: So this morning, I made a start. Without trying to come-off as a total smart-a*se, I'm pretty good with words, always was at school and beyond. That said I simply don't have enough superlatives in my vocabulary to do justice to this kit - and I only unpacked the contents from the box this morning !! The quality of Revell's moulding is so far beyond anything that I've seen in any scale before today. It is quite simply, astonishing. This is the result of gluing just seven pieces of the cabin together, the quality here is, in my opinion, breathtaking. I just hope that later-on my painting skills such as they are can do justice to all this fantastic detail. Here's hoping !! More soon. Ian.
-
Bf 109E-7 Trop Eduard 1:48 Weekend Edition If you have not heard of the Messerschmitt Bf 109 then were have you been? The E-7 variant incorporated the developments of the E-4 with Armour and structural improvements, the change from MG FF cannons to the MG FF/M and the "square" canopy. In addition it introduced provision for an optional 300L drop tank, the first time the 109 would carry a drop tank. Alternatively a bomb could be fitted. The E-7 entered combat at the end of August 1940. A total of 438 E-7s would be built. The Kit On opening the box for this weekend edition the modeller is greeted with four sprues of grey plastic, a clear sprue, and a set of Eduard's super fabric seat belts. The moulding is top quality and there is no sign of any issues. Construction starts in the cockpit area, with the first order of business being to add some detail to the cockpit sidewalls. We briefly move away from the cockpit to construct the intake area on the underside of the engine. Once this is done we resume the cockpit proper and get onto the main area for the pilot. The control column is added along with the pilots seat, rudder pedals, lower instrument panel and landing gear controls. Then engine bulkhead is then complete along with main instrument panel and the gun sight. The next step is construction of the engine, and the armament which sits on top of it. If you are going to build the model with the engine cowl closed then most of the engine parts and the guns can be left off. It would be shame to do this however as there is a lot of good detail in this area. Once the engine is complete in either the fully constructed or basic form, it along with the cockpit and tail wheel are placed into the main fuselage and it is closed up. The next major construction step is the wings. These are a conventional lower one part main wing with left & right uppers. The wheel wells need to be placed inside the wings before they are closed up. Fully positionable flaps and slats are provided if the modeller wishes to pose them up or down. The underwing radiators are also added at this point. Once the wing assembly is complete it is mated up with the main fuselage. The next step is to attach the tail-planes and the rudder. The tail-planes are one part but the rudder can be positioned as needed. The main undercarriage is the next item to be constructed and added. These consist of a tyre with a left and right hub. A one part main gear leg is added with a separate main brake line which is a nice touch. These are then attached to the main gear door and installed onto the airframe. The external tank is also made and attached at this point if you are going to be using it. The last construction steps are to add the cowlings to engine if you are using them. The head armour needs to be attached to the main canopy, and all the clear parts assembled. Canopy The canopy from Eduard is very clear, and a crisp moulding. It should pose no problems. Decals The decals in Eduard's weekend options are certainly improving. Not only do you now get two options, but they have included some stencil data which was previously missing from the weekend kits. The decals are The options are; 2./JG 27, Ain El Gazala Airfield. Libya 1941. 1./JG 27, Ain El Gazala Airfield. Libya July 1941. Flown by The Co Oblt Karl-Wolfgang Redlich. . Conclusion This is another great boxing in their 109 series from Eduard. With the inclusion of two decal options, stencils; and a set of seat belts this Weekend Boxing is great value for money. Overall Highly recommended. Review sample courtesy of
- 3 replies
-
- 1
-
-
- Messerschmitt
- Bf 109
- (and 3 more)
-
 I recently posted my Spitfire Vb. Here Is the 109F. Some Unhappy with the canopy and I'm hoping to attempt a different approach with my next build. I'm still not happy with the finish. I think that none of the mistakes right at the end where I am perhaps into much of a rush to finish the model. On this bold tried some new techniques on the undersurface. Despite having looked at a number of photographs I turned down the exhaust staining and the overall weathering for this build. I found myself in Hobby Craft with the wife and spotted some place in the bridal section. This makes for superb grill affects and 2 meetings cost a couple equipped. It will last forever. I bought a few different types. I used a small piece to cover the air filter and am pretty happy with the result. As always I am hap to receive comments, criticisms and pointers which I can apply in my next build. I await your feedback. This was my first attempt at painting a pilot
 -
After realising that I participated in over 200 posts I have yet to present a model for inspection. I have a Hasegawa Hurricane and Airfix BF109f on the bench. I finally completed my FW 190-A3. 9 So this is my actually my second completed model. it is also my first attempt at some sort of base. I started the model just over two weeks ago and was in a rush to finish it last night so that I could present it as a gift to a young Chinese led that I have been helping prepare for his IELTS test. a few weeks ago we were practising the "listening exercises" and all I think of that the time was to briefly narrate the story of Douglas Bader. Shock and horror- he had no idea what the Spitfire was. This needed to be corrected and once, so I thought that would build him a model as a keepsake. The results are below. the aurora number of things I'm really unhappy about in the bold namely the canopy, being unable to get any type of dihedral on the wings and a few obvious the mishaps that started occurring as the clock neared midnight last night and I was extremely tired. As always I welcome comments criticisms suggestions and a general lack on the head with appropriate words "Proby" - ( Jethro Gibbs NCIS)
-
Here are some photos of a build of a BF109E I bought a little while ago. I've followed some astounding builds on this "work in progress site" which I can't compete with (especially the Skyraider!!) but I hoped that some of you might be interested in a less expert build. I've included some fabric seatbelts and have done some pipework and cables with lead wire I got on line but it is essentially out of the box. Thanks for watching and I'll post the finished article soon.