Search the Community
Showing results for tags 'Tornado'.
-
 Have never built a 1/48th Panavia Tornado so this Group Build is a great opportunity to cut my teeth on the Italeri Tornado IDS kit No.2648, this was released in 2006 and cost me £12.99 four years later The main decal sheet is for a Marineflieger MFG 2 Anniversary scheme worn in 2003, there are other options for two 'Operation Granby' RAF GR.1's, an Italian IDS of the same period, and a Luftwaffe IDS of JBG 37. This will be out of the box although I might look at other decal sheets. Michael
 -
Welcome to the lesson on how not to build the Revell Tornado. I've taken the plunge and started my first build thread, don't expect regular updates, because I don't have nearly enough time to devote to modelling as I'd like to But, I will endeavour to see this through to the end, this may result in a finished model or a pile of plastic lying at the bottom of the wall it's just been launched at. Any hoo, as the title suggest's here's what I'll be using, Closer look at the Flightpath set, Where I'm at to date It'll be converted to a GR4, and if I can find current pictures of a GR4 cockpit, will be bang up to date. Scratch building anything not included in the Flightpath set, at least until my talent runs out. As for the finished markings, I've not decided, But as I live not too far away from Lossiemouth, It will be one of the local Squadrons. 15sqn would be nice but I'd have to make the markings myself, or the easier route 617sqn, using the kit decals but incorperating any changes needed to make a Grey jet. Any encourgement and pointers gratefully recieved Thanks for looking Mike
-
 Hello and welcome to my build of Revell's 1/72 Tornado Black Panther. This is a German Luftwaffe Panavia Tornado IDS with Black Panther markings for the 2011 NATO Tiger Meet. This is my second wip on Britmodeller.com and once again I look forward to your input. The kit contain two bags of black and clear sprues. Instructions. Decal sheet. Revell's recommended paints. The aftermarket. In accordance with my personal preference, this model will be displayed in-flight. I will need to source some aircrew in due course. Let's take a closer look at the resin cockpit. Photo etch and film. Cockpit tub. Ejection seats. There's some nice detail there. Instrument panels. Control stick. Well that's it until I make a start on it. Can't promise rapid progress as I like to take my time with these things and I am working on my F-4 8sq Black Panthers at the same time. In addition, I would like to produce something special to honour Merv. I never had the pleasure of making his acquaintance but it is evident from the tributes of those that did that he was someone you would be happy to count among your friends.
 -
Certainly not a straight forward build, i had a few problems with the xtracrylix paint and also the aftermarket decals were extremely fragile. Also had problems with the sidewinder mount, i ended up ditching the sidewinders as theyre not that great. Anyway, we got there in the end, so here she is. I knew i would forget to take the masks of the targeting pod! And I noticed on the pics that one of the lights on the gear door had fallen off, luckily i found it on the floor and has now been glued back on. Kit: Revell Scale: 1/48 Type: Tornado IDS Extras used: decals, eduard photoetch cockpit and crew ladder, Hindenburg tanks and Paveway bombs from the old airfix kit. Paints used: Xtracrylix and Tamiya
- 46 replies
-
- 54
-

-
 OOB, with the IR lens from an old Airfix kit. Xtradecals.
 -
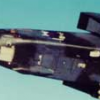
 Hello all! So this is my first WIP on Britmodeller. Thought it would be nice to contribute to the many fellow modellers around. In this WIP thread I'll be building the new Revell Torando IDS on 1/48. I bought the kit pretty soon after it was release in 2014 because I really like the looks of the Tornado. Next to that I've seen many many Tonka's flying while I'm also a keen aviation photographer. I already posted some WIP shots and stories on a dutch forum, and now I'm sharing this here too. Many of you probably know the kit but here are some inbox shots. The one I'll be building dates back in the 80's where the grey/white scheme was replaced by a three tone scheme, the so calles Norm87e scheme. This a three tone scheme. In the Revell box a EADS recce pod is supplied, I won't be using that. The typical 80's MarineFlieger (FAA) loadout was two fuel tanks together with Kormoran missles. Typically that would be fueltanks on the wing hard points and the kormoran on the belly hardpoint. But I found this image on © Airliners.net: You can see the fueltanks are on the belly and the Kormorans on the wing. Well that's the loadout I'll be doing. First of all I (still) have to find good Kormorans. I know there is a resin AM one, but those are around €20 for two, which is quite expensive for two missles (IMHO). I'll using Harald Hensel excellent decals to make this Tornado a Marineflieger Tornado. Enough talking some photos of the build so far: Cockpit is OOB here with a dryfit of the two side parts. You can see the construction as made by Revell. First the wheelbay for the front suspension. On top of that the cockpit tub is put. Alignment is good. Now on to the rear wheel bays. These have a few sinkmarks (visible on the photos), so sanding is required. The bays lack wiring, that's why I'll be adding some wiring to make it look a bit more realistic. I recently purchased some lead wires on Ebay. Very nice stuff to bend and create a more realistic look. More on that later on. Next step are the intakes. I glued them, and you can see some seems. A well known trick to solve this is to use some white latex and poor that in the intakes let it cure for a few minutes and then release the back to let remaining latex poor out. I'll be doing that. You can see on this photo I have put some put in the seams and after that I've sanded it. (grid 600). This gives a fairly good result Now on to the Latex trick. Got some latex from my neighbour. I filled the intakes and let it for about 10min. After that I released the tape. I spilled a bit, but Latex is cheap so no worries. The picture below shows the tape removed and with a little space between the latex was able to poor out. After some comment on the dutch forum I decided to add the kit decals to the cockpit to make it a bit more realistic. I'm OK with te result. After the Belgian Mirage that I built (many rescribing and other challenges) I wanted to build a nice 'new' kit OOB. That's why I picked the Revell Tornado. Now after building for about a month this build is getting difficult in some ways. Main issue is the breakdown of the plane. This results is many parts for building up the plane. Especially the tub and the underside combined with the other parts making up the sides under the wing. But also a factor is that the plastic is quite soft, with my knife I sometimes remove to much simply because it's so soft. Next to that I started scribing the panellines. That's needed because they are really soft and far from deep. I tested that with a small part and some primer, but after the primer not much was left of the details. So that means that I'll be scribing the whole plane in order to be able to do a wash in the painting process. Starting with the wheelbays combined with the main section of the intakes. The plastic is soft an despite carefull cutting and sanding sometimes you get some annoying cuts. Seen here is the main section, cockpit attached, intakes glued and also the side panels for the rear part. A lot and I mean a lot of dry fitting was needed in order to a descent alignment of the parts. Sometimes I needed to glue it in differten steps in order to get the result I wanted. What you see here is the section of the intakes and the side panels. It took me an hour sanding, fitting and glueing to get this result. I even grabbed my girl friends hairdryer to get stiffness out of the plane in order not to put to much pressure on the glued parts. You can see some cuts here, this shows how soft the plastic is. So that's it for now, comments appreciated and hope you like the build! Cheers, Evert
 -
My first completed model of this year, although it was started way back last September. Revell's Tornado F3 finished as ZE907, with decals from Xtradal and stencil data from the kit decals.
-
Does anyone know of a source for 1:48 scale decals for a 5 Sqn Tornado F.3? eg:
- 2 replies
-
- 1
-
-
- tornado
- tornado f.3
- (and 1 more)
-
I've been given a Revell Tornado F2 in 32nd scale to build as a Saudi F3. Specifically the F3 that is On the gate of the RSAF museum here in Riyadh. It's for one of the guys who put that airframe there. I was on GR1's so the F's are slightly off topic for me. Main question is, The box says F2 but markings inside are (or seem to be) for a RSAF F3? So what is the main difference? This will be a quick/simple build, OOB with anything extra scratchbuilt. The seats for example are awful! Any help gratefully accepted. My payment? an Airfix 1/48th Buccaneer. Fair swap! Pete
-
 Panavia Tornado GR4 ZD843 Operational at Kandahar, Afghanistan. Pics thanks to Alex.
 -
Tornado ZA452. Pics taken by me at RAF Marham
-
ZA475 which is the gate guardian at RAF Lossiemouth. Pics thanks to Nigel Heath.
-
ZD793 from the Lossimouth Engineering & Logistics Wing. Pic thanks to Nigel Heath.
-
Hi all Probably most of you know about Ugo Crisponi work, he does some very nice profiles, I browse his site and his flickr acount from time to time to get the inspiration for some modeling. During my latest perusing of his very nice work, I spotted an Italian Tornado from Operation Locusta (Italian contribution to the Gulf War) with a marking on its buddy buddy pod. http://www.aviationgraphic.com/fighters/1349-tornado-ids-36-46-156gruppo-am-jp-1459.html The marking is of the biggest Italian petrol company AGIP, in a similar way of Victors with BP mission markings, I did look for pictures online but I didn't find any. I wonder if any of you came across pictures of Buddy buddy pods marked with the AGIP six legged dog, I would love to see them. Cheers Paolo
-
This is the second 1/144 Tornado I have done in a Tiger Meet Livery. The other was a 2011 version. Both of these kits were easy to build and with plenty of detail. The plane depicted in this version was based in Lechfeld AB in 1994. In both kits, the decals were the focus of the build, so pretty much everything was OOB. And, Revell must be given credit as the decals behaved quite well with the Micro Set/Sol solutions. What distinguishes this kit from the other was the paint disaster that occurred in layering a top clear coat. The coat topside went on fine, no problems and I thought I was on the home stretch to completing this kit. The protective sealing coat on the bottom; not so protective, more the opposite. So, needless to say with it being so close to completion and with all the paint and decals done, I was not a happy camper for this to happen. And, to keep it from becoming a modern art display with the shattered pieces embedding themselves into the wall I wanted to throw it against, I put it away for a while. I am clearing out my shelf (shelves!) of doom and making myself get all those half-started kits finished. This is one of them. I carefully sanded back the paint on the underside so as to not ruin the decals as much as possible. Them I had to figure out what colors I had used and repaint. I did lose one of the wing decals, but that seems a small price to pay. I repainted, resprayed another top coat and this time, no problem. Then I put the finishing items on and here it is. I should have removed the canopy masking before storing this kit as it was a bear to remove. I am not real happy with the results, but it due to the paint problems, not the kit build or design. I am just glad to get it done. And here it is with its little brother And cousins As always, all comments are welcome. And, if someone out there knows the correct magic incantations to make the air brush demons behave, please post. I would like to know there is one out there that exists without too drastic of small animal sacrifices and less than the sale of my soul to learn. Evil black art; how I miss hairy sticks
- 6 replies
-
- 4
-
-
- Tiger Meet
- 1994
- (and 3 more)
-
Hi Folks, This is the finished article - only took me 5 months. Unfortunately the Tornado groupbuild was just 4 months Build thread exists again, it's HERE Since i saw the pics i realised i'd missed a couple of blade antennae and the aircon hoses for the crew seats. They are now on! The wire support in the canopy is just so I don't have to glue it in place. This was (near enough) the 617 Sqn 60th Anniversary plane (AJ-T "It's Show Time") - very simple as the Squadron was actually fighting in Op Telic on the anniversary date. I believe this aeroplane was previously called "Rects Controllers Dream" and didn't actually fly any missions as it was used for emergency spares due to some tech problem. ("It's Show Time" was actually applied to AJ-J originally.) The noseart is wrong as applied to this aeroplane (too small and the writing in the wrong place), and the lightning strikes on the tail are also wrong. But hey! WHO CARES!! I know what it's meant to be. Al
-
It seems like everyone is building Tonkas on here at the moment, so I didn't want to be left out! Lovely little kit (save the dodgy nose profile...) All OOB, except craft wire AoA probes. This was built to hang from the ceiling at work, so I didn't go all out with aftermarket goodies to tart it up; in all honesty, it's only got about half a sheet of stencils on it that you can't tell are missing, too! 17 sqn scheme is depicted, purely because I couldn't be bothered with masking out a 2 tone wrap camo scheme... maybe next time. I think I got the Tornado bug after building this, so I'll be keeping my eye out for the 1/48 kit for sure, now. C&C welcomed as always. After seeing some of the Tornado posts recently and following Melchie's WIP, I'm under no illusions that this could hold a light up to some of the others on here, but I hope you enjoy nonetheless! Daryl.
- 12 replies
-
- 16
-
-
1/72 Revell 50 Stormo Tornado ECR The purpose of this build was to get some experience with acrylics and weathered/faded schemes, and because Tornadoes are very cool of course. I hope I've done it justice. The base 'primer' coat is Model Master enamel Light Grey to give the acrylic something to 'bite'. The main coat is Lifecolor acrylic FS 36280 lightened with Lifecolor white. I then applied a 'wash' made up of an acrylic matt medium with a further lightened FS 36280. Weathering was done with ink pens and tempera paints. Decals are from an Italeri kit. I hope you enjoy and any advice is always welcome. Building a model of a subject gives you a great 'feel' for its design and shape. I know that the Tornado is known as the 'Big Fin' and now I completely understand why: the thing has a gigantic vertical fin. Thanks for looking.
- 22 replies
-
- 15
-
-
Hi everyone! Here's my latest finished model - well known Revell 1:72 Tornado, built as a Germany Navy bird. Click on the photo for more photos and information.
- 16 replies
-
- 16
-
-
http://www.bbc.co.uk/news/world-28763911 Recon only
-
 As the title says, RAF Tornado GR.4 with 2014 special markings for 12 Squadron. Markings for the 'flashy tail' and a standard scheme will be included. New tooled parts include the FLIR/Laser fairing thing under the nose and a few other small parts. Also included are a set of sprues from the new NATO Weapons set that also featured in the Hasegawa Eurofighter Typhoon kits.
 -
Hi Guys, I hope someone can help, I'm trying to work out the yellow colour used by Tornado GR1's for inside the doors...Any assistance would be more than welcome Below is an image showing the Ground Support Panel so you know what I mean:
-
**
-
We've all been there with our mental colour cards trying to figure out which is the correct green, peering at every conceivable book and internet resource. Even blindly following the recommendations of a bloke you ever met or heard of before. Painting strips of slightly different shades of green again and again slowly becoming mad and even more unsure of your choice. So after my little rant which Tamiya XF- green is the correct one or nearest to an Italian camo Panavia Tornado from the 80's. Hopefully one of you Tonka boys will help me out. thanks, Wayne
-
Hi I'm quite new to making models and I recently got a tornado GR mk1 1:72 scale for a fiver before spending more on a 1:48 GR 4 and I'm wondering what would be a good colour of paint to buy for a desert colour.