Search the Community
Showing results for tags 'Thunderbolt'.
-
Hello and Welcome to a collection of my builds that I'll fill up as this CraZY year progresses. Hope you enjoy them. 🤠 Johnny Messerschmitt Me 262B-1a/U1 by Airfix 1/72 WIP RFI The Mighty "JUG". P-47 N Thunderbolt by Academy 1/48 WIP RFI De Havilland Sea Venom 1/32 by Revell / Matchbox WIP RFI Dr Spadgent's House of Horrors . ( Multitudinous modelling ) Horton Go 229 1:72 Revell WIP RFI Bell AH-1 / AB-47 1:72 Italeri WIP RFI Polikarpov I-16 Zvesda 1:144 WIP RFI Bristol Blenheim Mk.1f Airfix 1:72 WIP RFI The Mi-24v “HIND” 1/48 by Zvezda WIP TO BE CONTINUED........................................................
- 6 replies
-
- 22
-

-
- Sea Venom
- Thunderbolt
- (and 1 more)
-
Republic P-43 Lancer (DW48029) 1:48 Dora Wings via Albion Alloys Ltd The P-43 Lancer was a work-in-progress in the mid-30s, and bears more than a passing resemblance to the pinnacle of its design, the P-47 Thunderbolt. Republic’s name was changed from Seversky, and it was their P-35 that was the jumping-off point for a number of designs in the period when it wasn’t yet certain that the US was going to join the war in Europe. The P-43 was one of the more successful designs, but it was an aircraft with some limitations, only performing at its best at higher altitudes where it was fast enough to catch and kill high flying reconnaissance aircraft. Lower down it wasn’t so great, so while it went into limited service with the US Air Force and other operators in small numbers it was soon obsolete thanks to the speed of technological progress during war. Some aircraft found their way to the AVG, flying against the Japanese before the US entered the war officially, where they were well-liked enough that when they were withdrawn, petitions were made by the Flying Tigers to keep them. They also served as high altitude reconnaissance with the RAAF who received a few airframes, and to intercept the aforementioned reconnaissance aircraft, but with only just under 300 built they were never destined for fame, and the P-44 Rocket that was to replace it didn’t even reach service, as the P-47 was just so good. The Kit This is a brand-new tool from our friends at Dora Wings, who have a short but interesting history of producing unusual subjects in various scales. I built their P-63E KingCobra kit when it was released, and thoroughly enjoyed it, despite a few trials, some of which were of my own making. Perusing the sprues of this kit gives me the impression that the moulding has moved on somewhat since then, and detail is good too, with decent transparencies, instrument panels with decals for each one, and a well-moulded engine, some PE parts with an alternate instrument panel and even some masks. That’s a pretty good package. The kit arrives in a small top-opening box, with six sprues in grey styrene, a clear sprue, a sheet of Photo-Etch (PE) brass, a small pre-cut vinyl mask sheet and a medium sized decal sheet, with the colour A5 instruction booklet that has painting and decaling instructions in the rear completing the package. Moulding is neat, and while there are loads of sink marks on the sprues, there aren't any visible on the parts, although there is a small amount of flash on the parts that make up the supercharger, but that won't take more than a few scrapes to remove - the logo on the photo covers it nicely though Construction begins with the cockpit, starting with the instrument panel (IP), which can be either built with moulded-in dials and decal over the top, or with a flat panel to which you apply the decal then the PE panel to allow the decals to show through more realistically. Rudder pedals are fitted to the back of the IP, sidewalls are detailed with additional parts, then the sections are joined together on a floor panel and rear bulkhead, strengthened with the side panels and with the seat and PE belts glued in place and a short control column in front. The cockpit is put to the side while the firewall and engine mounts are made up, then the tail wheel bay, supercharger assembly, landing gear with 2-part tyres and separate scissor-links, and finally the engine. This is well-detailed, with both cylinder banks fully replicated with push-rods, reduction housing bell at the front, ignition harness and finally the close-fitting cowling added. The initial cowling comprises three parts plus a PE grille in the bottom, with the cowling lip added to the front and the PE cooling flaps inserted into the gap at the rear, giving a scale look and a view into the engine, so you’ve not wasted your time painting it. The prop is also made up, with all blades moulded together, a spinner at the front and a tiny ring at the rear. All of this makes for a very fast final assembly, and is akin to the process many modellers take when building a model – you can tell Eugen and friends are modellers first and foremost. The cockpit and firewall are joined together first, then trapped between the fuselage halves along with the tail wheel bay, while the full-width lower wing has the two bay parts inserted then closed over with the upper wing halves, filling the gap in the middle with the fuselage. The ailerons are also separate parts, which is also the case with the tail feathers, giving you some options for a more candid pose. A clear gunsight, headrest and the rear canopy section are fitted first, then the rest of the canopy and windscreen are added to close it over, while the engine cowling assembly is glued to the front of the fuselage onto its mounts. Flipping the model over, the supercharger, cooling flap, pitot and wing guns are installed along with the prop, which you’ll probably leave off until later, then the main gear assemblies, bay doors and tail wheel with bay doors added while it is still inverted. Job done! Markings You get a generous four decal options in the box on a medium-sized decal sheet that is bright and colourful. From the box you can build one of the following: YP-43 Lancer, US Air Force, 1941 P-43A Lancer s/n 40-2920, 55th Pursuit Group, Portland Air Base, Jan 1942 P-43A Lancer s/n 41-6721, US Air Force 1942 P-43A Lancer s/n 41-31496, Aug 1943 Decals are by DecoGraph, which is a guarantee of good registration, sharpness and colour density, with a thin matt carrier film cut close to the printed areas. On the rear of the booklet is a colour table decoding the letter codes given throughout the instructions in Mr Hobby, Tamiya, AMMO, Hataka and Life Color codes, plus a key for the instruction icons that are also seen within. The vinyl masks are ready for application to the canopy, taking some of the work out of that aspect of the build, which is always welcome. Conclusion Dora Wings are to be lauded for their efforts to widen the subjects covered in all scales, and with the improvements they have made so far in their successive products, we’re going to be treated to many more interesting and esoteric kits in the future in differing scales, and I really like this one, which will look great next to my old Academy P-47D I built a number of years back. Very highly recommended. Review sample courtesy of UK Distributors of
-
 Republic P-47D Thunderbolt - WZ-P - No.226551 As flown by Lt.Col. Benjamin Mayo, 84th FS, 78th FG, Duxford Air Base, 1944 Kit: 1/48 Tamiya "Bubbletop" Paints: Citadel, Humbrol and Revell - all applied by brush. Built mostly OOB apart from a few bits of scratch-built plastic and wire in the cockpit and wheel wells. This was built as part of the Republic P-47 Thunderbolt STGB Work In Progress: Here This build represents a number of firsts for me. It's the first non-Spitfire aircraft build since getting back into making kits again a few years back (I'm not counting the Captain Scarlet Angel's Interceptor here!). I'm pretty sure I only made one American aircraft when I was a child which, I think, was a Hellcat. This is also the first time I have attempted a brush painted NMF on such a large area. With regards the NMF paint - I got a lot of advice from fellow Britmodellers, thank you, and did some practicing on some scrap bits before deciding to use Citadel's Runefang Steel - I've not really used much Citadel paint in the past either. I have to say I thoroughly enjoyed building this kit - it is a well detailed kit and the fit is excellent. Some photos: The detail in the cockpit was excellent but I couldn't get any decent photos yesterday so here are a few from during the build: Photos of the undersides added 04/04/16: Edit 04/04/16: I have now added some photos of the detail on the undersides (above). I'll also do some more B&W versions when I get chance. Edit - B&W photos added 09/04/16 As always: comments and suggestions welcome. Kind regards, Stix
- 67 replies
-
- 74
-
-
- Brush painted
- Thunderbolt
- (and 2 more)
-
 I present this RFI
 -
 Sword is to rebox its 1/72nd Republic P-47N Thunderbolt in a 2in1 kit - ref. SW72121 Source: http://swordmodels.cz/en/home/140-sw-72121-p-47n-2-in-1.html V.P.
- 8 replies
-
- 2
-
-
- Thunderbolt
- P-47
- (and 1 more)
-
Hello everyone... With my RF-4B Phantom shelved due to unforeseen circumstances. I decided to go dig in my stash. I found three Kits that would fall under the rules, though two of them are slated for the Corsair STGB. That left this kit, Monograms classic P-47D Thunderbolt from 1983. I first built this very kit in junior high about the time it came out in this boxing, so ‘83-‘84. I would build three more of these before I was 21. https://www.scalemates.com/kits/monogram-6838-thunderbolt-p-47d--159066 I found this kit by chance last November at the one local swap meet here in Chicago and grabbed it. A gentleman was selling his late fathers collection. I grabbed two kits this one and the Monogram P-51B for a total of $7. Both were bagged kits this one still in a shrink wrapped box. So for the obligatory sprue photos. Now the kit is not difficult as its only about 40 pieces total. Here are the Kit Markings, “The Turtle #10 509th Fs., 405th Fg, 9th USAAF based somewhere in France summer 1944. The other option are these two Jugs. These are also from the same 405th Fg. The 509th and 510 Fs. I have a fourth and fifth option but would need custom decals printed for that plane, and it would be from the 12th A.F. 57th Fg. in Italy. If I can find someone to make them for me it would definitely move up to the front. The last one would be to cobble the markings to make a RAF Thunderbolt II from the CBI Theatre. Please feel free to ask questions, post comments, and or thoughts. Dennis
- 69 replies
-
- 9
-
-
- Monogram 1/48 P-47D
- Thunderbolt
- (and 1 more)
-
P-47D Wheels (648484 for Tamiya) 1:48 Eduard Brassin In 1:48 we have a choice of Thunderbolts from Academy and Tamiya, both of which could do with a set of nice crisp resin wheels, which is exactly what you’ll find in this set. Arriving in the new low-profile flat-packs that Eduard are using for their small resin sets, there are two wheels with highly detailed hubs, two hub caps that have flash between the spokes, and a small white tail wheel with moulded-in strut. There are also flat hubcaps on the accompanying Photo-Etch (PE) fret, and a sheet of pre-cut kabuki-tape masks for all three wheels. Detail is exceptional, as you can see from the photos, and they are a huge improvement on the kit parts from either camp, with sensibly placed attachment points on the slight flat-spot that gives the tyre some weighting as appropriate to the weight of the machine. Review sample courtesy of
-
Good morning everyone I’ve recently joined Britmodeller and this is the first of two recently completed 1/72 scale builds - well not really ‘builds’ as they were more ‘restoration’ projects! A friend gave me the (Revell I believe) P-51B Mustang without propeller, canopy and landing gear, and in olive drab camouflage. I used a spare Malcolm hood and a set of Techmod decals to recreate this Mustang III flown by Squadron Leader Eugeniusz Horbaczewski of 315 Squadron, RAF in June 1944. The second aircraft is a restored Republic F-47N (P-47N until 1948) Thunderbolt of the 198th Fighter Squadron (Augmented), Puerto Rico Air National Guard, 1947-53. This model (probably Revell too) is a P-47M and also came in olive drab with a damaged undercarriage, missing canopy and propeller. I used Blue Rider Aircraft decals, a Quickboost propeller and a Falcon canopy; I also used the project to experiment with Tamiya AS-12 Bare metal silver finish. On a note of historical accuracy the subject aircraft - ‘Wild Hare’ 44-89425 which resides in the Peterson Air and Space Museum, Peterson AFB, Colorado - is a ’N’ version with slightly longer wing span (to hold more fuel for Pacific missions) while the kit I restored is an ‘M’ version. Thanks for looking! Mike
- 1 reply
-
- 22
-
-
- Mustang
- Thunderbolt
- (and 1 more)
-
Hobby Boss is to re-box (with new decals ?) its 1/48th Republic P-47D Thunderbolt kit as ref. 85811 Release expected in China in late September 2019. Source: http://www.hobbyboss.com/index.php?g=home&m=article&a=show&id=143&l=en In box review of the 2012 original boxing - ref. 85804: https://www.cybermodeler.com/hobby/kits/hb/kit_hb_85804.shtml V.P.
- 3 replies
-
- 2
-
-
- Hobby Boss
- Thunderbolt
- (and 1 more)
-
Another old kit, this time a Hasegawa P47D Thunderbolt. Circa 1972 I think. Part of the stash I bought from the family of an avid modeller who passed away. The stash is in another post. The decals are useless as they are stuck fast to the backing and crumbles when soaked and I tried to tease them apart. So for this one I tried printing my own decal. More of it later on.
-
Hi! Some of my Thunderbolts on the working table... From top to bottom... Revell P-47D, 509th FS, 405th FG, 9th Air Force. Academy P-47D, 509 FS, 405th FG, 9th Air Force. Revell P-47M, 63rd FS, 56th FG, 8th Air Force. Cheers / André
- 6 replies
-
- 6
-
-
- Thunderbolt
- P-47M
- (and 1 more)
-
Hi Guys, just finished this one, it was built for a GB on another forum. It's only the 2nd aircraft I've built, so plenty of mistakes and still a lot to learn.
- 35 replies
-
- 55
-
-

-
- A-10A
- Thunderbolt
- (and 1 more)
-
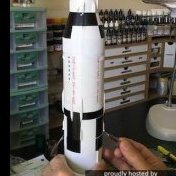
Hallo again This is my P-47D Thunderbolt. 1/32 Kit is Trumpeter. Stencils are from HGW as wet transfers. Happy modelling
-
Pics by Nick Cronin 44-90464 (ex-Yugoslav AF 13056) - Museum of Aviation, Belgrade
-
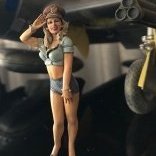
Hi everybody, my recent completion: P-47D 42-7937, 62nd Fighter Squadron, 56th Fighter Group, 8th Air Force, Lt. Anthony R. Carcione, late 1943. The stereotypical USAAF aircraft as we imagine it carried some nose art, so when I decided to do a P-47, I was looking for one with either a cartoon figure or a pin-up. Finding a meaningful photo and the corresponding decal sheet can be frustrating at times, but finally, I settled for this aircraft that even displayed two dames, one more appropriately dressed than the other. This particular aircraft is quite well documented; apart from several photos it was also captured on film and appeared in the wartime documentary „Ramrod to Emden“ (www.youtube.com/watch?v=9_5ELQhzrPA). You can see LM-Q at about 32:05 in this clip. Part of the cowling with the nose art even survived to this day and apparently can be seen in a museum in Suffolk. This aircraft is representative of the moment when the 8th Air Force’s strategic bombing campaign against Germany was still teetering on a knife-edge, and the P-47s and P-38s struggled to protect the bombers during the most crucial points of the campaign. The puny P-51 only took over the role of the Thunderbolts and Lightning later. This is Tamiya’s 1/72 kit, and it is, of course, of the highest quality. The fit of the canopy is actually so tight that I couldn’t remove it again after test-fitting. The decals were included in the booklet Nigel Julian/Peter Randall/Zbigniew Kolacha, 56th Fighter Group. Part 1 (AJ Press), which I highly recommend. The red-bordered stars neither come with the kit nor the booklet, so I used a separate decal sheet by Experts Choice. One of the nice things about modelling is that you really learn new things about your subject. In this case, I learned that early and late D-models differ regarding the cooling flaps. On the later production blocks (and most likely the majority of all Thunderbolts built) the lower two flaps on each side are cut back and therefore narrower than the other flaps. The Tamiya kit and I guess every other kit has this later variant. 42-7937, however, was one of the early production blocks. Unfortunately, I discovered this only when I had already started airbrushing the model. So some meticulous last-minute cutting, puttying, adding of plastic sheet and sanding was due. Otherwise, this aircraft also needed a whip antenna instead of the antenna mast supplied with the kit. Now somebody should build an even earlier 56th FG P-47C with the yellow-bordered insignia without bars. Every comment welcome.
- 11 replies
-
- 36
-
-
- P-47
- Thunderbolt
- (and 1 more)
-
I built this kit oob , the kit coming along very nice , minimal fitting. I have the problem when i masking to paint over the decal, when i take the masking tape out it rip the decal i have to masking again and the decal is brittle and very thin, the most time consuming part is the decal. I use Ammo Mig Aluminum color for the whole aircraft and masking panel on the wing and paint with different shade of metal to break the mono-tone of the color. Overall this kit is very nice and easy to build, beware of the thin and brittle decal . Here is the video how i build the model : Youtube link removed And here is some photos of the model :
- 15 replies
-
- 27
-
-
- hasegawa p47
- thunderbolt
- (and 1 more)
-
Whilst trawling the IWM website for other stuff, I happened upon this 8 minute long colour film of 79 Squadron RAF Thunderbolts in theatre. It also shows some aircraft of 42 Squadron. RAF Thunderbolts Seems to show some retained the original US cockpit harness and raises some interesting colour conundrums, especially around the 4:08 mark. Enjoy, Mark.
- 10 replies
-
- 14
-
-
-
I'm just starting to model an aircraft attached to 135 Sq. RAF in May 1945, a Thunderbolt P-47D-22. And I want to model it on a specific day, May 2, 1945, when 135 Sq. strafed the beaches south of Rangoon in support of the Operation Dracula landing. I'm trying to decide what sort of drop tanks I need on this aircraft. Round trip distance from Akyab probably about 650 miles. No bombs were dropped, so I presume none were carried. Take-off 0445, return 0830. I have photographs of 135 Sq. aircraft with paired 150 US gallon wing tanks, and also of aircraft carrying three 108 US gallon tanks, but none from the day in question. Does the absence of bombing necessarily imply that all three pylons were occupied, or would the fuel load preclude a bomb? Or might there be reasons not to carry a bomb? (It had been established the previous day that the area was unexpectedly lightly defended.) Any other practical reasons that would make one arrangement of tanks more likely than another? Thanks in advance for any thoughts you can offer.
-
Lone Star Models (link) is to release a 1/48th Republic XP-72 Super Thunderbolt reisn conversion set for the Tamiya bubbletop P-47 kit. Sources: http://www.lonestarmodels.com/store/c8r/lsm-480664-xp-72-superbolt-conversion https://www.facebook.com/groups/695711033832473/permalink/1749565748446991/ V.P.
- 1 reply
-
- 3
-
-
- XP-72
- Lone Star Models
- (and 1 more)
-
Does anyone out there know which block number the F-47s supplied to Dominica were? I have a Revell -30 in the pile and hope that this would work? Also, is there any producer of FAD decals for the F-51D in 1/72? Thanks in advance. Martin
-
I bought this kit few years ago, before Eduard made their Limited Edition P-47 set, but i lost my appetite for this big fish . Now i have new airbrush from Gunze so it was a good time to check how it works. I used these additions for P-47: - Eduard resin wheels, - interior PE set, - RB model gun barrels, - Montex masks/decals
- 9 replies
-
- 25
-
-
- Hasegawa
- Thunderbolt
- (and 1 more)
-
Kit manufacture: Hasegawa Scale: 1/72 Type: A-10A Thunderbolt II Extras used: Verlinden Productions resin and photoetch update Paints and colours used: Vallejo Model Air Ghost Grey in the cockpit, various Vallajo and Tamiya paints inside, Gunze H57 Aircraft Grey, H301 Grey FS36081, H302 Green FS34092 and H303 Green FS34102 for the camo colours. Aqua Gloss, Tamiya Semi Gloss and Flat Coat were used for the clear coats. Weather was done with thinned down Tamiya Rubber black and Flory Dark Dirt weathering wash. The kit was ok... Raised panel lines are a pain as they are hard to reproduce when lost through sanding as well as cause issues with holding wash. The fit wasn't great; a lot of filler and sanded needed. To be fair it is an older kit and the amount of resin and lead I crammed in definitely didn't help. That said, it wasn't cheap for an older kit. I bought this before I really new about reboxing etc, and knowing what I know now I'd have probably invested the same money on a new kit. At the end of the day, I'm pleased with how she turned out and she undeniably looks like a hog. Here's the pics: So there we go! Thanks for looking! Comments and criticism welcome as always, Many thanks, Val
- 15 replies
-
- 36
-
-
Hello Modellers Finished this recently. Essentially an OOB build with decals by Eaglecals. I'm pretty happy with it, thought its flaws are quite obvious. I have no references which affirm operational use of the centre tank and wing-mounted bomb configuration, so I will plead artistic licence. Comments welcome.
- 16 replies
-
- 40
-
-
Hello friends, here's another completed models this year. The plane used in the Yugoslav Air Force after World War II, until the beginning of the 60s.
-
Hello there fine gentlemen! This build kept me busy over the holiday while I'm also building my personal Gundam "masterpiece", or at least trying to make it one, and have a half-started Tamiya 1/32 F16. When I saw this box marked down I just couldn't resist. The A-10 is one of the coolest planes ever built in my opinion, simple, sturdy, pragmatic, actually just a big cannon with wings. I couldn't resist making "Whoosj" and "Brrrrrtrrt" noises while building, the lady thinks I'm retarded regardless so very little is lost. Two mates of mine saw this thing in action while being stationed in the middle east and had some impressive stories to take home. Seeing a half mile stretch of land obliterated by 30mm grenades at 3900rpm in front of you must be a true sight indeed. The kit that I needed a diversion from below. Lovely one, when it comes to engineering Bandai kits are amazing, but lots of decals and parts, and I decided to paint quite a bit which gets a bit tedious at some point with such a big complex kit. But anyways. The Italeri A-10. I did not enjoy this kit as much as I hoped, fit and engineering was not as good as I like, even though still good by most standards. If I had to condense it in one sentence I would say good for an Italeri kit, bad for a Tamiya kit (Tamiya also released this kit with the same moulds). I messed up a few steps. Overpainted it quite a bit with old Humbrol spraycans, left my airbrush kit at the ladyfriend her home, so panel lines and detail were lost a bit. The two shades of grey I originally chose where a bit too contrasting so another layer of paint and some sanding it was. In the end I'm quite content, especially for an in-betweener that was built quickly for pleasure, the holiday spirits and white russians might have made some parts of the build a bit sloppy too. Methods used: Humbrol rattlecans for the main paint layers Detail painting with Tamiya and Vallejo acrylics Weathered with Tamiya and Mig powdered pigments Panel lines with Flory washes and Tamiya panel line accent colour Base from a aluminium picture frame and Heller "platz folie" painted and weathered to look like a stretch of runway Seatbelts and buckles from tape and left over PE Glossed with Mr. Hobby Superclear, finished with Tamiya satin clear Decals set with Tamiya Markfit Liberal use of MIG Gun Metal powdered pigment Some minor rescribing of panel lines (HATE doing that) It took me a while to get some good pics, the weather in Holland was not photo friendly and indoor pictures always just look bland to me. I hope you'll still excuse me the dark shade of the photos, grey is quite difficult to get right. In real life the plane is quite a bit lighter and the tonal variation has been crushed quite a bit in the photos. I'll try to get better ones on a more sunny day, which may take a while because Holland tends to be very grey the coming months. The whole plane Some details The underside (in artificial light) Well, I think I might have to consider a dedicated photo setup. Thanks for watching guys, comments, suggestions and criticism are always much appreciated. Have a nice weekend! Cheers, Kas.
- 1 reply
-
- 11
-
-
- 1/72
- Thunderbolt
- (and 1 more)