Search the Community
Showing results for tags 'Tamiya'.
-
Hello everyone , I just recently completed the Tamiya 1/35 M51 Super Sherman and created a video on you tube , if anyone is interested I have included the link below. Thanks, https://youtu.be/k8o3VR1qOD0
-
For my Scarab... 50s/60s, and often later until the military was sold off to the civi contractors, RAF or RN vehicles were generally blue (obviously save for specials and frontline eg RAFG). Best Revell, Humbrol or Tamiya (possibly Vallejo if stocked)? Would love 100% accuracy but won't be mixing %s so will take a 'very close'. ... VMT. D.
-
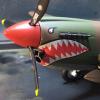
Hey guys, i have decided to make some quick build for one upcomming kit show. This year just for a hobby category (masters hopefuly next year ), so i do not need super accuracy when speaking about details, but something catchy and something i have modelled before, so i know the details and such. In the end i have chosed the Tamiya´s P-51D and started to work on it I m still chosing the camo i ll be using, i think i ll make some poll here so you gyus could help me decide Anyway, so far i have riveted the fuselage and puttied the panel lines on wing. Next i have completed the cockpit and joined the fuselage halves together. Scratched pit floor, painting was done by light brown base followed by brown and orange oils (by sponge) and finished with red clear + satin varnish. Details were added by using punch n die set and plastic sheet The gunsitght from the kit was slightly reshaped and i have added some details on it as well. Some details added to the pit - first i removed most of the original details from fuselage sides and made new from plastic profiles. I have used PE Zoom for Tamiya (pre-painted, but i have overpainted the pit green parts anyway), for the intstruments i have glued the pre-painted front side of the instruments on plastic sheet for less flat look. I have also used some Eduard´s placards for P-51D, seat is from Aires set, HGW fabric harness (still need to learn to work with these...) and some more details scratchbuilt. and it is in.. Next few days i have night shifts, so i wont be working on this, but i have to chose the camo still anyway..
-
Hi, here's my current wip (for a GB on Flory Models). Somehow I have managed to delete my in progress pics for the hosting site, sorry! Anyway it's the excellent Tamiya kit with Aeromaster decals. For some reason the image appears rather large on my preview, if it's too large can somebody help resize please?
-
Kit - Tamiya Paint - Alclad lacquers, Tamiya acrylics Decals - Aeromaster 48-083 Extras - Eduard setbelts, 75 gallon droptank from Tamiya P-51, 1000lb bombs from Academy P-38 Republic P-47D-20 Thnderbolt Assigned to Col. Gil Wymond 65th FS, 57th FG Italy 1944 Well, I have mentioned here previously that I usually build/finish a project at glacier-like speed and here's the proof, started last winter (here in NZ), and finished as we approach the middle of our summer. Hun Hunter came back to the bench because I scr*w*d-up a Trumpeter Seahawk by losing the (already painted) IP. !! As ever I'm happy to take all questions, comments and criticism. Thanks for taking the time to look. Ian
-
From the information on the All Japan Model & Hobby Show page on the Tamiya website: http://www.tamiya.com/english/THS/ths2015index.htm Andrew
-
 Hi Everyone, Here is another of my upcoming projects : Dragon's 1:9 scale Iron Patriot kit. I will be painting this kit with primarily Tamiya Acrylic Paints : Clear Red, Titanium Silver, Metallic Blue, Steel (Revell Acrylic). The major differences between this kit and the Iron Man Mark III that I have are that a sheet of decals is supplied along with a very large gun. Anyway here are the photos of the kit. Anyway I will post progress photos once I have started on this kit. Cheers, Rick
 -
Another one to add to the collection..... Tamiya's superb I-400........ More photos here. Ken
- 14 replies
-
- 15
-

-
Hi all I have just finished the Hobbyboss 1/32 Spitfire kit for my Dad. I wanted it finished as EN821 SNM as found in this kit but at the time In case i could not model it in 1/32 I bought this lovely little kit as a back up.... (I like Spitfires too... ) So I have started Making her yesterday and today.. (You think I would have had enough spits nope...) I Think the intention with this kit is to be a quick fun build and I will most likely do it as EN821 SNM again but this time a flying wheels up model to photo shop. I am really enjoying this little kit and will defiantly be buying more of them Including the mk1 too. This is my first ever Tamiya and I am blown away at the quality.. Cheers Rob
- 18 replies
-
- 2
-
-
- Tamiya
- Spitfire vb
- (and 1 more)
-
 Also found this on the Tamiya Blog: http://tamiyablog.com/2015/08/future-tamiya-releases-autumn-2015/ Presumably a re-issue of the 12039 kit? Andrew
 -
I recently bought this kit in a hobby shop near work as I really like aircraft in national colours other than the country they were built in. I'm planning to build the version with the malcolm hood. The built is out of the box apart from a set of Montex masks and the Eduard photoetch set for the P-51B Mustang. So far I've made good progress on the interior, once I add the photoetch seatbelts and finish some of the detail around the radio compartment then it will be time to seal up the fuselage. It will have to wait however until I get back from my holidays. Looking forward to adding the RAF colours to it when I get back!
-
This is my first armour post here, Tamiya's 1/35 Tiger 1 (Afrika). Lots of mods to portray an initial Tiger 1 of the 501st Battalion in Tunisia, AFV workable early Tiger tracks (plastic), photo etch screens, and painted in a "troppen 1" scheme of RAL 8000 and RAL 7008 using Tamiya acrylics, Hope you like. I wasn't sure how much could be seen through the screens, so I scratch built fuel tanks, rads, and fans - as it turns out not much is visible - Oh well ... Comments always welcome, thanks for looking, Colin
- 20 replies
-
- 23
-
-
Hi! This is Tamiyas Humvee built as a vehicle stationed at Camp Bond Steel, Kososvo in 2000. I was lucky to hitch a ride in one of these when I served with KFOR in 2000, and I have tried to depict the vehicle I rode in The model is built OOB, except antenna, and gunners strap. I then painted it using Tamiyas Nato colours. Weathering is added using filters, pigmenter og Rain Streaks from AK Interactive
- 11 replies
-
- 14
-
-
Panzer II Pz.Kpfw.II Ausf.G Kit: Tamiya 1/35 Panzer Kampfwagen II Ausf. F/G This is my first 1/35 AFV kit and was my fifth and final kit for the Achtung Panzer GB. It's quite a nicely detailed kit for saying how old the moulds are and the fit is pretty good. And it was cheap! It is OOB including the tank crew figure and soldiers. Paints are all Humbrol and Revell acrylics applied with hairy sticks. The WIP can be found here: http://www.britmodel...-update-180515/ I figured I needed to post these here before dawkuk posts photos of his rather superb version of this kit!! And a few on a simple base I made for it with a couple of the soldiers: And an overall view - just showing how small it is: Finally one from above: Kind regards, Stix
- 18 replies
-
- 19
-
-
So I'm back again with a more focused modelling interest this time so hopefully no more stalled builds haha. Right onwards we go. The kit is as the title suggests: I got this as part of a large collection I brought earlier this year. The kit included thus: yes that is a Riko tube of glue lol and a renaissance WRC transkit for Didier Auriol's 1999 car. The reason for the transkit is as follows: However though I would love to build a WRC spec escort, I don't find Auriol's livery exciting and would much prefer either of the Factory one's. So I decided to treat this elderly kit to a shiny new decals sheet courtesy of Shunko Models: So onto the building process. Firstly I am prepping the body shell for painting and decaling whilst I finish another kit. This is how the body looks before priming, with all the parts attached: The Whaletail spoiler is only held on with bluetac to allow the central support to be glued in place. Of interest is that the no.6 car of Francois Delecour has only one sideview mirror whereas Miki Biasion's no.2 car had both mirrors. Can you tell which I'm building haha. I'm building the Monte Carlo 1993 car as I have a few others to build from this event. (Celica and Lancer, if I could find decals to make Sainz's Delta it would complete the set lol) I have also prepared all the parts that will end up white, like the chassis and rollcage etc. Hopefully progress wont be too slow lol TTFN
-
Hi All, Here is my 2nd model on this forum and my first ever 1:48 aircraft. So i went with Tamiya inspired by many builds of this kit here on BM. From a newbie perspective I made every single mistake that was possible during the building. From wrong colors and respraying it to destroying extradecal roundels, not having a very good looking canopy in the end and so on and so on Colours are Vallejo Air. I still like the result all things considered. a few from during the build: Thanks for looking. Dema
- 16 replies
-
- 23
-
-
So another of my recent completed builds. Had this model a couple of year, got it from a car show for about £15ish lol It needed to be started fairly soon as the decals were very slightly yellowing. No problems with the build, pretty straight forward. Pics Ahoy: I decided to build the Piero Liatti no.4 car as opposed to the more commonly seen Mcrae car. I empolyed my seat belt cheat trick here and i'll be using it again on the Escort. If anyone cant work it out from the pics you'll have to stay tuned on my build to find out TTFN
-
We've got some more great re-releases from the Tamiya plastic model kits range coming to us later this September, with some exciting and unusual models to be had! Included in this re-release: The 1/24 Lexus LFA "Full View" with transparent body, a 1/25 German Tiger I Heavy Tank, a 1/35 Japanese Type 97 Medium Tank Late Production, and last but not least a 1/35 German Tiger I Late Production with "Ace Commander" and Crew Figures. See our Newsletter for further details!
-
I have been working on this car for what feels like forever now and it is now finally finished I made the a few changes from the base kit like: cutting the front end off and having the front area detailed with the brake cooling ducts, carbon fibre decal has been used through out the car, solder wire has been used to add the absent piping from the engine bay, I have added the walls ahead of the rear wheels and added the cooling ducts that go through them also, Due to a clumsy missus who stepped on the air stacks I had to make adjustments to the air intake area Paint is all tamiya spray or cheap shop brand for less important parts So without waffling anymore here it is And opened up Thanks for looking and feel free to leave good or bad comments Shaun
- 15 replies
-
- 13
-
-
Hello all, starting to get brave now! My builds are not quite up to the stunning standards usually seen here but as I've said in numerous posts each of my models gets that little bit better each and every time (even if it's in a two steps forward and three steps back sort of fashion!). Therefore as I start to finish off the log-jam of projects I currently have on my bench I will share them with you for your kind (notice I said kind please!) constructive comments and criticisms. As a prelude to my BoB GB builds I started building a couple of Bf109E's as a confidence booster having not modelled a Luftwaffe subject for some 30+ years. I first started the Airfix boxing that became Yellow 12 of 3./JG27 which as I chose to "bottle the mottle" had a straightforward RLM70/71 splinter scheme over RLM 65 fuselage sides and underside (oh yeah and a big yellow nose & tail). This is almost finished now and I will RFI this in the coming days/weeks. When the Airfix Emil was almost complete I was feeling more comfortable working with the up til' then unfamiliar Gunze Aqueous acrylics, so I started the Tamiya E-3 and chose one of the mottled schemes to see if I could master the technique. Now obviously being a tart of the highest order also had me choose the option with a great pair of flaming red lips stuck on the underside of the nose! The markings for both came from the Southern Expo BoB 70th Anniversary sheet that I have been slowly working my way through (those who know the sheet can deduce that my next Emil, if I have time to to start it for the GB, will be 3.JG3's Yellow 4!) and I have found these transfers to be a delight, reacting well to Microset and Sol. This plane is marked as White 2 of 4./JG51 and on 9 July 1940 whilst being flown by Johann Illner it was in a collision with one of Al Deere's Spitfires but managed to return to France (unfortunately F/Lt Deere's Spit was not as fortunate as it crashed in Kent with Al Deere surviving to fight another day). The build was a little fretful and my main schoolboy error is with the dihedral of the wings. When fitting the fuselage to the wings there was a huge gap on both sides that I really really should have shimmed with Evergreen, however not having done that before at this stage, I chose to use Tamiya Extra Thin and tape the wingtips together across the fuselage and hope that when the tension was released they'd be at the correct angle, yeah right! OK standing on its own it's not blindingly obvious but next to any plans (or the Airfix Emil) it is quite a few degrees too marked. I also think I went a little heavier on the mottling than I had planned, but hey ho we'll have to move on to the next one to see if we can do better. Anyways let's cut the blathering and let the dog see the rabbit. I present to you White 2. Thanks for checking in on me!!
- 10 replies
-
- 15
-
-
 If Spitfires are not your thing then it may be worth looking away now as I'm going to try to make two 1/48 versions simultaneously! A fair while back, when I decided I'd one day like to make the Eduard Mk.IX Spitfire, I didn't know at the time what I was starting. You can check out my finished version of the Mk.IX here. When I thought about such a lovely, quite expensive kit, I decided I ought to practice the skills I'd need to do it justice beforehand. So I practiced by making three 1/72 Spitfires and then moved onto a 1/48 Mk.XVI. Even before I'd started the Mk.IX I realised I was addicted to making Spitfires. A few months ago I'd already picked up the 1/48 Tamiya Mk.Vb and then when the Airfix version appeared (and was quite cheap on pre-order on the big A) I decided to get one of those too. I had originally planned to make the Tamiya kit before the Eduard one but I ended up making the latter for the D-Day Group Build first. So now it's time to expand my Spitfire collection by two. I'm quite excited by this project and thought it would be interesting to see what the comparisons are between the two kits - I have little pre-knowledge about them other than reading bits and pieces about them on the web. Some people seem to be positive about both and others the opposite. Versions of these that I have seen built look pretty good to me but I'm not an expert on the real thing or the kits. In my head I have this idea that I might be able to use each kit to be make the other a better version but this may not work out in practice. I don't intend to do any major surgery on either, but rather just enjoy the type of thing I feel comfortable with. Edit 21/08/15 - if anyone is interested there is a follow up thread to this one where I am currently making the Tamiya and Airfix (new tool) 1/48 Mk.I kits. I'm using a lot of the lessons I learned from this thread. If you are interested it can be found in the Battle of Britain Group Build section here. So box and sprue photos first - I like the artwork on both: In comparison the Airfix box seems a lot fuller of parts but I already know some of them won't get used: Tamiya box: As there did seem to be fewer parts with the Tamiya kit I decided to bolster it a bit with Eduard Zoom set: Tamiya sprues: Some cockpit details - I really like making up the cockpits and both kits seem to have nice details - Tamiya: Tamiya instructions: Versions included in the kit: Airfix sprues: Airfix cockpit detail: Airfix - new style instructions - not sure about these yet: Possible versions in the box: I have also got these bits left over from the cockpit of the Eduard Mk.IX and I might think about if they're better to use somewhere: I'm hoping to get some work started on these this weekend - all I've done so far is get all the parts washed in warm soapy water. Comments and suggestions welcome. Kind regards, Stix
- 607 replies
-
- 10
-
-
 #28/2015 Tamiya boxing of the Italeri kit, started by me in ancient times, mostly built up but then I put it away. After lying around for some years my dad finally decided to finish it. Here´s the outcome.
 -
Tamiya P51-D Mustang 1:48 scale Eduard Photo Etch for cockpit details. Macro shots taken in the studio with a Canon EOS M3 mirrorless compact camera to which a Canon TS-E 90mm lens and 20mm extension tube was attached via an adapter. Lit with three Canon 600ex-rt flash guns mounted inside a large softbox 600. exposure was 1/60th sec. @ f16 iso 100. The cockpit area is just over 2cm in length. My wife has always loved the P51, and Ferrocious Frankie in particular. So to keep in her good books, this one is for her. Scratches on the seat where the pilot clambers in and out were carefully markes with a sharp silver pencil. The wood effect flooring was grained and weathers with tamiya weathering sets. Flory models wash was applied to give relief. Photo etch was glued with medium superglue and some with gator glue. Here is one of my photos of the real Ferrocious Frankie, on which my model will be based. And on the the images of the cockpit assembly.
-
Both built several years ago. Tamiya F-8, resin wheels, decals from Cutting Edge, flaps are from an old Monogram kit 7./SG 10 on Czech territory Hasegawa BMW built oob
- 7 replies
-
- 16
-
-
- older stuff
- Tamiya
- (and 1 more)